Modems from are popular all over the world due to their simplicity, reliability in operation and high quality manufacturing.
Despite the reasonable prices, the routers of this company have the entire list of necessary functions for use at home.
Setting up the device will not be difficult even for novice users, but for the first time it is recommended to perform all the steps yourself using the instructions.
The information below will introduce you to TP Link equipment and help you quickly understand the procedure for entering network parameters in the device’s web configurator.
Packaging, equipment and price of the TP-Link TD-W8951ND model
The box must contain the following:
- one wireless N series router with built-in ADSL2+ modem;
- one router power adapter;
- Quick Installation Guide;
- one RJ45 cable;
- two RJ11 cables;
- one ADSL splitter;
- one CD with user manual.
The average cost of a router according to Yandex.Market is 2,190 ₽.
ADSL router TP-Link TD-W8951ND can be purchased for about 2,200 rubles
Appearance: material, color, indicators, ports
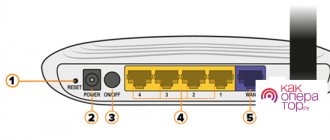
The model has a white plastic body. On the top panel there is a grid in the form of chaotic squares. The router has one antenna. Here along the edge there are several indicators corresponding to the outputs on the back of the router:
- Power - food. It always lights up if the router is turned on (using the button of the same name on the back).
- ADSL. If the indicator is lit, the LINE (ADSL) port is connected.
- Internet. If it lights up, there is an Internet connection.
There are 9 indicators on the front panel of the router that show the activity of ports and buttons on the device
- WLAN. If flashing, data is currently being transmitted. If it just lights up, the Wi-Fi function on the router is turned on, but transmission is not currently taking place.
- WPS. If it lights up, it means you have successfully connected the device to your access point using the WPS function (the button of the same name on the back turns on to connect the device to the access point - you do not need to enter a password).
- Four LAN indicators. They are responsible for the operation of the local yellow ports at the back of the router. If the indicator is on, it means that a device is currently connected to the connector.
On the rear panel there are all outputs, including for the provider's telephone cable
What other buttons are on the back of the router? RESET key - it allows you to quickly reset the router settings to factory settings. Using a pen shaft, a needle, or a toothpick, hold it down for 5 seconds - the settings will be rolled back immediately.
Setting up an Asus ADSL router
The second method is that we remove the ADSL modem link from the diagram and replace it and the router with a single device - a WiFi router with support for ADSL connections.
It looks the same as a regular router, only with a socket for inserting a telephone cable. Zyxel, TP-Link, D-Link, Acorp - any brand of network equipment has such a device in its model range. As an example, I suggest that you first familiarize yourself with the Asus DSL N-12U model.
All connection settings will be made in the admin panel of the router itself. First you need to connect the telephone cable to the ADSL modem router, and the Ethernet patch cord to the computer. We go to the address - you already know which one 100 times - enter the well-known login and password if you still haven’t changed them (by the way, if you forgot them, you can look at the bottom of the router).
We go to the settings page, select manual settings, select a provider from the list, the settings for which are already built into the device. If it is not there, then select “Not in list”. Here you will also need to fill in all the parameters for VPI, VCI, Protocol and Encapsulation Mode,
and also in the next step your login and password for access. All this can be found out from the provider or from the contract.
These were the modem part settings. Now let’s go to the router room, set the network identifier and encryption keys.
Table: technical specifications of TP-Link TD-W8951ND
| Parameter | Meaning |
| ADSL2+ support | There is |
| Incoming traffic speed | up to 24 Mbit/s |
| Outgoing traffic speed | up to 3.5 Mbit/s (with Annex M enabled) |
| Mode support | bridge and router mode |
| LAN ports | 4, 100 Mbit/s |
| ADSL industry standard support | all standards |
| PPPoE support | There is |
| Function to turn off the Internet when idle | There is |
| Surge protection | There is |
| Data protection | WPA-PSK/WPA2-PSK, |
| ACL (Access Control List) function for wireless LAN | There is |
| Filtering by IP/MAC address, application, URL | There is |
| Built-in firewall | There is |
| Virtual Server support | There is |
| Standards and protocols support | ANSI T1.413, ITU G.992.1, ITU G.992.2, ITU G.992.3, ITU G.992.5, IEEE 802.11b, IEEE 802.11g, IEEE 802.11n, IEEE 802.3, IEEE 802.3u, TCP/IP, PPPoA, PPPoE, SNTP, HTTP, DHCP, ICMP, NAT |
| System requirements | Internet Explorer 5.0 or higher, Netscape Navigator 6.0 or higher Win 9x/ ME/ 2000/ XP/ Vista/ Windows 7 |
Setting up TP link adsl2
Connection type: “Dynamic IP” (for individuals of the InfoLada company)
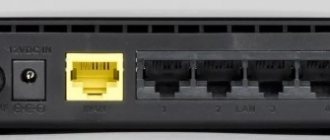
1. Before setting up, connect the cables to the router:
- Telephone line to splitter to LINE connector
- Next, connect the telephone cable from the kit with one end to the MODEM connector on the splitter, and the other end to the ADSL connector on the modem.
- We connect the PC to the modem via any LAN port (4 yellow ports) using the cable that comes with the modem.
- Next, you need to connect the power cable to the POWER connector (power supply sockets in the figure).
- Plug in the power supply.
- Then press the power button to turn on the router.
2. Next, open a browser (Google, Mozilla Firefox, Opera, Internet Explorer).
3. If something is written in the address bar of the browser, you need to erase it, then enter the standard IP address of the router (192.168.1.1 or 192.168.0.1) and press Enter on the keyboard.
4. Next, a window will appear that asks for a username and password (to enter the router settings). By default on the router, the username is admin and the password is admin. This must be entered in the window that appears. Next click “Login”
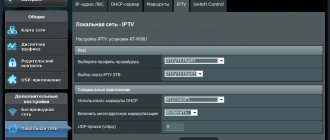
5. After entering the router settings, go to the menu at the top to the “Interface Setup” section and below to the “Internet” subsection
Here we fill in the following fields:
- Virtual Circuit – when you click the “PVCs Summary” button, a table with available PVC profiles will be displayed; you need to find a profile that matches your PVC parameters. Typically this is a PVC1 profile with parameters VPI-0, VCI-33
- after setting the desired profile, the VPI and VCI items should be registered automatically.
- Status – Activated
- IP Version – IPv4
- ISP – Dynamic IP Address
- Encapsulation – 1483 Bridged IP LLC
- Bridge Interface – Activated
- Default Route – Yes
- NAT - Enable
- Dynamic Route – RIP-B
- Multicast – IGMP v2
6. “LAN” submenu
Here we fill in the following fields:
- Multicast – IGMP v2
- IGMP Snoop – Enabled
- DHCP – Enabled
- Physical Ports – check all four boxes
- DNS Relay – Use Auto Discovered DNS Server Only
After registering all the settings, click the “ SAVE”
7. “Wireless” submenu
Here we fill in the following fields:
- Access Point – Activated
- Channel – RUSSIA Auto
- Transmit Power – High
- Wireless Mode – 802.11 b+g+n
- Channel Bandwidth – Auto
- SSID – Enter any name of your wi- fi
- Authentication Type – WPA-PSK/WPA2-PSK
- Encryption – TKIP/AES
- Pre-Shared Key – Create and Enter your password for the wi-fi
After registering all the settings, click the “ SAVE”
8. This completes the router setup. Next, you need to go through authorization from a computer or phone connected to the router.
Source
Connecting a modem to a telephone line and a computer - a clear diagram
Before setting up, the ADSL router needs to be connected to a telephone line and a computer on which the setup itself will take place. Before connecting, make sure that the router and PC are turned off.
Connect the ADSL cable that comes with one end to the telephone socket, and the other to the ADSL output on the back of the router to the left of the antenna.
Insert the telephone line wire into a separate ADSL input
If you need to disconnect the telephone line and the Internet, use the splitter included. We connect a telephone line to the Line output on the splitter. We insert the cable for the phone into Phone, and the cable for the Internet into Modem. From the Modem socket we stretch the cable to the router (insert it into the ADSL connector).
A splitter allows you to separate the line to the Internet and telephone
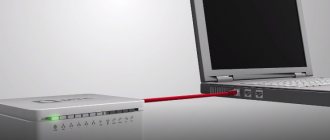
Now we connect the laptop or desktop PC to the router: connect the Ethernet cable to the output of the network card on the computer (on the side of the laptop or on the back of the desktop). Insert the other end of the wire into one of the LAN connectors on the router.
The router must be connected to the telephone line, computer and electrical network
Turn on your computer. Connect the power adapter to the router (Power output), and then insert the plug into an electrical outlet. Turn on your router.
Manual setting
Step-by-step manual configuration of a TP-Link router is more flexible than automatic configuration. In it, the user has access to more parameters that can be changed, in contrast to the quick one, where only basic settings are presented.
You can manually configure TP-Link on a laptop or computer using step-by-step instructions:
- Click "Basic setup".
- Click “Auto-detection” to have the router manually detect the connection type. If there is no such option, you need to ask your provider what kind of connection it supports and select the required type from the list. Typically this is a “Dynamic IP”, it is automated and does not require any data entry.
Wi-Fi setup
After setting up the connection, create an access point and specify a complex password for it:
- In the Interface Setup section, go to the Wireless tab. Turn on the access point.
- We select the transmitter power depending on the area that the router must cover.
- In Wireless Mode we set the value with all network standards.
Select network standard from the menu
- For Broadcast SSID, check Yes to enable broadcasting of the access point - you will see it in the list of available networks on your PC or phone.
- In the SSID field, change the name of the access point if necessary. We set WPA2 PSK protection and write a pre-created password in the field for the key (Pre-Shared Key). We save using the Save button at the end of the page.
Setup procedure
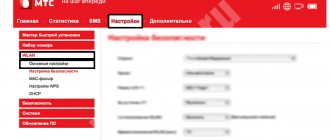
The answer to the question of how to enter the tp link modem settings is not original, as it is completely standard.
If the user has previously had to work in the router interface, then he will not even need the instructions described below.
Login to the device configurator is carried out through an Internet browser.
To display the web menu correctly, it is recommended to use the default browser installed on your PC or Chrome. Other browsers also work, but some pages may display errors.
Sequence of actions when setting up:
- Launch browser;
- Enter the modem address, which is printed on the sticker on the bottom cover of the device;
- After going to the address, the authorization menu will be displayed, where you need to print the name and access code (they are also printed on the device sticker, next to the address);
- Click “Enter”;
- The router interface will appear;
- Open the “Network” tab;
- Next, go to the “WAN” tab;
- Specify the type of connection reflected in the subscriber’s contract with the communication service provider, the most common type today is “PPPoE”;
- Print authorization parameters issued by the provider;
- Set o;
- Then click “Save”;
- Open the “MAC Clone” tab;
- Then in the interface, click on the “Clone MAC Address” virtual key;
- Click “Save”;
- Ready. Network settings are complete.
Now all that remains is to configure the wireless network.
Wi-Fi setup
To be able to safely work with any gadgets that have a built-in wireless module, you only need to take the following few steps:
- Open the “Wireless” tab;
- Next, go to the “Wireless Settings” tab;
- Showing your imagination, come up with an original name for Wi-Fi yourself and type in the column: “SSID”;
- In the next line, set the physical location of the device – “Russia”;
- Click “Save”;
- Open the “Wireless Security” tab;
- For greater safety. It is recommended to set o;
- Then select “WPA2-PSK” from the drop-down list of versions;
- Showing your imagination again, come up with your own original Wi-Fi access code and type in the column: “Password”;
- Click “Save”;
- Ready.
Possible problems with the router and their solutions
We will briefly tell you what to do if you suddenly were unable to log into the router’s web shell or if the Internet did not appear after setting up the router.
If you can't log into the web shell
You may have previously changed the password for the administrator account. If you don't remember it, reset the settings to default using the Reset button (press and hold for 5 seconds). After that, log into the shell using the word admin.
Use the word admin to enter the router settings
If this method does not help, make sure that automatic IP and DNS acquisition is enabled in the settings on your computer for a local connection. How to check this is described in the instructions “Preparing the PC for settings”.
What else can you do? Check your Internet Explorer settings:
- Click on the gear icon in the upper right corner. Select browser properties.
Go to IE Internet Options
- Go to the "Connections" section.
- Put o.
Set it to "Never Use" and click on OK
If you can't get online
What can you do if it turns out that after setting up no sites open:
- See if you have connected all the cables correctly - check the instructions in the article again. Make sure that the plugs fit tightly into the connectors (you can hear a click when connecting), and that the wires are not damaged or crushed by furniture.
- Call your provider's support line to see if there are any problems on their side. Also check the configuration parameters - VPI and VCI, connection type, network login and password (if the connection is PPPoE), and then enter the correct values.
- Try resetting the settings to factory defaults and setting up the router again step by step.
- Contact TP-Link support: Go to the official website. Click on the “Technical Support” panel. Select a topic for ADSL routers. Enter the email address to which you should receive a response from the specialist. Describe the essence of your problem and submit a request.
Leave a request on the website describing your problem - you will receive an email with instructions and directions
Setting up a TP-Link ADSL modem to connect to the Internet
Before you start setting up:
You should check with your provider about the parameters that need to be set in the modem settings to connect to the Internet. It doesn’t matter what provider you have: Rostelecom, Ukrtelecom, or some other. You can request this data from the provider's support. Or look in the Internet connection agreement. We will need the connection type (PPPoE, dynamic, static), VPI/VCI values, encapsulation, username, password.
Go to the “Interface Setup” – “Internet” section.
- From the “Virtual Circuit” drop-down menu, select the “PVC0” virtual circuit.
- Set the VPI and VCI values.
- Opposite “ATM QoS” select “UBR”.
- Next you need to select the connection type. For example: PPPoE.
- If you have PPPoE, then you need to specify a login and password (issued by your provider). "Encapsulation": "PPPoE LLC".
- And to ensure that the connection is always active, make sure that next to “Connection” the “Always On” item is selected.
- Save the settings by clicking the “Save” button.
See screenshot.
If you have, for example, “Dynamic IP”, then it’s even simpler. There is no need to specify a login and password.