The Internet has become a part of almost all people's lives. With its help you can not only work, but also study or have fun. More and more people are using a wireless connection to access the Internet. This is convenient and does not require the use of any wires other than the provider cable. There are currently a huge number of providers.
One of the youngest was Iota. To access high-speed Internet, subscribers of this mobile operator use modems. This solution is ideal for one person. If you need to provide a network to several people, then the right solution would be to use the Yota Internet center. This review article will tell you what the Yota B315 Internet center is, what its characteristics are and how to connect it.
How to connect to PC?
It is not for nothing that the operator is in demand among consumers in different regions of Russia. Indeed, in addition to high-speed data transfer, he simplified the work with his equipment as much as possible. To connect the Yota modem to your laptop, follow the step-by-step instructions.
First, you need to connect the device to your computer or laptop via a USB port. The installation wizard will start automatically. All you need to do is agree to the provider’s terms and conditions for using data.
On modern PCs, the installation process takes place secretly; upon completion, a corresponding notification appears on the screen. After downloading all the software data, the computer will “say” that a new RNDIS device is connected to the USB port. There is no need to carry out any additional manipulations; you can immediately go online. The only thing the user can adjust is the Wi-Fi information.
If you cannot cope with the connection on your own, it is better to contact technical support. Experienced workers will tell you the sequence of actions on how to connect a Yota modem.
Additional settings - turning off the router at specific hours, login and password for authorization. This will protect against unauthorized access to your network.
Connecting the Yota modem to the router
If you follow the instructions, you won't have any problems. Correctly entered data will ensure uninterrupted access to the Internet.
Connect the router to the PC through a free port. Then in the Control Panel, find the “Network Settings” shortcut, then the “Network and Sharing Center” item. You will need to correct the device data; to do this, select “Change adapter settings” in the menu on the right and find the icon for your Yota Many router. In “Properties”, install Internet Protocol 4 and check the boxes to automatically obtain IP/DNS. Then provide the following information:
The login and password fields remain blank.
However, not all routers need such configuration. Some models begin to function smoothly after self-installation.
The connection to the tablet is carried out in the same way.
How to set up a Wi-Fi network on the Yota 4G LTE IC?
To configure:
- Select the “Management” group and in it the “Wifi Settings” tab to enter the wireless connection configuration;
- In this window, you need to check the box next to “Enable Wi-Fi”;
- Several fields will appear that need to be filled in: Connection name, Network mode, Channel number (Auto);
- After applying the settings, LED indicators will indicate that the connection is active.
To protect your Wifi, you need to create a password for it and set the encryption method. For this you need:
- Go to the Security tab and fill in the authentication type field (network encryption method);
- Enter a strong password to connect to a wireless connection;
- Remember the created password and click “Apply”.
How to connect the Eta Internet center?
At the back of the equipment there are several ports through which connections to devices are made.
The status of the indicators located on the front panel shows the cable connections and the health of the communication line on certain ports.
Setting up the Yota Internet Center occurs from its web interface. But first you need to connect the device using a cable to a laptop or computer. The Yota SIM card for the modem must be inserted into the appropriate slot. Obtaining an IP address and accessing the network occurs automatically.
Advantages and disadvantages
What are the differences between 3G and 4G networks: features, advantages and disadvantages
Any device has pros and cons. They depend not only on appearance, but also on quality and technical characteristics. This is where Internet Center-Iota succeeds. Its main advantages can be listed separately:
- Connect up to 12 devices, ten of which are wireless, and two are wired, connected via local cable;
- Supports all modern standards of the Wifi wireless communication protocol;
- Relatively low price for such rich functionality;
- Small body dimensions and light weight;
- Possibility of connecting devices for IP telephony.
It is also not without its disadvantages. Some may still be confused by the price, while others are unlikely to configure the device themselves and will be able to go to its web configurator. Another disadvantage can be voiced more concerning the operator - he never notifies about technical work, which is carried out according to an incomprehensible schedule.
How to strengthen the signal?
A weak signal is characterized by interruptions in the Internet.
If the provider claims that there are no problems on its part, then perhaps the Internet center is located far from the base station or the network is overloaded. You can temporarily change the connection channel. To do this, select a less busy one in the Wi-Fi settings.
An external antenna for the Internet center, directed towards the nearest tower, will help improve the signal. If this does not give the desired results, then an additional router connected as a signal amplifier will help to expand the coverage area.
Setting up the MMS Yota service
Manually connecting a multimedia messaging system (pictures, music, video) has an algorithm very similar to that described above for VPN. To avoid confusion when filling out the data, we will again provide the information in the form of a consolidated table.
| Parameter name | iOS (iPhone, iPad) | Windows Phone | Android |
| Menu path | “Settings”, “Cellular”, “Cellular Data”, “Cellular Data Network”, “MMS”. | “Settings”, “Network and wireless”, “Cellular and SIM card”, “SIM card options”, “Add MMS hotspot” | “Settings”, “More...”, “Mobile networks”, “Access points”, “Create a new access point”. |
| Name | – | MMS Yota | MMS Yota |
| APN (Access Point) | mms.yota | mms.yota | mms.yota |
| WAP gateway | – | 10.10.10.10 | – |
| Proxy MMS | – | – | 10.10.10.10 |
| WAP gateway port | – | 8080 | 8080 |
| MMSC | https://mmsc:8002 | https://mmsc/ | https://mmsc:8002 |
| MMS center port | – | 8002 | – |
| MMS proxy address | 10.10.10.10:8080 | – | – |
| APN Type | – | – | mms |
Be sure to save the created APN MMS access point and restart your smartphone (phone) to update the SIM card online. Let us remind you once again: setting up Yota Internet on a tablet is done in exactly the same way and does not require the use of additional resources.
How to update the software?
You can update the firmware of the Yota Internet center in two ways.
In semi-automatic mode
After entering, the Hardware Control Center window will open. It will display available updates if the latest version is available. If they are, then you need to click on the “Available” button. A list of updates for your router will immediately appear.
If you click “Update”, the necessary files will be downloaded, the firmware will be updated and the reboot will start. After installation is complete, the router will operate based on the latest software version.
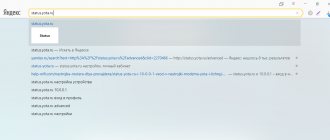
Why can’t I go to status.yota.ru?
Unfortunately, sometimes when you try to access the modem’s web interface, various problems may appear. Most often, the page at status.yota.ru or 10.0.0.1 simply does not open. An error may appear stating that “the page is unavailable” or “the site cannot be accessed.”
A few tips to try to solve this problem:
- Disconnect the Yota Wi-Fi modem from the computer and reconnect. If it is not a USB modem, but a Yota Many, then simply turn off and turn on the power.
- If you are trying to go into the settings of a modem that is connected via USB, you can try connecting to its wireless network and accessing the control panel via Wi-Fi.
- Try logging into status.yota.ru from another browser or device. You can even do it from your phone or tablet. Just connect it to the Wi-Fi network of your Yota mobile router.
- If the modem is still not available
(including at address 10.0.0.1), then you need to check the network settings on your computer
(if you are trying to log in from a computer)
. It's not difficult to do.
Checking network parameters
Go to "Network Connections".
Next you need to open the properties of the connection through which you are connected to the Yota modem. If you are connected via Wi-Fi, then this is the “Wireless Network” adapter (in Windows 10), or the “Wireless Network Connection” adapter (in Windows 7). If the modem is connected via USB, then it will most likely be a “Local Area Connection 2” or “Ethernet 2” adapter (the number may be different).
Just right-click and select “Properties”. For example, I am connected to a mobile router (aka modem) via Wi-Fi:
Next, we set automatic acquisition of IP and DNS for the IPv4 protocol.
If this does not help, or automatic receipt of addresses was set there, then you can try registering static addresses:
IP address: 10.0.0.2
Subnet mask: 255.255.255.0
Default Gateway: 10.0.0.1
DNS can be specified as 8.8.8.8.
After these settings, the page at IP address 10.0.0.1 should definitely open.
If nothing helps, then it is quite possible that this is some kind of software or hardware failure of the modem.
I hope you were able to go into the settings of your mobile router from the Yota provider and change the necessary parameters. If you still have any questions about this article, feel free to ask them in the comments below.
Setting up a router for your provider
How to flash
Instructions for flashing the Internet center firmware will be based on the example of the previously described Keenetic. The first and easiest way to flash a device is to use several keys. But it will only work if the router has built-in Internet.
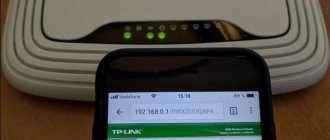
The first thing you need to do is go into the settings of the Internet center, as was done earlier. In this case, the address will be different, since the Internet center has already changed. By going to 192.168.1.1, the device control center will open. You must enter a username and password.
The main window immediately opens, with an update button located on it - it immediately checks for the latest updates. If there are updates, this will be immediately indicated - you need to click on the “Available” button.
A list of recent updates for this router will appear. After the user clicks “Update”, the necessary parameters will be loaded, the firmware will be updated and the Internet center will reboot.
After setting the parameters, the router will turn on and work with the new firmware of the latest version.
The second method is designed for those devices that do not have built-in Internet and will need to download the firmware from the official website. Initially, you need to go to the device website with download files and indicate the required device.
After the Internet center model is specified, at the end of the page there will be a “Download Files” block. There you can see the latest updates for the router, which you will need to install on your computer.
The executable file is extracted from the archive. Now in the router settings you need to find the files section and select the downloaded file. Next, all that remains is to replace the file with a new one and wait for the installation to complete.
This completes the router update and now you need to check whether it is working correctly and whether the firmware version matches the router model.
This method must be used extremely carefully. It is advisable to communicate with the router via a LAN network, since using a wireless network is unsafe.
There are a huge number of reviews on the Internet about the Yota Internet center. Moreover, opinions are both positive and negative. In general, many users were satisfied with the router.
For example, a subscriber who purchased a Yota Internet center for a large house notes both the advantages and disadvantages of the device. Here are some of them:
Advantages:
- It is very commendable that it is possible to use your personal account when there are not enough funds in your account.
- They also note such a positive side as regulating the Internet speed yourself.
- You can pay for Yota services, including the Internet, using your personal account.
- An online consultant is a good idea, as sometimes it helps a lot.
- High Internet speed and wireless network coverage.
Flaws:
- Unfortunately, the Internet may stop working unexpectedly due to technical work on the Yota server without warning.
- There is no option to pay for Yota communication services through Sberbank.
- As mentioned earlier, no warnings regarding Internet shutdowns have been received from Yota employees.
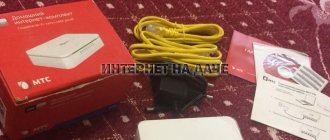
Connecting the iota internet center
To turn on the device, inspect it. There are several connectors at the back, most of which will have to be used. Starting from the left side:
To turn on the device, just insert the SIM card and connect the cable with one end to the outer power slot and the other to the outlet. The router will turn on automatically. The indicators located on the front panel should indicate the presence of charge and network, lighting up in blue.
In total, there are 7 indicators on the device: power, the operating status of each of the four connectors, the level of the LTE signal received by the gadget, and the distributed Wi-Fi. An antenna is also installed on top, providing better network distribution throughout the room.
Device setup
To set up the Yota Internet Center, connect the router to your computer using a network cable. Insert the patch cord into the LAN connector on the back wall of the mobile device and into the same connector of a personal computer or laptop. Turn on both devices. Go to the browser on your computer and enter 192.188.8.1 in the search bar. On the page that opens, enter your username and password. Usually both words are admin, but if that doesn’t work, read the documentation.
After logging in, the user is taken to the settings page. Here you need to indicate the name of the network under which others will see it, the password to access it, as well as other necessary information. If you wish, you can change the password to access this page. Additionally, you can configure a SIP client to use the Internet center in conjunction with IP telephony.
After finishing setting the parameters, reboot the router. Only after this the changes made will take effect and the center will begin to stably distribute the wireless network. Check the status of the indicators: each one that is activated should glow blue.
Manual Internet settings Yota
Connecting an Yota SIM card to the global network on your own also does not take much time and can be done even by an inexperienced user. To get a high-speed Internet connection, just follow three simple steps:
- enabling data transfer option;
- creating an APN (Access Point Name) access point;
- Activation of the changes made by rebooting the device.
It is important to consider the type of control program. To make it as easy as possible for you to understand the procedure, we organize the information into compact tables, separately for smartphones running iOS (IPhone, iPad), Windows Phone, Android. The parameters change similarly for tablets.
Setting up Yota Internet on iPhone
| Enabling data transfer | Sequential opening of menu items: “Settings”, “Cellular”, “Cellular data”, “Data settings”, “Voice and data”. Next, you need to select the most suitable network standard - LTE, 2G, 3G, 4G |
| Creating an access point | Sequential opening: Settings, Cellular, Cellular Data, Data Settings, Cellular Data Network. Next, indicate in the APN column the name of the access point – internet.yota. Leave the remaining fields blank |
After rebooting the OS, the device will be identified on the Internet and will be able to receive and send data.
Yota Internet settings on Windows
| Enabling data transfer | “Settings”, “Network and wireless communications”, “Cellular network and SIM card”. To enable data transfer, you will need to move the slider button to the far right position |
| Creating an access point | “Settings”, “Network and wireless communications”, “Cellular network and SIM card”, “SIM card settings”, “Internet access point”, “Add Internet access point”. In the “Profile name” column, enter – Internet Yota. In the access point column – internet.yota |
As in the previous case, to save the changes you have made, you must restart the operating system.
Setting up Yota Internet on Android
| Enabling data transfer | “Settings”, “More...”, “Mobile networks”, “Data transfer”. Next, you need to activate the checkbox (checkbox button) next to the “Mobile data” option |
| Creating an access point | “Settings”, “More...”, “Mobile networks”, “Access point”, “Create an access point”. In the “Name” column, enter – Internet Yota. In the APN column – internet.yota. All other fields must be left blank. Click the “Save” button |
To successfully set up Yota Internet on Android, it is also important to check the value of the APN type field, which should indicate supl or default, and reboot the device.
Please note that depending on the version of the operating system, there may be some differences in the spelling of the names of menu items, but their functional and semantic load is the same everywhere.
What to do if the Internet center from yota does not work
Sometimes a new device may not provide network access. There are many reasons for this problem. The easiest way to determine the problem is to contact technical support for Yota users. This can be done by calling 800 550 0007. Calls within Russia are free. Or contact technical support on the company’s official website in the support section.
Iota employees will help identify the problem and explain how to fix it on the spot, if possible. If the fault is related to the SIM card, then the router does not see it. In this case, activate the SIM card and reboot the device.
To activate the SIM card, install the Yota application and log in to it. This completes the activation. The application can be used to control the balance of your personal account.
Specifications
Review and configuration of the D-Link Dir-320 modem
It is worth saying that the Gemtek Internet center was initially designed to work only with the mobile Internet provider Yota. To use it with SIM cards from other operators, you will need to change its firmware to unlock (unlock) it. The technical characteristics of the Internet center are as follows:
- The power of the antenna, which is built under the body, is 5 dB;
- The optimal operating temperature of the device is from 0 to 45 degrees;
- Supported network - Iota;
- The maximum speed of the wireless Wifi network is 300 Mbit/s;
- The maximum speed of a wired LAN network is 100 Mbit/s;
- There is functionality for separating the public (guest) network from the private (home);
- Availability of a built-in firewall;
- Availability of built-in VPN;
Important! The device is powered by a power adapter that connects to a 220-volt home power outlet.
Signal Boost
Proper placement of the device in the room will help improve the signal. It should be located in an open space close to users.
Networks have multiple channels. If one of them becomes clogged, subscribers lose speed. The selected channel can be changed in the network settings at 192.188.8.1. Go to the appropriate tab and select a less crowded channel to improve the signal.
Install a metal screen near the antenna that will reflect the waves in the desired direction. This improves performance for users within the reflection.
To improve the network, an additional router operating in repeater mode is also used. It amplifies the signal from the main modem, stabilizing operation.
Firmware update
On older devices, it is necessary to update the firmware so that the modem does not stop working. This process is done in two ways.
In automatic mode
Let's look at updating the firmware using the example of the Yota Kinetic b315 router. An easy way to update your device's software is to use the built-in functions. To do this, you will need to execute a certain sequence of commands only if the device is connected to the network. How to set up the gadget:
The turned on device will work on the new version. Check it using your laptop or smartphone.