Few users know how to properly configure a Rostelecom modem. Even the status of the most popular and largest company in Russia operating in this area does not help increase the number of subscribers who are able to independently change connection settings and adjust network access parameters in the most suitable way for themselves.
But, if you look at this process a little more closely, it turns out that there is nothing complicated about it. The main thing is to be patient and attentive, because without these qualities you may encounter some difficulties.
It is worth remembering that in the most difficult situations, clients are able to contact support operators, who will definitely suggest the correct parameters and explain what actions need to be taken.
Reset
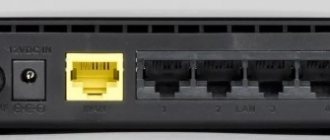
Most often, the initial settings of the router are closest to those needed for the smooth operation of the Internet. Just change a couple of points and get started. If you receive a router with broken configurations and don’t want to waste time fixing them, it’s easier to reset them. For this purpose, a special “Reset” button is provided in the case of modern models. As a rule, it is recessed into the body so that you only see the hole with the signature. Take a non-sharp pin, such as a paperclip, and use it to press the button inside the hole. For clarity, in the figure below the button is indicated by the number 1.
Figure 1 – Rear panel of the router
Before connecting for the first time, select the correct location of the router. Do not put it in a closet, do not put it on a distant windowsill. It should be equidistant from all potential uses. Remember, the fewer obstacles, the stronger the router's Wi-Fi signal and the faster the connection.
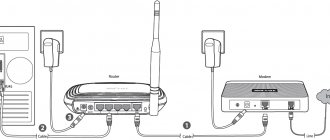
Initial connection
The initial connection process is similar for all types of wired routers. Manufacturers try to indicate clear and similar symbols on different models and be sure to indicate detailed instructions in the documentation.
Connection diagram
To set up a Wi-Fi router, first follow the preliminary steps:
- Connect the router's power cable to the electrical outlet and insert it into the “Power” connector on the back panel of the device. In Figure 1, the connector is labeled 2. Make sure that the device operation indicator lights up. As a rule, it is indicated by a classic icon - a line partially or completely inscribed in a circle. For an example of designation, see Figure 2 under number 1.
Figure 2 – Router indicator panel
- Insert the Internet cable into the appropriate connector. It is usually located first, separated from the rest by color, distance and/or frame. Below it is the designation “WAN”, “INTERNET”, “NET”, a drawing of our planet or any other commonly used designation. If everything is done correctly, another indicator will light up on the front panel. It is marked in the same way as the connector. See example designation in Figure 2 under number 4.
If you are connecting an ADSL modem, you will not be able to physically insert the Internet cable into the wrong connector - it differs from the others in size and number of contacts.
- The next step is to connect your computer. You will need a regular network cable. The short version is always supplied with the router. If you don't have enough length to connect, measure and buy, it's inexpensive. Insert one end of the crimped cable into the LAN connector of the computer, and the other into a free connector of the router. Suitable connectors are numbered and highlighted with the word “LAN”. See an example of the designation in Figure 1 under number 4.
- If the router has preset wireless connection settings, the Wi-Fi indicators will also blink. They are indicated by three brackets of different sizes, which are nested within each other. Brackets can be positioned either vertically or horizontally. See example number 2 in Figure 2.
After connecting, proceed to setup. It has its own characteristics for each model and manufacturer, but the general algorithm remains unchanged and is divided into 2 types:
- Automatic setup.
- Manual setting.
There is a third configuration option - using a program installed on your computer. It is usually supplied on disks. But this setup process is a thing of the past.
Installing drivers
Modern routers are devices that solve problems independently. Manufacturers have already taught them to communicate with most modern operating systems. Therefore, when connecting a router, you do not need to install any additional drivers on your computer.
The only driver that should be is the driver for the network card. In most cases it is already installed.
Routers have their own software that needs to be updated regularly. This is what is most often meant by the word “driver” in such situations.
Updating the router firmware is simple, but in its own way for each firmware version. Go to the router configuration system; we will describe how to do this after the next subheading. Next, find the section called “Settings” or “Administration”, in it look for the section with the word “Update”. For example, in the screenshot below (Figure 3) the section is called “Firmware Update”. In it, click on the “Check” button, and the system will determine whether a new firmware version has been released. Depending on the result, the page will display a message that no update is required or display a Download button.
Figure 3 – Router configuration system
Updating the router is required for several reasons:
- no program is perfect. During operation, errors and problems encountered by users are identified. The developers are fixing them and including them in the next update;
- Technologies are developing not only in routers, but also in user devices. In smart homes, even bedside lamps, not to mention TVs, work via Wi-Fi. In order for the router to communicate with new devices, programmers write new instructions for it, and you install them.
We recommend that you do not neglect updates and check them at least occasionally.
Computer requirements
Before concluding an agreement, you should remember that equipment from the Rostelecom provider may not work on an outdated personal computer. To ensure stable operation and an uninterrupted signal, adjusters strongly recommend checking the PC settings. They must have the following indicators:
- Operating system not lower than Windows XP.
- Active renewal system.
- Automatic browser update.
- Free RAM of at least 256 MB for Windows XP, 1024 MB for Windows 7.
- Network card.
Setting methods
Before starting setup, go to the web interface of the router firmware. To do this, find the authorization information on one of the sides of the device or on its documentation. It includes the device’s IP address and the login-password pair specified by the developers by default.
In the example below, the authorization data is imprinted on the bottom of the D-Link router:
- IP: 192.168.0.1;
- Login: admin;
- Password: "" (leave the field blank).
Figure 4 – Example of location of authorization data
If the IP address information is nowhere to be found, follow the instructions:
- Open the Start menu.
- Type "cmd" in the Search programs and files box and press Enter.
Figure 5 – entering the CMD command
- Type "ipconfig" in the window that appears and press Enter.
Figure 6 – entering the Ipconfig command
- Remember or copy the numbers next to the “Default Gateway” in the Ethernet connection over the local network.
Figure 7 – determining the gateway IP address
Next, proceed step by step:
- Open any browser.
- Enter the IP address value in the address bar. The required line is indicated by an arrow in the figure below. After successful input, do not forget to press Enter.
Figure 8 – Entering the IP address to enter the settings system
- Enter your login password and click “Login”.
Figure 9 – Entering data to enter the settings system
For security, we recommend changing the standard login and password for logging into the router program.
Automatic setup
Most router manufacturers offer quick setup so you don't waste time entering strange values into unclear fields. You provide a minimum of data and receive a ready-made Internet connection. In some models, it is enough to enter a login, password for an agreement on the provision of Internet access services and data to create a wireless Wi-Fi network.
If the router was provided to you by employees of PJSC Rostelecom, then the settings have probably already been entered in advance and all that remains is to indicate what we described in the previous paragraph.
Let's take a more specific look at the automatic configuration of a router using the example of the proprietary firmware of PJSC Rostelecom:
- After logging in, click "Setup Wizard" in the menu.
Figure 10 – Firmware interface for routers from PJSC Rostelecom
- Next, click “Setup Wizard” twice more, as shown in the figure below and follow further instructions.
Figure 11 – Quick setup
- All that remains is to enter the login and password from the contract. To do this, go to the “Internet Connection” block, enter the data and click “Apply”.
Figure 12 - Quick setup
Any type of router settings for the Rostelecom PJSC network includes entering the following data:
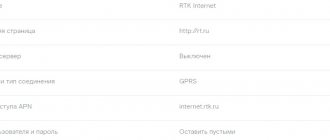
- Login and password. Do not confuse them with the ones you specified earlier to log into the configuration system via a browser. This login and password were given to you by the provider when drawing up the contract. Look for them there. Below we have indicated the place in the document where they should be.
Figure 13 – Where to specify the login and password in the agreement with PJSC Rostelecom
- Network name SSID. An arbitrary value that needs to be entered and remembered.
- Wi-Fi password. This field is called differently, but the essence is the same - come up with a set of characters consisting of letters of the Latin alphabet of different case, numbers and punctuation marks. The final password length must be at least 8.
- Authentication type. Choose the one with the phrase “WPA-2” or “Personal”. This is a standard that determines the level of security when attempts are made to enter your network from outside.
- Encryption. Select "AES". This parameter determines the security of your network when operating subscriber devices that are already logged in.
To start setting up a Wi-Fi wireless connection, follow the route “Network” - “WLAN” - “Basic settings”. Here, enter the SSID as mentioned above. What to set in the remaining columns is everyone’s business. But keep in mind 2 recommendations:
- the wider the channel, the higher its speed, but the greater the likelihood that a neighboring router will interfere with it;
- try to choose the least crowded channel so that the Internet is faster. To do this, install special software on a device with a built-in Wi-Fi module. A laptop or smartphone will do. For the latter, there are a number of applications in the App Store or Play Market. We recommend "WiFi Analyzer".
For example, here are 2 screenshots (Figure 7) from the application. On the right is the network congestion in the standard 2.4 GHz band. The best performance of the router will be if you run it on 12, 13 or 14 channels. If you run it on channel 7, the signal quality will be the worst, because 3 routers will interfere with it at once.
The left side of Figure 7 shows the operation of routers in the 5 GHz band. Dual-band routers operate at such frequencies, which have been sold for a long time, but became affordable only a year or two ago. Apart from the red signal from channels 36 to 165, not a single device works, so you can give your router the right to select any channel.
Figure 14 – analysis of Wi-Fi network congestion
Next, go to the “Network” – “WLAN” – “Security” section. Here, specify the encryption, shared key (password) and WPA mode, as we already described above. The remaining settings are additional; the wireless connection will start without them.
Manual setting
You will have to enter an order of magnitude more information. Before this, log into the firmware management system, as described in the “Setting methods” section.
If you have installed the firmware of PJSC Rostelecom, then:
- Click on the “Network” button in the top menu and on the “WAN” item in the same block of the left menu.
- Scroll to the bottom of the window to the list of “WAN” interfaces. Remove all items from the list using the trash can button on the right next to each item.
- Scroll the window all the way up and enter the data as indicated below:
- default route selection – Specified;
- enable DNS – tick;
- enable NAPT – check mark;
- interface type – pppoe1;
- username, password, connection, downtime, as well as data in the WAN IP, IPv6 WAN and DHCPv6 mode sections are filled in according to the agreement.
After filling, click “Connect”.
How to configure a Rostelecom router yourself and connect to the Internet?
Rostelecom provides subscribers with high-quality equipment for connecting to the Internet.
And if previously these were routers from third-party companies, today the provider’s logo increasingly appears on devices. This does not mean that the company produces routers independently. Famous Chinese manufacturers do this for her. There are several of them, and they produce different equipment. Therefore, the configuration of the Rostelecom router is different. In this article we will look at the general principles of configuration. We will try to present the material in such a way that you can independently understand equipment from any manufacturer. Let's consider the most popular models as an example.
However, don't rely on step-by-step instructions. It’s better to understand the operating principle itself so that you can easily do everything yourself without pictures or screenshots.
Setting up a D-Link modem for Rostelecom
D-Link offers 3 types of firmware for various router models. In general, the algorithm for setting them up is the same as described in the previous sections. Let's look at it using the DSL-2640U router as an example.
- Open the address 192.168.1.1 in your browser.
- Enter “admin” in the login and password fields.
- Follow the route “Network” – “Connections” – “Add”.
- Enter the data from the agreement in the “Login”, “Password”, “Password Confirmation” and VPI/VCI fields.
- Specify the connection type – PPPoE.
- In the “Service name” column, enter an arbitrary but understandable value.
- O and "IGMP".
Possible difficulties
If the Internet space is properly organized and a dsl router from Rostelecom is connected, a stable connection to the equipment should be established. The reasons for failure of normal operation may be the following factors:
- Network equipment malfunction.
- Damaged telephone cable.
- Debt on subscription fees.
- An error appears in the configuration of the router parameters.
Some of these problems can be fixed on your own. The rest require the intervention of specialists from the service provider company.
Setting up a Rostelecom Intercross ADSL modem
The main difference between an ADSL modem and a regular router is that it uses a telephone channel to transmit data. Without interfering with conversations, ADSL allows you to reach speeds of up to 10 Mbit/second. The technology is being replaced by modern fiber optic communication channels, but is still in use.
Before logging in, reset the settings using the corresponding button on the case. To log in, use the authorization details specified in the previous section.
The appearance of the firmware is outdated, but the inscriptions are clear and distinguishable. There is no Russian interface language. Follow the instructions:
- Click on the "Wizard" button in the top menu. The quick connection setup system will open.
- In the VPI and VCI columns, enter 8 and 35, respectively. Click Next.
- O and “Enable NAT”. Click Next.
- Enter the login and password from the agreement in the “PPP Username” and “Password” columns, respectively. Click "Next" twice.
- To complete the setup, click “Finish”.
What to do if problems arise
If unexpected difficulties arise, you should call the contact center (the number is available on the provider’s official website and in the service agreement) and ask for help from a consultant. He can clarify the caller's address, last name and contract number. It is worth preparing this information in advance.
To be able to visit your favorite sites, you will have to follow the advice of the support operator and wait for the results. As a last resort, you can invite a specialist, but this service is not free, so it is more profitable to try to handle the setup yourself.
Setting up a TP-Link ADSL modem under Rostelecom
Let's look at the example of TP-Link TD-W8151N. Unlike the previously reviewed models, this one comes with a disk with software for automatically setting up the modem. To configure the network:
- Connect the modem to the computer and Internet cable as indicated in the “Initial connection” chapter.
- Insert the disc into the drive. Make sure it supports reading DVDs.
- Specify the interface language and device model name.
- Follow the instructions and enter the data from the contract.
- To log in, use the standard algorithm described in the previous section.
Content
Rostelecom is one of the largest Russian cellular operators. Thanks to the variety of individual tariffs and additional options for Internet connections, telephone communications and television, a huge number of subscribers use the services of this provider. At the time of signing the contract, the user can purchase the necessary network equipment using ADSL technology. For correct operation, the owner needs to know how to configure the Rostelecom modem.
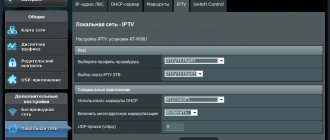
Setting up IPTV
All modern router firmware has a separate page or part of it where you can specify IPTV settings. In order for the set-top box to work, it is enough to enter the port number indicated on the back of the router to which the television signal should go. In some firmware, you additionally need to enable IPTV mode.
The IPTV section, as a rule, is located in the same place where the login and password settings from the contract are entered. Look for the corresponding button or heading on the page.