The TD-W8960N router from TP-LINK is a wireless four-port router with an ADSL2+ modem. The maximum data transfer speed on the 802.11n standard is 300Mbps, which allows you to comfortably surf the Internet or play online games.
- Brief overview of the tp link td w8960n router
- Setting up an Internet connection on a tp link td w8960n router
"PPP over Ethernet (PPPoE)"
- "IP over Ethernet"
- "Bridging"
- Section "Basic":
Connecting a router
Before connecting and setting up, the modem must be installed correctly. If a wired connection is to be created, the device is usually located close to the PC so that the cable does not spoil the interior of the room. When creating Wi-Fi networks, a smart solution would be to place the router in the central part of the house or office. This will ensure a uniform signal in all rooms. If necessary, the device can be mounted on the wall using special holes on the bottom side.
Instructions for connecting the router:
- Run a telephone wire or Ethernet cable from your service provider and connect it to the ADSL or WAN sockets, respectively.
- When setting up a wired connection, run a cable from the LAN port to a similar port on the laptop or PC.
- Insert the power adapter plug into the connector on the router body and the plug into the socket.
- Press the power button and start the router.
Now you can start setting up the TP-LINK TD8960N router for Rostelecom or another provider.
What if I can't create a network or wireless connection?
Problems can arise due to errors in the equipment’s firmware, incorrect parameters being set, and operator problems. What to do:
- Call the RT support service at number.
- Select the connection point with the operator.
- Wait for a response, the period the client remains on line depends on the load of the contact center.
- Tell a specialist about the problem.
- It will check for access to the specified address and help the subscriber set the correct values.
Source
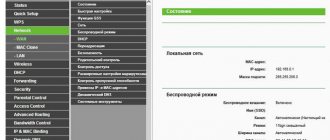
Settings
If there are no instructions for setting up the TP-LINK TD-W8960N in Russian, a detailed step-by-step description of the connection process can be found below. Just select the type you need and follow the instructions.
PPPOE
The PPPOE protocol is most often used by Rostelecom.
Instructions:
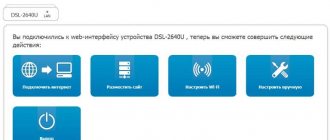
- Open a browser, enter tplinkmodem.net or 192.168.1.1 in the address bar.
- Specify login credentials – default is “admin/admin”.
- Select quick setup – “Quick Setup”.
- Click “Next”.
- Specify the connection type – “ADSL WAN”.
- In the “VPI/VCI” column, enter 8 and 35, respectively, in the “PPP Username” and “PPP Password” fields - the name and password provided by the provider.
- If a wireless network is not needed, remove the checkbox next to the “Enable Wireless” line. Otherwise, come up with a name for the Wi-Fi network, enter “WPA-Personal” in the “Network Authentication” field and specify a password.
- Check the entered information. If everything is correct, click “Confirm”.
The quick setup of the PPPOE connection is complete.
IP Over Ethernet
Setting up a router with a built-in ADSL modem in IP Over Ethernet mode is also easiest to do in the quick setup mode.
Procedure:
- Login to the web interface.
- Log in using “admin/admin” as the default login and password.
- In the menu on the left, select “Quick Setup”, in the next window click “Next”.
- Specify the connection type – “ADSL” or “Ethernet”.
- For ADSL: in the “WAN Link Type” field, click “IPOE”, then specify a dynamic or static IP in the “WAN IP Address Settings” field. If you select “Dynamic IP”, you will not need to enter anything else; click “Next”. If “Static IP” is specified, fill in the fields below “WAN IP Address”, “WAN Subnet Mask”, “WAN gateway IP Address”, click “Next”.
- For Ethernet: select “IPOE”, specify the IP type, for static IP fill in the fields “WAN IP Address”, “WAN Subnet Mask”, “WAN gateway IP Address”. Click “Next”.
- Uncheck the box next to “Enable Wireless” if a wireless network is not needed, or enter the name of the Wi-Fi network, set the security type to “WPA-Personal”, create and specify a password.
- Check the entered data and click “Confirm”.
The IP over Ethernet connection setup is complete.
Repeater mode
Repeater (repeater, “bridge”) mode is designed to expand a wireless network using multiple access points. It can be used to increase the coverage area of a router in a large home or office. When activated, the second router receives the signal from the first and transmits it to client devices, thereby expanding the coverage area of the wireless network.
This is what the setup looks like in TP-LINK TD-W8960N repeater mode (the main router is a similar model):
- Open the web interface of the main router, select “Wireless” in the menu, click “Advanced”. In the “Channel” tab, instead of “Auto”, set the channel number to “1”. Click "Apple/Save".
- In the “Wireless” section, click “Wireless Bridge”. Set the access point mode to “Access Point”, in the “Bridge Restrict” line set to “Enabled”. Enter the MAC address of the additional router. Click “Save”.
- Go to the “Security” tab, select “WPA2-PSK” in the “Network Authentication” field, create and enter a password. Save changes.
- Close the interface of the first router, go to the second device and load its web interface.
- Click “Wireless” – “Advanced”, select the wireless network channel corresponding to that installed on the first device. Save changes.
- Click “Wireless Bridge”, set “Enable” to “Bridge Restrict”, enter the MAC address of the main router.
- Go to the “Security” tab and change the security settings to match the settings on the first router.
- Click “Advanced Setup”, select “LAN”, change the IP address to 192.168.1.2, disable the “DHCP Server” function. Click “Save” to reboot the device.
Setting up the router in repeater mode is complete.
To expand your wireless network, you can look at the MAC addresses of routers on the bottom side of their cases.
Wi-Fi setup
To set up a wireless network on the TP-Link TD-W8960N, you must:
- Open the web interface, go to the “Wireless” tab, check the box next to “Enable Wireless”, come up with and enter a name in the “SSID” field, click “Save”.
- Open the “Security” tab, opposite “Enable WPS” leave “Enable” in order to be able to connect devices via WPS in the future. In the “Network Authentication” field, select “WPA2-PSK”, in the field below, create and enter a password. Save changes.
Wi-Fi setup is complete.
IP TV
The modem can be configured to watch interactive television.
Management:
- Connect the set-top box to any of the LAN ports (1-3).
- Open the web interface, go to the “IP TV” tab.
- Place a label next to the port to which the set-top box is connected.
- In the “VPI” and “VCI” fields, enter the data specified in the provider agreement.
- Save changes.
Now you can watch IP TV on all user devices.
Characteristics
Technical characteristics of TP-LINK TD-W8960N are among the best in the budget price segment. Together with an attractive price, reliability and wide functionality, they make the model one of the best-selling inexpensive routers.
| Wireless protocols | IEEE 802.11 b/g/n |
| Data transfer rate | Up to 300 Mbit/s |
| Number of antennas | 2, non-removable, gain 5 dBi |
| Connectors | 1 WAN, 3 LAN, 1 RJ11 |
| Control | Power, Wi-Fi, WPS |
| Indicators | Power, ADSL, Internet, Wi-Fi, WPS, LAN 1-4 |
A distinctive feature of the device is a variable LAN/WAN port. Its function is set by the user depending on the needs: to connect client computers or a cable from the provider. This makes it possible to use the TP-LINK TD-W8960N modem to create different types of Internet connections: via ADSL or using an Ethernet cable.
Overview of indicators and connectors
When making the router, the manufacturer changed the color scheme and made the device in a dark blue case. On the top panel there are holes for ventilation, closer to the front edge there is a panel with nine indicators:
- Power: on – the router is on, off – off;
- ADSL: on – connection established, blinking – connection in progress, off – connection failure;
- Internet: lit – there is access to the Internet, off – no access to the Internet or modem in bridge mode;
- Wi-Fi: on – a wireless connection is established, blinking – data is being sent or received, off – Wi-Fi is disabled;
- WPS: on – a new device is connected and added to the network, blinking – a new client is connecting to the network, off – the function is disabled or the new device cannot be connected to the network;
- LAN: on – a client is connected to the router, blinking – data is being transmitted or received, off – there are no connected devices.
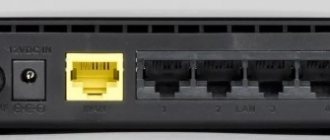
On the back of the router there are connectors:
- ADSL – for connecting the cable coming from the splitter;
- LAN 1-3 – connectors for connecting a PC or other devices to the router;
- LAN4/WAN – combined connector, can be used to connect a PC or cable from a service provider;
- Connector for power adapter.
Setting up a network schedule
One of the interesting features of this router is setting a schedule for a day or week according to which the wireless network will operate.
Instructions:
- Open the “Wireless” tab, select “Wireless Schedule”.
- Put “Enable” in the top line.
- Specify "Each Day" or "Each Week" to set a schedule for the day or week.
- Specify the days of the week during which the schedule will operate, and note the Wi-Fi operating hours.
For the schedule to take effect, you must save the changes.
Additional features of a wireless router
As an additional setting for the TD-W8960N, you should pay attention to the “Wireless Schedule” section - this is the ability to set a schedule to turn on/off wireless network broadcasting.
The settings look like this:
- select “Enable” in the “Wireless Schedule” line;
- in “Apply to”, select how often the schedule will operate – “Each day” every day or “Each week” - every week;
- in “Start Time” “End Time” specify the time range of the schedule (if you click on the “ADD” button, all time cells will be highlighted, all you have to do is click on those intervals when the rule is not required).
As a summary: “TD-W8960N” is a modern representative of routers with ADSL modems with good technical characteristics and a web interface that even an inexperienced user can understand.
source
Changing the factory password
The default login and password for logging into the web interface is “admin/admin”. To prevent outsiders from using this data and changing the settings of the TP-Link TD-W8960N, you need to change the password to a more secure one.
Management:
- Open the “Management” tab, click “Access Control”, select “Passwords”.
- Enter the old password in the “Old Password” field.
- Create a new password, enter it in the “New Password” field, duplicate it in the line below.
Save changes.
Firmware
After purchasing and connecting the router, it is recommended to update the TP-LINK TD-W8960N firmware to the latest one, and then repeat this operation at least once every six months.
Management:
- Go to the page https://www.tp-link.com/ru/support/download/td-w8960n/.
- Select the hardware version of the router and click “Firmware”.
- Scroll down the page to the current firmware version. Click on the arrow button to download and specify the folder to save the file. Unpack the downloaded archive and extract the file with the .bin extension. This is the new firmware.
- Open the router’s web interface, go to the “Management” section, click “Firmware Upgrade”.
- Click “Select file” and specify the path to the downloaded firmware.
- Click "Update Firmware".
Wait a few minutes until the router reboots.
Do not disconnect the device during the update process. This may damage it.
The model under review is a budget Wi-Fi router with a built-in ADSL2+ modem, a combined LAN/WAN port and high data transfer speeds. Good technical characteristics, wide functionality and low price make the device one of the most popular in its price segment.
Brief overview of the tp link td w8960n router
When creating this model, the developers “moved away” from the color palette used for most TP Link routers (these are white and black shades) and designed the TD-W8960N router in dark blue.
On the front side of the case there is an indicator panel consisting of nine elements:
- “Power” - the indicator can be in two states (on/off).
- “ADSL” - a flashing indicator indicates synchronization with “ADSL”.
- “Internet” - if the indicator is on, the connection is successful; if it is off, there is no connection or the router is operating in “Bridge” mode.
- “WiFi” - blinking indicator means that data is being received or transmitted.
- “WPS” - informs about the activity of connecting to a wireless network using WPS technology.
- “LAN 1/2/3/4” — connection status of network devices.
On the back of the case there are two antennas for receiving and transmitting signals, as well as ports and connectors for connecting external devices:
- “ADSL” - used to connect to a splitter modem or telephone line.
- Combined “LAN/WAN” and “LAN” ports.
- WiFi button.
- Combined WPS/RESET button.
- Button to turn the router ON/OFF.
- Connector for connecting a power adapter.