Unfortunately for users of Android devices, this operating system does not contain standard tools for recording video from the screen. What to do when such a need arises? The answer is simple: you need to find, install, and then start using a specialized application created by third-party developers. We will talk about a couple of such solutions in our material today.
How to Record a Screencast on iOS Devices
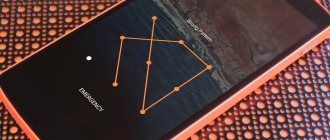
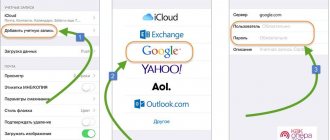
In order to record video from the screen of your iPhone, you need to do the following. First, you need to go to “Settings” and open “Control Panel”, then click “Customize Controls”. The following menu will open:
Next, pay attention to the “Screen Recording” item and click the “+” sign to the left of it.
In order to drag the shortcut of an activated function to the main screen, you need to press the “Home” button and drag the bottom of the screen. A button for creating a screencast will appear in the Control Center, after which it can be placed on the main display. The Screen Recording button looks traditional: a dot in a red circle.
When you press this button, recording will start silent by default, however, if you press and hold the button, a menu like this will appear:
It allows you to enable audio recording from your smartphone's microphone. You can stop recording by pressing the function button again.
Question answer
Let's look at common questions that users have when recording pictures from their phone screen.
Is Root required?
Older or unpopular apps may require root access to mute the microphone when capturing a picture. However, most well-known applications do not require root access.
How to record with app audio
You can record games or any streams with internal sound on Android. However, to do this you will need to connect the gadget to the TV and record audio and video broadcasts from it. The second method is to obtain root rights to connect system and other sounds of the smartphone. Otherwise, you will have to be content with only the sound from the microphone.
DU Recorder
Perhaps DU Recorder is the most adequate program for recording video from the screen. It has many advantages: it has completely free functions, no advertising, and high-quality video recording. The interface is localized into more than 20 languages - Russian is included, of course.
So what can the program do? Firstly, of course, it can record screencasts, and in various formats, different resolutions, and bit rates. The program also supports HD video. The pause and resume recording feature can be quite useful. When using the program, you can choose where to save the video: to a card or to internal memory.
In addition, using the program you can broadcast video to Youtube, Facebook or Twitch, edit it, take screenshots and much more.
Applications for recording video from your phone screen
If on the iPhone the ability to create screencasts appeared only in iOS 11, then Android smartphones and tablets acquired a similar function back in 2014 - starting with the fifth version of Google OS. True, capturing an image from the iPhone screen is available after activating one item in the settings, but on Android you will have to download additional applications.
AZ Screen Recorder
If you have Android 8, 9, 10 or 11 installed on your smartphone, allow AZ Screen Recorder to appear on top of other windows. To do this, first go to the Apps & Notifications section in Settings and select AZ Screen Recorder. Then expand additional options, click on “On top of other applications” and activate the toggle switch.
Now, when you click on the program icon, a touch-sensitive “floating” button will appear on the screen. Clicking on it reveals a list of functions. Among them: taking a screenshot, recording video from the screen, starting a stream, watching live broadcasts and going to the application settings.
The AZ Screen Recorder toolbar will also be added to the notification shade. The program is also managed from it.
To start filming a screencast, click on the recording icon, which is located in the floating button menu and on the toolbar.
Give AZ Screen Recorder access to photos, media and files on your device, and allow it to record audio. The system will then notify you that the application will access the image on the device screen. Select "Get Started."
The timer will count down for 3 seconds, after which image capture will start.
To pause shooting, expand the notification panel and click on “Pause”. Click “Resume” to continue.
You can draw while capturing the screen. To do this, select “Draw” in the program toolbar. A palette icon will appear on the screen; by clicking on it, you can adjust the color and thickness of the lines.
To stop shooting, click on the “Stop” button in the “curtain”. The created video will appear on top of other applications. You can immediately view a post, share it, delete it, and open the built-in editor.
AZ Screen Recorder is the most functional application presented in the review. To go to its settings, select the first item in the list of options.
The settings menu consists of three tabs: the first contains the main functions, the second contains screencasts, and the third contains screenshots.
You can activate the magic button, after which the small area in the upper right corner turns into a program control: a single tap pauses and resumes shooting, a double tap stops it, and a long tap brings up the drawing tool.
Then comes the setting to stop recording. You can make shooting stop after the screen fades out, after a specified time, or by clicking on the moving red dot.
Next, you can configure the resolution of the recorded video, frame rate, bitrate, orientation, recording speed (useful for creating time-lapses) and muting the microphone.
The next item is adding text or a logo to the video. You can change the location, font, color and size of the inscription. It is also allowed to use a logo: your own picture or sticker. The location and size of the image are also customizable.
The second option from the “Overlay” section is the activation of the camera and it is worth talking about it in more detail. At the same time as recording a skincast, you can shoot video from the front or rear camera. Moreover, the location of the image on the display, aspect ratio, transparency, brightness and contrast of the picture are adjusted.
In the “Timer” section, you can enable time recording (while shooting a screencast, the duration of the video will be displayed on the display) and change the number of seconds of the countdown before the start of image capture.
The last section contains settings responsible for displaying a “floating” button. You can replace it with a toolbar or select which controls will be available by clicking on the program icon.
There you can also disable preview output after creating a screencast and select the folder in which the videos will be saved.
To view screencasts, go to the second tab. Click on the ellipsis next to the desired video, after which a menu will open with the following actions: delete, rename and share.
To go to editing the entry, click on the magic wand icon. You can trim or flip the video, convert it to GIF animation, add a background, text or audio, and combine several videos into one.
With the Video Compression feature, you can lower the resolution and bitrate of a video, which will reduce the file size.
The third tab contains screenshots created using AZ Screen Recorder. There is also a button for stitching them. Click on it, mark the screenshots in the correct sequence and click "Done". Cut out unnecessary parts of the image and click on the floppy disk thumbnail to save.
The only useful function hidden in the side menu is “Wifi Transfer”. With its help, you can send files from your phone to your computer in a couple of clicks when your mobile device and PC are connected to the same Wi-Fi network. To do this, open the address specified in the application in a browser on your computer and click on the file to download it to your PC.
And lastly: to remove the “floating” button, drag the program icon to the cross, and to completely close the application, expand the notification panel and select “Exit”.
Screencasts recorded using AZ Screen Recorder will be located in the “AzRecorderFree” folder in the internal memory of the device. The following can also be stored inside: screenshots in the “AzScreenShots” folder, GIF animations in the “AzGif” folder, edited videos in the “AzVideoEdit” folder and stitched screenshots in the “AzImageEdit” folder. Also, all media files will be displayed in Gallery and Google Photos.
DU Recorder
When you first launch DU Recorder, the application will ask for permission to display program interface elements on top of other windows. Click "Enable" and activate the switch in the settings window.
After the second click on the application icon, a request will appear to provide access to photos, multimedia and files on the mobile device. Select Allow.
If your smartphone is running Android 8, 9, 10 or 11, a window will pop up with a recommendation to enable notifications to improve recording stability. Click “OK”, activate the toggle switch next to “DU Recorder” and confirm your choice by clicking “Allow”.
Managing notifications on stock Android is located along the path: “Settings” → “Applications and notifications” → “Advanced” → “Special access” → “Access to notifications”. Therefore, if after launching DU Recorder a window does not appear with a recommendation to grant the application access to notifications, do it yourself.
The interface of DU Recorder is the same as that of AZ Screen Recorder: clicking on the program icon displays a “floating” button, and clicking on it brings up the main controls. At the same time, a toolbar appears in the notification shade.
The drop-down menu consists of four options: you can enable screen capture, go to the application settings, display additional functions and start a live broadcast. To remove a screencast, click on the button with a red circle inside. Allow the program to record audio and select "Start" in the pop-up window.
A countdown begins, after which the image capture from the screen will begin. You can pause or stop shooting from the notification panel, or by clicking on the button and selecting the appropriate item.
After recording is complete, a video preview will appear on the display. You can share the video, edit it immediately or delete it.
By default, other recording tools are hidden. Functions such as taking a screenshot, shooting from the front or rear camera, drawing with a brush, and recording GIF are available. To add a button for the desired tool to the screen, select the third item in the menu and activate the switch.
The tools are also customizable: you can change the frame, location and size of the camera image, as well as select the color and thickness of the brush lines for drawing.
To record animations, activate the toggle switch next to the “Record GIF” item. Now, to create an animated screencast, just click on the corresponding button.
An orange bar will appear at the top of the display and decrease in size, indicating how much time is left until the end of the recording. To stop filming before the specified time, click the translucent gray “GIF” button. A preview of the animation will appear on the screen. You can view it, delete it, or send it.
To go to the main page of the program, expand the controls and click on the second button. The DU Recorder menu consists of five tabs. The first contains recorded screencasts that can be played in the built-in player, renamed, deleted, edited and compressed.
The following functions are available in the editor: trimming, adding music (from the device or from the DU Recorder media library), background image or subtitles, changing the speed, rotating the video and others.
The second tab displays screenshots taken using DU Recorder. The stitch feature allows you to stitch together multiple images to create one long screenshot.
The third tab is for streaming fans. Live broadcasts of the following games are shown: Minecraft, PUBG, Clash Royale, Clash of Clans and others. There is also a button to start a LIVE broadcast.
But the fourth tab contains the application’s tools: video and photo editor, screencast to GIF converter, WiFi transmission (works in the same way as the AZ Screen Recorder function of the same name), combining images and merging videos.
If you want to lower the screencast resolution and quality, go to the “Video Compression” section. Then select the video, set the necessary parameters and click “Compress”.
To create a GIF from a screencast, open the “Video to GIF” item, select a video, select a fragment up to 20 seconds long and click “Save”.
In the image editor you can process screenshots, uploaded pictures and photos. Tools available include mosaic, trim, and brush painting.
The last tab is the program settings. The first section adjusts the resolution, quality, bitrate, frame rate and orientation of the video. You can also turn off sound recording, select the directory where the videos will be saved, and enable video color inversion.
In the “Control Settings” section, you can select a recording mode, hide the timer that shows the duration of the video during shooting, disable the pop-up notification after taking a screenshot, and set the number of seconds to count down before recording starts. Other functions can also be configured: you can make screencasting stop when there is an incoming call, so that recording continues when the screen is turned off, or stops after you shake the phone.
Next is the Recording Tools section: choose which options appear on the display. Also remove the DU Recorder logo on the rollers and add a custom text or graphic watermark if desired.
In the “Other” section, the program language changes. You can also add a video editor shortcut to your desktop.
To close the program, click on the “×” in the toolbar or move the “floating” button to the cross.
Screencasts recorded using DU Recorder are saved by default in the “recordmaster” directory on the SD card. The following can be stored inside: created GIF animations in the “GIF” folder, edited and stitched images in the “RecordMasterEdit” folder, screenshots in the “RecordMasterScreenshots” folder and edited videos in the “VideoEdit” folder. The same media will appear in Gallery and the Google Photos app.
Mobizen
This program works similarly to AZ Screen Recorder and DU Recorder, but, unlike its competitors, it is not overloaded with additional options. Mobizen does not have a video to GIF converter, there is no function for transferring files over Wi-Fi, you cannot create long screenshots, draw while shooting, or stream. But most users don't need this.
The application interface consists of a “floating” button, which is called up by clicking on the Mobizen icon, and three menu items that appear after clicking on this button. Also, the program's tools are duplicated on the notification panel.
To start capturing video from the display, click on the video camera icon, or select “Record” in the “curtain”.
Give Mobizen access to files on your device, allow it to record audio, and click “Start.”
The timer will count down for 3 seconds, after which the screencast recording will begin. The AirCircle button will become translucent and show how long the video is. To pause or stop shooting, expand the program menu and select the desired option, or in the notification shade, click “Pause” or “Stop,” respectively.
After recording is complete, you can instantly delete the video by clicking “Delete”, or open the tab with the created screencasts by clicking “Watch video”. Also, to go to the archive with videos, use AirCircle: click on the button and select the second item in the menu.
Screencasts can be renamed, deleted, sent, and edited. You can add an intro or outro, trim the video, change the sound volume, add music. To save changes, click on the “Save” button in the upper right corner.
Mobizen can also take screenshots. The third menu button is responsible for this function. The screenshots themselves are displayed on the second page of the application.
The last tab contains settings. You can manually change the resolution, quality and frame rate of the videos, or in the “Video settings” section, click the “Recording Wizard” button, then “Start” and “Start” (in the pop-up window), and the application will select the optimal settings.
If you enable “Clean recording mode”, the watermark, timer and floating button will disappear from the frame during shooting.
AirCircle is also customizable: you can change the transparency of the button, make it so that it does not appear on the screen while recording is in progress, or completely replace the icon with your own picture or photograph. The size of the button, with its image inside, changes.
You can turn off audio recording, display the image from the front camera and adjust its size, remove the watermark or add your own (the latter option is only available in the paid version of the program), change the number of seconds of the countdown before the start of shooting, and choose where on the display it will appear The duration of the screencast will be displayed.
You can also select the directory in which the videos will be stored, display the built-in editor icon on the main screen and access it from the settings menu.
To close the program, select “End” in the notification shade or move the AirCircle button to “×”.
Screencasts recorded using Mobizen are saved by default in the internal memory in the “Mobizen” folder, and edited videos inside it are saved in the “Mobizen_edit” folder. All media files can be viewed in the file manager, Google Photos app and Gallery.
Screen recording on Xiaomi and Redmi smartphones
Devices from Xiaomi and its sub-brand Redmi come pre-installed with the Screen Recording application. This program displays a button that starts and stops video recording. By default, the application icon is located in the "Tools" folder on the main screen. Open it and click on the video camera icon in the lower right corner. After this, a moveable “Start” button will be added to the screen, clicking on which starts capturing an image from the display.
To stop shooting, double-click on the button, and to remove this button, click on the cross.
A thumbnail of the created video will appear in the upper right corner of the display and “hang” there for a couple of seconds. Click on it to go to the full video. The video can be edited in the built-in video editor - to do this, click on the magic wand icon. You can trim the video, add a filter, audio or watermark, and change the brightness, sharpness or contrast of the video.
The created screencasts are saved in the “DCIM/ScreenRecorder” path in the internal memory, and are also displayed in the Screen Recording application. You can also configure recording parameters such as resolution, video quality, frame rate and sound source (microphone or system sounds). You can also enable display of screen touches and hardware button presses.
Screen Recording feature in EMUI on Huawei and Honor
On Huawei and Honor smartphones, the Screen Recording function is available out of the box. Its button is located in the quick settings panel, but is not displayed there by default. So first activate it: open the notification shade by swiping from the top edge of the display, click on the “Edit” button (pencil icon) and drag the “Screen Recording” icon to the quick settings panel.
To start filming a screencast, click on the button in the “curtain”, allow the application to record audio and provide access to photos, multimedia, files on your smartphone and microphone.
You can stop recording in four ways: by clicking on the “Stop” button that appears on the display, by opening the notification shade and clicking on the blue square, by clicking on the “Screen Recording” button again in the quick settings panel, or by holding down the power and volume up hardware keys.
The video recording will be saved to the internal memory along the path “Pictures/Screenshots” and will be displayed in the Gallery in the “Video”, “Screenshots” and “All Photos” folders.
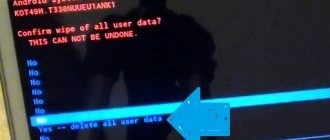
How to capture screen video on Android 4.4 KitKat
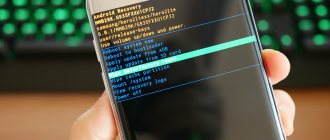
In Android 4.4, support for recording screencasts appeared for the first time, but root rights are required for the function to work on this version of the OS. They are obtained using the following exploits: SuperSU, Kingo Root, Towelroot and others. In addition to Superuser rights, special programs are needed to create screencasts on Android KitKat. At the moment, there are only 2 applications left in the Play Market: Rec. (Screen Recorder) and SCR.
Other programs suitable for Android 4.4, such as SCR Screen Recorder and Recordable, are no longer available on Google Play. To download them, you will have to allow installation of applications from unknown sources, download .apk files and install.
Rec. (Screen Recorder)
Unlike competitors, the Rec. lacks additional functions. In the main window of the program, you can configure the resolution, bitrate and duration of the future screencast. If you want audio to be recorded, check the appropriate checkbox. Leave the last field blank or come up with your own file name. To start capturing video from the screen, click on the “Record” button.
The timer will count down 10 seconds, after which shooting will begin. To end recording before the set time, open the curtain and tap the Rec notification.
A notification will appear indicating that the recording is complete. Only two actions will be available: share or delete.
In the free version of Rec. In the settings, you can choose where to store the videos, disable auto-rotate the video after changing the device orientation, remove the notification when recording is complete, make the application minimize during shooting, and ensure that image capture continues after the display fades out.
In the paid version of the application, you can set the time before recording starts, enable the display of clicks and remove the Rec icon. from the status bar.
Created using Rec. The videos are saved in the internal memory along the “Movies/Rec” path. They can also be viewed through Gallery and Google Photos (the “Rec” folder appears on the “Albums” tab).
SCR
To capture a screencast using SCR, open the application and click on the video camera button located in the upper right corner. The SCR logo will appear first and then shooting will begin.
SCR is controlled from the notification panel. While recording a video, you can display the image from the front camera and place it in a suitable place on the display. Drawing is also available.
To stop screencasting, select “Stop” in the “curtain”, or in the application, click on the button in the upper right corner.
Screencasts are displayed on the main page of the program and they can be deleted, sent and edited. In the editor, in addition to trimming and gluing videos, a function is available for creating GIFs from videos.
In the settings, you can select the folder where videos will be stored, set the number of seconds of delay before recording starts, and disable recording to stop if the screen is in sleep mode. And if you activate the toggle switches opposite the items “Minimize while recording” and “Stop by shaking”, then the program will minimize after the start of shooting, and to stop recording you will only need to shake the phone.
In the “Video” section you can configure the resolution, orientation, frame rate and recording bitrate. The program also allows you to add a text banner to video recordings, but the option is only available in the paid version of SCR.
In the “Sound” and “FaceCam” sections, audio and facial recording are activated and configured (recording from the front camera during screencasting). For the first option, the following parameters are available: selecting a microphone and adjusting the sound quality, and for the second, transparency and image size.
An internal media player is used to play videos. It can also be disabled in the settings.
Screen recordings and videos edited using SCR are saved by default in the “ScreenRecorder” folder in the internal memory, and created GIF animations are saved in the “Pictures/ScreenRecorder5” path.
Media files can be viewed in the file manager, Gallery and Google Photos.
XRecorder
An application from the creators of InShot, perhaps the most convenient video editor for Android. Allows you to take screencasts and screenshots in HD format, record video calls and streams you watch. It’s nicely free: it doesn’t put any watermarks on the video, doesn’t limit recording time, and doesn’t require root.
Videos can be exported with customizable settings - from 240p to Full HD with a resolution of 1080p, 60 frames per second and 12 Mbps. During the recording process, there is a pause, the ability to rotate the screen, and a countdown timer. And you can share captured screencasts directly from the application on Youtube or Instagram.
AZ Screen Recorder
And the third practically free program is AZ Screen Recorder. Does not require root, with minimal advertising and no restrictions on shooting duration. Pauses and starts with one tap, can record various formats, including Full HD and QHD. You can also select any of a variety of bitrates, resolutions, frame rates, force the program to countdown, etc. The resulting video can be saved on an SD card or in internal memory, as is more convenient for the user. The application, however, has various paid features: for example, creating GIFs, drawing on the screen, and there is a button for managing entries without entering the application. These cute additions cost about 100 rubles.
Android
First, let's look at all the ways to capture images and sound using third-party software in the Android operating system. Let's look at the standard methods of screen recording, which are available in different OS shells or in pre-installed software.
Mobizen Screen Recorder
Another popular application with a huge number of downloads on the Play Market (). According to statistics from the developers, more than 930,000 videos are created per day using their program. The utility allows you to record screen video broadcasts in good quality.
Main advantages of the program:
- Root rights are not required. The program works on Android version 4.4 and higher.
- Full HD (1080p) format support.
- Possibility to mute the microphone.
- Shooting from the front camera using FaceCam.
On the downside, users note some lags when recording games, as well as when capturing the screen in instant messengers. Some users complain about the annoying “app rating” that appears even in cases where a person has already set stars in Google Market.
XRecorder
This application allows you to make good videos by capturing the screen without watermarks, root rights and time limits. The program works in all known video platforms. XRecorder is capable of recording videos during a video call or chatting in instant messenger.
.
Main advantages:
- Video up to 1080p.
- Ability to save videos to an SD card.
- Quick launch, one touch.
- To complete a video screenshot, just shake your smartphone from side to side.
The program has its drawbacks: the lack of shooting from the front camera.
AZ Screen Recorder
Another free application that does not require root rights. It is suitable for both beginners and advanced bloggers. There are no advertisements in the program. The developers themselves position their program as the only application in which you can pause while recording. Although this is not true. Get it here.
- Main advantages:
- Video file in FullHD and QHD format (up to 1440p).
- Ability to record streams.
- Mute the microphone.
- Overlaying texts and pictures on videos.
- Save files to SD card.
As a minus, it can be noted that the application only works under Android versions from edition 5 and higher.
Lollipop Screen Recorder
A slightly outdated application that is not particularly popular today. The last update of the program was released at the beginning of 2021. Consequently, the functionality of Lollipop Screen Recorder lags far behind similar utilities.
The program has a lot of advertising. You don't need root rights to operate it. The application uses the official operating system API. The user has access to a recording mode: picture-in-picture, full-screen image capture, and saving to an SD card.
DU Recorder
One of the most popular applications for capturing video streams from a smartphone running Android OS. DU Recorder is free, but it contains advertisements.
The user can capture an image with literally one touch. However, a watermark in the form of a logo will be displayed on the saved video file. To remove this restriction, you will need to purchase a paid version of the program.
One of the main advantages of DU Recorder is that it is non-rooting and has no time limit. You can also add various sound and visual effects to the finished video. Additional options:
- Video file in HD format up to 1080p;
- Landscape or portrait orientation of the picture;
- Overlaying stickers, sketches and other images;
- Possibility to mute the sound from the microphone.
Using ADB
This is the most difficult way to capture video from the display of an Android device. Recommended for use by experienced users only. To work with ADB, you will need to download the “Android SDK” program from the official page of the developer company: https://developer.android.com/sdk/index.html on a PC or laptop.
Instructions:
- Unzip the Android SDK to a convenient location.
- Enable USB debugging on your smartphone. This can be done through the “For Developers” item.
- Connect your smartphone to your computer via a USB cable.
- Find the sdk/platform-tools folder. Go into it and hold down the “shift” key.
- Without releasing Shift, right-click and select “Open command window” from the drop-down menu.
- A command prompt will open. Enter in it: “adb devices” (without quotes).
- A list of connected devices appears. In some cases, the computer will prompt you to debug. Allow this action.
- After that, enter the command: “adb shell screenrecord /sdcard/video.mp4”.
The recording of everything that happens on the smartphone screen will begin. The video will be saved to the SD card or to the “sdcard” folder if the phone does not have a flash drive installed.
By regular means
Some operating system shells have pre-installed screen recording functions. For example, MIU (Xiaomi) has a “broadcast” option. It is located in the top curtain of the smartphone settings. Typically the function is located on the second settings screen in the form of an icon with a large monitor. You can configure the process to start by touching your palm to the display.
In this case, you will need to connect to some external repeater (TV or monitor), from which there will be a full broadcast of all actions on the smartphone screen. The procedure can be carried out directly from the monitor or TV with the recording functions built into them.