Setting up ZTE routers under Rostelecom
When connecting to a network from the Internet provider Rostelecom, many users need to independently configure the purchased router. Often the manufacturer of such equipment is ZTE, because the mentioned Internet service provider cooperates with this company. In such cases, the configuration procedure acquires a certain algorithm, which we would like to talk about further, touching on the main features associated with the WAN and IPTV protocols used by Rostelecom.
Preparing for setup
How to change the password on the MGTS Wi-Fi router: features for GPON
Many people wonder how to set up the ZXHN H298A router, neglecting its preliminary preparation. Before you start setting up FTTB Medium ZTE H298A, you need to write an application to change the tariff plan at the nearest Rostelecom branch. In the near future, the company’s technical specialists will check the capabilities of the equipment installed at the user’s home and make a positive/negative decision.
If a positive decision is made, all that remains is to configure the FTTB Medium ZTE H298A gaming router to connect the Internet and IPTV.
Preparatory actions
Let's start with an analysis of the preparatory steps, which should be paid attention to by those users who have not even unpacked the router yet. First, select the place where you want to place the device itself. Make sure that there are no problems with laying the cable from the provider, and that the Wi-Fi coverage area covers all the required points. To do this, it will be enough to avoid thick walls and electrical appliances operating nearby, the radiation of which can affect the quality of the signal. This applies, for example, to a microwave or baby monitor. After this, carry out the direct connection process, which you can read about in more detail below.
The most popular protocol used by Rostelecom is called PPPoE. The principle of its operation is that the user is given unique data for authorization, he enters them in the Internet center and after that the packages are automatically received. In this case, the DNS and IP address are configured automatically, so it is important to ensure that the standard operating system parameters responsible for receiving the same data do not conflict with the router itself. This is implemented by switching the parameter to automatic mode, which is done in just a few clicks. Find detailed instructions on this topic in another article on our website by clicking on the following link.
Setting up the ZXHN H108N modem
To connect the router you will not need to purchase additional wires and devices, because The standard package includes everything needed to install the device.
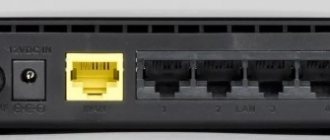
First of all, you need to connect an Ethernet cable, a wire from a computer and a telephone line or a 3G modem (depending on what type of connection to Internet services is offered by the provider).
If your Internet is connected via a telephone line, then when connecting the router it is recommended to install a splitter, which is also included as standard. The splitter acts as a separator of the Internet signal from the telephone signal, which allows you to use both the telephone and Internet services at the same time.
To install a splitter, you need to connect a telephone cable to it through the input connector, and connect the cables coming from the phone and the router to two output ports. The splitter should not hang on the wires, so it is recommended to mount it on a table or wall.
Login to the web interface
The next step is to log into the web interface. This authorization is performed under standard credentials, which can be determined by various methods. It is in the Internet center that all further manipulations will be carried out, so you must log in to it. Read about how this operation is performed for routers from Rostelecom in the material below.
After going to the web interface, a small instruction will be displayed on the screen that you should follow. Let's deal with this in order.
- At the first stage, set a new password to access the web interface. You can specify exactly the same key that was used for authorization just now. After this, click on the “OK” button.
Next, a form for setting up wireless access points will be displayed on the screen. If the router can operate on two different frequencies, it will be possible to activate both SSIDs. If desired, any of them can be disabled. Now you are required to change the names of the access points and set passwords for them. You can skip this step and return to it later during quick or manual setup.
You will be notified that the configuration has been completed successfully.
Log in to the web interface using your new credentials.
As you can see, a network map appears on the screen. This means that you can proceed to selecting the configuration mode.
Firmware ZXHN H118N - an easy way
Those users who need to return the device to factory firmware will need to do the following:
- Download the Patched__ZXHN H118NV2.0.1d_E04_OV.zip file to your PC and unpack it.
- Enter the router IP in the address bar. In the window that opens, click on any symbol, after which a menu should open.
- Find the Management item. In it, go to the Firmware Upgrade tab.
- Flash the ZXHN H118N firmware using the file DOMRU__ZXHN+H118NV2.0.1d_E04_OV.img. After this, you will only be able to log into the web interface via TELNET.
- Press the Reset key for a few seconds.
- Log in to the router menu using the standard login and password (admin).
- Flash the system with the file ZXHN+H118NV2.0.1d_E04_OV.img. As soon as the device reboots, repeat steps 5 and 6.
Quick setup of a ZTE router under Rostelecom
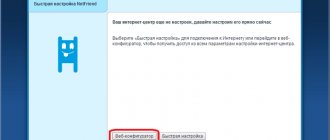
Let's move on to a direct analysis of the main task of today's material. The first type of configuration we want to talk about is using the Setup Wizard. Thanks to it, the entire process is carried out in just a few clicks and does not cause problems even for novice users.
- While on the first “Home” tab in the web center, click on the “Enter Setup Wizard” button, which is located at the top right.
Select a branch of the company that provides Internet connection services, then indicate your city and tariff plan. Rostelecom clients often purchase Internet + TV, so we will now and will continue to focus on this tariff plan. Before clicking the “Next” button, check that the information entered is correct.
The WAN configuration form will now be displayed. The number and type of options displayed will depend on what protocol the selected branch uses. Most often this is PPPoE, so you only need to enter a username and password. This information must be specified in the agreement with the provider or official instructions from him. The rule also applies to all other protocols, including Static IP and DHCP. All parameters are configured exactly according to the instructions from the Internet service provider.
When selecting IPTV parameters, first specify the LAN port to which the cable from the TV will be connected. Check the appropriate box, and then click on the “Next” button.
Set the parameters of wireless access points, if this was not done during the first connection to the web interface. We have already spoken about all the parameters present in this form earlier, so we will not repeat ourselves about the correctness of filling it out.
Review the information about the settings you just installed. If you are happy with them, apply the changes.
Applying the configuration will take some time, which will be described in the next Configuration Wizard window.
The router will automatically reboot, and then a message will appear on the screen indicating that it is ready to operate.
Proceed to interact with the browser and other Internet-dependent programs only after the device is fully turned on. If you still cannot access the network, but you are sure that the configuration is correct, contact your Internet service provider's hotline to resolve the problem.
Creating an Internet connection and additional sections
After all the preparatory activities have been completed, all that remains is to configure the Internet connection. Configuration must be done directly through the device’s web interface. To open the control panel, you need to open any browser installed on your PC and enter the router management IP address in the address bar. It is always written on a sticker located on the back of the device.
The first thing that will open is a welcome window, where you will need to enter your default username and password. After authorization, the control panel will appear on the screen. The general principles of all devices are similar; as a rule, the differences are only visual.
The user has the opportunity to choose 2 options for creating an Internet connection: “Quick Setup”, “Settings Wizard” and “Wizard”.
You must first familiarize yourself with all the information provided by the provider.
First of all, you need to select the connection type. Several main connection methods are used: Static IP, Dynamic IP, PPPoE.
Next, you will need to make the following settings:
- SSID - name of the wireless network. You can specify any name consisting of Latin letters.
- Channel – You can leave it at the default “Auto”.
- Encryption type. To use the network securely, it is recommended to give preference to combined network encryption methods, for example, WPA/WPA2 PSK.
- Wireless network key, also known as password. Experts recommend setting an access key that consists of at least 8 characters.
For all changes to take effect, you must save them by clicking “Save”. Next, it is recommended to restart the device. Finally, all that remains is to make sure that the device is working.
Manual configuration of a ZTE router under Rostelecom
The process of manually setting up ZTE routers under Rostelecom is a little more complicated than discussed earlier, since the user needs to perform all the steps independently. However, if you have the necessary knowledge and information from the provider, this operation will not seem difficult. Let's look at the choice of WAN and IPTV parameters separately.
Network configuration
We immediately warn you that in the web interface of some router models from ZTE you cannot set Wi-Fi parameters manually, since this is done when you first start the Internet center or in the Quick Setup Wizard, as we already talked about earlier. The user is only given the opportunity to determine the WAN parameters, which we will talk about now.
Through the top panel, move to the “Internet” tab. On the left, select “WAN”. Here, expand the block with the name of the protocol that matches the one provided by the provider. Fill in each field according to the information provided. Before clicking the “Confirm” button, be sure to check that the settings are correct.
Additionally, we will clarify the information for owners of the DHCP protocol type. In this case, you do not need to change any fields because the IP address and subnet mask will be set to the default value, which is correct. As for all other protocols, they are configured strictly in accordance with the rules from the Internet service provider. You do not need to perform any further actions to ensure a correct connection via WAN.
Setting up IPTV
Let's touch on another important process that many owners of ZTE routers face when connecting to the Internet from Rostelecom. The fact is that IPTV won’t work just like that either, because there are no corresponding Ethernet settings by default. You will have to set them yourself, which happens as follows:
Old firmware
- Enter the old password for this admin panel and the new one twice.
- If a window like this appears, then indicate “WAN Type” as “DSL”.
- Now the most important thing is to indicate the type of connection that your provider uses. This can be found in the contract or by calling technical support. If the contract specifies a login and password, then it is most likely “PPPoE”. If IP and mask are specified, then “Static”. If nothing is said, then “DHCP”. Rostelecom uses PPPoE.
- From the sheet, enter the data “VPI” and “VCI”. Now below we indicate the ports that will be used by the Internet. We indicate all “LANs” except the one to which the IPTV set-top box will be connected. If it is not there, then specify all ports. And check the box next to “SSID1”.
- If you previously specified the connection type as “PPPoE”, then enter your login and password here.
- Next comes the Wi-Fi setup. We indicate only the network name and password.
- If you need to set up IPTV, then indicate “Bridge” on the next circle.
- Here we indicate VPI and PCI from the IP-TV settings sheet. We indicate only one port to which the set-top box is connected.
Source
Optical GPON terminals Rostelecom
Today I want to talk in detail about GPON optical terminals from Rostelecom, which the telecom operator provides to customers when connecting to the Internet via passive optical networks of xPON technology. Moreover, in 2020, the operator began to gradually move away from the “menagerie” of terminal devices, introducing into circulation a branded line of routers with their own indexes and proprietary firmware. I will show all the models known to me, briefly talk about their characteristics and features, and also, if possible, post the current firmware for each model. Let's go!
Logically, the entire line of optical Internet terminals at Rostelecom was divided into 3 classes:
- Low - Simplest
- Medium - Average
- Premium - Higher (Premium)
They differ not only in cost, but also in functionality and tasks performed. For example, in the LOW segment there is no WiFi, while Premium is offered in conjunction with special tariffs.
Low-level optical Internet terminals
This segment includes access devices, which are also called PON socket . In fact, this is a “smarter” media converter for passive optics, having a WAN port with an SC connector, several LAN ports and an optional telephone connector for connecting a landline phone.
There are two options for using a PON socket. The first option is the simplest, cheapest option for connecting to the Internet. Everything is clear here. The second option is suitable for more advanced users and involves installing an additional Wi-Fi router or even an entire Mesh system. And so I advise you to use this option. Why? The fact is that at the time of writing, I have not seen a single optical PON terminal with WiFI from any manufacturer that would have a good coverage area. As a rule, it is either bad or so-so. And this is not only for Rostelecom, but also for all other operators. Perhaps the top-end optical router RT-X is doing better, but so far there has been no opportunity to test the capabilities. So, using a PON socket allows you to install a good, powerful router or MESH system and forget about problems with the wireless network.
Huawei HG8120H (HW 867.A)
The most widespread and reliable PON socket of Rostelecom. The HG8120H model is widely used by different providers and therefore usually has no problems with compatibility with exchange OLT terminals. You can buy it quite cheaply on Avito. Ports: 1 x GPON type SC/APC 1 x LAN GigabitEthernet 100/1000Base-T 1 x LAN FastEthernet 100Base-TX 1 x POTS FXS
Huawei HG8210H firmware: download
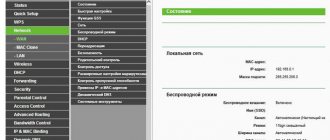
Standard IP address: 192.168.100.1 Authorization: login - telecomadmin, password - admintelecom
ZTE F612 (HW V6.0)
Another fairly common simplified Internet subscriber terminal (PON socket) is the ZTE F612. In the presented hardware version, HW Ver.6 is practically a double of the Huawei HG8210H.
Ports: 1 x GPON type SC/APC 1 x LAN GigabitEthernet 100/1000Base-T 1 x LAN FastEthernet 100Base-TX 1 x POTS FXS
Firmware ZTE F612: Download
Standard IP address: 192.168.0.1 Authorization: PLOAM password - 1234567890 login - admin, password - during installation.
Qtech QONT-RT-1G1F1V (HW V1.0)
Well, the third type is a Rostelecom gigabit GPON socket in a regular layout. This is the rarest model to date.
Ports: 1 x GPON type SC/APC 1 x LAN GigabitEthernet 100/1000Base-T 1 x LAN FastEthernet 100Base-TX 1 x POTS FXS
Firmware Qtech QONT-RT-1G1F1V: Download
Standard IP address: 192.168.0.1 login - admin, password - unique, on a sticker
Features of settings for different providers
This modification of the gaming router can work from different providers, and not just Rostelecom. The most common providers include MTS and Beeline; they have decent Internet coverage throughout the country.
There are no fundamental differences in configuration; the providers' web interfaces look more or less the same. The parameters involved are mostly the same.
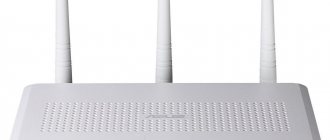
FTTB wi-fi router ZTE H298A is an advanced gaming modem that allows you to enjoy all the delights of a high-speed Internet connection. When choosing network equipment, you definitely need to pay attention to it.
Source
Rostelecom GPON terminals with WiFi
The average Medium level of optical routers is now represented by six models with the RT-GM- . In addition, I will show several more Rostelecom GPON subscriber terminals, which can also be found in a number of branches. The connection diagram of such a device is practically no different from a conventional FTTB router, which everyone is already accustomed to, with the only difference being that the uplink is optics.
Each of the presented ONT routers is dual-band, that is, it works both in the classic 2.4 GHz band and in the 5 GHz band, which is still new to Russians. I’ll say right away - don’t expect good Wi-Fi from these devices. Firstly, they all have internal antennas, which is no longer “ice”. And secondly, they have a fairly low power wireless access point and, as a result, simply disgusting coverage area. Sercomm and Huawei have it even more or less normal, but Eltex and ZTE are very weak.
Note! I’d like to note especially for Rostelecom haters - now there isn’t much choice in the GPON terminal market, but among what is there, these are the most popular models that are used in MGTS, Dom.ru and Sibirsky Medved is no exception, AND in principle, for most inexperienced subscribers their capabilities are sufficient. But if you really want to cover a large apartment or cottage with a plot of land together with Wi-Fi, consider the “PON socket plus MESH system” option.
RT-GM-1 SERCOMM (HW ver.4)
A basic dual-band model that has proven itself quite well. RT-GM-1 is in fact the Sercomm RV6699 v2 model, known since 2021. Inside, almost everything is the same. The optical transceiver is quite good, the signal strength is a couple of decibels better than that of Eltex.
Specifications: Chip - Broadcom BCM68380 (600 MHz, 2 cores) ROM - 128 MB RAM - 256 MB WiFi 2.4 GHz - BCM43217T 802.11n chip WiFi 5 GHz - BCM4360 802.11ac chip Ports: 1 x GPON type SC/APC 4 x Gigabit Ethernet 100/1000Base-T 1 x POTS FXS RJ-11 2 X USB 2.0 Available in either black or white.
Rostelecom Game RT-X gaming terminal
At the time of writing, this is the most technically advanced, most expensive (almost 9,000 rubles) and most interesting GPON terminal from Rostelecom. The RT-X model is presented as a gaming optical router specifically for gamers using artificial intelligence technologies, separate traffic prioritization and reducing the time of data exchange with remote servers. It is stated that there is a neural network module that recognizes game traffic and increases its priority over other data.
Judging by the fact that the Game RT-X router is presented as a joint development by Rostelecom and Huawei, in which specialists from both companies participated, the device does not have a direct prototype among existing models. Perhaps something was taken precisely from the Huawei Echolife K5 Pro mentioned above, but these are not just assumptions.
Specifications: Chip – SD5117V ROM – 256 MB RAM – 128 MB WiFi 2.4 GHz – SD1151 V742 chip WiFi 5 GHz – SD1151 V740 chip Ports: 1 x GPON type SC/APC 4 x Gigabit Ethernet 100/1000Base-T 2 x POTS FXS RJ-11 1 X USB 2.0
Game RT-X firmware : Download
Standard IP address: 192.168.0.1 Authorization: login - admin, password - unique, on a sticker
Connection
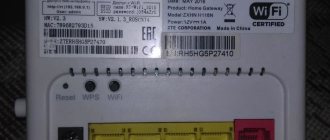
First, let's get acquainted with the ports, buttons and connect it:
- ON/OFF – on/off button. If it freezes, just double-click on it.
- Reset – button to reset to factory settings. If you did not receive it from company employees, then press it for 10 seconds to reset the configuration to the factory one.
- WLAN – Wi-Fi activation button. By default, the wireless network is already turned on.
- WPS – fast connection to WiFi.
- POWER – connect the power supply here.
- LAN1-4 – ports for connecting local devices: computer, laptop, TV, etc. I connected my laptop here. For initial setup, it is better to do everything via cable
- DSL or WAN - here we connect the cable that your provider provided to you. If you have aDSL version, then we connect the telephone wire.
Once you have it plugged in and turned on, you need to connect to its LAN. This can be done using a cable by plugging it into one of the LAN inputs. Or connect using Wi-Fi - you can find the network name and password on the device label.
After you connect to the network, you need to open any browser and enter one of the presented addresses in the address bar:
- 192.168.0.1
- 192.168.1.1
If you are asked to enter your username and password, then try the following combinations:
- admin-admin
- admin -*Empty line*
If none of the combinations are suitable, then we look at the same piece of paper. If nothing is specified there, then your specification does not have a password. You need to reset the router to factory settings by pressing the “Reset” button for exactly 10 seconds.
ATTENTION! Now a very important point. It turns out that the ZTE ZXHN H108N router has two hardware specifications and two different firmware. Therefore, we look at our chapter, focusing on the screenshots that I provided. Be sure to keep the settings sheet from your provider at hand.
Other models of Internet terminals
Below are several more models of Rostelecom optical GPON routers, which can also be found quite often in different regions.
Eltex NTU-RG-1421G-Wac
This model is very widespread among almost all providers that have passive optics. And it seems to be inexpensive and works stably, but there is one significant “fly in the ointment” - weak WiFi coverage area.
Specifications: Chip – SD5117V ROM – 256 MB RAM – 128 MB WiFi 2.4 GHz – SD1151 V742 chip WiFi 5 GHz – SD1151 V740 chip Ports: 1 x GPON type SC/APC 4 x Gigabit Ethernet 100/1000Base-T 2 x POTS FXS RJ-11 2 X USB 2.0
Firmware Eltex NTU-RG-1421G-Wac : Download
Standard IP address: 192.168.1.1 Authorization: login - user, password - user
QTech QONT-9-4G-2V-2W-1U
This optical router is rare and can mainly be found in the Ural MRF. The copy is already quite outdated - 2017, but nevertheless still relevant, you can buy it on Avito for 300-500 rubles and use it.
Specifications: Chip - BCM68380i ROM - 128 MB RAM - 128 MB WiFi 2.4 GHz - BCM43217+ chip WiFi 5 GHz - BCM4360 chip Ports: 1 x GPON type SC/APC 4 x Gigabit Ethernet 100/1000Base-T 2 x POTS FXS RJ -11 1 X USB 2.0
SERCOMM RV6699 (HW v2)
This device completely replicates the Rostelecom RT-GM-1 GPON terminal in appearance and characteristics, so I don’t see any point in duplicating the same information. Personally, I have had such a router on my stand for several months now and, with the exception of the wireless network coverage area, I am satisfied with everything.
Optical GPON terminals Rostelecom:
“default ip 192.168.0.1, login admin and password admin” with this password you get under the user, there is no talk of any admin rights, half of the settings are hidden. What is the superuser password? And then you are telling a lie; there is no admin password, he suggests creating your own after flashing it.
We do not use a superuser when setting up - there is simply no need for it, all the necessary settings are available under the admin. The superuser password is generated individually for each Rostelecom terminal on a special service for installers. During initial setup, the admin password must be changed to your own according to the security rules. That's the whole truth. How did I deceive you?
The deception is that there is no superuser password! Since the connection name is HSI and it cannot be deleted or can it be done with SU rights?
So this is a topic about Rostelecom terminals and the firmware recommended by the provider for them. The operator does not give the user superuser rights - this is its policy (in fact, the same as Dom.ru and Beeline). These firmwares are installed by the automated terminal management system in those branches where it is available. I’m not forcing you to use these firmwares: if you’re happy with your own, use yours, but if you want the provider’s firmware, here’s the provider’s firmware for you. We use the latter and we are more than satisfied with them. Regarding HSI - what does it interfere with? We just leave it and that’s it. There are no problems from this.
Sorry for the question, I downloaded the RT-GM-3 Iskratel (HW A2) firmware in the archive 2 firmwares to flash both or to choose from. I'm flashing it because the smart speaker from Yandex constantly falls off and loses Wi-Fi, I have to constantly reboot the router.
There is no need to hide behind an incomprehensible policy, all operators have long provided both SU and Telnet passwords, but they won’t provide passwords if my personal equipment was purchased from RT, this is a passed stage. And operators have not encrypted their firmware for a long time, to the point of such stupefaction as yours. I found the passwords for this firmware and deleted HSI. Who needs passwords from HG8120H write
Huawei HG8120H (HW 867.A) how to roll back the native firmware HG8120HV300R015C10SPC155_common_all.bin after yours? When updating the software, the error appears: “Update failed. Select the correct file and try again. Attention! The selected file is incorrect.”, while the correct file was checked on a similar terminal with the same HW 867.A.
Hello! How to configure a port for IPTV on RT-GM-4?
There are no instructions yet, unfortunately. I’ll post it when it appears.
I don’t know which operators provide which passwords - I’m telling you how things are with Rostelecom at the moment. Although I doubt that in your Labytnagi anyone other than Rostelek sells PON. Yamaltelecom, if only, is not an indicator at all. I mean terminals from large operators Dom.ru, MTGS and Megafon, for example. Anyway. In any case, if you are not satisfied with this policy, contact Rostelecom, not me. I cannot influence this in any way. Moreover, in our region, for example, terminals are mainly leased, not sold. Another question: you deleted HSI - what did it give you in the end? This will not add speed, nor will it add functionality. What's the point of all the hype about HSI removal?
Vitaly - my colleague did a rollback to v3r015c10s130 - there were no problems. Haven't tried it with your version.
There are two versions. The latest recommended by Rostelecom is 1.6.898
Thank you. I have long wanted to update my rv6699, otherwise the firmware was very old.
XasaH Hello, for Huawei – RT-GM-2 (HW 1B2D.A) you can publish s62 firmware, this was the case in the Murmansk branch.
Is there any other news about this terminal?, recent updates?
Vladimir - good afternoon. I update the archive as firmware appears. Because that’s all I have at the moment.
Source