Hello everyone, comrades! Today we will configure the TP-Link TD W8961n. By the way, the router has several hardware versions that can also be configured: W8961ND, W8961NB and W8961N. First, let's connect it correctly if you haven't done so yet. Take everything out of the box if it's new and install it next to the phone cord or outlet that your provider installed.
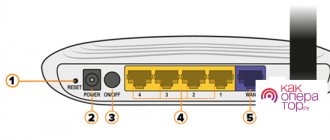
Look closely at the back panel where all the ports are installed. In the very first input, you need to insert the power supply. You can do this. After that, there is an on and off button. After that, the WPS button is for quickly connecting via Wi-Fi using a PIN code, not a password. Next comes the “Reset” hole. In fact, this is a factory reset button - don’t touch it for now, then I’ll tell you what it’s for. After that, the Wi-Fi button, which turns the wireless network on and off.
4 yellow LAN ports – for local connection, computer and the latest aDSL port. Take the cable from your provider and insert the input on the right into the ADSL. Turn on the Internet center. Now we will see how to configure this aDSL modem and WiFi router.
TP-LINK TD-W8968 - brief description
The TD-W8968 is a device that is highly versatile. This is a router, an ADSL2 modem, and a wireless access point.
Wireless data transfer speeds are excellent - up to 300 Mbps. The device supports IEEE802.11b/g/n standards, and data transmission is carried out at a frequency of 2.4 GHz. So the router is perfect for organizing a local network, to which several devices that regularly and actively use network access are connected wirelessly. For example, for a home that has two laptops from which members of the household play online games (sometimes simultaneously), the TD-W8968 is perfect.
The router supports the modern IPv6 protocol. It is not yet widely used, but it is always better to have equipment that is already ready for technological revolutions in the future. This router can serve you for more than five years and will not become outdated.
The cost of the device starts from 1,500 rubles - a very reasonable price for excellent technical characteristics.
Among the disadvantages of the model, users note:
- poor ADSL line performance. The connection takes a long time and periodically fails;
- problems with torrent downloads. Judging by the reviews, the router freezes if you start downloading something through a torrent client. The problem is partially solved by installing the latest firmware. We will tell you how to update the firmware below;
- poor technical support. TP-Link is not very active in responding to user requests, so you may not get an answer to a technical question.
Appearance and interfaces
TP-Link decided to make an original design for the case, so you can see an abstract geometric pattern on its top side.
Status indicators on the front
On the back side are located:
- WLAN port;
- three LAN ports;
- ADSL2 socket;
- power button;
- reset button;
- two fixed antennas;
- USB port.
The presence of USB allows you to:
- connect hard drives or flash drives, allowing them to be shared with all network participants;
- create an FTP server;
- use a 3G/4G modem and distribute its Internet to all local network participants. But before you buy a USB modem, check out the list of supported devices on the official website.
All ports are located on the back of the case
Connection
Connecting TP-LINK TD-W8961ND can be done in the following order:
- connect the router to the telephone line. To do this, connect the ADSL port located on the rear panel of the device to the MODEM connector of the splitter;
- connect one end of the Ethernet cable to the network connector of the computer, and the other to one of the 4 LAN connectors of the router;
- turn on the PC;
- plug the power adapter into the POWER connector and plug it into a power outlet;
- then press the ON/OFF button.
ADSL router connection diagram.
Preparing for setup
So, you bought a new device, took it out of the box along with all the components (namely an Ethernet cable and a power cord). How to set up a network connection now?
First, let's make a physical connection:
- Connect the power supply to the POWER port on the back of the case. After inserting the plug into the outlet, press the power button - the indicators should light up and start flashing.
- Now let's connect the router to the Internet. Take the cord that extends from the entrance and connect it to the WLAN port (the outermost yellow one, located closer to the white ADSL port).
You can also connect to the Internet via a USB modem, but since this article is about setting up Rostelecom, we will not consider this possibility now.
- Connect the router and computer with the Ethernet cable that comes with the device. Plug one end of it into any free yellow socket of the router (LAN), and the other into the computer’s network card.
How to automatically obtain a network address
In order for the Rostelecom router to work properly and for us to be able to configure it, it needs to automatically receive its network address. So let's check that this is true:
- Turn on your computer and right-click on the Start button.
- Select “Control Panel” from the drop-down list.
- Then find the "Network" section.
- There will be a “Network Connections” item. Click on it.
The window we need looks like this
- You will see a window containing a list of all previously used network connections. We are now interested in what is called Ethernet. Right-click on it.
- Select "Properties" from the list.
- Now click on the TCP/IPv4 line and the “Properties” button in the window that opens.
Here we will configure the IPv4 protocol
- Make sure that "Obtain an IP address automatically" is selected and not "Use the following". If this is not the case, then correct it.
- Click OK and exit settings.
IP TV connection
The router supports IPTV technology. In order to connect it, you need:
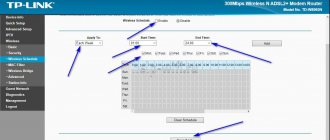
- Go to the “Interface Settings” menu, “Wireless Network” submenu and select PVC1 in the “Virtual channel” line;
- Set VPI/VCI values, which must be confirmed with your Internet service provider;
- In the “ATM QoS” line, select the UBR value;
- Select the type of connection - bridge;
- In the encapsulation line, select the value 1483 Bridged IP LLC.
Now you need to configure the LAN ports. For this:
- Go to the “Advanced Settings” menu, “VLAN” submenu. We check that the VLAN function is enabled;
- Select the line “Define VLAN group”;
VLAN window.
- In the new window we set the parameters as in the figure. After that, click the “Save” and “Next” button;
The first window with VLAN settings.
In the window that appears, set the parameters from the image again and click “Save”, “Next”;
- In the next window, in the line “Virtual channel No. 1” we change the value to 2, in the line “Port 4” we set the same value;
Now you can connect interactive television through the 4th LAN port.
Login to settings
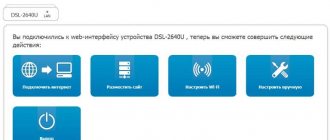
Now that we have made all the preparations, we can start setting up the network directly. For this:
- Open your browser.
- Enter 192.168.1.1 in the address bar.
- Enter admin in both fields in the window that opens.
This is what the TP-Link settings login window looks like
Is it possible to change the password
It is possible, and even recommended, to improve security. For this:
- In the settings, open the item “Management” - “Access Control” - “Passwords”.
- Select the admin account.
- Enter the old password and the new one twice.
If you have created several users, then to change their password you need to select their logins in the drop-down list
Be sure to remember, or better yet, write down the new password. If you forget it, you will be able to get into the settings only after a factory reset (the procedure is described below). In this case, you will lose all configured configurations.
More detailed Internet configuration
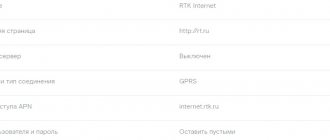
You can configure the Internet in more detail through a regular configurator. To do this, go to “Advanced settings” – “Network” – “Internet”. The old connection will already be there, you can delete it and add a new one. Next, simply enter the required data and save.
New firmware
Old firmware
Go to “Interface Settings” and then select “Internet”. Afterwards, similarly select the necessary data and enter additional information from the contract. If some information is missing, then simply skip and leave the fields with default values.
Wi-Fi setup
A wireless access point can also be configured in the web interface:
- Open the Wireless - Basic menu.
- Make sure the first checkbox is Enabled.
- You can enter any network name in the SSID1 field.
In basic settings you can instantly enable or disable the access point
- You can also add two more networks distributed by this router. Check the box next to SSID2 or SSID3 and enter a name for the new network. This can be useful if there are a lot of devices to connect.
- Click Save/Apply.
- Then go to Wireless - Security.
- We are interested in the Manual Setup AP section.
- Select the network for which you want to set a password from the drop-down list.
- On the next line, select WPA2-Personal.
- In the Network Key field, enter the password - it will be the key to access the network.
You can change your Wi-Fi password without even knowing the previous one
- Leave the rest of the fields intact and click Save/Apply.
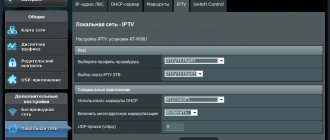
Setting up IPTV
If you have a set-top box, you can connect it to this router:
- Connect the set-top box to the router using an Ethernet cable into any free LAN socket. Remember the socket number (they are all numbered below).
- Login to the web interface.
- Open the IPTV item.
- Check the Enable IPTV checkbox.
- Just below, check the box next to the port into which you connected the set-top box - LAN1, LAN2 or LAN3.
Turning on IPTV will not take much time
- Click Save/Apply.
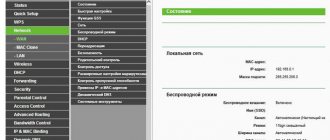
LAN and DHCP
In the web configurator you can also configure your home LAN/DHCP network:
- Select LAN.
- The main window displays all settings at once.
- In the first two lines, enter the router's IP address (default 192.168.1.1) and subnet mask (255.255.255.0).
- If you want to organize a DHCP server, then check the box next to Enable DHCP Server below.
- Specify the starting and ending addresses. They must be the same until the last comma. The number after it should be smaller for the starting address and larger for the ending address. The default starting address is 192.168.1.2, but you can set it to anything higher.
In this menu you will see all devices connected to the server
- Click Save/Apply.
Purpose of the device
Equipped with a built-in ADSL2+ modem, the TD W8961ND router is intended primarily for use in a home network.
Data transfer rates reaching up to 150 Mpbs allow you to work comfortably in the wireless network created by the router. It should be noted that it is possible to connect not only using ADSL, but also through standard Enternet ports.
The device is designed to connect to the Internet via ADSL: computers, laptops, netbooks, smartphones, smart TVs, multimedia set-top boxes, etc. Provides Wi-Fi coverage within a radius of almost 100 meters.
The settings procedure is not complicated and can be quickly completed even by beginners. The network is reliably protected by encryption mode, filtering by MAC and IP addresses, and a firewall.
Factory reset
Factory reset is a very useful feature that allows you to quickly roll back your router to factory settings. Please note that resetting will not affect the firmware version. If the problem is caused by installing incorrect firmware, then resetting it will not solve it! But with the help of this function you can correct an unsuccessful configuration, return a forgotten login and password for logging into the web interface.
To reset, have a paperclip or pen ready to write on:
- Press the RESET button recessed in the case.
- Hold it until the lights on the router blink. This is about 10–15 seconds.
- After this, release the button. The router will blink again and then be ready for use.
Firmware update
Before starting to follow the instructions described below, you should download the firmware from the official resource of the router manufacturer and save the file on your computer. Next, you can update the router software by following these steps:
- After launching the interface, go to the “Maintance” tab;
- Next, go to the “Firmware” section;
- Then click “Select file” and show the firmware the location of the firmware file on the computer;
- Click “Upgrade”;
- Wait for the process to complete;
- Ready. This is how easy it is to flash the device with an updated version of the software.
How to reboot the router
If your router freezes or starts to slow down a lot, you can try rebooting it. In most cases, it solves the problem.
If your router freezes regularly, you should check the firmware. Perhaps it began to freeze after the update? In this case, download the older version and install it instead of the new one. If the router starts to freeze without flashing it, then, on the contrary, try updating it.
To reboot the TD-W8968:
- Press and hold the power button on the back of the case.
- Wait until all the indicators on the front panel go out. Release the button.
- Wait three seconds and press the Power button again.
- Wait until the indicators stop flashing and remain steady. The router is ready to continue working!