Today I want to talk in detail about GPON optical terminals from Rostelecom, which the telecom operator provides to customers when connecting to the Internet via passive optical networks of xPON technology. Moreover, in 2020, the operator began to gradually move away from the “menagerie” of terminal devices, introducing into circulation a branded line of routers with their own indexes and proprietary firmware. I will show all the models known to me, briefly talk about their characteristics and features, and also, if possible, post the current firmware for each model. Let's go!
Logically, the entire line of optical Internet terminals at Rostelecom was divided into 3 classes:
- Low - Simplest
- Medium - Average
- Premium - Higher (Premium)
They differ not only in cost, but also in functionality and tasks performed. For example, in the LOW segment there is no WiFi, while Premium is offered in conjunction with special tariffs.
GPON from Rostelecom
The foundation of GPON technology from Rostelecom, which has repeatedly received positive reviews from both professionals and users, was laid many years ago. Development began in the 80s of the last century. Tests were first carried out in 1987 in England. The second stage was a consortium in 1995 dedicated to PON standardization. Developers and the world's largest Internet providers took part in it. Within three years of the consortium, the first optical networks accessible to a wide audience were installed in the United States and Japan. Further, the technology began its rapid development in other countries of the world.
In Russia, the implementation of GPON is now at an early stage. Providers MGTS and Rostelecom are actively participating in this event. The transition to fiber optics after long-term use of copper cable is quite difficult, as it requires significant costs for laying new lines and purchasing compatible equipment. Nevertheless, Rostelecom is ready to offer GPON connections not only in large cities, but also in some private sectors outside them.
Use the Internet without restrictions! Find out about the special offer from Rostelecom for residents of the Central Federal District and regions.
You can read about the connection and terms of use of the “Call Yours” tariff here.
The GPON connection diagram from Rostelecom is quite simple. The provider supplies optical fiber to each of the houses, and then, using a switch, the cable is divided and sent to compatible user equipment. In the apartment itself, the signal is converted by a special router, which has an input for fiber optics. Such equipment is quite expensive, so users often rent it from a provider.
Important: Before setting up GPON from Rostelecom for your own equipment on your home network, you need to connect the Internet operator cable and one computer via the LAN connector. After this, you can log into the device’s web interface.
Setting up equipment for GPON from Rostelecom
Suitable equipment for GPON connection can be rented directly from Rostelecom. If this option suits you, the provider will personally configure the network devices in your home. In cases where equipment is purchased separately, setup costs will not be included in the initial connection. Therefore, you will need to enter the Internet settings on the router yourself.
To successfully create a fiber optic network, you should pay special attention to the selection of equipment. The first thing to consider is the functionality of the router. If you need, in addition to the Internet, to also be able to connect IPTV and telephony, it is recommended to purchase a terminal. In other cases, it will be enough to have a simple fiber optic router.
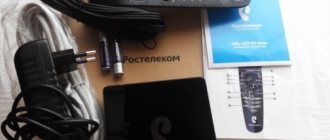
One of the optimal terminal models that can be rented or purchased from Rostelecom is the G PON ONT RFT620. In addition to four LAN ports for connecting computers to the Internet and a built-in Wi-Fi module, such a device will allow you to take advantage of all the advantages of IP and classic telephony.
Find out about the conditions for using the “Call Home” tariff plan from Rostelecom.
You can read how to configure the Eltex NTP-RG-1402G-W terminal yourself here.
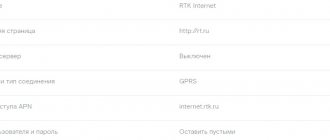
Having connected the GPON cable from Rostelecom and the computer via the LAN connector, you need to turn on the equipment and go into its settings. To do this, you will need to open any browser and write the IP terminal in the address bar. GPON ONT RFT620 from Rostelecom uses the IP address 192.168.1.254 to enter the default settings. Before logging into the device software, you will need to enter a login and password, which have the values user/user. After this, you will be taken to the firmware home page. The Internet settings on this model are already predefined by the provider and do not need to be changed.
By default, the equipment does not have a wireless connection, which will need to be activated manually. Wi-Fi on a router from Rostelecom, model GPON ONT RFT620, can be enabled in the “Wireless Network” menu. Before activation, it is recommended to pay special attention to the security settings that will help protect the network from unauthorized access.
Features of the technology
How is GPON fundamentally different? This technology is based on the use of fiber optic cables. They significantly outperform copper ones and allow you to increase network stability and data transfer speed.
Let's list the advantages of the technology:
- There is no need to buy a Rostelecom GPON terminal and router. If desired, you can connect the cable directly to your computer.
- Thousands of clients can be connected to the network without losing signal quality.
- The Internet works stably.
- It will not depend on the current weather.
- Provides high speed. G – designation of gigabit Internet.
- Fiber optics can last for many years. The cable does not oxidize during operation.
- Based on this technology, new solutions with increased data transfer rates are being developed.
- Subscribers do not have problems with further use of the Internet.
GPON has already become the company's basic solution. The technology provides access speeds of up to 100 Mbit/s. This is enough for online games, quickly downloading files and watching videos in high definition.
Rostelecom also offers connection to XPON in large cities. The data transfer speed using this technology has been increased to 200 Mbit/s. This is an excellent parameter; RT was one of the first to master the new standard.
Gpon – general job description
Passive optical technologies (Pon) appeared not very long ago, but are confidently replacing traditional methods of organizing Internet access operating over copper cables. Optical cable has huge advantages over copper cable:
- the ability to transmit information at enormous speeds;
- Thousands of clients can be connected via one optical cable, and this will not affect the quality of communication;
- connection speed is not dependent on weather conditions;
- durability, i.e. Fiber optic cable does not rot or rust.
Speed of the gpon network of Rostelecom.
The "G" prefix assumes that the connection is at gigabit speed. This technology is called passive because there is no active network equipment between the provider’s node and the end consumer, and the optics are laid directly into the client’s apartment.
No equipment is required, because the length of the optical cable without additional signal amplification is up to 20 km, and in the near future developments are underway to increase the line to 60 km.
The connection can be carried out in synchronous and asynchronous modes. Typically, providers prefer asynchronous mode. The maximum speed is limited to 2.5 Gb/s for receiving, and 1.25 Gb/s for transmitting information.
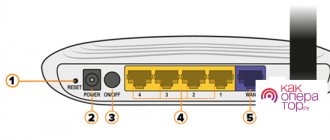
Appearance
Purpose of indicators
Power - power supply
Link (PON) / Act (PON)
Off / Off – cable not connected (initial state)
Flashing / Off - standby mode (response from OLT, apparently)
Flashing / Flashing - authentication attempt
On / On - operating mode (normal operation of the terminal)
On / Off - emergency stop mode.
USB-1/.USB-2 - connection to a USB storage device. (in the firmware from Rostelecom it is not possible to use storage)
LAN 1-4 - Lights up - the ethernet connection is established. Flashing - data is being transferred
WLAN - a manufacturing defect turned the WAN indicator into WLAN. So, keep in mind that the WLAN indicator is WAN
Wi-Fi - On - The access point is active (wi-fi is on) , Flashing - data is being exchanged via a wireless connection
Phone 1/2 - Flashing quickly - The phone is registered with the provider’s equipment and a call is in progress. Flashing slowly —The phone is registered and the phone is off-hook. On - The phone is registered, the handset is not picked up. Off - phone is not registered
VoIP — The VoIP protocol (SIP) is active on the terminal.
[adace-ad id=”3482"]
The principle of connecting to Rostelecom
In order to connect, a future subscriber must contact the nearest Rostelecom office and leave a request. You can connect one or more services to choose from:
- Internet;
- City (landline) telephony;
- IP television.
Any connection to a provider via wire requires additional costs.
Those clients who have previously been connected to Rostelecom using ADSL technology know this from their own experience; new subscribers will be told about this when submitting an application.
The main difficulty is the installation of the cable, which, due to its specific qualities, is not advisable to bend too much, so usually all equipment is installed in the hallway. The equipment includes a special ONT router designed to work in fiber-optic networks, which can be rented directly from a provider or purchased independently. It is advisable that an electrical outlet be installed in the hallway. End devices are connected via regular twisted pair Ethernet or via WiFi.
Gpon network diagram provided by the provider Rostelecom.
After technical issues have been agreed upon with the client, a router has been purchased, and a service agreement is concluded. The cable is being installed, laid, and the router is configured.
Routers Rostelecom
To make it easier for the user to choose a router, we suggest that you familiarize yourself with what modern connection methods and types are available. Which of our routers are suitable for certain available network connection options.
A router is called routing equipment. It routes and delivers data packets from one device to another. For this purpose, connectors are built into the equipment, when connected to which the Internet is transmitted
When selecting a router, the buyer needs to decide on the purpose and basic necessary parameters of its installation. It is worth paying attention to the main characteristics:
- Types of routers.
- Availability of antennas.
- Ports.
- Supported network standard.
Setting up connection equipment
If the router is purchased or rented from Rostelecom, then its initial configuration is performed during installation directly by Rostelecom employees. In cases where the subscriber is purchasing a router himself or he already has equipment, the configuration options may vary depending on the model and manufacturer of the network equipment, as well as on its capabilities. You can find enough information on the Internet with step-by-step instructions that you can follow to set it up yourself.
Rostelecom offers its customers several models of ONT devices, one of which is G PON ONT RFT620. This is a fairly successful and universal model that allows you to connect up to 4 devices to the LAN, and an unlimited number via wireless technology, it is possible to watch streaming television, and connect up to 2 landline phones.
All settings are made via the web configurator. To do this, you need to type the address “192.168.1.254” in your browser and enter the username and password: user/user. There is no need to enter any Internet settings; this has already been done by the provider. You just need to configure your home network to suit your needs:
- enable the WiFi wireless module;
- change security settings;
- set static or dynamic IP addresses, etc.
Features of setting up some routers
Sagemon
In recent years, the company has increasingly provided subscribers with the opportunity to work with equipment that has an interface specially created for the company. We will describe the procedure for setting up Sagemon routers from Rostelecom.
In the main interface window you can select Russian language. This will greatly simplify the work.
The developers have provided the opportunity to carry out quick setup, which is completed in just a few steps. The main thing is to have a contract at hand, which contains all the necessary data.
Open the “Wizard” tab of the settings and click on the section of the same name.
You will see input fields, as well as text guidance on how to fill them out correctly. Follow the instructions and save your changes. The Internet should work.
Another section is also available. It's called "Internet Connection". Here everything is set up even easier. By default, the most popular connection type is selected PPPoE1. You just need to provide your login and password.
D-Link
It is possible to set the interface language to Russian, which makes working with it easier.
Internet settings are located in the “Network - WAN” menu. Here you need to delete old connections and add new ones.
A global settings window will open, which allows you to select the desired connection type, then allows you to insert your login and password.
The new interface looks different. To find the menu you need, click on "Advanced settings" in the lower right corner.
The procedure is described in more detail in the video tutorial.
And a couple more lessons on working with models from the manufacturer.
D Link Dir 300
D Link DSL 2640u, DSL 2500u
Asus RT N12
Setting up the Asus RT N12 router is easy. To do this, go to the “Network Map” category and specify the desired connection type.
A window will appear in which you need to enter all the necessary data. Instructions are provided that make it easy to figure everything out on your own.
Zyxel
Login information for the interface may differ on different models. Look for the data on the bottom of the case.
In the left column, select the “Internet” section and click on the “Authorization” link.
Select the desired connection type on the right side. Most often this is PPPoE.
We fill in the login and password that are indicated in your copy of the agreement with Rostelecom.
For different connection types, different parameters may appear to be filled in. All this information is indicated in the text of the contract. If you need help, you can always call the support operator and check the details with him.
After entering all the data, click the “Apply” button.
Huawei
In the main menu, select the “Basic” item and the “WAN” sub-item. Remove unnecessary connections. Now you will need to create a new one by clicking on the “NEW” button. You may decide to reconfigure your old connection. Then click on its name.
Check the box "WAN Connection". The agreement from Rostelecom must indicate the values for the VPI and VCI fields. Fill out these fields with the required values.
Now select your internet connection type from the “Connection type” drop-down list. This is usually "PPPoE".
Now you need to enter your authorization details. This is your login and password. Their meanings are in a copy of the agreement with Rostelecom. After entering the data, click on “Submit”.
The Internet will be up and running within a minute.
QBR Qutech
Services and packages
Rostelecom offers its customers many different options and service packages, the most popular of which are the following:
- home Internet via fiber optic line with selectable connection speed;
- interactive television with more than 160 channels;
- home landline telephone, with the ability to choose a call tariff;
- mobile telephony;
- ONT router rental at a low price.
All these services can be selected separately or combined into packages. The monthly subscription fee will depend on your choice. The company holds constant promotions and discounts, information about which can be found on their portal. Also, for each region the price for services is different.
All common types of Rostelecom routers
These devices can be easily divided into four main types. The separation occurs based on the choice of channel by the router for sending blocks of data in batch mode between different devices.
ADSL modem.
Receiving a signal from telephone networks, it converts it and delivers it to the consumer. A special feature of the router is that in addition to local network connectors for connection, it is equipped with a connector for connecting a telephone.
FTTx modem.
Often used when network data comes over a fiber optic line, and in the home the network runs to the router along paths that are standard distribution cables.
Fiber optic router.
It differs from the above equipment in the way it is connected to the fiber optic network. This happens directly without the need for intermediate intermediate devices. Which is very convenient for Internet users in the private sector.
4G modem.
It does not require laying cables or a fiber optic line, since the network transmission occurs from the nearest station of the network operator. To do this, you need to install a SIM card in the corresponding slot in the modem.
The most common use is an FTTx modem, but its installation requires optical fiber and, in its absence, requires wiring, which is sometimes highly costly.
If there is no cable Internet and it is impossible to install a fiber optic line, the choice falls on a 4G modem. Here, the main criterion for obtaining high-speed Internet is the choice of a cellular operator. You should start from the quality of the network signal and whether the base station is located close to the installation site of the router.
Antennas on the router.
The number of antennas can also affect the coverage area. More often, routers have two, but there are routers with 1 to 6 antennas. Area coverage is influenced by power, radio frequency spectrum, building wall material, and sometimes weather.
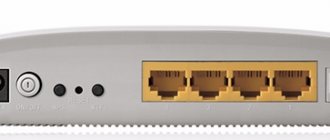
Number of port connectors.
The choice must be made based on which devices and how many the user wants to connect.
- Network connectors range from 1 to 4; on the device they are marked with the inscription LAN with numbering. They are needed to connect an IPTV set-top box and to connect directly to a computer.
- IP telephony connector. No more than 2. They are used when connecting to a server or to connect a wireless network to a system complex.
- WAN ports . They are used to connect telephone network paths, the Internet network itself or fiber optics.
- Wireless communication methods. In Russia, radio frequencies in two spectrums are used for high-speed access to the global Internet. One transmits data in the 2.4 GHz range, the other at frequencies equal to 5 GHz. In the second case, data exchange is available using the latest modern methods, transmission channels are wider and, accordingly, fewer unwanted impacts are created for the devices of other network users. Receiving and sending a data packet at a given frequency is carried out at a higher speed. Such advantages also affect the price of the device, which is an order of magnitude higher than a router with the ability to connect in the 2.4 GHz radio frequency spectrum
To independently determine the wave spectrum supported by the device, the user can read the device documentation. The inscription begins with "IEEE 802." and ends in Latin. The letters b, g, n mean the radio wave spectrum of 2.4 GHz. Letters a, ac, ax - the router supports 5GHz radio frequencies
Pros and cons of connecting using Gpon technology
Connecting via GPON, like any other method, has its positive and negative sides. The positive ones include the following:
- The cable is pulled directly between the provider's PBX and into the user's apartment, i.e. There are no intermediate nodes, which significantly increases the speed of information transfer and signal stability.
- The signal in a fiber optic cable is transmitted not by electrical impulses, but by light impulses. This means that there is no risk of injury from electric shock at all.
- Possibility to connect several services at once through one ONT device.
There are, of course, disadvantages to this connection method:
- The optical cable is very susceptible to sharp bends, which means that it will be difficult to route it around the apartment to distant rooms. It is also not recommended to place furniture and other heavy objects on the cable.
- Although there is nothing valuable for sale in the cable, main lines and wiring in entrances are constantly under threat from vandals.
- The cable does not transmit electricity, which is why animals are of increased interest in it. It is advisable to hide it in a box.
Answers to frequently asked questions about Rostelecom routers
- Where can I find the password for a Rostelecom router?
The login and password on Rostelecom routers are initially indicated on the back cover of the router. There is a sticker on it indicating all the data. If you change your password, keep it in a safe place.
- Why is the Rostelecom router blinking, what does it mean?
LAN - the indicator light is constantly green - the connection to the network has been established. When the indicator light blinks, it confirms network activity. The Internet is connected.
- Rostelecom router lights up red - what to do?
If the indicator on the Rostelecom router lights up red and there is no access to the Internet, this indicates that the network is not connected. There can be several reasons for the lack of Internet, and very often the user has the opportunity to restore the work independently without turning to the help of specialists. To troubleshoot and determine the cause, you must go through a series of procedures.
— 1. Find out if the subscriber has any debt.
— 2. Check whether the cable is connected to the WAN connector. If the cable is connected, check if it is damaged. The cable is intact, then you should check the settings that may go wrong due to instability or network failure. For this:
— Go to the router settings panel and enter IP in the address entry line.
— Go through authorization by entering your login and password.
— Save the entered data and reboot the router.
— 3. Failures are also often caused by technical work or a malfunction on the line itself. In this situation, you need to call the Rostelecom technical support operator.
So, to fix the problem you need to:
- Inspect the router and make sure the case is intact.
- Set which connector indicator is off or red.
- Check the connections of all cables and ensure they are not damaged.
- Reboot the modem.
- Check that the balance is positive.
- Contact the operator using the toll-free technical number. support and find out if technical support is carried out. line work.
- Reset the router settings to the initial factory settings and configure again.
If, after going through all the procedures, it was not possible to restore the network, you must contact Rostelecom customer support, where they will help you fix the problem remotely or send technical service to you.
- How to reset a Rostelecom router?
This can be done using the reset button available on the router; most often it is very small and recessed; you need to press and hold it for 10 seconds.
You can also reset the settings by logging in from your computer through the router settings menu. To do this, you need to go to the administration panel of the Rostelecom router.
- Login to the admin panel of the Rostelecom router - address, login and password
Logging into the admin panel of the router via a computer is done by entering the IP address, its username and password. All data is indicated in the contract or on the back cover of the router. On some, a URL may be indicated instead of an IP; in this case, enter it. After entering, press Enter and enter your login and password.
Customer Reviews
There are many both positive and negative reviews on the Internet. Many people, speaking in raised voices, simply have no idea how technology works. When technicians suggest drilling a wall and installing an outlet in the hallway. This causes a lot of outrage. But almost all providers only sell wired home Internet, and in any case the cable will be routed into the apartment.
Some people complain about low connection speeds, without completely understanding how this speed is measured and how it is expressed. People often try to measure speed by measuring speed from a phone running via WiFi. But no one takes into account the fact that several devices are connected to the router, and the channel width is divided evenly between them.
In any case, GPON technology is very promising, Rostelecom equipment is being actively replaced throughout the country and the home Internet connection service is moving to a new level.
Source
Devices for television from Rostelecom
Consoles
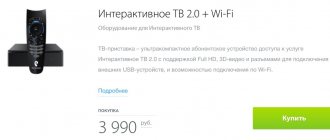
Wink
Main features:
- Connects to home Internet from Rostelecom;
- TV channels, films and series are available in high quality;
- Interactive services;
- You can rent it by signing up for a package tariff plan.
Price:
- Purchase - 3990 rubles;
- Rent depends on the tariff plan.
Wink+
Main features:
- Connects to any Internet regardless of the provider;
- TV channels, films and series are available in maximum quality;
- Interactive services and entertainment applications;
- 260 TV channels and 7,000 movies and TV series free for a month.
Cost: 4990 rubles.
IPTV Sercomm STB 122A
Operating system: Android.
Memory:
- Operational - 2 Gigabytes;
- Internal - 8 Gigabytes.
Technology support: 4K, BTLE, Wi-Fi.
CPU:
- Model - Hi3798MV200;
- Frequency - up to 2000 MHz.
Cost: 4990 rubles.
IPTV SuperWave IP6003 STB
Operating system: Android.
Memory:
- Operational - 2 Gigabytes;
- Internal - 8 Gigabytes.
Technology support: 4K, BTLE, Wi-Fi.
CPU:
- Model - Hi3798MV200;
- Frequency - up to 2000 MHz.
Cost: 4990 rubles.
Smart speaker “Capsule”
Voice assistant Marusya with artificial intelligence and a pleasant voice. Can be used for entertainment, smart home control, interactive TV and so on. Lots of interactive features.
Cost: 8990 rubles.
PLC-RT500 adapters
PLC adapters are needed in order to connect interactive set-top boxes in different rooms of the house, without stringing extra cables between them. The gadget is installed in an outlet in two places. The connection between them occurs automatically.
Main characteristics:
- Connection speed - 500 Mbit per second;
- Easy installation according to instructions;
- No need to run cables between rooms.
Price:
- Basic set (2 devices) - 3300 rubles;
- Additional device - 1700 rubles.
Remote control
Each set of set-top boxes includes a remote control by default. However, if you have lost it, you can purchase an additional one. The main feature of the gadget is that it can simultaneously control both a TV set-top box and the TV itself.
Cost: 385 rubles.
Long-450 Antenna Kit
Long-450 is a direct antenna for analog television.
Specifications:
- Range - 400 - 480 MHz;
- Gain up to 11 dB;
- Resistance - 50 Ohm;
- Dimensions: Devices - 116x10x38 cm;
- Fastenings - 50x15.5x2 cm;
- Devices - 3 kg;
About optics and PON
If there was something unclear to you from the definition, now I will try to explain this concept in more detail. At the moment, optical cables are laid everywhere in cities - that is, the optics go all the way to the house, connect to a special modem-switch, and then apartments are connected using twisted pair cables.
Optical cable
Optics are special glass cables through which information is transmitted using light. Due to this, information can be transmitted over many kilometers. Via twisted pair cable you can transmit data over a maximum distance of 50-100 meters. That is why this technology is called a passive optical network - because we can throw wires without the use of repeaters and other devices.
twisted pair
Well, the technology itself involves laying an optical cable directly to the subscriber’s apartment. That is, we have two types of connection from Rostelecom:
- The usual thing is that the optics go to the house, then connect to the switch, and apartments are connected from it using a twisted pair cable.
- xPON – optics are directly connected to the subscriber’s apartment.
Why do we need PON technology at all ? Firstly, it is cheaper for Rostelecom itself, because there is no need to install equipment on each floor. Secondly, there is almost no packet loss with such a connection, since light (in optics), unlike electricity (in twisted pair), has almost no influence from electromagnetic waves. As a result: there is less ping in games, the speed does not jump or drop, and the Internet is much more stable. Thirdly, the speed increases significantly and you can connect to the Internet at speeds of 300, 500 or even 1 Gbit per second.
Let me remind you that Rostelecom uses GPON technology - the letter “G” stands for “Gigabit” - this means that the speed can be higher than 1 Gbit per second.
What is GPON
GPON (Gigabit Passive Optical Network) is a passive optical network with maximum Internet speed, which is one of the most advanced data transmission standards. The throughput of such a network reaches 1 Gbit/s. If we consider home use, then this is quite enough for any digital needs.
The user does not encounter freezes and problems when downloading large files, watching digital television with maximum quality, talking on the phone, and even implementing a video surveillance system.
Connection diagrams
Rostelecom has several home connection schemes:
- FTTN – optics extend from the network node of a district or an entire city.
- FTTC - optics extends only from a small microdistrict.
- FTTB – optics are connected to the building.
- FTTH - optics are extended to the entrance or apartment, as in our case.
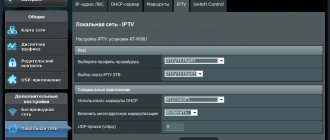
How to open a port
In order to connect a DVR to the terminal or open a port for games and torrents, go to the NAT . It will contain a group of parameters “Port Mapping”:
In the “External Port Range” and “Internal Port” fields we must enter the port that we want to open and forward on the GPON terminal. In the “Protocol” field, select the desired transport protocol - TCP or UDP. If you need both, then you will need to create two rules. In the “Internal IP Address” field, you must enter the IP of the computer or device for which we are doing port forwarding. Click on the “ADD” button to add a rule.
If something doesn’t work out and the port is closed, try doing something differently. D-Link DPN R5402 from Rostelecom has one excellent option in the NAT demilitarized zone DMZ. To use it, in this section we find the “DMZ Host” group:
Set the “DMZ” switch to the “ON” position. In the “Internal IP Address” field, enter the IP of the computer, video recorder or other gadget for which we open the port. Click the Apply button. Now all open ports of this device will “glow” on the Internet.
How to connect?
In general, I’ll tell you my story that happened to me. I live in the private sector and then there was a rumor that Rostelecom was installing fiber optics. I called, clarified and left a request for an Internet connection and IP-TV. If you live in an apartment, you can also call and find out if you can connect using GPON technology. If possible, then connect. If not, then there may be two options:
- You can stay on twisted pair - in fact, you are already connected to optics, it’s just the “vikha” that goes to the apartment. There is nothing wrong with this, as experts say, there are no serious packet losses, but there will be no speed above 1 Gbit.
- Get together the residents of the building and write a collective application for the provision of optics to each apartment. Of course you will have to pay for this.
In any case, just call the Rostelecom hotline, and they will tell you everything: 8 (800) 10-00-800 - also don’t forget to ask about the “GiPON” tariffs that they have.
Wi-Fi setup
- You can enter the settings via IP: 192.168.0.1 or 192.168.198.1.
Username – admin / admin
- After logging in, you will be taken to the next page. Select Routing .
- Next, select Wireless LAN . In the Basic you can:
A. Turn on/off the Wi-Fi transmitter. To enable it, WLAN must be set to Enable (this is the default)
b. AP select AP 1 (default).
V. AP Enable should be set to On (default).
d. Change the name of the wireless network to one that the user likes. The default is Default . You can use Latin letters and numbers. The use of Cyrillic letters is undesirable, since in wireless connections on the subscriber’s device the name of this network will appear as “doodles”
d. Hide SSID to off (default). If on, then the client will not see this wireless network on his device.
When finished, click Apply. The changes will take effect immediately.
The next item is to select Security to configure security.
A. AR select AR 1.
b. Security Mode for greater security should be WPA2PSK (this is the default).
V. Enabling Mixed Mode allows legacy devices with WPA encryption (enabled by default) to connect to this Wi-Fi network.
d. Passphrase is the password that the user will enter when connecting to the network. Default is 0123456789 . The client can enter any password longer than 8 characters and shorter than 63. It must consist of Latin letters of various registers and numbers. Cyrillic alphabet is not allowed! This password will not be accepted when connecting to the network.
d. Changes are accepted by clicking on Apply . No additional saves are required; you can exit the settings.
What to do after application?
Once you have the optics installed, you will also have two connection options, but first things first. Let's start with the fact that the computer does not understand the information that is transmitted via an optical cable. This is understandable: it doesn’t even have such a port. Therefore, to connect you need:
- A regular GPON terminal - it will essentially act as a kind of translator and bridge. The input will be optical and the output will be Ethernet. Then the terminal itself can be connected to the computer directly or using a router so that all family members can enjoy the benefits of the Internet.
- A fiber optic GPON router is two in one: both a terminal and a router.
And now the most important thing - they will sell you SFP routers or terminals from Rostelecom, they will say that they only work with their equipment. Know that they just want to make money from you, since such terminals and routers cost many times more than their competitors. I advise you to simply buy a router with an SFP port or a similar terminal. In general, there is only one piece of advice - don’t buy or rent anything from them. See a selection of routers with optical cables here.
How to set up WiFi on DPN-R5402
The parameters of the Wi-Fi wireless network on the D-Link optical modem are located in the Wireless LAN of the main menu of the web configurator. First, go to the Basic :
You can turn on/off the WiFi network on the DPN-R5402 from Rostelecom using the “WLAN” parameter. By default it is set to “Enable”, that is, enabled. In the “AP” field, you need to select the main network - AP1 (the rest can be completely disabled if enabled). The main parameters of this WiFi network will appear below. In most cases, there is no need to change anything except its name in the “SSID” field. Here you can come up with and enter any name in Latin. Click on the “Apply” button.
Go to the Security :
Here you can enable wireless network protection if it is turned off and change the Wi-Fi password. Security mode in the “Security Mode” field select “WPA2PSK”. You should leave the “Mixed mode” checkbox only in cases where you have old phones or tablets on your network that cannot work properly with WPA2. To change the WiFi password on the DPN-R5402, create and enter a new key phrase in the “Passphrase” field. Click on the “Apply” button.
Setting up GPON equipment Rostelecom
Everything is done very simply - so there is no need to be afraid. If you bought a router yourself, then you can see detailed instructions on setting up the equipment on our website. You can ask a question in the comments or find the instructions yourself - to do this, enter the full name of the model into the search bar on the portal.
If you purchased a device from Rostelecom, then most likely you have an ONT NTP-RG-1402G-W router . You can watch the video below for setup. If you have a different device, write in the comments, and I will add instructions for it - just please write the full name of the model, which can be seen on the label under the case.
Source
Setting up D-Link DPN-R5402 from Rostelecom
D-Link DPN-R5402 - Discussion
- The topic contains all the Forum Rules and the 10 commandments of a beginner who finds it difficult to master the Forum Rules
- Discussion of devices not related to this topic is prohibited. If the topic you need for a specific model does not exist, create it.
- Instead of saying “Thank you!” use . If you have less than 15 posts, click on the button under the message where you were helped and write a thank you.
- Useful topics to note: FAQ on the forum, How to search on the forum?, How to remove images under spoiler., Networks and Equipment Guide
Configuration and Management • Remote management using PLOAM functions • Management via G.984.4 OMCI (ONT Management and Control Interface) • Secure access via ACL (Access Control List) • Telnet session for remote management • Shell & Logger for advanced user configuration/use diagnostics • Software update via OMCI or CLI • Configurable QoS classes and related parameters (T-CONT, PortID, AllocID)
GPON Features • GPON Class B+ Optical Transceiver • Upstream (Transmitter): 1310 nm +/- 50 nm, max. speed 1.244 Gbps (burst mode) • Downstream (Receiver): 1490 nm +/- 10 nm, max. speed 2.488 Gbps (continuous mode) • 1 port with SC connector with the ability to connect via fiber optic on the CO side • Single-mode optical cable • Maximum data transmission distance: 20 km • Address management (add, delete, clear MAC address) • Support IGMP v1/v2 Snooping, 16 entries, can be enabled/disabled, Fast leaving • UNI port configuration (speed, duplex mode, flow control, disable/enable, automatic mode) • ONT dying gasp compliance • ONT authentication • Configurable AES encryption on DS payload • Learn MAC addresses: up to 64 • Full set of ITU-T G.984 ONU features with advanced capabilities
LAN Features • 10BASE-T IEEE 802.3 • 100BASE-TX IEEE 802.3u • 1000BASE-TX IEEE 802.3ab • IEEE 802.3x flow control (PAUSE frame) • Auto-negotiation, auto MDI/MDIX polarity detection • Ethernet packet size 522 bytes (Tag Packet) ) • Manual speed setting: 10M, 100M, 1000M • Cable: UTP (Category 5e) • IEEE 802.1Q VLAN (32 VLAN, VID: 1-4094) • VLAN trunk, VLAN based on user port and service type
VoIP Features • Incoming and Outgoing Calls, Call Waiting, Three-Way Conference, Call Forwarding, Caller ID Display • Voice Codecs: 711 a-law, G.711 u-law, G.723.1A, G.729A, G.729B • Voice: RTP compliance (RFC1889) • Call Control SIP (RFC3261) • T.38 Fax relay • Echo cancellation
Wireless Network Specifications • 802.11n • 2.4 GHz to 2.4835 GHz • WEP, WPA-PSK and WPA-PSK AES encryption protocols
USB characteristics • Storage functionality • SAMBA
Interfaces • GPON port (SC connector) • 4 10/100/1000 BASE-TX Gigabit Ethernet ports (RJ-45 connector) • 2 VoIP FXS ports (RJ-11 connector) • 802.11n WLAN (wireless connection of computers to an access point) • 2 USB 2.0 ports • WPS button • Factory reset button • ON/OFF power switch
Indicators • Power • Link (PON) • ACT (PON) • LAN (1-4) • Wi-Fi • WAN • Phone (1-2) • VoIP • USB (1-2)
Dimensions 228 x 160 x 40.98 mm
Power Output: 12V/2A
Temperature • Operating: 0 to 40 C • Storage: -40 to 70 C
Humidity 0% to 95% (non-condensing)
Certifications • CE • FCC Class B
This topic has no curator. For questions about filling out the header, please contact the section moderators through the “Complaint” button under the messages to which you need to add links, or through QMS.
Post edited by [email protected]
— 06.02.17, 19:18
Instructions for flashing the subject:
1. Download the firmware file (GPON) 1.0.22 or (GEPON) 22.0.1 2. Install a tftp server (for example tftp32); 3. Set the IP parameters on the network card manually: IP address 192.168.0.2 mask 255.255.255.0; 4. Connect the network cable to the “LAN1” port of the DPN-R5402;. 5. Run the tftp32 utility. In the "Current directory" field, specify the directory with the downloaded firmware. In the “server interfaces” field, select “192.168.0.2” from the drop-down list; 6. In the start menu, run cmd; 7. Using the telnet 192.168.0.1 command, connect to the DPN-R5402. An authorization window should open in front of you. For authorization, use the following data: login: admin password: admin 8. Run the command: firmware_upgrade 192.168.0.2 2210 (where 2210 is the name of the firmware file); 9. Wait for the software update process to complete (about 5 minutes); 10. You received a router with factory firmware. :good:
PS: When downloading firmware through a browser, it can be downloaded without a file extension. If this happens, then you should know that this is a gz packaged archive. Just add the gz extension and unpack (there is only 1 file in the archive).
PPS: What was written is 100% verified: hi: The attached archive contains everything you need (the firmware is already unpacked) contact me))).
Advantages of the Internet using PON technology from Rostelecom
The most significant advantage of PON Internet from Rostelecom is that, with the help of inexpensive optical splitters, a common optical fiber provides a network for many users. But remember that such splitters keep the network responsive for up to 64 users. Thus, this technology is of interest not only to subscribers, but also to service providers who want to replace somewhat outdated copper networks.
Features of PON networks, which can also be called advantages, are:
- absence of electromagnetic interference, since there is no need to use active equipment directly in the access network;
- reduction of fiber and equipment in the central office.
PON equipment from Rostelecom provides greater throughput and supports a double distribution coefficient. This means that with a 64-lane allocation, each user will receive a fairly large connection throughput, about 35 Mbps. If the provider uses lower distribution factors, for example, 16 or 32, subscribers will receive even more bandwidth. Thanks to the efficient use of PON standard bandwidth, subscribers are provided with high data transfer speeds. In addition, this technology makes it possible to use not only high-speed Internet, but also multiservice services, such as video, voice, and data.
Setting up WiFi on D-Link DPN-R5402 from Rostelecom
The D-Link DPN-R5402 optical ONT terminal is issued by Rostelecom to subscribers connected using GPON technology in the Moscow region and St. Petersburg. Unfortunately, I have no information about whether it is used in MGTS. In most cases, as with other terminals, the configuration options for connecting to the Internet and the optical line are closed to the user due to the fact that in parallel with the terminal, the port for it is configured from the station equipment side (OLT) and there is no point in getting into all this for the subscriber. If any problems arise, you need to contact technical support, who will check the station port and terminal configuration remotely. But the user can set up WiFi on the DPN-R5402 or simply change the password; fortunately, it’s very simple.
After authorization, we will be greeted by the device status page. Unfortunately, on this model it is not very informative.
In order to set up Wi-Fi on the D-Link DPN-R5402, you need to select the “Routing” -> “Wireless LAN” -> “Basic” section in the menu on the left:
First of all, we check that the wireless module is turned on - “WLAN” - “Enable”. The first network in the AP list should be set by default. The device has several of them. For security reasons, it is better to disable everything else on the list. Now let's move down to the wireless network settings. "AP Enable" should default to "On". In the “SSID” field we enter the name of our WiFi network. It can be any word in Latin. For example, "nastroisam". We don’t change anything else and click on the “Apply” button.
The next step will be setting up security. Go to the “Security” subsection:
In the “AP” list, you need to select the same network number that we configured in the Basic section - “AP1”. We set the security mode to the most reliable one today - “WPA2PSK”. All that remains is to enter the WiFi password for the DPN-R5402 in the “Passphrase” field. It can be any alphabetic, digital or mixed sequence of characters no shorter than 8 characters long. Click on the “Apply” button.