Many Rostelecom users some time ago could not cope with the router setup procedure, and as a result, this grew into a big problem. In order to fully use the benefits of civilization provided, for example, to have unhindered access to the Internet, people were forced to wait for days and weeks for the master. Some spent hours on the phone, trying to understand instructions from a specialist.
Nowadays, everything has become noticeably simpler; there is no longer a need for professionals to understand the settings of any router. I would like to offer a few simple steps of this procedure and all that is required of you is to strictly follow the instructions. In just a few minutes you will be able to enjoy the results. So let's get down to business.
Connection conditions and features
Despite the importance of proper connection, clients often needlessly worry about the possible difficulties of setting up Wi-Fi. If you purchase equipment at the provider's points of sale, additional preparation of the device for operation is usually not required.
As a result, users are left with:
- connect the device to the network (replacing a broken or outdated one) turn on the power;
- wait until all the necessary lights light up (especially the one next to which the wi-fi icon is located);
- turn on the computer or laptop that you want to connect to the network;
- find a list of available connections on your computer (by clicking the corresponding icon in the lower right corner);
- enter a password for authorization;
- wait for connection.
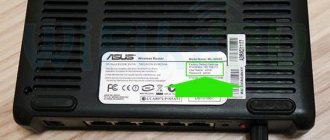
It is important to emphasize that all important information about the router is located on its body. This also applies to the password required to use the Internet and connect to the router.
If the required information is not on the case, you should look for it in the instructions that were in the same box with the equipment, and if difficulties arise, it is recommended to simply call the contact center of the telecommunications company and consult with consultants. They will explain what is preventing the connection.
How to connect a wi-fi router if you have wired Internet Rostelecom
If a subscriber previously used wired Internet and now decides to replace it with a more modern connection method, the process of connecting and setting up the equipment will not change. The only nuance that needs to be paid attention to in such a situation is related to the cable. It must be inserted not into the computer slot, but into the corresponding modem port (ADSL). If the user makes no mistakes and does everything correctly, he will see the light on the device light up. It will be signed in the same way as the previously selected port (ADSL).
What to do if the settings are incorrect or the password is lost?
Now we will try to explain what to do if the router settings are lost, and how they can be restored. The easiest way is to reset and configure again, and also change the password on the router. There are simple instructions for resetting the settings:
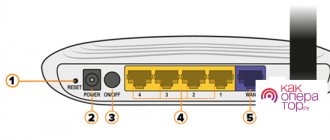
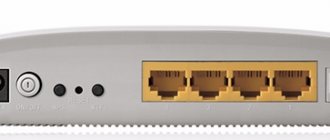
- Find the WPS/RESET option on the device.
- Press and hold it for ten seconds.
- Wait until the indicator flashes - this is a signal indicating that the settings have been reset.
After completing these steps, you need to connect the device and configure it again. If the need arises, you can contact the operator at any time - call the hotline.
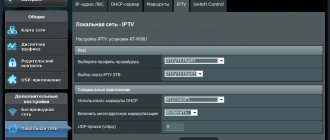
Setting up a Rostelecom TP Link router
When you can’t do without additional settings, you just have to connect Wi-Fi from Rostelecom manually.
To do this you will have to:
- turn on all equipment and connect all existing wires;
- open the control panel on your computer (using the “Start” button);
- find the “network connections” subsection in the section dedicated to networks;
- find the “local network connection” icon and open its properties using the right mouse button;
- in the tab that opens, you need to select “TCP/IP protocol” and click the “properties” button below;
- in the next window you need to select the option that offers to obtain an IP address automatically;
- and save changes;
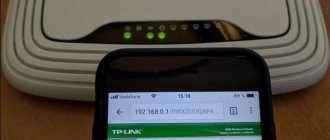
- then all you have to do is open any browser;
- enter 192.168.0.1 into the address bar (the exact combination is usually indicated on a sticker on the router);
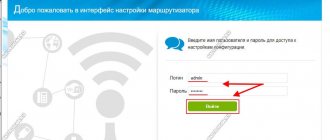
- enter your login and password in the window that opens (usually admin/admin, but the exact words are indicated on the sticker mentioned earlier);
- open a tab mentioning the connection;
- in the “type” line indicate IPoE;
- check the boxes next to offers to automatically obtain an IP address and DNS server address;
- save changes.
It is important to emphasize that in different router models the setup process may differ from that described.
Wi-Fi tariffs Rostelecom
There are no special tariffs that are compatible exclusively with the transmission of information via wi-fi, or that do not allow the use of wireless communications. Therefore, users are able to choose any tariff plan that suits them, without focusing on the type of equipment they have installed.
This will not affect the cost of providing services in any way, and the connection price will remain unchanged, no matter what the client decides on. The main thing is the convenience of the subscriber, and other nuances are not decisive. In addition, the choice of technology does not affect the provider’s actions in providing connected people with communications.
Related software
Rostelecom supplies some devices with a disk and software, this simplifies interaction with network equipment. For example, Huawei SmartAXMT810 can be quickly configured using software; for this you will need:
- Insert the disc and run the installer.
- After installation, the ADSL icon will appear on the desktop; by clicking on it, the user will see a window.
- Now you will need a keyboard - you need to hold down Alt + D at the same time to open a working window in which you need to open the “Config” menu. PPPoE should be selected as the connection type, and the VPI/VCI windows should have values corresponding to the region.
Table with values in various cities and regions
However, setting up a Rostelecom ADSL modem is possible through the web configurator, regardless of the brand and manufacturer.
How to find out who is connected to my Rostelecom wifi router
Having decided on the correct settings, you need to think about the security of your own network. After all, an unprotected switch is vulnerable not only to intruders, but also to unscrupulous neighbors who can take advantage of other people’s traffic.
The first sign that someone is stealing gigabytes is a sharp drop in connection speed, but to finally make sure that there are lovers of someone else’s Internet nearby, it’s worth looking at the list of connected devices.
To check who is connected to the Rostelecom wifi router, you will need:
- open the browser and enter the already mentioned combination in the address bar;
- log in using your username and password;
- open the “clients” section (in some devices the section name may be different);
- wait for a detailed list with a list of connected users to appear;
- determine which devices belong to strangers.
After that, all that remains is to disconnect them from the network and worry about reliable protection so that they do not re-join later.
How to block Rostelecom Wi-Fi from other users
There are several ways to block access to Wi-Fi. You should start by changing the password for authorization in the modem control panel. To change, you will need to log in using the method already mentioned above and set your own combination using the appropriate section. It is worth mentioning that some devices offer to replace the CD upon first login.
The next way to increase security is to change your network password. To change settings, use the same approach as described above.
The last, most reliable method is to set a special access mode, which involves independently creating an exact list of devices that can connect. To do this, you need to enable the MAC address filter and allow access to only a few devices, specifying their addresses for this.
Situations where a subscriber went a little overboard with security and accidentally forgot the set passwords deserve special consideration, limiting access to the Internet not only to attackers, but also to themselves. In such cases, you need to reset all settings to factory levels. The reset is done by long pressing the reset button on the router.
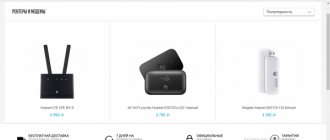
Which ADSL modem is better to choose?
ADSL Internet requires a special ADSL modem. It can be purchased at any digital equipment store or at the office of the Rostelecom provider. First, we'll look at camera equipment. Here we recommend using the Sagem Fast 2804 modem. This is an easy-to-set up model that can connect via ADSL and FTTh. Its essence is that if you have the opportunity to switch to optics, this can be done without buying another router - you will already have one.
Sagem 2804 includes a built-in ADSL modem that allows you to connect to the network at speeds of up to 24 Mbit/s by supporting ADSL2+ technology. When connecting via optical, the maximum speed will be up to 100 Mbit/s when connecting computers via wire and up to 150 Mbit/s when connecting via Wi-Fi (in reality, the speed will be slightly lower). The modem is supplied in original packaging with the Rostelecom logo.
Another recommended ADSL modem from Rostelecom is the Sagem Fast 1704 RT, which is suitable not only for the Internet, but also for digital TV. Equipment from D-Link is not recommended for purchase - experts say that it does not work well on bad lines, and does not meet the requirements for stability.
Other recommended ADSL modems:
- TP-Link TD-W8968 is one of the most popular models. The key feature is the affordable price, about 1700-1800 rubles. Functions – support for 3G modems for organizing backup Internet access channels, built-in print server (connecting a printer for use on a home network), file server support. The ADSL modem organizes a fairly impressive Wi-Fi coverage area; it is easily enough to fully cover a two-story brick household measuring 10*10 meters.
- Netgear DGN2200 is an ADSL modem from an old and successful brand. Characterized by stable and glitch-free operation. Equipped with two antennas, which significantly expands the Wi-Fi broadcast range. Users leave purely positive reviews about the device, rejoicing in its stability. There is also information about the proper quality of communication on lines with poor characteristics. True, the price is a little steep - an ADSL modem costs about 5,000 rubles.
- ZYXEL Keenetic VOX - network equipment of this brand was phenomenally stable even 30 years ago. Today this ADSL modem can be called perfection. It has received the maximum number of positive user ratings, it is stable on bad lines, allows you to create high-speed home networks, and there are two USB ports on board for connecting printers and external media for organizing local storage. There is support for SkyDNS and Yandex.DNS for filtering phishing and unsafe resources in conjunction with parental controls. The cost of an ADSL modem is about 4.5 thousand rubles. Expensive, but you will get a stable modem that can work even on old lines.
It would be more correct to call all the devices presented in the list routers with built-in ADSL modems. They work successfully with Rostelecom and are easy to set up. And the presence of WiFi modules makes it possible to connect all home devices to the Internet - from smartphones to Smart TV.
How to disable Wi-Fi on a Rostelecom router
To disable Wi-Fi on a Rostelecom router and use your home Internet directly via cable, you will need:
- enter the already mentioned control menu by entering a short combination into the address bar of the browser;
- open the WAN section (sometimes Interface setup);
- uncheck the phrase prompting you to activate the wireless network;
- save changes.
After which the connection will be impossible, and the person who was connected earlier will automatically disconnect. To restore the wireless network, you will need to re-visit the specified section and put the checkbox back. Nothing additional is needed.
If difficulties arise or there is no suitable section, you should call the support service and talk to consultants.