The capabilities of standard firmware sometimes do not satisfy the user's requirements, so it becomes necessary to update the router software. The firmware of the router occurs both by updating the installed program and by changing to new software. The Rostelecom router is updated in several cases: in case of unstable operation, device errors or periodic loss of communication.
Reflashing a router is unsafe, especially for inexperienced users. An incorrectly selected version or a sudden power outage can damage the router.
[edit] Method 1: Using the router's web interface
Reset your router settings to default values. This most likely won't be necessary, but if the router's memory or NVRAM is almost full, updating the firmware may damage it. Thus, it is recommended that you at least get to know the specific device in detail.
Perform a reset in the web interface (Administration → Factory Defaults in DD-WRT) or use an alternative method: Reset 30/30/30
Please note: Some devices cannot use 30/30/30 reset, including all ARM devices.
Reset Button: When the router is operating normally, hold down the Reset button until the lights start flashing (or up to 30 seconds). Be careful when using this method! Read the instructions for your current firmware to avoid problems.
Log in to the router's web interface. Javascript may be required for the web interface to work properly
Try a different browser if you encounter problems.
You will be prompted to enter your username and password. If your router already has a version of DD-WRT since February 28, 2006, the default username is root. In previous versions, the default username is empty. For both stock and DD-WRT firmware Linksys routers, the default username can be left blank or set to any value, and the default password is admin. For other routers, search the Internet for defaults.
Download the firmware. NOTE. When flashing from factory firmware, several flashings in a row may be required. See for more information.
WARNING: Do not interrupt the process while the router is flashing and rebooting. Do not turn off your computer, close your browser, or turn off your router during this process!
This section of the manual is written for the DD-WRT web interface. The factory firmware interface will be different. See section. Go to the Administration → Firmware Upgrade tab.
Optional: Select the Reset to Defaults option to reset the settings to factory defaults after flashing (note: this may cause problems when flashing).
Click the “Browse” button and select the downloaded DD-WRT firmware binary .bin file whose checksum has been verified.
Click the “Upgrade” button and wait for the redirection page to appear confirming the successful download.
Wait at least 5 minutes before clicking the “Continue” button. This depends on the router hardware.
If the firmware is successfully installed, you can now access the DD-WRT web interface at IP address 192.168.1.1.
Reset your router settings to default settings again. Do this only after you have verified that the router is working after the firmware update.
This is required when flashing from factory firmware! See section above.
In the case of upgrading the DD-WRT version, this is only necessary if there are large jumps in the build version, a kernel version change (for example, from 2.4 to 2.6 or from 2.6 to 3.10), or if there are problems. For the latter, reset, retest, and then search the forum before making a new post.
Possible errors when downloading firmware. If the DD-WRT web interface is not accessible after 10 minutes, try clearing the browser cache, updating the IP address (“ipconfig -renew” in the Windows command prompt window), performing another reset, or turning off the power.
Check the connection to the router with a Ping command: a TTL=64 response indicates normal operation, and a TTL=100 usually indicates a TFTP server waiting for the firmware to be downloaded. The TFTP server is typically only available for the first couple of seconds after power on. See Tftp flash article.
The firmware upload process may fail with an “Upload Failed” message if the wrong file type, kernel, or size of the DD-WRT firmware binary is used (or may simply “become bricked”). For example, this can happen if you use the wrt54g.bin file when you should have selected the generic version. Also, some routers may require the Mini build to be flashed before the full version. Make sure you have the correct version as described in the first section.
See the article Recover from a Bad Flash or try a different browser to download the firmware.
If you are unable to log in using the default username and password, please reset again.
Setting up the Sercomm RT-FL1 router
I will show how to configure the RT-FL-1 router for the Rostelecom provider, although it will work without problems with any other Russian telecom operator using the PPPoE or IPoE connection type (DHCP or Static IP). The local IP address of RT-FL-1 is 192.168.0.1. After connecting to the web interface, you will be required to authorize:
To do this, use the login admin , the password is unique for each router and is written on a sticker on the back of the case. Click the “Login” button.
After authorization, the device will require you to connect the provider’s cable to it and will provide a choice of how further configuration of the RT-FL-1 will be performed: manually or through a wizard.
Rostelecom router quick setup wizard
Everything here is as usual with most modern Rostelecom routers and, of course, the same as with the Sercomm S1010. It all starts with choosing your branch and service:
I will consider the most standard option - the Internet and digital TV. Click on the “Continue” button.
If your branch uses a PPPoE connection type, then the next step is to enter your login and password for the connection. But if you use Dynamic IPoE, then you will immediately go to the IPTV settings:
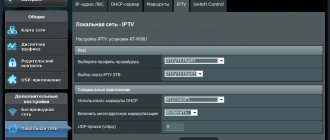
Here we select the port into which the TV set-top box will be connected. In some branches of Rostelecom, for example in our Saratov branch, the service model for providing IPTV services implies the need to also register a virtual network identifier VLAN ID. You can find it out in technical support.
Click on the “Continue” button and go to the WiFi wireless network settings:
You need to come up with a name for the router's wireless network. I would advise changing the factory Wi-Fi password to your own. Try to make it as complex as possible and at least 8 characters. Let's move on.
At the final stage, we check everything again, remember the passwords and click on the “Apply settings” button.
The router will reboot and return to us in about 2 minutes with new settings. You can connect gadgets and a set-top box and check the work.
How to configure the RT-FL-1 router via the web interface
Now let's look at setting up this router manually. This is suitable if you can’t do this through the wizard or if you like to check the boxes yourself.
To set up an Internet connection, in the interface menu, open the “Basic Settings” → “Public Network (WAN)” section.
Here we need to create a new connection, for which we need to click on the “ADD” button. A connection settings pop-up window will appear:
If your branch uses the PPPoE connection type, then select this protocol in the appropriate field. Below, in the “Username” and “Password” fields, enter the authorization data that was provided to you by Rostelecom when concluding the agreement. We don’t change anything else and click the “Save” button.
But if your provider uses “Dynamic IP” (IPoE), then in the “Connection type” field put the value “DHCP”.
In principle, you usually don’t need to change anything else - just click on the “Save” button.
Now you can launch your browser and check your Internet access.
Digital television IPTV
The service model for connecting interactive TV in Rostelecom involves connecting a set-top box to a separate LAN port, which must first be configured. To do this, on the Sercomm RT-FL-1 router, open the “Basic Settings” → “VLAN Settings” section.
Typically, a TV receiver uses the 4th LAN port. We find it in the table and change the operating mode to “Bridge”. If in your branch, for IPTV to work, you need to specify a VLAN ID, then in the VLAN field you need to enter the virtual network number, which you must first find out from technical support. In the “Priority” field you must set the value “4”. Click the “Apply” button.
In some Rostelecom branches, you must additionally enable IGMP Proxy for interactive TV to work. This can be done in the “Basic settings” → “Digital TV” section. Here you just need to move the slider to the “ON” position and click on the “Apply” button.
Setting up WiFi on RT-FL-1
Almost all the Wi-Fi wireless network settings required by the user on the Sercomm RT-FL-1 router are on one page, which can be accessed through the “Wi-Fi” → “General” menu section:
The page is divided into two parts - parameters for the 2.4 GHz band and for the 5 GHz band, respectively. We act the same way both there and there. The first is the line “Wi-Fi name (SSID)” - here you need to come up with and enter the name of the wireless network. The second is the lines “Protection mode” and “Encryption type”. Use only WPA2 and AES encryption. The third is the Wi-Fi password, which is located in the “Network Key” line. Create a password that is as complex as possible, consisting of letters and numbers, at least 8 characters long, and click the “Change Key” button. After all the settings are made, click the “Apply” button.
Note: To increase the security of your home Wi-Fi network, I would strongly recommend disabling the WPS function:
To do this, open the “Wi-Fi” section in the main menu, and then the WPS subsection in the menu on the left. On the page that opens, move the switch to the “OFF” position, and then click the “Apply” button.
How to open a port on the Sercomm RT-FL-1 router
On this router model, there are three options to open the port for gaming or file sharing.
The first method is the UPnP function, which allows you to forward ports on the Rostelecom router automatically at the request of the application. To enable it, go to the “Advanced” → “UPnP Protocol” section and move the only slider there to the “ON” position.
Don't forget to click the "Apply" button to save the settings.
The second way to open a port is through the “Port Forwarding” subsection:
Here you need to create a new rule for each port using the “ADD” button.
In the window that appears, write the name of the application or game, the IP address of the computer for which we are forwarding, the protocol (TCP, UDP or both at once) and the port number. In the “WAN Interface” list, you must select the interface through which Internet access is configured. Click the “Save” button. A new line should appear in the rules table:
Well, the third way is a demilitarized zone DMZ. It provides immediate access to all ports of one of the computers on the local area.
The function is enabled in the “Advanced” → “DMZ” section. Move the slider to the “ON” position and enter the computer’s IP address below. Click the “Apply” button and check.
PROS and CONS of flashing the Rostelecom set-top box
Reflashing hardware is a process that anyone can do. But at the same time, the operation is labor-intensive and requires certain knowledge. Therefore, before updating, you need to understand why the flashing procedure is performed at all.
Self-flashing is a controversial process. On the one hand, performing the procedure entails several advantages. On the other hand, reflashing can lead to dire consequences. In this regard, it is recommended that you familiarize yourself with all the advantages and disadvantages of flashing before engaging in this procedure.
Pros:
- Possibility to increase the number of available channels.
- Additional opportunities may become available.
- Installing good firmware will speed up the interface.
Minuses:
- Some pre-installed services, such as weather or exchange rates, will probably disappear.
- Deterioration in operational stability cannot be ruled out.
- After flashing, the set-top box may stop working.
Alternative firmware for Rostelecom set-top box for free viewing of all channels
Official firmware for the Rostelecom set-top box software is required only in cases where the client is not satisfied with the performance of the system. After the update, subscribers' equipment begins to work faster, but at the same time the channels that were previously available by subscription remain open. For many, flashing is a process that allows you to open blocked channels. This way, customers avoid having to pay unaffordable subscription fees.
The informal update process also requires some preparation. So you should make sure that the equipment meets the following parameters:
- There is a flash drive, the volume of which does not exceed 8 gigabytes.
- The USB storage device is in FAT format.
- There is a folder on the flash drive with the name of the console.
- The folder contains the Bootstrap and imageupdate files, as well as utilities from the preparatory stage.
In addition, we must not forget about resetting to factory settings. Without this operation, the update is unlikely to install correctly. If all conditions are met, you can proceed to flashing the equipment.
How to hack a Rostelecom console through the menu
The process of reinstalling software from official to unofficial is similar to the procedures that were described earlier. But still there are a few exceptions.
To hack a console through the menu you need to:
- Connect the flash drive containing the firmware to the equipment:
- Turn on the set-top box.
- Enter settings.
- Select "Software Update".
- Click on “Update via USB”.
- Click on “Start”.
- Wait for the installation to complete.
The update process is completed by rebooting the set-top box. After the first turn on, the user will see that absolutely all channels are unlocked. If problems arise, it is better not to contact Rostelecom, as company employees may notice that the equipment has been hacked. And this will lead to sanctions.
Alternative firmware via BIOS parameters
BIOS or engineering menu is another way to install alternative firmware. For flashing, the same tools are used as in the case of installing updates using the standard interface.
Firmware flashing via BIOS is performed in several steps:
- Insert the USB drive with the necessary files into the console.
- Turn on the equipment.
- Press and hold the “MENU” button on the remote control.
- In the menu that opens, click on “Ugrade Tools”.
- Select “USB Bootstrap”.
- Click on “OK” and wait for the installation to complete.
In conclusion, it is worth noting once again that all the described actions for alternative flashing are performed at your own peril and risk. In this case, Rostelecom cannot guarantee support, since by removing the block from the channels, the client is engaged in illegal activities.
Voice
Article Rating
Preparatory work
Regardless of the brand of the router, its installation follows the same rules - it is important to avoid the presence of electrical appliances working nearby, and also take into account that walls and partitions between rooms can cause an insufficiently high-quality signal from a wireless point. Look at the back of the device
All available connectors are displayed on it, with the exception of USB 3.0, which is located on the side. The connection to the operator’s network occurs via the WAN port, and local equipment is connected via Ethernet 1-4. The reset and power buttons are also located here.
Look at the back of the device. All available connectors are displayed on it, with the exception of USB 3.0, which is located on the side. The connection to the operator’s network occurs via the WAN port, and local equipment is connected via Ethernet 1-4. The reset and power buttons are also located here.
Reset previous settings
Resetting the parameters that were entered into the router system is very simple. On any model there is a special “reset” button for this. To prevent the user from accidentally pressing it and resetting the system to factory default, the developers hid the button in a special recess. You can press it with any thin stick, for example, an ordinary paper clip. To reset, you must press and hold for 10 seconds.
The fact that the Rostelecom modem is ready to establish a new connection, and the system has been updated, will be notified by a sound signal or the simultaneous lighting of all lights.
After which you can connect the Rostelecom device to another network using wires.
In order to start installing a new Internet, the user needs to find out the details of the third-party provider:
- login information (login, password);
- connection type (PPPoE, L2TP, dynamic);
- connection basics: whether binding is carried out via MAC, IP address (if necessary).
How to reconfigure a Rostelecom router to another provider
What are the differences between 3G and 4G networks: features, advantages and disadvantages
When changing your provider from Rostelecom to another, it is important to reconfigure the modem. Algorithm for connecting to the provider:
- Reset old settings.
- Login to “Device Management”.
- Entering new parameters.
To reset the settings, the model has a Reset button. It must be pressed and held for 10 seconds, after which the Rostelecom modem must be connected using wires.
To establish a new connection, you must enter your login and password, connection type and basic information.
To configure the router to work with a new provider, you need to go to “System Data”, where you enter your login and password.
You may need firmware for the device. Internet settings and Wi-Fi connection data (username and password) are also required to change.
Specifications
Smart is a completely standard device, the price of which varies from 2000 to 3000 rubles. To connect a Beeline router to another provider, you should study the device parameters, and then perform the firmware. Characteristics:
| Parameter | Meaning |
| Name | (SSID) default |
| Modes | DHCP client, Static IP, L2TP |
| WiFi | 802.11b/g/n 300Mbps, 2.4GHz and 5GHz Dual Band, Guest Wi-Fi |
| WAN/LAN | Fast Ethernet LAN and WAN ports |
| Connection speed | 100 Mbit/s |
| USB port | 1 USB 2.0 |
| IPTV support | Dedicated LAN port and IGMP proxy |
| Range | 2.4 GHz - 2G; 5 GHz - 5G |
| Status | Current version - 2.0.22 |
| Address bar | 192.168.1.1 |
How to flash a router based on new Asus firmware
I'll start with an example based on new firmware. When I say “new”, I don’t mean the latest versions, but the type of interface (globally, as far as I know, Asus had two types: the old interface (clear and convenient) and the new one (drawn and cumbersome)). In general, from the screenshots you will understand what I mean. Let's go.
First, let's go to the web face (that's what I call the web interface) of the router. To do this, launch any browser (IE, Mozilla Firefox, Google Chrome, etc.) that is installed on your computer, and enter 192.168.1.1 in its address bar (for some routers this may be 192.168.0.1). After this action, you will be asked to enter a password:
If you have never changed your password, then most likely it will be admin and admin (login and password, respectively), if you have changed, then enter yours. Once inside, we move to the tab “Advanced settings – Administration – Save / Load / Restore settings”:
Where, in fact, we need to reset the settings to factory settings.
Note: just in case, you can first save the settings file using the corresponding button. However, I strongly recommend not using the saved settings file after migrating to a new firmware version, but reconfiguring it manually after the reset. Thus, saving the settings file is a special insurance case if suddenly something went wrong and you had to return to the previous (the one that was installed before the start of the firmware) version of the firmware (only in this case I allow the use of a previously saved file) .
This is done by clicking the “Restore” button. After waiting for the factory reset process, we re-enter the router’s web interface (this time entering the factory admin and admin) and go to the “Advanced settings - Administration - Firmware update” tab. Click the “Browse” button and point to the downloaded and unpacked firmware file.
Next, we methodically wait for the process to complete, once again enter the web interface and - this is important - do another reset to factory settings in the new firmware. If after flashing you have a request to run the setup wizard, then for now we can safely reject it
Since, most likely, your interface (and its language) changed after switching to alternative firmware from Oleg, I’ll tell you how it’s done:
Go along the path “System Setup – Factory Default” and click the “Restore” button. Next, we wait for the reset process without touching anything or pressing anything.
When do you need to reflash your router?
Despite the fact that developers create new versions of updates, it is not always necessary to flash the device. Reflashing is necessary when there are frequent problems in transmitting and receiving data, the connection is interrupted, and the user has to reboot the gadget. Updating the device to the latest version helps solve the problem, but before flashing, you need to make sure that the problem is in the router.
When signing an agreement for the use of services, the client is connected to the home Internet at the stated speed. It is worth familiarizing yourself with the terms of the tariff and testing the current speed of data transmission and reception. Special services for checking the speed of your Internet connection will help with this.
If the digital values differ from the declared indicators, then you need to contact the operator, he will help solve the problem. If the problem still remains after calling technical support, then you should download the update.
Internet
There are no particular problems when configuring SAGEMCOM 2804 v7 from Rostelecom. All manipulations are performed through the interface. First, we recommend that you register the route “192.168.1.1” and enter authorization data. For a new product, enter the keyword admin in both fields, and if no changes occur, then click reset.
So, the setup begins with creating a PVC connection. Find the item “ATM PVC Interface”. Having done this, click on “Add” and set the following parameters:
- VPI/VCI - 0/33;
- Encapsulation mode - LLC;
- DSL Link type - EoA.
Then add a connection through the “WAN service” (click on “Add” in this window). It is recommended to set the physical interface to the atm0 position.
Interestingly, the network here can be selected as “Bridge” or “Router”. The system will prompt you to make this choice during setup.
When using a PPPoE connection, enter the following data in the fields provided:
- login/pass — enter the data provided in the agreement;
- To avoid repeating PPP authentication in case of an error, check the box next to this item;
- service name - come up with a name for your network;
- auto authentication.
Also enable Firewall and NAT (these fields may be missing in some firmwares). There is no need to touch other fields, click “Apply”.
Now re-enter the login/pass of the router issued by , and then reboot the device to get started.
Connection and Setup Basics
In order for everything to work, and you can access the Internet from any device, you need to correctly configure the TP Link Rostelecom router. There are two options here - getting automatic settings or the manual method.
Automatic method
- Open the packaging box and review the included accessories - among them there should be a cable with connectors for LAN ports (usually yellow).
- We connect the router with one end of the cable, and, for example, a laptop with the other.
- Now we need a cable through which the Internet is supplied to the apartment. We connect it to the connector marked WAN.
Now you need to configure the tp link router. To do this, we need to go to its web interface; the address can be found from the information indicated on the packaging box. Usually it is the same for all types of models - 192.168.0.1, or you can simply enter the address manually tplinklogin.net. The address is entered in the search bar of any browser. The authorization page will open, here you need to enter admin in two fields; if this does not work, then check the input data on the equipment label. Then you should indicate your personal data and location - fill in all fields correctly, do not forget to indicate the name of your provider. In the next window you need to fill in the data to log into your personal account as a network subscriber. All this is stated in your agreement for the supply of Rostelecom services.
We looked at the automatic settings method. If after all the manipulations the Internet pages do not open, then you can set the settings manually, which is discussed below.
Manual method
- Open the web interface of the TP Link router for Rostelecom and enter the settings mode.
- Here you need to select the network parameters - WAN, and specify the type - PPPoE.
- Then you must again provide your login and password information.
- At the bottom, click the option to save without changing anything else.
- A direct connection through the router should work.
Now you need to set the values for the output of other devices via Wi-Fi wireless technology:
- You also need to open the interface and select the “Wireless Connection” tab, and then “Settings”.
- Look on the box for the name of your equipment, this will be the name of the network, it should be entered in the appropriate field.
- Everything else can be left unchanged.
- We go to the connection protection block - here you need to enter a password, also indicated on the box.
- Save your changes and reboot your computer.
Now your personal wireless network is protected; the built-in software will filter out unwanted requests from intruders.
Conclusion
Updating the firmware of a router from Rostelecom is an action that requires attention and accuracy. An incorrectly selected version of the router or power surges during installation can damage the device and cause it to fail. By following each step of the router flashing algorithm, you can configure the device yourself without calling a technician.
«Rostelecom
» is a leader in the field of providing access to the Internet via protocols: ADSL, PPPoE, GPON and others.
Setting up the router
D-Link Dir-320 for
Rostelecom
: device preparation,
firmware
, setting provider connection parameters in auto-i.
Setting up the router
"
Rostelecom
" TP-Link: general information, connection, automatic and manual methods.
Organizing a secure connection, connecting IPTV via a router
. The most common mistakes.
When changing residence, or concluding an agreement with an operator, the subscriber will need to set up an Internet connection. If a person does not want to change equipment, he should know how to connect a Rostelecom router to another provider. This is quite easy to do, since all modems and routers work on the same principle.
Algorithm for connecting a modem to a third-party operator:
- Reset previous settings.
- Login to device management.
- Entering new data.
Depending on the router model, some items may differ slightly.
Firmware update
Updating the router firmware is an update to the operating system. It is similar to a computer program, but only works with a wired or wireless (Wi-Fi) network. Popular firmware: Linus, Windows 10 ZyXEL and others. There are alternative firmwares.
Router manufacturers, increasing the stability of their devices, release free operating system updates. You can download the updated firmware file from the manufacturer's website. For example, the updated firmware of the Sagemcom 1744 v4 router replaced the earlier versions of Sagemcom 1744 v2 and v2 2. All 3 versions are configured almost identically. The process of installing the firmware is a little complicated, but for beginners there is a special guide called the “Quick Setup Wizard”.
Automatic router firmware update
For routers used by Rostelecom, there is a common set of parameters for all. These include:
- login and password “admin”, in some models this may be “1234” or an empty string;
- connection type PPPoE;
- login/password pair from Rostelecom;
- VPI and VCI.
Some devices have a built-in automatic firmware update system. You need to go to the web configurator and find the lines “Basic version” and “Updates”. If there are updates, click the “Available” sub-item. On the page that opens with a list of components of the base system, click the “Update” button. The router flashing started automatically.
The device's operating system automatically updates and reboots. At the end of the process, the settings are checked and the provider’s cable is connected to the WAN connector.
How to reflash a modem or router via a computer
Updated firmware for Rostelecom routers is downloaded from manufacturers’ websites using the link posted there. The IP address 192.168.1.2 or 192.168.0.2 is registered on the computer. In the web interface you need to find the “Advanced settings” section. It may be called "System" or "Administration".
Select the “Firmware Update” tab from the menu. In the list of buttons that appears, click “Browse”, select the “Firmware” file and click the “Submit” button. The device flashing starts. When the process is complete, the browser will display the interface again. For GPON ONT terminals there is no need to change the firmware when switching to EPON technology
How to reconfigure a Rostelecom router to another provider
You can reflash the Rostelecom router for another provider yourself. The process consists of the following stages:
- resetting the settings of the previous provider;
- finding out information for connecting to the Internet from a new provider;
- Configuring the device using new parameters.
To reset the contents of a file that is not supported by the new provider, you need to go to the router and click the Reset or “Reset” button. It can be found on the back panel. You need to press for at least 15 seconds. We reset the settings and the router will automatically reboot.
The new provider receives the following data:
- connection type: for dynamic IP, information about the parameters is not needed; for statistical IP, PPPoE, PPTP or L2TP, you need to know the IP itself, server address, login, password (this data is in the Internet connection agreement);
- presence of binding by MAC address;
- MTU value.
Setting up the router begins by connecting the cable from the new provider. It is inserted into the WAN connector. The Administration page opens. You need to add data from the contract with the new provider to the appropriate boxes. Next, the Internet network is configured in the WAN tab. Set wireless connection parameters. To do this, set the WiFi password and the value of the standard user.
How to reflash for another operator
Many people ask whether Rostelecom router firmware is available for all operators. This is possible if you follow these steps:
- reset old settings;
- go to Device Management;
- Enter new data for the operator.
To reset the settings, click on the Reset button located on the back of the device. To activate it, the key must be pressed and held for ten seconds. After this you need to do the following:
- Connect the Rostelecom router to your PC or laptop via wires.
- Enter your login IP, login and password.
- Specify the connection type and basic connection information.
Instructions on how to flash a Rostelecom router for another operator involve going through the steps discussed above. The main thing is to enter the parameters for the new operator after the reset.
About the backup
To restore settings, there is a chance to create a backup copy. Backup is one of the most reliable ways to save entered data. The algorithm is similar for different models, only the names of the buttons may differ. The format of the downloaded files also differs: for TP-Link the document will be in binary BIN code, for other models it will be in text JSON.
Saving the settings of the Rostelecom router is done as follows:
- In the “Control Panel”, select the “Backup and Restore” item.
- Click the “Backup” button, then select a file and download the archive with the configuration file.
- Then click “Save”.
The recorded data will remain in the computer's memory, and you can always return to it. To restore the settings, click the “Restore” button and specify the path to the address with the settings file.
After this, you need to reboot the Rostelecom router.
How to update the firmware of a TP-Link router
Classic software updates are much easier. You can also download the current version of the software on the official websites of the manufacturers. At the same time, in d link dir 615, d link dir 620, d link dir 300, and their analogues, it is worth taking into account the revision number, which affects stable operation.
The further work process is as follows:
- Connect the receiver to the computer via the LAN port;
- Enter the IP subnets in the browser line (default – 192.168.1.1), after which the basic user access panel will be displayed on the screen;
- The client will now need to log in. The basic combination “admin” must be entered in both fields provided;
- The choice of further category depends solely on the version and model of your router. You need to find the section “Software Update”, “Upgrade” or their equivalents. Detailed instructions can be found in the official documentation;
- Select the previously downloaded firmware version and download it. Confirm your actions and reboot your device.
Considering how to update a zyxel keenetic router, the above process is also relevant for zyxel keenetic lite, zyxel keenetic 4g, as well as for models from Rostelecom - rt n12 and other analogues.
Logging in and setting up a router for another provider
To configure a Rostelecom modem to work with another operator, you need to go to its system data. Depending on the type of connection, you may be required to enter a login and password. Instructions for entering information into the modem parameters can be found on the website of the connected provider.
If the router does not allow you to change data for a third-party operator, the user will have to reflash it. Free latest versions, which are always available on the device manufacturer’s website:
- ZTE - https://zte.ru/enterprise/products/routers/;
- TP-LINK – https://www.tp-link.com/ru/products/list-4691.html;
- Sagem - https://sagemcom.ru/catalog_3.htm;
- D-Link - https://www.dlink.ru/ru/products/5/.
For correct operation you will need to change:
- Internet settings;
- Wi-Fi connection (name, password).
Thus, if necessary, each subscriber can configure the Rostelecom router for another operator by resetting it and setting new parameters.
Router is translated from English as router. A device with its own operating system is used to connect users to the Internet.
Firmware updating of a Rostelecom router, like models from other manufacturers, is performed when it is necessary to improve its capabilities and performance. The new operating system is installed in the router's persistent storage device.
Standard firmware update methods
The ability to update the router firmware using standard means is provided by the manufacturers. Here we will talk about general principles; special cases may differ depending on the model of your device.
Download the firmware
First, you need to download the firmware for the router from the manufacturer’s official website.
Please note that one router model may have several hardware versions. The firmware should be selected taking into account the hardware version of the device
Trying to flash a Wi-Fi router with the wrong firmware can lead to its failure.
Connecting to the router
We will assume that you downloaded the firmware and unpacked it into a separate folder. Next, go to the router’s web interface. As a rule, to do this, you need to type the address 192.168.0.1 or 192.168.1.1 into your browser (there may be other options).
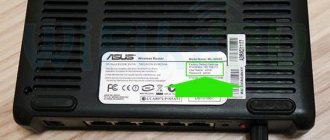
Typically, the connection parameters to the router are indicated on a sticker. It is located on its back side.
For example, the photo below shows a sticker from the ZyXEL Keenetic router. It shows a default IP address of 192.168.1.1. To connect you will need a login and password. In this case, the login is admin, and the password is 1234. On many models, the default login and password are the same: admin/admin.
Flashing
Find the software update item in the menu. For TP-Link and D-Link routers it is usually called: Firmware update. Models from other manufacturers may have their own options. For example, “Firmware update”. Through “Browse” we indicate the path to the firmware file and click the “Update” button. We are waiting for the process to complete. At the end the router will reboot. The firmware has been updated.
Until the update is completed, you cannot turn off the power to the router and restart the computer.
TP-Link example
In system tools, select “Firmware Update”. The current firmware version of the router and its version are immediately displayed here. Select the firmware file. After that, click the “Update” button.
Example ZyXEL
In the system, select the “Firmware” item. The firmware version is displayed there. Upload the firmware file (downloaded firmware) and update it.
Where to download the firmware
One of the main questions that needs to be resolved before installation is where to download the firmware for the Rostelecom router. Here you need to focus on the manufacturer. Let's look at the main options:
- ASUS. To search for firmware, follow the link asus.com/ru/support, then enter the name of your router in the search bar. Next, go to the Drivers and Utilities section to download the required firmware.
- D-Link. Before flashing your router under Rostelecom D-Link, go to the link ftp.dlink.ru/pub/. There, select and download the desired version.
- Zexel. Owners of ZyXEL routers need to go to zyxel.com/. Now select your device, go to the Files and Downloads section, and then find the required file in Firmware.
- ZTE. To obtain information, you can go to the website zte.ru and contact the support service with a question about your model.
- TP-Link. To download the firmware for the Rostelecom TP-Link router, follow the link tp-link.com/ru, go to the Support section, and then enter the name of your device. Next, find the software in the list, download and install it.
- Linksys. To update Linksys routers, go to linksys.com/ua/support, specify the modem model and search. After that, download the firmware for the router.
Now you know where to find the software needed to update the program.