When changing residence, or concluding an agreement with an operator, the subscriber will need to set up an Internet connection. If a person does not want to change equipment, he should know how to connect a Rostelecom router to another provider. This is quite easy to do, since all modems and routers work on the same principle.
Algorithm for connecting a modem to a third-party operator:
- Reset previous settings.
- Login to device management.
- Entering new data.
Depending on the router model, some items may differ slightly.
Are private houses connected?
As a rule, in cities the connection is free for everyone. This is due to the fact that in large and medium-sized cities the infrastructure has been established and the necessary cables have been laid. As for small settlements with private houses, there are some peculiarities here; there may not be technical capabilities (laid communications), so to connect such objects it is proposed to lay a fiber optic cable or telephone line. Fiber optic connection costs 99 rubles for the minimum tariff.
What should be done?
Usually, when we set up a router from scratch, we go through the following steps:
- Connection
- Login to settings
- Internet
- WiFi
- Change Password
- Additional settings
If your router has already been configured correctly, you only need to change the third step - reconfigure the Internet. To do this, you need to know how the provider provides access. You can find out this either in the contract or by calling his hotline.
Main connection types in our country:
- PPPoE - requires a login and password, the most common option.
- Dynamic IP - the Internet will work immediately as soon as you connect the router.
- Static IP, L2TP, PPTP are less common and require additional data such as IP addresses, but this is also specified in the contract.
Those. at this stage you need to pick up the contract and find out the type of connection and all the information necessary for it.
How long does a wifi router last and how often does it need to be replaced?
WiFi router is a fairly unpretentious device. And with the initially high quality of production, it lasts quite a long time. For example, I still have a 2011 router and it could easily continue to work if it had not broken down due to a power surge in the outlet. But there is one thing.
As technology improves every year, any electronics will eventually become obsolete. Let me give you a simple example. 10 years ago, at the dawn of WiFi, all network equipment operated in the 2.4 GHz frequency range.
When wireless devices appeared in large numbers in every home, the airwaves became so clogged that today it is simply impossible to normally use the Internet in an apartment building at 2.4 GHz.
Accordingly, a new operating range of 5 GHz has appeared, with which old routers and wireless adapters do not work. What to do? If you're happy with the low speed, that's okay, keep using it. If you want to constantly maintain high speed and stability of the network, watch videos in high quality, play modern games, then the requirements for equipment are increasing from year to year. This means that all equipment must be changed periodically. Fortunately, not so often - once 5-7 years will be enough.
Firmware download links
Rostelecom has its own program for different types of routers. You can find out the model at the bottom or side of the device sticker. It is recommended to download the firmware from the following links:
- For D-Link, the firmware is obtained from the website ftp://ftp.dlink.ru/.
- For ASUS, go to the official website in the “Support” section https://www.asus.com/ru/support/, write the device name in the search bar, go to the “Drivers and Utilities” section, download the appropriate program and update the router.
- TP-Link: you need to go to the website https://www.tp-link.com/ru/, write the name of the modem and in the “Support” item find the necessary flashing and install it.
- Zyxel: on the website https://www.zyxel.com/ru/ru/ you select a device, in the “Files and Downloads” section in the “Firmware” block the document is downloaded.
- Sagemcom: in the list of devices on the website https://sagemcom.ru/catalog_15.htm, select a model and download its program.
- Linksys: similarly, on the website https://www.linksys.com/ua/support/ you need to select a modem, click on the Download Software link and download the software.
- ZTE: https://zte.ru/enterprise/products/routers/.
Is it safe
Above we looked at whether it is possible to flash a router with Rostelecom. This is easy to do if you perform the automatic update or follow the steps required for a manual installation. The only risk in doing the job is the possibility of system failure. For such cases, it is better to use backup, which allows you to restore data in case of unsuccessful firmware.
Depending on the model, the algorithm of actions may vary. Let's look at the example of TP-Link:
- Log in to the Rostelecom router that you plan to reflash.
- In Control Panel, find Backup and Restore.
- Click on Backup, select a file and download the archive with the configuration file.
- Save your data.
The received information remains in the memory of the PC or laptop, which allows you to restore the data in the future.
Logging in and setting up a router for a new provider
In order to install a new APN access point and distribute Wi-Fi, the client needs to reconfigure the router. The user will need to enter the device menu. Step-by-step instructions for gaining access to the router interface:
- Turn on the router, personal computer or laptop, check the functioning of the gadgets. The user will need to take a short cable and connect it to the router socket. Insert the second end into the computer’s USB port (it is advisable to use the connectors not on the front of the system unit, but on the opposite side);
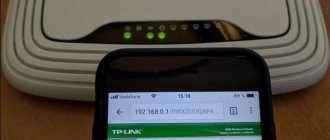
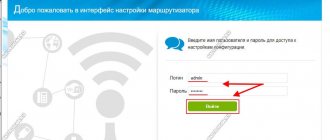
- The user needs to open any web browser and type the combination 168.0.1 or 192.168.1.1 into the address bar. After this, press the “Enter” key and the page will begin loading. A window will pop up where you will need to provide data (username/login and password) for authorization;
- By default, enter the word “admin” in both lines and press the OK key. If the command is incorrect, then the user should copy the data from the label on the router case. The address at which you should log into the device interface is also indicated. Using this data, the client will be in the router menu;
- Depending on the router model, the user will need to indicate the city and region in the lines. You will need to set a password for the router administrator. Use the prompts to fill in the fields. Some gadget models are not equipped with such sections, so if there are no windows, you can continue setting up;
- You need to go to the “Network” or “WLAN” section, and then hover your mouse over the “Basic Settings” command. On this page, the user needs to specify the name of the new Wi-Fi access point. The network name is indicated in the SSID line, then the password is entered twice for authorization. In the same window, you can limit the number of connected devices so that there is no unnecessary load on the device when receiving and transmitting data;
- Next, the client needs to left-click on the “Security” section. To prevent strangers from connecting to the user’s network, you should select a secure connection. So the router setup is complete.
If the computer does not detect the network, then you will need to do several operations. All other devices (tablet, TV, smartphone) must be connected to the access point. Instructions for synchronizing a personal computer:
- You need to click on the “Start” command, and then hover over the “Control Panel” item. In the window that opens, select the “Network and Internet” section (or similar);
- You need to select the “Create a new connection” command. Depending on the version of the Windows operating system, the name of the item may differ, then you should select a similar command. Next, you will need to right-click on the new Internet connection and click on “Properties” in the options window that appears. Execute the commands indicated in the picture;
- If the new operator’s contract does not specify an IP address, you need to pay attention to the “Properties: Internet Protocol Version 4” window. You should click on the “Obtain an IP address automatically” item and enter the same digital indicators. Click OK, saving the specified parameters. The computer setup is complete.
How to connect to Rostelecom
To use Rostelecom services, you must connect to this provider and sign an agreement. First, you should visit the provider’s website and study the proposed tariffs. They are different, and the prices depend on the connection speed, which ranges from 3 megabits per second to 100. The minimum price tag is 450 rubles per month, there is a tariff for 850 rubles. Once you have chosen the appropriate tariff, you can submit a request. This is done in two ways:
Over the phone, the manager will tell you what is required of you, and after receiving the necessary data, he will accept the application. The second option is calmer and can be used at any time of the day. On the provider’s website, in the “tariffs” section, just click on the selected “Connect”. Then a window will open with a questionnaire form, which you need to slowly fill out. Please enter your personal information and connection address carefully. The status of the application can be tracked by notifications by email or SMS. When filling out the form, pay attention to the possibility of renting a router; if you don’t have one, check the box and select a convenient time for a technician to come and connect. Once completed, click “Connect”.
Possible connection diagrams
Rostelecom subscribers can connect Wi-Fi on their computer in two ways. The first is using a Rostelecom modem with a wireless network distribution function, it simultaneously receives connected Internet traffic and works through Wi-Fi. Since this is usually not the most convenient and reliable method, we advise you to proceed according to another option, such as connecting the device. It assumes the presence of both a router from Rostelecom and a modem. In this case, you can connect not to a computer, but to a router, since they work in pairs. It is important that when you connect a modem to a computer, Wi-Fi will not work while the computer is turned off. Distribution using a router is possible around the clock.
Conclusion
Updating the firmware of a router from Rostelecom is an action that requires attention and accuracy. An incorrectly selected version of the router or power surges during installation can damage the device and cause it to fail. By following each step of the router flashing algorithm, you can configure the device yourself without calling a technician.
» is a leader in the field of providing access to the Internet via protocols: ADSL, PPPoE, GPON and others.
D-Link Dir-320 for Rostelecom
": preparing the device, updating
the firmware
, setting the provider connection parameters in auto-i.
« Rostelecom
» TP-Link: general information, connection, automatic and manual methods.
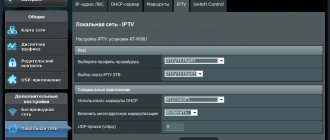
Organizing a secure connection, connecting IPTV via a router
. The most common mistakes.
At the moment, Rostelecom is one of the largest Internet service providers in Russia. It provides its users with branded network equipment of various models. The current ADSL router is Sagemcom 1744 v4. It is its configuration that will be discussed further, and owners of other versions or models need to find the same items in their web interface and set them as shown below.
Preparatory work
Regardless of the brand of the router, its installation follows the same rules - it is important to avoid the presence of electrical appliances working nearby, and also take into account that walls and partitions between rooms can cause an insufficiently high-quality signal from a wireless point.
Look at the back of the device. All available connectors are displayed on it, with the exception of USB 3.0, which is located on the side. The connection to the operator’s network occurs via the WAN port, and local equipment is connected via Ethernet 1-4. The reset and power buttons are also located here.
Check the IP and DNS protocols in your operating system before configuring your network equipment. The markers should be opposite the “Receive automatically” items. Read about how to check and change these parameters in our other material at the link below.
Setting up a wireless connection
In order to activate Wi-Fi, you need to open the Interface Setup section in the settings of the Rostelecom router. After this, you need to go to the Wireless section and act as shown in the image:
In order to avoid problems in the future when connecting devices to Wi-Fi, you need to select the WPA/PSK authorization type and assign AES as the encryption method.
The SSID column contains the name of your Wi-Fi network.
In the Pre-Shared Key field, enter keys for wireless Wi-Fi channels. You need to select a key with a number of 8 to 63 characters.
If the user has files that contain ready-made settings for accessing the modem from Rostelecom, you need to open the Maintenance window among the settings, and then Firmware.
Click on the review field and try to find a file that contains ready-made installations (its name is usually romfile.cfg).
If the name contains extraneous letters or an extension value, the modems will generate an error and you will see a fault message.
If there are no errors, the Rostelecom program will automatically configure the Wi-Fi router through the built-in modem settings.
Do you need a backup?
Updating programs in Qtech Rostelecom and other brands of routers does not require resetting the settings, and you can do without a backup copy. But there are different situations, and it is better to create and preserve it. To do this you need:
- go to the “Settings” of the router;
- open the “System Tools” folder, select the “Backup and Restore” section;
- select the “Backup” button.
The backup copy is saved in the "Downloads" folder with a bin extension. It is important to have a backup copy of your ADSL modem settings. It may be needed to configure the device after flashing.