Greetings! In this article we will talk about a special DSL modem with 3G routing capabilities. We will talk about setting up the TP-Link TD-W8968. Standard step-by-step instructions with additions and nuances from our experience.
We write hundreds of similar instructions for each model of router or modem - and over time we can omit very important details. Therefore, if you still have a question or an addition, just write about it in the comments to this article. You can certainly help other readers solve their problem!
The instructions are perfect for setting up Rostelecom, as well as for other providers and cellular operators. Watch and try!
: Connect your devices according to the picture below. Step...
Page 3
- Image
- Text
3
Step 1:
Connect your devices according to the figure below.
Step 2:
Turn on all network devices and check the LED indicators.
Open your web browser and enter
192.168.1.1
V
address bar, press Enter
.
Note
If you were unable to log into the web configuration utility using 192.168.1.1, see the question 3
in the
Troubleshooting
.
POWER: Lights up
ADSL: Lights up or flashes
WLAN: Lights up or flashes
LAN: Lights up when connected to the corresponding port
How to reboot the router
If your router freezes or starts to slow down a lot, you can try rebooting it. In most cases, it solves the problem.
If your router freezes regularly, you should check the firmware. Perhaps it began to freeze after the update? In this case, download the older version and install it instead of the new one. If the router starts to freeze without flashing it, then, on the contrary, try updating it.
To reboot the TD-W8968:
- Press and hold the power button on the back of the case.
- Wait until all the indicators on the front panel go out. Release the button.
- Wait three seconds and press the Power button again.
- Wait until the indicators stop flashing and remain steady. The router is ready to continue working!
Enter username...
Page 4
- Image
- Text
4
Enter
Name
router user and password: admin/admin
, click
OK
.
Note
If you have forgotten your password, see the question 2
Troubleshooting
section .
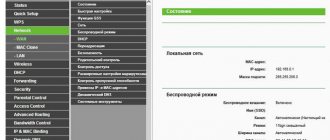
Select the Quick Setup
(
Quick Setup
), then click
Next
to enter the
Operation
Mode
page .
Select
Mode
work
(
Operation Mode
) and click
Next
to continue
. For example, selected
mode
Router with ADSL modem
(
ADSL Modem Router Mode
).
Note
Configuration in 3G router
(
3G Router Mode
) or
Wireless Router
Mode
is described in the User Guide, section 3.2 Quick setup. The user manual can be found on the materials CD or downloaded from https://www.tp-linkru.com/.
Enter VPI/VCI
, provided
yours
Internet service provider. Click Next
(
Next
) to continue.
Setting up a network schedule
One of the interesting features of this router is setting a schedule for a day or week according to which the wireless network will operate.
Instructions:
- Open the “Wireless” tab, select “Wireless Schedule”.
- Put “Enable” in the top line.
- Specify "Each Day" or "Each Week" to set a schedule for the day or week.
- Specify the days of the week during which the schedule will operate, and note the Wi-Fi operating hours.
For the schedule to take effect, you must save the changes.
Troubleshooting
Page 7
- Image
- Text
7
1. How to restore the router to factory settings?
2. What should I do if I lost my router password?
1) Restore your router's settings to default. If you not
know how to do this, see the question 1
.
2) Use default username and password: admin
,
admin
.
3) Configure the router again using the above
instructions.
3. I can't log into the web configuration utility using the IP address 192.168.1.1?
In your computer settings you will need to specify “Get
“Obtain an IP address automatically” and “Obtain DNS server address automatically”.
To do this, you need to follow the steps below:
For Mac OS X:
Click the Apple menu icon on your computer's taskbar. Click System Preferences -> Network
Network).
After resetting the settings, the current settings will be lost, so you will have to reconfigure the router again. It is highly recommended that you create a backup copy of your current settings before restoring the factory defaults.
Not
turning off
nutrition
router, use a pin to press and hold the RESET
,
located
on
back of the device.
Troubleshooting
Note
Briefly about the model
I usually don't include this section, but here we don't have the most standard modem.
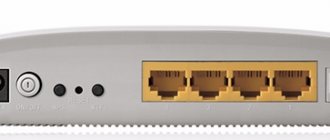
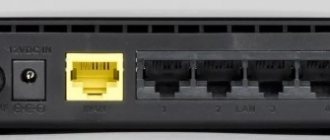
The most important thing before setting up the TP-Link TD-W8968 is to decide on the ports. What we have on the back panel (see the picture above, from left to right):
- DSL – for connecting a telephone cable (I will show the wiring diagram in more detail below)
- LAN – 4 ports for connecting local devices. It is better to connect your computer through them during initial setup.
- USB – can be used to connect a 3G modem.
- 4 buttons – Wi-Fi activation, factory reset, WPS activation, power button.
- Power port.
That's all I wanted to say, because... In the process of description I will repeatedly refer to these ports and buttons. Now you can start setting up.
In the left side window, select AirPort and click the More... button.
Page 8
- Image
- Text
8
In the left side window, select AirPort and click
Advanced for wireless connection or Ethernet for wired connection.
Open the TCP/IP tab, then below select Using DHCP
(Using DHCP) from the Configure IPv4 drop-down list.
Click OK (Apply) to save the settings.
For Windows XP:
Open the Start menu and select Control Panel
Panel). Then select Network and Internet Connections. Next, Network Connections.
Right-click on the Wireless Network icon
Wireless Network Connection or Local Area Connection, and then click the Properties button.
In the window that appears, select Internet Protocol (TCP/IP) (Internet
Protocol (TCP/IP), then click the Properties button.
Select Obtain an IP address
automatically) and Obtain DNS server address automatically, then click OK.
For Windows 7:
Open the Start menu and select Control Panel
Panel), then – Network and Internet -> View network status and tasks -> Change adapter settings.
Right-click once on the Wireless icon
Wireless Network Connection or Local Area Connection, and then click the Properties button.
In the window that appears, select Internet Protocol Version 4
(TCP/IPv4) (Internet Protocol Version 4 (TCP/IPv4)) and click the Properties button.
Select Obtain an IP address
automatically) and Obtain DNS server address automatically, then click OK.
Wi-Fi setup
A wireless access point can also be configured in the web interface:
- Open the Wireless - Basic menu.
- Make sure the first checkbox is Enabled.
- You can enter any network name in the SSID1 field.
In basic settings you can instantly enable or disable the access point
- You can also add two more networks distributed by this router. Check the box next to SSID2 or SSID3 and enter a name for the new network. This can be useful if there are a lot of devices to connect.
- Click Save/Apply.
- Then go to Wireless - Security.
- We are interested in the Manual Setup AP section.
- Select the network for which you want to set a password from the drop-down list.
- On the next line, select WPA2-Personal.
- In the Network Key field, enter the password - it will be the key to access the network.
You can change your Wi-Fi password without even knowing the previous one
- Leave the rest of the fields intact and click Save/Apply.
. What to do if you lose access to the Internet...
Page 9
- Image
- Text
9
Note
4. What to do if access to the Internet is lost?
1) Check if all connectors are well connected, including the connector
telephone cable, Ethernet cable and power adapter connector.
2) Check if you can access the web setup utility page
router. Default IP address for web browser login: 192.168.1.1
.
If you succeed, follow the instructions below. If not, set up your computer as indicated in question 3
, then check again if you have access to the Internet. If the problem is not resolved, proceed to the next step.
3) Contact your Internet service provider and confirm your
VPI/VCI, connection type, username and password for Internet access. You may have provided incorrect information, please check it and correct it if necessary.
4) If the problem with Internet access is still not resolved, restore
factory settings of your router and reconfigure the modem according to the instructions in this manual.
5) If you have any questions or cannot solve the problem
with Internet access, please contact technical support.
5. How to set up USB function?
Please see detailed instructions in the User's Guide to:
1) Open the materials CD and find the Application folder
Guide", which contains the User's Guide.
2) Go to the TP-LINK website using the link:
https://www.tp-link.com/app/usb/?siteid=1
For more detailed troubleshooting information from technical support, visit our website: https://www.tp-linkru.com/support/contact/
No image, show text version
Setting up IPTV
If you have a set-top box, you can connect it to this router:
- Connect the set-top box to the router using an Ethernet cable into any free LAN socket. Remember the socket number (they are all numbered below).
- Login to the web interface.
- Open the IPTV item.
- Check the Enable IPTV checkbox.
- Just below, check the box next to the port into which you connected the set-top box - LAN1, LAN2 or LAN3.
Turning on IPTV will not take much time
- Click Save/Apply.
Technical support
Page 10
- Image
- Text
Technical support
To troubleshoot and troubleshoot:
www.tp-linkru.com/support/faq www.tp-link.ua/support/faq
To download the latest firmware, drivers, utilities and user manuals:
www.tp-linkru.com/support/download www.tp-link.ua/support/download
For other technical support issues, please contact us using the following
contact information:
Russian Federation
Tel., 8 (800) 250-55-60 E-mail Forum: https://forum.tp-linkru.ru/ Opening hours: Monday to Friday, from 10:00 to 18:00 (Moscow time)
*except holidays in the Russian Federation.
Ukraine
LLC "TIPI-LINK UKRAINE" Support department: +380 (44) 590 51 14
E-mail Opening hours: Monday to Friday, from 14:00 to 20:00
All over the world
Tel.: +86 755 26504400
Opening hours: 24 hours a day, seven days a week
Quick Setup Guide Wireless N Router with Built-in ADSL2+ Modem and USB Port, Data Transfer Speed up to 300 Mbps
Comments
Select → I found instructions for my router here! #manualza
- Click →
From the instructions for using a gas mask: - Pull until the point is in front of the eye!
Manualza!manualza.ru
Still not with us?
TP-LINK TD-W8968 - brief description
The TD-W8968 is a device that is highly versatile. This is a router, an ADSL2 modem, and a wireless access point.
Wireless data transfer speeds are excellent - up to 300 Mbps. The device supports IEEE802.11b/g/n standards, and data transmission is carried out at a frequency of 2.4 GHz. So the router is perfect for organizing a local network, to which several devices that regularly and actively use network access are connected wirelessly. For example, for a home that has two laptops from which members of the household play online games (sometimes simultaneously), the TD-W8968 is perfect.
The router supports the modern IPv6 protocol. It is not yet widely used, but it is always better to have equipment that is already ready for technological revolutions in the future. This router can serve you for more than five years and will not become outdated.
The cost of the device starts from 1,500 rubles - a very reasonable price for excellent technical characteristics.
Among the disadvantages of the model, users note:
- poor ADSL line performance. The connection takes a long time and periodically fails;
- problems with torrent downloads. Judging by the reviews, the router freezes if you start downloading something through a torrent client. The problem is partially solved by installing the latest firmware. We will tell you how to update the firmware below;
- poor technical support. TP-Link is not very active in responding to user requests, so you may not get an answer to a technical question.
Appearance and interfaces
TP-Link decided to make an original design for the case, so you can see an abstract geometric pattern on its top side.
Status indicators on the front
On the back side are located:
- WLAN port;
- three LAN ports;
- ADSL2 socket;
- power button;
- reset button;
- two fixed antennas;
- USB port.
The presence of USB allows you to:
- connect hard drives or flash drives, allowing them to be shared with all network participants;
- create an FTP server;
- use a 3G/4G modem and distribute its Internet to all local network participants. But before you buy a USB modem, check out the list of supported devices on the official website.
All ports are located on the back of the case
Brief summary of technical characteristics
For those who have at least a little understanding of this technique, the following information may be useful:
- The wireless router and ADSL modem combination supports NAT forwarding technology.
- The speed of operation is around 300 Mbit/s.
- A USB port built into the case allows you to exchange files with the device, connect a network printer to it, or organize communication between media and FTP servers.
- Exchange with the network occurs through the latest version of the TCP/IP protocol, namely IPv6.
- Broadband cable Ethernet with four LAN connectors.
- QoS technology is used to prioritize individual connections.
- The device is capable of supporting guest networks.
In principle, all these options are available separately, but it is much better to have them in one single device. At the same time, there is no need to clutter your workplace with a whole heap of cords and boxes for various purposes. Additional effort may be required to switch them among themselves, which is not necessary in this case. Having dealt with this TP-Link as a whole, let’s move on to studying how to configure it.
Step 1 – Connection
If you can cheat with setting up routers at this point, you can’t with ADSL modems. We have to explain in detail. What we do:
- We connect the power adapter to the network through the power port - the lights should light up.
- We connect via a wire to a computer or laptop through any of the LAN ports (the light will also light up).
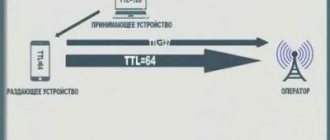
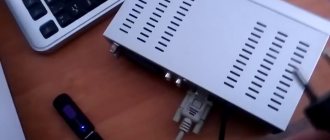
- We choose a method of connecting to the Internet (still in our head) - through the provider’s cord, through a 3G modem, through a cord and modem. This item is for you to have already prepared either a provider cord, or a 3G modem, or both. Then you can safely skip the comments on the type of connection that is not suitable for you, but I will still dwell on both of them, since we still have a hybrid, and this may be very useful for someone.
Connecting a 3G modem is not difficult - just plug it into the USB connector. But with the provider’s cord it’s a little more complicated - you can immediately connect it to the DSL port, or you can route it correctly through the splitter included in the kit so that there are no overlaps with the telephone network.