Many providers still use ADSL (dial-up) technology to connect the Internet to apartments. This standard requires a special router. The TP-Link catalog contains such routers, for example, the TP-LINK TD-W8901N model.
- 2 Connection diagram: to the provider’s telephone line and to the computer
- 3 Prepare your computer for the router settings
- 4 Enter settings
- 5 Setting up an Internet connection
- 6 Wi-Fi setup
- 7 IPTV connection
- 8 Possible problems with the router and their solutions
8.1 Unable to log into the web interface with settings
- 8.2 Unable to access the Internet
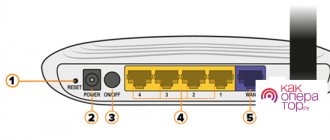
Indicators and connectors
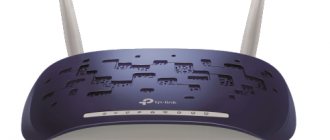
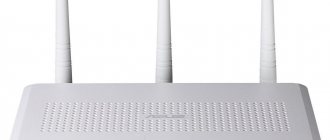
W8901N is made in white color, the front part is faceted, and the top looks like brushed metal. The indicators are located on the top panel and glow green.
Indicators:
- power supply (220 V);
- ADSL;
- WLAN (wireless internet connection);
- connections via LAN network (4 ports).
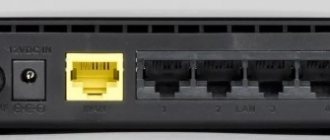
Connectors and buttons on the rear panel:
- 4 LAN ports (yellow) for Ethernet cable;
- 1 ADSL for connecting to a splitter into which a telephone cable is inserted;
- power switch;
- next to it is a socket for a cable from an electrical outlet;
- buttons: reset settings, turn Wi-Fi on and off, power.
Digital television
For example, I will consider an IPTV connection from Rostelecom with a set-top box connected to the 4th port of the router. We start with the section Interface Setup -> Internet . In the “Virtual Circuit” list, select connection PVC1.
Let's write down the VPI/VCI value for Rostelecom digital TV - our value is 0/50. In the ATM QoS list, leave the value UBR. Then, in the “Encapsulation” section, check the “Bridge Mode” value. A field will appear below in which you need to select the value “1483 Bridged IP LLC”. Click the “Save” button.
The connection is configured, but that's not all. Now we need to group the LAN ports correctly. To do this, go to the section Advanced Setup -> VLAN -> Define VLAN Group .
We select the first group, in which we have all connections and ports by default. In it we leave everything as in the screenshot - that is, ports 1,2,3 and the WiFi wireless network are tied to the Internet connection. Save and open Vlan Index 2 .
In the “VLAN ID” field we enter the number 2 .
In the “ATM” list, leave the connection for TV and bind LAN port 4 to it. It should look like in the screenshot. Save.
Connection
Having installed the router on a table or wall, connect it to electricity and a computer network. For this purpose, a computer or other device accessible for connection via cable (patch cord) is used. A browser must be installed on the PC, since there is no software disc included.
Algorithm:
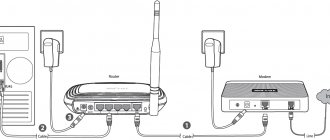
- The first method: connect the ADSL cable to a suitable connector on the router, and plug the other end into a power outlet.
- Connect the splitter (ADSL splitter) through the LINE socket to a socket (for a telephone), connect the phone to the PHONE socket on the splitter, and the router via DSL. Connect the PC to the router using a cable or WI-FI, plug the router into a power outlet and start the system. Fig.20
- Connect the twisted pair cable (provider cable) to the WAN socket of the router. Patch cord connect the Lan port and the computer port.
- Turn on the power to the PC and local network devices.
- Connect the power adapter to the POWER port located on the back of the device and plug the adapter into a power outlet or extension cord. After this, turn on the power to the device. An electrical outlet must be nearby and accessible.
Before connecting cables, you will need to turn off the power to the device. Keep your hands dry during installation.
Login to router settings
The standard IP address for entering the Tp-Link TD-W8901N setup application is 192.168.1.1. Subnet mask 255.255.255.0. These settings can be changed as needed. Throughout the manual, only default values are used.
You need to connect your local network computer to the router's LAN port. After this, you can configure the IP address for your PC using this method:
- In the TCP/IP settings of your personal computer, select “Obtain an IP address automatically.”
- The DHCP server must assign the PC an IP address.
To check the network connection between the PC and the router, enter the PING command at the command prompt. By clicking on the start menu, select the “Run” tab, enter CMD or COMMAND in the line and press the Enter button on the keyboard. In a separate window, enter ping 192.168.1.1, then press Enter.
If the result is like the picture below, then the connection between the computer and the router has been established.
If the result is as in the figure below, then there is no connection between the PC and the device.
Checking connection:
- The LAN and PC adapter LEDs should be lit.
- If the IP address is 192.168.1.1, then the computers' IP addresses should be in the range 192.168.1.2 - 192.168.1.254.
How to set up an Internet connection
In the main menu of the TP-Link TD-W8901N router, select the section Interface Setup -> Internet . The device supports up to 7 virtual channels simultaneously. We are only interested in one for now. In the “Virtual Circuit” list, select the first virtual channel with index PVC0.
We make sure that its status is “Activated”. Below in the VPI and VCI fields you need to enter the values provided by technical support. ATM QoS is left at “UBR”. In the ISP section, you must select the connection type used by the provider. If it is Dynamic IP , this is the simplest option, since no other settings need to be made. If the PPPoE , then below, in the appropriate fields, you must enter the username and password for the connection. Encapsulation - "PPPoE LLC". In the “Connection” section, check the “Always On” checkbox so that the connection is always active. Click the “Save” button.
Automatic setup
In the address field of the browser, enter the standard address - 192.168.1.1. After this, a login window will pop up, which is similar to the one shown in the figure below. In the Tp-Link W8901N input form, enter the client name and password “Admin” (default). After that, log in to get to the web interface management field. To complete the quick setup, do the following:
Step 1: By clicking the “Quick Start” tab, you need to click “Run Setup Wizard”.
Step 2: Set the time. On the Time Zone page, select your country and click Next.
Step 3: Select your country and service provider, and how to connect to your Internet service provider. Set up according to the instructions provided by your Internet service provider. After that, click on “Next”.
Step 4: After setting up your Internet connection, you need to set up a key for the WLAN and click next.
Step 5: Click “Save” to end the quick start.
The user will receive complete settings for the W8901ND router. If a new network is not found or you cannot connect to it, it is recommended to do the setup separately.
Setting up a TP-Link TD-W8901N ADSL router (Internet + IPTV): 24 comments
Guys, how can you configure this router to distribute Wi-Fi if a LAN wire is connected to it?
No way. It does not know how to reassign the WAN port.
Tell us how we can configure TP LInk Archer VR 300 AC 1200? I also have a multiroom service connected and 2 TVs in my apartment are connected to IPTV.
You need to create a second PVC connection for IPTV and add two ports to it in the port grouping.
TP-Link TD-W8901N is a functional model of an ADSL modem with a Wi-Fi router. It is quite new, so there are a lot of questions about setting it up. The router is easy to configure, works without failures or glitches, but you need to figure it out. About the procedure for setting up TP-Link TD-W8901N and connection methods below.
Manual setting
After automatic configuration and re-login, you can configure additional functions of the router - Internet access (if the automatic settings did not catch the necessary parameters), setting up a home network, IPTV, and registering routes.
The router may incorrectly detect the Internet settings for Rostelecom. Below are instructions with settings.
Rostelecom connection
To set up the W8901N, you need to call the provider’s technical department at 8-800-100-0800 and check the connection parameters:
- connection characteristics - VPI and VCI;
- encapsulation – LLC;
- connection – PPPoE, Dynamic or Static IP.
When using the services of this operator, you can do everything similarly, taking into account the applied network parameters.
Setting up the connection.
Go to the modem’s web window and in the main menu select the “Interface Settings> Internet” section. Typically, the device is already pre-configured with several virtual connections. Therefore, a new one is not needed; you need to edit the existing one by clicking on the “Brief information about PVC” button, as in the screenshot above.
After this, a table with a list of connections will appear. You need to look for matches with the VPI and VCI values. If they exist, then in the “Virtual channel” field, select this PVC connection. If there is nothing like that, then choose any, for example, PVC1.
When establishing a PPPoE connection, the bridge interface is set to “on” mode. Below the settings, click on “save”.
In the "supplier" field. After saving the configuration and rebooting the modem, you can use the Internet.
Configuration method with PPPoE
In the following video you can see the setup clearly:
Let's look at setting up TP-Link TD-W8901N for the Rostelecom provider. To complete the work you need:
- Go to the web interface, select “Internet”, indicate the PVC channel in the first line. To do this, set the active status, enter the VPI and PVC values (you need to find them out from the provider).
- In the “ATM QoS” item, look for the UBR value.
- Now we select the service provider - in this case it is PPPoA/PPPoE.
- Fill in the login and password lines (find out in the contract).
- In the “Connection” line, select 1 item “Always One”.
- Click the save button at the bottom of the page.
Wireless network
- In the settings, select “Wireless” and activate the access point.
- In the channel selection line, select Russia and automatic selection.
- In the SSID section we specify the network name, and in the next section – the type of protection.
- In the Encription line, select the encryption type, and below it write the Wi-Fi password.
- Save the changes.
Setting up IPTV
Open the interface settings again, find the “Internet” item there, register the PVC virtual channel. Further:
- We set the VPI and PVC parameters.
- In the “ATM QoS” item, also select the UBR value.
- Set the Bridge mode.
- In the Encapsulation line, select the “1483...” parameter and save the changes.
- Open the advanced settings and select the “VLAN” tab.
- In the “Wlan Index” line, select 1, activate, Wlan ID – 1, in the “ATM...” group put a checkmark next to port 0, in the Ethernet group – checkboxes for ports 1, 2, 3, Wireless – port 1. Don’t touch anything else , click “Next”.
Wi-Fi connection and settings
Go to wireless network setup:
- Go to the Wireless block. Set the first value to “Activated”.
- Indicate your country in the Channel. In Transmit Power you can adjust the transmitter power. If the maximum value is set to “High”.
- Go to the menu in the WPS Settings category below. Here you can change the SSID (wi-fi name), and also register a new password in the Pre-Shared Key. Write WPA2 PSK for AuthenticationType in advance. Click “Save” below to save your changes.
Setting up IP TV
Now set up digital television from your provider:
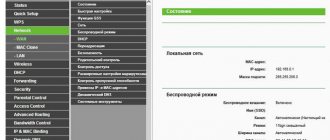
- Go to the Status category. Look at the PVC (virtual circuit) number that is used for the Internet. You can recognize it by the VPI/VCI parameters.
- Reopen the section in the Interface Setup category. In the VC (virtual circuit) specify the PVC number that does not match the PVC number for the Internet.
- Also indicate the properties for VCI and VPI (they differ for TV and the Internet - you should contact the provider’s support or look for information in the contract). Save by clicking on the “Save” button.
- Open the LAN category. Uncheck the port to which the set-top box will be connected. Save changes.
- Go to Advanced Setup. In the VLAN category, put “Yes” and open the 2nd item in the VLAN Index. Mark the local output in the table and save.
- Restart the router and connect the set-top box via the local port. Check the functionality of the device.
Change Password
The router may have a different password that the user saved earlier, and if it is forgotten, then you should:
- Reset the settings by pressing the “Reset” button (hold it for 3-6 seconds with a sharp object) and releasing it until the indicators turn off.
- Log in to the web-based configuration utility of the modem router by selecting “Device Operation> Reboot” from the menu. After selecting “Factory settings”, click “Restart” and wait for the process to complete.
- Use admin (lowercase) for default login and password.
The wireless password and PIN are marked as standard in the setup web application, please select "Interface Setting>Wireless" from the menu to find out the password or reset it.
Possible problems with the router and their solutions
What should you do if your attempt to configure the router was unsuccessful or you were unable to access the web panel with settings at all?
Can't log into the web interface with settings
Have you used a router before or bought it second-hand? Perhaps the router settings now have a different password that you or another user previously saved. If you do not remember this password, reset the router settings using the Reset button (press it for a few seconds with a sharp object).
Reset the settings, and then try to log in again using the login password admin
If the page for entering the settings does not open at all, make sure once again that automatic data transfer is set in the network card settings (section of the article “Let’s prepare the computer for the router settings”).
Try also opening the web interface through another browser, for example, in the standard Internet Explorer from Windows.
Can't access the Internet
After entering all the data and setting up the Internet, you still haven’t gained access to it? Do this:
- Make sure the equipment is connected correctly. All plugs must fit tightly into the outputs. The wires must be intact.
- Contact your provider's support team. Perhaps the problems with Internet access are on the company’s side and your router is not at all to blame. Also, check again all the values (VPI and VCI, name and password from the provider’s network) that apply to your region and your contract.
- Reset your router using Reset and try setting up the device again. If you can’t set it up, order a technician at home from your provider’s technical support.
To set up the Internet on the TP-LINK TD-W8901N router, you need VCI and VPI parameters, which you must first obtain from your provider. After debugging the connection type, change the “Wi-Fi” password to a more complex one. If necessary, set up IPTV if you have additionally connected digital TV.
Repeater mode
The TD-W8901N ADSL router does not have this function, but it does have a WDS (wireless distribution system), when enabled, the device will not work as a router, but will take on the function of a repeater and increase network coverage. This option will be useful when there are 2 routers. Each device has several different settings, modes, and panel appearance. It is important to determine what IP address the router supports.
WDS Settings: Select "enable/disable" to enable or disable the function
WDS. When the function is enabled, the device connects 2 or more local wireless networks.
About the router itself: appearance, price, equipment, characteristics
There are 8 indicators on the top panel: power, Internet access, Wi-Fi enabled/disabled, operation of 4 local ports (if the port indicator is on, it means the device is successfully connected to it).
The TP-LINK TD-W8901N router is compact and has only one antenna
On the back is everything a router usually has:
- power adapter output;
- on/off button;
- Reset (reset settings) and “Wi-Fi” buttons (to disable/enable the network);
- 4 local outputs of 100 Mbit/s for connecting home devices, including PCs;
- DSL output for connecting to a telephone line;
- 5 dBi antenna.
The model has an impressive package. In addition to the device itself, the box also contains:
- external splitter;
- telephone cable;
- Ethernet cable;
- quick setup instructions;
- disk with materials;
- power adapter.
The price of the device is low - about 1150 rubles. For this money you get the following options:
- Supports 2.4 GHz band.
- Firewall NAT and SPI.
- Filtering by MAC address, IP address, packets, applications, URL.
- Protection against DoS attacks, SYN Flooding, Ping of Death.
- Supports PPP, PPTP, L2TP, IPoA protocols.
Firmware update
In order for the Tp-Link model TD-W8901N to work without problems, it is recommended to regularly update the software. To do this, select “Device Operation > Firmware”.
The firmware or ROM image must be located on the computer's hard drive. You must click Browse to locate the local drive and locate the software or ROM image that will be used for the update.
Algorithm:
- Download the new version on the official Tp-Link website: https://www.tp-link.com/ru/.
- Enter the path and name of the update file in the “Location of file with new firmware” field. Or click on “Browse” to find the update file.
- Click on “Update”.
During the update process, you cannot turn off the device and press “Reset”.
Results
The TP-Link TD-W8901N router is convenient, reliable, and does not glitch. This is a fairly new model, which is a combined version of an ADSL modem and Wi-Fi router, suitable for setting up IPTV. Follow the setup instructions in the article, if still nothing works, welcome to the comments!
Many providers still use ADSL (dial-up) technology to connect the Internet to apartments. This standard requires a special router. The TP-Link catalog contains such routers, for example, the TP-LINK TD-W8901N model.