Subscribers of the Yota cellular operator who use Internet connection services on their computers are probably familiar with the equipment that the company offers for purchase and further use. One of the most popular solutions today is the Yota Many router. This is a compact device with an attractive appearance, somewhat similar to the currently popular power banks from Xiaomi. And today we want to pay attention to the issues of setting up the Yota Many router so that using it together with the operator’s 3G/4G networks is as simple and comfortable as possible.
Yota personal account: what the user gets
The operator’s personal account (PA) has a simple and accessible interface, which allows each subscriber to quickly navigate and find the information they need. The user can track their own expenses, edit connected services, and change options. Every instrument in the office is free for the client. To experience all the possibilities of the personal account, the user only needs to register on the site and log in.
Let's consider what opportunities a subscriber receives using his personal account:
- Control of balance and expenses.
- Top up your balance using any available methods.
- Linking the balance to a bank card.
- Information on tariffs.
- Changing the tariff plan and connected options.
- Package settings.
- Setting up auto payment.
- Adjusting Internet speed.
- Get acquainted with current information and special offers.
- Increasing the limit on minutes and mobile traffic.
- Activation and deactivation of additional commands.
- Blocking numbers.
Registration from a computer (laptop)
Registration in the Yota account is a mandatory procedure for each subscriber. Regardless of what device you put the SIM card into, an LTE modem or a tablet, you will automatically be taken to the online account. Thanks to a convenient hint system, you can quickly go through the initial registration procedure.
Let's consider what steps need to be taken to fully operate the LC:
- The first step is to install SIM card Yota. After this, you will be immediately redirected to the welcome page. On it, you need to carefully read the contract for the provision of services and support it with a digital signature. Then you will see a registration form.
- The second step is to go to your new profile. To do this, you need to follow the link my.yota.ru. Here we enter the password and login that you received during registration.
- The third step is to link the card. Now you can link a bank card to your account, with which you will make payments in the future.
Installing drivers
- All drivers are packaged in the firmware of Yoto modems.
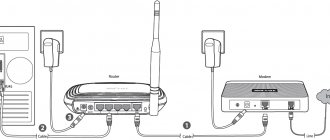
- When you connect the modem to the device, it will be immediately detected by the operating system and a driver installation wizard will appear.
- A window will open with automatic installation of drivers.
- Next, install the drivers according to the prompts indicated in the installation window.
- Reboot the device.
- Launch the Internet connection program shortcut that appeared on your desktop after installation.
- In the program window, click the button to connect to the network.
- We go into the browser and check its functionality.
If everything is done according to the instructions, the Internet network should work.
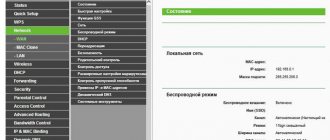
10.0.0.1 and Yota status: how to enter the device (router) settings
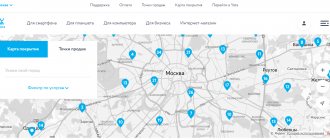
If you want to start using a Yota modem or router, you first need to access the settings of the device itself. You must be connected to it. We connect the modem via a USB connector to the computer, open the browser and type status.yota.ru in the address bar. To go to the specified address, press the Enter key. If you can’t log in, try entering 10.0.0.1. A control panel will open in front of you with all the information about the modem, speed and connection status. To change Wi-Fi network settings, you need to go to the “Device Settings” section. If you need additional settings, you can try going to https://status.yota.ru/advanced. In the modem menu, the user can also check firmware updates for their device, change the password, and perform a factory reset.
Technical problems
If the Yota modem does not connect (the blue indicator does not light), there is a problem of physical damage. First of all, check the USB port. Try connecting the modem to another one. If this does not help, and the port is checked and working (it sees other devices or flash drives), then the modem may not have enough power. In this case:
- Go to Device Manager (Control Panel in Windows 7 or right-click on Start in Windows 10);
- Find the “USB Controllers” section and click on it;
- On USB Mass Storage Device, right-click and click Disable.
This will increase power to the port. Because the modem may not work due to lack of energy.
When the Yota modem constantly turns off, this may mean the following:
- Poor network access. In this case, the connection is constantly broken. Try moving it to another place where the connection is better;
- If you use a cord, its length should not exceed 1.8 m. Check its serviceability and integrity. Try using the device directly, without an extension cord;
- The contacts in the USB port are broken. From frequent use it could simply become loose. In this case, you should either repair it or replace it.
If the modem still refuses to work, contact your nearest dealership for advice.
Addresses for logging into Yota router
In order to get to the web page with configurations, there are two current addresses:
- status.yota.ru;
- 10.0.0.1.
Here you will get basic information regarding the modem (router), including:
- Iota connection status.
- Basic operational characteristics of the device.
- Internet connection speed.
- Signal quality.
- Traffic expenses.
Having found out your Yota Status, you will have access to many settings and actions for even greater convenience in using the operator’s services.
How to log into the Yota modem: advanced settings
Using advanced settings, the user can adjust the operation of the modem to suit his needs. You can allow third-party connections, change the real IP address, reconfigure the port, change DHCP parameters.
To get to the profile menu, you need to specify identifiers in the URL after the slash:
- advanced – DHCP will open for manual configuration;
- network – here you can change the network parameters of the modem device;
- manualupdate – update the modem firmware manually;
- dir – the most advanced functionality is presented here.
If you don’t know which Yota DHCP band to choose, you can consult a specialist who can make the settings correctly and not harm the device.
Manufacturer's warranty
1. The manufacturer bears a warranty for 12 months from the date of sale of the modem (in the absence of violations of these terms and conditions).
2. The manufacturer's warranty obligations apply only to modems intended for supply and sale in the Russian Federation, purchased in the Russian Federation and certified for compliance with standards.
3. To receive warranty service from the date of sale of the modem, we ask you to keep sales and cash receipts or other fiscal documents certifying the fact and date of sale of the device, and present them when applying for warranty service. If the date of sale cannot be determined, in accordance with the legislation of the Russian Federation on the protection of consumer rights, the warranty period is calculated from the date of release of the modem.
4. Warranty obligations are terminated in the following cases:
- If the serial number is changed;
- If the modem was used for purposes other than its intended purpose;
- If the device shows signs of unqualified repair attempts;
- If the defect occurs due to natural wear and tear during operation of the modem;
- If the defect is caused by a change in the design or circuit of the modem not provided by the Manufacturer;
- If the defect is caused by force majeure, accidents, intentional and (or) careless actions (inaction) of the consumer and/or third parties;
- If the defect is caused by exposure to moisture, high or low temperatures, corrosion, oxidation, or foreign objects, substances, liquids, or insects entering the device.
More about Yota: Which satellite internet to choose
5. Warranty obligations do not apply to the following defects of the modem:
- Mechanical damage that occurred after the device was handed over to the consumer;
- Disadvantages caused by the impact of computer viruses and similar programs, installation, change or removal of modem passwords/codes by unqualified use of service codes; modification and (or) reinstallation of device software (firmware) and user software, installation and (or) use of non-original device software and user software;
- Disadvantages resulting from natural wear and tear during operation
- Disadvantages caused by unsatisfactory performance and (or) non-compliance with standards of parameters of power supply, telecommunications, cable networks and other similar external factors;
- Disadvantages resulting from insufficient capacity of telecommunication networks and radio signal power, including due to the terrain and urban environment, the use of a modem at the border or outside the coverage area of the network signal and (or) compatible devices;
- Disadvantages caused by the use of non-standard and (or) low-quality consumables, accessories, spare parts, batteries, and various types of storage media.
6. The Manufacturer, Importer and Seller are not responsible for possible damage caused directly or indirectly by the loss, change and (or) inability to use any data transmitted via the modem.
7. The Manufacturer, Importer and Seller are not responsible for possible harm directly and (or) indirectly caused to people, pets, property, if this occurred as a result of non-compliance with the rules of operation and storage of the modem, intentional and (or) careless actions (inaction) of the consumer and (or) third parties.
Firmware update via manualupdate
Below are detailed instructions that will allow you to perform the update yourself:
- download the latest version of drivers for modem;
- connect the device to the computer and wait for the initialization process to begin;
- in the address bar set https://status.yota.ru/manualupdate;
- when a new window appears, click “Browse” and select the downloaded file;
- Now you need to click “Update” to install the software;
- We reboot the modem.
Setting up and changing the password
To protect your network from unauthorized intrusion by neighbors and others, you need to protect your access point.
To do this, set a security password in your personal account:
- First, go to your personal profile to be able to configure the router
- find the item “Protection type”
- set the “Protected WPA2” parameters by specifying the current password
- The minimum number of symbols is eight.
In this section you can also change the name of your network.
Windows phone.
- Find “Settings” and select “More”.
- Open the section called “Access Point”.
- In this section, you will need to click the “ ” symbol, which will allow you to create a new access point.
- After the “ ” symbol is pressed, a window will open in which you need to enter the following data: name - “Yota”, then APN - “internet.yota”.
- We save all the changes made.
- After the changes are saved, you will need to repeat the same procedure again and make sure that the status for this access point is set to “active”.
Testing internet speed
To accurately determine the speed of your Internet connection, you need to carry out a special measurement.
What you will need for this:
- reboot the router;
- we turn off the Wi-Fi network on all home devices, except for the one with which we will perform testing;
- in the OS settings we deactivate applications that consume traffic;
- the most accessible service is on the website of the operator Yota in LC;
- follow the link my.yota.ru and log in to your personal profile;
- in the interface you will find an Internet speed measurement;
- run the test and wait for the results.
Checking the signal level
You can check the signal for modem Yota through a personal account at 10.0.0.1. By opening Device Settings, you will see a table with data about the operation of the modem. The table format will depend on the installed OS version.
Signal quality can be determined by two key parameters:
- RSRP - this indicator can help establish the signal strength of the operator's base station.
- SINR - shows the interference ratio relative to the signal.
Please note that when the coefficient next to SINR is 0, this means that the signal and interference indicators are equal to each other.
Today we looked at what the IP address of a Yota modem is, how to go into the device settings, and what the capabilities of your personal account are. If you encounter any difficulties with the operation of the Iota modem, you can always contact support.
Device characteristics
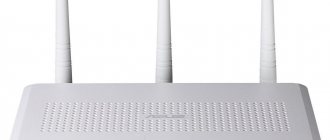
The Yota Many router is a small mobile device that transmits a network signal to several gadgets at once. It has a built-in rechargeable battery that allows the device to operate in autonomous mode. In the old version of the modem, users were provided with a 1430 mAh battery, but now its capacity has increased to 2100 mAh. If the client uses the Internet for surfing, the battery in the router will last for 16 hours of operation. Once in standby mode, the equipment remains operational for up to 60 hours. You can take the modem with you on a trip to use Yota Many 4G at any time.
- note
- The subscriber can use the router while traveling, but connecting to the Internet is only possible if the area is covered by the Iota network.
Let's look at the main characteristics of this router:
- The weight of the device is 90 grams;
- a maximum of 8 gadgets can be connected to one equipment;
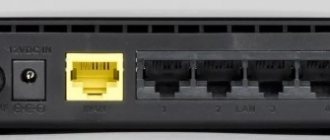
- The kit includes the router itself, instructions for use and a USB cable;
- the case has dimensions 67x97x13 mm;
- the equipment is fully compatible with operating systems such as Mac OS, Windows XP and Linux;
- it will take 2 hours to fully charge;
- the developer is Russia, but the assembly is carried out in China;
- The USB port must be at least version 2.0.
- note
- The kit does not include a charger, so you will have to use a computer to charge the router.
There is a small display on the case; it is based on E-Ink technology and allows you to control the battery and other parameters of the router. Thanks to improved technology, the power consumption of the router has decreased. Additionally, the device has a Yota logo that lights up. But it can be disabled by visiting the modem interface.