The Huawei B525 cat.6 4G router is an excellent choice for connecting mobile Internet in the office. It makes it possible to connect to the network anywhere where there is 2G/3G or 4G coverage from a mobile operator. There is support for 5 GHz Wi-Fi, which can significantly improve the quality of communication in heavily congested 2.4 GHz business bands.
How to open Huawei modem settings?
First you need to connect the modem to your computer. If you have a regular USB modem, for example Huawei E3372, then simply connect it to the USB port of your laptop or desktop computer.
A mobile Wi-Fi router can usually also be connected to a computer via a USB cable.
When the modem is connected to a computer via cable, it is identified as a virtual network card (RNDIS adapter).
If you have a modem with Wi-Fi distribution function (mobile router), then you can connect to it via a Wi-Fi network. Not only from a PC (via Wi-Fi adapter) or laptop, but also from a tablet or phone. The factory network name (SSID) and password (Key) are usually indicated under the cover of the Huawei modem itself.
After connecting the modem to the computer via cable for the first time, you will most likely need to install drivers. In most cases, it is enough to complete the installation in the window that appears immediately after connecting the modem.
- Login 192.168.0.1 to the Personal Account of the Router - How to Login to Settings via Login and Password Admin-Admin
Most likely, after this the browser will automatically open, the page at https://192.168.8.1 will load and you will see the modem’s home page. It looks something like this:
If the modem's web interface does not open automatically, you can do it manually.
Establishing a connection with the router
To access the administrative panel, the router must be connected to a personal computer or mobile device. You can make a connection in two ways - wired or via a wireless Wi-Fi network.
In the first case, follow these instructions:
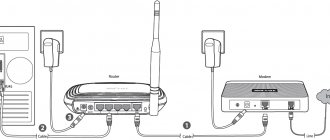
- one end of the network cable is connected to the PC network card connector;
- the second end is connected to the LAN port on the router;
- connect the provider's cable to the WAN port;
- Connect the power supply to the router.
This method will allow you to quickly establish a connection between devices. A router released by Huawei, which can be accessed through an Internet browser, requires proper connection to the network and PC.
The second option for connecting equipment involves using a wireless Wi-Fi space. To do this, the user needs to know the network access code. Many models of Huawei network devices do not have protection when they are first connected.
This allows you to do the following:
- connect the router to power;
- find the desired wireless network (its name usually contains the word Huawei);
- connect the client device.
After a successful connection, you can go to your router’s personal account for further configuration.
How to access 192.168.8.1?
Connect your Huawei modem via cable or Wi-Fi. Open any browser. It is advisable to use a browser that you do not use every day. There are usually no add-ons that can prevent us from opening the modem settings page. In the address bar of your browser, type the address https://192.168.8.1 and go to it.
Please note that on some modems/mobile routers the factory address may be 192.168.1.1
The modem settings page should load. If this does not happen, you can reset your Huawei modem.
- How to log into your personal account using 192.168.1.1 (does not go into the router settings)
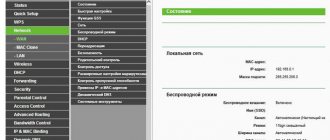
The main page displays information about your Internet connection, 3G/4G network signal strength, and access to other modem settings and functions.
Depending on the device (modem without/with Wi-Fi), model, mobile operator (Beeline, MTS, Megafon, etc.), your personal account (settings page) may differ slightly. Some menu items and settings may be missing.
If you have a Huawei modem without Wi-Fi, then you can easily go to any section: Statistics, SMS, USSD, Settings, etc. But if you have a modem with the ability to distribute Wi-Fi, then without entering your login and password, only the main page will be displayed. And if you try to go into the settings, or into another section, the “Login” window will appear asking for a username and password. Typically, the factory username and password on Huawei Wi-Fi modems are admin and admin .
The factory password can then be changed in the settings, in the “System” section – “Change password”.
Connect and configure
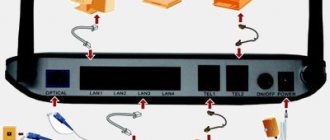
Let's now learn about how to set up a Huawei router. First, take the device out of the box and connect it to the mains. After connection, the green indicator light next to the PWR mark on the device should light up.
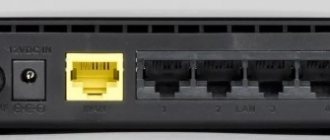
Now take an external Internet cord or telephone cable and insert it into one of the two connectors for the MGTS GPON network. The connectors are painted black and are located on the back of the device. Once connected, another green light on the router should light up next to the POS or LOS mark.
- Login 192.168.0.1 to the Personal Account of the Router - How to Login to Settings via Login and Password Admin-Admin
Once connected, you should activate the device. You can do this in two ways:
- Via Ethernet cable. To do this, you need to connect the router to the provider’s cable, and insert the patch cord into 1 of 4 connectors (the required sockets are colored yellow). Insert the other end into the Internet card slot on the computer.
- Via Wi-Fi. Using the Wi-Fi adapter on your computer, find your router and connect to it.
Now you need to go to the settings menu. Open any Internet browser, enter the address of your device into the search bar and press Enter.
Please note that HG8245H routers have an IP address of 192.168.100.1.
Now an authorization window will open in front of you in the HG8245H admin panel to enter your login and password. The default factory login is root, the default password is admin. They need to be entered into the fields to enter the modem settings.
If the device has already been in use, then it is quite possible that the previous owner changed the login and/or password. In this case, you need to reboot. To do this, click the “Default” button on the router. After the reboot, you should enter the standard login and password root/admin.
Instructions for logging into the interface are available in video format:
Also note that on some HG8245 routers, depending on the firmware version, a different factory Login/Password is installed by default:
| Login | Password |
| telecomadmin | telecomadmin |
| telecomadmin | admintelecom |
| admintelecom | telecomadmin |
| admintelecom | admintelecom |
| admin | admin |
| superadmin | superadmin |
| admin | HG8245H |
Setting up the modem
We have already found out that the “Home” displays basic information about your Internet connection. There you can change the language of the settings page at the top.
On the “Statistics” you can view information about Internet traffic.
In the “SMS” you can view incoming messages and, if necessary, send a text message. Or open SMS settings.
- Personal Account 1.1.1.1 - How to Configure ZYXEL One Network and Nebula Access Point?
The next tab is “Contacts”, where you can view your saved numbers.
Further along the course is a useful section “USSD” . From there you can execute USSD commands. For example, to check your account, the number of megabytes remaining, connection of packages, tariffs, etc.
Next comes the main “Settings” . First of all, this is “Mobile connection” . You can turn mobile data off or on, manage data roaming, and set an automatic shutdown interval.
In the “Manage Profiles” , select an Internet connection profile for our operator. Usually there are 1-2 profiles. Or create a new profile manually and enter a username, password and access point.
“Network settings” – you can set the network operating mode: GSM (2G), UMTS (3G), LTE (4G), or mixed modes. These settings may be useful when setting up an antenna, or when the connection is not very stable.
There is nothing interesting in the "Security" When setting up, another page “System” - “Device Information” . There you can see the signal and noise levels. And already be guided by these indicators when setting up the modem or antenna itself.
If you have a model that not only works as a USB modem, but also distributes Wi-Fi, then in your Huawei personal account there will also be Wi-Fi network (WLAN) settings. There you can turn off Wi-Fi, change the network name, and change the Wi-Fi password (key).
It is very difficult to write such instructions, since there are a lot of devices themselves, and they are all different from each other. Some have an unlocked modem with a SIM card from the same Megafon, while others have a modem from MTS. With and without Wi-Fi. Different models and firmware. But on almost all of them, settings can be opened at 192.168.8.1, through any browser and from any device. The main thing is that it is connected to the modem.
If you can’t access the settings of your Huawei modem, or you don’t know how to configure some function, then describe your problem in the comments under this article. I try to help.
572
SergeyHuawei
Hi all! Before we begin, let's clarify what a personal account is. I just constantly receive letters asking me how to log into my Huawei personal account. And when I tell them: that this can be done on the official website. They answer me: what do they mean the interface for internal settings. Now briefly:
- Personal account – located on the website shop.huawei.ru. At the top you can see two buttons “Registration” and “Login”. First we register, and then we log in. To be honest, I don’t know why it is needed. Probably for quick purchase of goods.
- Web interface - designed to configure your router or modem. It is located inside the device and can be accessed through any browser. But this is not a personal account.
HELP! If you have any questions while reading the article, write them in the comments.
Brief technical description
The Huawei HG8245H router is a device for managing Internet networks and telephony.
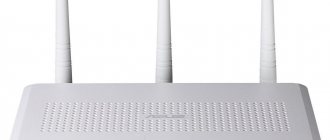
The router works with both wired and wireless networks. The device belongs to the class of GPON terminals, so using this device you can achieve high connection speeds (up to 1.2 gigabits per second). Externally it looks like a small rectangular white box. On the sides of the device there are 2 antennas for working with wireless networks. Please note that the device is available in different versions (HG8245A, HG8245M and others). However, they differ slightly from each other (usually only the factory defaults differ).
Detailed technical characteristics of the device are presented in the table below:
| Technical capabilities | Router, Wi-Fi network management, working with IPTV connections |
| Number of connectors | 2 incoming ports, 4 outgoing ports and 1 USB port |
| Access speed | Incoming speed - up to 2.4 gigabits per second, outgoing speed - up to 1.2 gigabits per second |
| Wi-Fi standards | 802.11 b/g/n |
| Encryption | AES, TKIP, WPA/WPA2-PSK |
| Operating system compatibility | Windows XP/Vista/7/8/10, Linux, MacOS, UNIX and others |
| Dimensions | Approximately 3 x 17.5 x 13 cm |
| special instructions | It is possible to filter by MAC and IP addresses, there is built-in protection against DDoS attacks |
Watch the video review here:
How to log into the Web interface
You can go there from any browser, on any device: phone, tablet, computer, laptop or even TV with Web OS. The most important thing is to connect to it before doing this. This can be done in two ways:
- By cable - take a network cable and insert one end into the router or modem. The most important thing is to insert the cable into one of the LAN ports. They are usually designated as such.
- Via Wi-Fi - just turn on the device and look for a router with the desired network. If you have not configured it before, the default network name and password will be on the label under the Internet center.
A few words about the label - it contains almost all the information that may be useful to you. For example, to connect via WiFi, look at two lines: “WLAN – NAME (SSID)” is the name of the network; “WLAN – Key (WPA/WPA2)” is the password for it.
But some models do not have this information. Then you can enter in different ways. If you are connecting from a computer or laptop, then you need to set the necessary settings of the network module in advance so that the computer and laptop see the router when connecting:
- Find two keys like in the picture above and press them at the same time;
- A window like this will pop up - then you will need to enter “ncpa.cpl” and click “OK”;
- Now it is very important to select the exact connection through which you are connected to the router. If you have a laptop, you should still see a wireless connection. Select the one you need, right-click and click “Properties”;
- Click on protocol 4 and then on “Properties”. Check the boxes as in the screenshot above and click “OK”.
Now you need to open any browser and enter the IP or DNS address of the router that you found on the case into the address bar. If there is nothing on the case on that same piece of paper, then try one of these addresses:
- https://homerouter.cpe;
- 192.168.1.1
- 192.168.100.1
- 192.168.3.1
- 192.168.8.1
Don’t get confused, you need to enter the address into the address bar, and not into the search bar, which is usually located below.
After this, you will be asked to enter your login and password for the admin panel. The default is:
- Login: admin;
- Password: admin; or empty string;
If the login and password are not suitable, it means that it was previously changed during the first setup. Usually, the provider’s employees also change it when setting it up. Therefore, you can try calling them and find out what password they set. Also, the password and login are on the same label that we talked about earlier.
For information on setting up individual routers and modems, see our separate “Huawei” section. Just go there and look for your model, and then read the instructions written by our specialists. You can also use the search on the site - just enter the full name of the model in the search bar.
Huawei is one of the leading companies in the market of manufacturers of mobile gadgets, including high-speed modems, which are easy to interact with through any multimedia gadget. The most convenient and stable connection method is a cable. The functionality of the devices varies depending on the technical characteristics: access to 3G or 4G networks, use as a WiFi router. The modem can be configured to distribute wired Internet or using a SIM card from a cellular operator.
Method 2: Connecting to dynamic DNS
Dynamic DNS often comes at a cost, but there are more and more services that offer trial periods as well as free versions. The essence of such DNS is to assign a letter address to the router, which replaces the standard IP. This is suitable in situations where organizing remote access is impossible due to the constant change of the router address. Connect dynamic DNS in four simple steps.
Step 1: Select a service
You should start by choosing a service to find a free or cheap option. Often, several compatible options are already built into the router’s web interface, so it would be better to use them, but nothing can hurt you from finding a site on the Internet that provides such services.
- In the Internet center, open the “Dynamic DNS” section.
Expand the "Service Provider" list, select one of the services there, and then click "Proceed to Registration" to check each site.
Review the descriptions and prices on each site to find the plan that suits you. Noip is available on TP-Link and some other routers. This is the optimal solution for those who want to test the technology for free. Using this service as an example, the next step will be discussed.
Step 2: Register Dynamic DNS
The interface of the sites varies, so it is impossible to create a universal guide that will allow you to understand each of them. However, almost everywhere the principle of interaction is the same, so we’ll focus on noip, and you just have to take the following steps as an example.
- After going to the main page of the site, create your domain by writing its address in Latin letters. Please note that the address itself must be unique.
Create a new account on the site by entering your email and password.
Pay for the subscription if you selected a paid tariff plan, then confirm the terms of use of the service and register.
Be sure to confirm your email by clicking on the link you received in the email.
You will be notified that your dynamic DNS registration has been successful. If the instructions on the website contain additional points about port forwarding and downloading the application, you can bypass this for now, and return to the setup only if the connection fails.
Once you go to your personal profile on the site, the domain name should appear in the list, which means it's working.
Step 3: Configure DDNS in the web interface
Before connecting, all that remains is to configure dynamic DNS through the router’s Internet center. To do this, go to the same menu, select the service provider, insert the received domain name, enter the login and password used on the site. Activate the “Enable DDNS” option and log in.
Make sure the connection status is "Successful". Only after this can you proceed to checking remote control.
If you are unable to log in, check that you have entered your personal account information correctly on the website or wait a few minutes for domain information to update, and then log in again. Additionally, you can always contact support at the service to get professional help.
Step 4: Gain Remote Access
Distribute the dynamic DNS address among all users who you want to provide remote control of the router. They will have to enter it into the browser's address bar and go. To authorize in the web interface, you will need to specify a login and password, and we talked about changing credentials when analyzing Method 1.
Let us clarify that in this article we did not discuss the “TP-Link Cloud” , since only a few expensive router models from this manufacturer support it, and other companies do not yet practice adding similar functions. If you own a device that has such a tool, go to it through the web interface and read the detailed instructions from the developers to understand the connection.
Source
How to access 192.168.8.1
Review and configuration of the D-Link Dir-320 modem
Instructions on how to enter the settings of a Huawei router include steps from physically connecting two gadgets to changing the standard conditions in 192.168.8.1 admin: password, login, Wi-Fi, network name.
Step 1. Connect to a desktop computer, laptop or phone
In a Huawei modem, the 4G setting depends on the equipment selected as the “base”: PC, laptop or smartphone, each of them has its own circuit.
For a computer or laptop you need:
- connect the LAN wire to the input connector of the Huawei modem;
- connect a computer or laptop with a LAN cable to the router;
- or insert the modem directly into the USB port.
Note! The computer may recognize the modem as a disk or flash drive.
Connection via phone or tablet is carried out via Wi-Fi, for this you need:
- Make sure that mobile Wi-Fi is turned on in the “Settings” menu, or open the curtain and click on the corresponding icon.
- Find the one you need in the list of networks and log in.
- Most models will not require a password, but if the device asks for one, the information is listed on the back of the modem.
- After logging into the Huawei network, access to the router through admin. The panel will open.
Step 2. Connect to your personal account at 192.168.8.1
- Open a browser: Safari, Internet Explore, Opera or any other.
Additional Information! We recommend using a web browser that is rarely opened. There are no additional add-ons that will interfere with the installation of the modem.
- In the address bar, enter the IP address: https://192.168.8.1 and run it. Login to the Huawei modem using this link.
Error when logging into the web interface
A common mistake that occurs when entering this address is the writing of characters. Letters may be printed instead of numbers, there may be an extra space or an erroneous number. Enter admin as username and password. This is the factory password; you can change it later. To avoid hacking and after resetting the settings with the Reset button for some reason, you will need to come up with a new password. The number of characters must be no shorter than six, and the use of Latin letters is mandatory.
Step 3. Authorization in the router’s personal account
The appearance of the personal account page depends on the type, model or mobile operator. However, most routers have a single shell, including using mobile WiFi, logging into the system is carried out like on a PC. The WiFi modem has an additional security function with the obligatory entry of a login and password when trying to enter any point.
Step 4: Change Settings
After logging into the Huawei router, the type of connection is configured in more detail depending on the state of the IP address, dynamic or static.
For WAN the procedure is as follows:
- Check the “WAN connection” box.
- Enter the VPI/VCI values that are assigned to the service in the region by the provider. As a rule, for the Internet VPI is 0, for cable television - 2. Information is indicated in the contract or on the official website or forum.
- Specify the connection type as “PPPoE”.
- Enter your login and password.
- Click the Submit button to save the profile.
Dynamic IP on some types of modems is configured in the same way and differs in only three variables:
- In the Connection type line, select IPoE.
- Select “DHCP” from the list in the Address Type line.
- Activate NAT, if given a choice, then register NAPT.
The next step is setting up a WiFi network through the WLAN tab:
- Select the first Network with index “1”. She will be the main network
Additional Information! The router has several WiFi profiles available. The number depends on the firmware, and the last ones on the list of networks will be considered guest.
- Fill in the SSID field with the name of the new network. The name is then displayed on all devices.
- Check the "WMM" box.
- The value “40 MHz” is placed in the Width line (channel frequency).
- Security type select WPA2-PSK with AES encryption.
- A mandatory condition is to enter the network access password in the “WPA pre-shared key” line to prevent unauthorized access.
Note! A password of up to 12 characters with different types of characters and case will provide additional security against unauthorized entry: no one will be able to log in.
- The settings are saved by clicking the “Submit” or “Apply” button.
Preparatory actions
First, you will need to log in to the router's web interface using a computer or laptop connected to it. All the following instructions will be discussed using TP-Link as an example, so we recommend reading about the principle of logging into the Internet center in another article on our website, where the corresponding router model is taken as a basis.
The second stage of preparatory actions is to determine the method for obtaining the IP address, as well as compare it on a special website. This must be done in order to choose a further method for setting up a remote connection and generally understand whether this can be implemented with the current parameters. Viewing the necessary information is carried out in all router web interfaces in the same way. Open the “Status” or “Monitoring” section, where you will find the “WAN” section and pay attention to the “IP address” line. Here you can find out whether it is static or dynamic.
Now you need to determine whether the IP address is white, that is, on the Internet it should be the same as what is displayed in the web interface. To do this, the easiest way is to use a special website to determine the IP address, which can be accessed using the link below. If the address matches the one defined through the Internet center, then it is white.
Based on the information received, you can understand what you should do next, which method of organizing remote access to choose and whether it is realistic to set it up at all. There are three options for the development of events:
- Gray IP. If, when comparing IP addresses, it turns out that one value is written in the web interface, but the site sees a completely different one, and VPN is not enabled on the computer, then the provider provides a gray IP. You won’t be able to use it for a remote connection - all you have to do is contact your Internet service provider directly and order a reconnection to a static IP address from them, if the company provides such a service.
- White static IP. If during the check it turned out that the address is static, this means that you should select the first method of setting up a remote connection, using the “Remote Management” function in the router’s web interface.
- White dynamic IP. A dynamic IP address changes from time to time, so the settings specified in the web browser can be lost at any time, causing remote access to be lost. Of course, nothing prevents you from using the first method to temporarily provide the ability to connect, but it will be easier to use, which will be discussed in the second method.
Carefully read the information provided to choose the appropriate option, and then proceed to implement it by following the instructions below.
List of possible usernames and passwords
What are the differences between 3G and 4G networks: features, advantages and disadvantages
The factory login and password are indicated on the modem case. Most often, the manufacturer uses the login “admin” and a password with a simple set of numbers or letters.
The documentation of the device or on it itself indicates the following information: “Huawei Rostelecom router: how to enter the settings.” The full operating instructions also contain information about login and password, which can be found on the technical support forum. If the access data is lost, you need to return the modem to default settings using the Reset button on the gadget panel. Afterwards you will have to re-do all the manipulations to install the profile.
Connecting a router
Before entering the router menu, the user should connect the gadget and synchronize it with a PC or laptop. You need to insert the plug into the socket and turn on the gadget. The work can be monitored by the lit indicators on the router body. Next, you should take a short cable and insert it into the router socket, and connect the other end to the computer unit. A notification may light up in the icon bar indicating that a new device has been found.
Changing the factory password
How to log in and configure the router via IP address 192.168.1.1
The factory password (admin) is changed in the settings, in the “System” section, “Change password”. The sequence of actions is the same for all types of modems:
- Connect the PC and modem via LAN or open a wireless connection.
- Go to the Settings page.
- In the SSID field, enter the new Network name.
- Enter a new password in the WPA key field.
- Confirm the changes with the “Submit” or “Finish” button.
If you can't log in via admin/admin
When the page at 192.168.3.1 / mediarouter.home is opened, you may encounter a problem when the username or password does not match. We enter the factory dmin and admin, but the router writes that the password is incorrect and does not allow us to access the settings. I have already talked about this problem here.
Again, the first thing we do is look at what Username and Password are listed on your router. It could be, for example, like this:
We try to enter the data indicated on the sticker. If they don't fit, someone changed them. In this case, the only option is to completely reset the router to factory settings. To do this, press and hold down the Reset button (WPS/Reset) for at least 15 seconds. After resetting the settings and rebooting the router, open your personal account again and try to enter the factory username and password.
What to do if 192.168.8.1 does not work
The causes of connection errors usually come down to hardware faults or errors when entering connection parameters:
- The power adapter is not connected. All indicators should be lit.
- Damaged cable. Integrity needs to be checked.
- Changing the router address. You need to reset your settings to factory defaults.
- There is a technical problem with the router. You need to contact the service center.
- A static IP address has been set. You can fix the problem by connecting automatic IP acquisition.
TP-Link
On the old firmware, go to the “Protection” tab; on some firmware it may also be called “Security”. Next is “Remote access”. In the line “ IP address of remote access management” you need to enter the IP address of the device from which you will try to access here (external IP).
For example, a computer at work. Find out the address and enter it here. Then access will be open only to this address. If you want all addresses to be open, enter 255.255.255.255. If it is 0.0.0.0, then the service is disabled. To access management from the Internet, enter the external address of the Internet center. It is listed in the “Status” tab. We also write the port “:80” at the end.
Source
Characteristics
Externally, the Huawei hg8245 router looks very stylish and modern. Compared to devices of previous generations, it is thinner and longer. Therefore, it takes up minimal space on a table or other work surface. It can even be mounted on the wall. Especially to implement this task, there are special connectors for fasteners at the bottom of the router.
The connection to the router occurs through two wires. One of them is optical, and the second is for the LAN connector. When connecting for the first time, you need to activate the router’s power via the button on the back wall of the gadget.
Login via Web interface
After turning on the 4g router, you will need to configure Huawei to activate the device. The most important steps to perform immediately after initial startup:
- Make sure that the connecting cable is connected and the POWER button is lit.
- We launch the browser on the computer and enter a simple set of numbers in the address bar: https://192.168.100.1, following this link.
- You will see a page where you need to enter your login and password. The default login here is Root and the password is Admin. This information needs to be specified.
- Having entered all this, click on the Login button and go to the router’s page on the Internet.
Problem starting LAN2 and LAN3
Update from Botan. I received the following interesting question from Oleg in the chat:
How to run the remaining two LAN2 and LAN3 on a Rostelecom router? I bought a Samsung TV, the built-in WiFi adapter is crooked, the signal always drops. Rostelecom has LAN4 installed on their set-top box, linked to the MAC address, and only LAN1 distributes the Internet (it goes to the computer). I want to plug the cord from LAN4 into LAN2 or LAN3, but they are locked. Huawei hg8245 router. How to make sure that the Internet is distributed from all LANs? Is it possible to open a port for a TV, and how do I find out what the range of ports is for them? Can this be done using Simple Port Forwarding, UPnP Wizard or other similar programs? Or do you definitely need to go into the router settings?
The problem arose that we did not have to deal with such blockings, because... modems arrived without preliminary “cutting off”. And when you enter the configurator, these settings are simply not there - everything is cleared. As a result, a solution was found - you need to log into the router not as a regular user, but with a super administrator password. The owner of this matter himself personally guessed this. I am attaching his comment almost verbatim below. For the benefit of everyone, maybe it will be useful:
I solved the problem: I just needed to get to the superadmin password. After the usual authorization 192.168.100.1 and entering the locked settings, in the address bar we put:
192.168.100.1/html/network/set.cgi?RequestFile=../../mnt/jffs2/hw_ctree.xml
– and download the terminal config. And there we are already looking:
Internet and connection types
On the page you find yourself on, you will need to set all the ports that will be active. Immediately after this we do the following:
- On the WAN tab we find the “Modifications” column and in it - the Route subsection. There is a servicelist item, opposite it we indicate INTERNET.
- Select the connection type. To do this, find the IP Acquisition mode field and select PPPoE there.
- When completing the Huawei setup, we confirm that the previously specified LAN ports will be active for connecting via the Internet and that we need to save this data (click on the Apply button).
Setting up a Huawei wi-fi router for Rostelecom
Most of the latest operating systems, provided the modem is configured correctly, automatically provide a high-speed connection. If this does not happen, then you can additionally try logging in through the control panel.
- Go to Network and Sharing Center. Here you need to select the option for a new high-speed connection.
- Specify the username and password. If you have concluded an agreement with the provider Rostelecom, then the relevant information is in it.
- Specify WLAN ID. To obtain this data you must contact your provider. The support team usually helps. Having received the data, you can turn on the Rostelecom router, setting up Wi-Fi.
The same algorithm of actions is suitable for Kazakhtelecom.
Possible problems and their solutions
The settings page may not be displayed for the following reasons:
- The Huawei terminal is not turned on or the cable is broken;
- The address has changed. In this case, the settings are reset to factory settings;
- The device is broken and requires repair;
- A static address is specified in the settings. You can fix the error by following the steps below.
Set the automatic mode for receiving IP addresses:
- In the tray, right-click on the connection icon;
- From the context menu, select “Network and Sharing Center”;
- Click on the item “Change adapter settings”;
- Right-click on the current connection used by the router. Select the “Properties” item.
- Next, go to the “Internet Protocol Version 4...” section and select “Properties” again. The checkboxes should be opposite “Obtain an IP address automatically” and “Obtain a DNS server address automatically.” If they are not there, install them.
After setting a new password, you don’t have to worry that your Internet speed will drop due to tariff thieves. Hacking a Wi-Fi network is difficult. The only omission may be an acquaintance who asked for the network password and then gave it to a stranger. But you already know how to behave in such a situation: change the data on the Huawei router.
Huawei router settings for Wi-Fi
To properly configure Wi-Fi on your router, you need:
- After disconnecting the Optical cable, enter the router settings (the familiar web interface will help with this). We wrote above about how to enter the router settings.
- Select the WLAN tab and check the box next to the item that requires activation.
- The system will ask you to enter the SSID name, that is, the network name. Which text or digital option you choose is up to you. The maximum allowed number of simultaneously connecting people is set here.
- On an already configured router, you need to select a wireless network password. It must include large and small Latin letters, as well as numbers. In the classic version, this parameter is configured with a code of 10 characters or more.
- Having specified the router address, we set the network security key.
- Save the data and open the browser - Wi-Fi should already be active.
How to set up IPTV
Many people are interested in the question of how to provide access to IPTV through a router. This is not difficult to do, and if you complete the simplest settings, you will be able to watch digital channels in excellent quality. Even if you have not previously configured a modem and had no idea what and where to insert into the router, the recommendations below will help you.
- We go to the browser at the same address indicated above and already familiar to us from the description in the previous paragraphs. Enter the same login and password information.
- Select the “Network Settings” tab. Here we activate multicast data transfer by checking the box next to Enable IGMP. Upon completion, save the data.
- Go to the WAN settings and create a new configuration. The connection to the router in this case is of the IpoE type.
Having completed entering all the data and indicating that you want to connect the Multicast VLAN ID, do not forget to save them.
Firmware update
If interruptions are noticed in the operation of the router, then it is quite possible that its firmware should be updated. This is done like this:
- Download the archive with the required firmware version to your computer. To do this, it is very important to know the exact name of the router model you have in your hands. Finding the required firmware is not difficult at all on the Internet.
- We enter the usual address in the browser in the settings menu.
- We go to the system settings and agree to the update, indicating the path where the new firmware is saved.
- When the process is completed, the settings will be automatically reset to factory settings, and you will have to reconfigure the router.
Changing the factory password
It is recommended to change the factory password set by default on the modem immediately during initial setup. You already know how to open the desired page in the browser - it is located at the numeric address repeatedly mentioned in the article.
Next, go to the “Security” tab. The system will first ask you to specify your old password and login, after which it will ask you to enter new ones and confirm your actions. Specify the appropriate combination and save it.