The Yota modem is a modern, cutting-edge device that has successfully embodied the latest achievements in the Internet technology market. It combines a wireless Wi-Fi module and a 4G modem and can provide a signal to eight mobile devices. The modem works very well in rural areas, in transport, or simply as a router, under one condition - the router must be in the coverage area.
After purchasing a device, most users have a question: “How to set up a Yota modem?” To do this, you need to connect it to a computer or tablet via a USB connector. The installation wizard will launch automatically and after a few minutes a window will appear on the monitor screen in the bottom right corner informing you that the RNDIS device has started working.
Sometimes the AutoPlay feature does not work or is disabled. How to configure the Yota 4G modem in this case? In such situations, you must start the modem manually. After connecting the device, a new disk icon will appear in the “Computer” section; here you need to find the AutoInstall.exe file. A dialog box will appear on the screen in which you select the language, click the “Install” button, after which the installation processes of the modem driver and the Yota Access program begin. This program will automatically find and connect to the Yota network.
You must complete the modem settings by registering and activating this device in your personal account on the Yota operator website using the connection card data. There is a protective layer on it, after erasing which the user will recognize his personal data. Clients who are connected to the corporate package do not need this card.
Those wishing to purchase the innovative Yota modem should take into account that the 4G device works with modern operating systems that are no older than Windows XP/Vista/7-8 or MacOS X. And in order for the Yota Internet connection to be present on several computers at the same time, you only need to purchase router recommended by Yota support. Today, router models from Asus, D-link Zyxel, and keenetic Yota brands work successfully with yota.
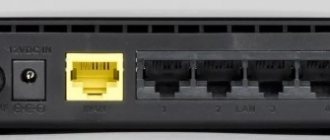
Physical connection of the device
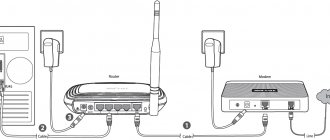
For the router to start working, it must be connected to an outlet and a device for configuration - a laptop, PC or any other. It is best to connect to your computer using a LAN cable to avoid any problems with the settings.
We proceed like this:
- We connect the power supply to the appropriate connector of the router, and insert the plug into the socket.
- We find a network cable included with the router. We connect it to the LAN port.
- We connect the second end of the cable to the network connector on the computer.
- Turn on the router.
⇡#Performance testing
We decided not to check the speed of the Internet connection, since it depends much more on the quality of the coverage than on the capabilities of the modem. But since Yota Many allows you to exchange data within a Wi-Fi network, you can evaluate the performance of the access point. For this, two computers with TRENDnet TEW-624UB and TEW-664UB network adapters were used, which operated in IEEE 802.11b/g mode. Testing was carried out using the IxChariot 6.70 program - its components (endpoints) installed on the test machines exchanged data with each other via a router. The Performance.scr script was selected in the program. The distance between the adapters and the router did not exceed one meter.
Judging by the testing results, the throughput of Yota Many corresponds to the provider’s WiMAX connection - 10 Mbit/s, but not a megabit more. The router's access point may even have a data transfer speed limit. Encrypting traffic has only a minor impact on network performance.
| Data transfer direction | Min. speed, Mbit/s | Avg. speed, Mbit/s | Max. speed, Mbit/s |
| No encryption | |||
| WLAN1 → WLAN2 | 8,79 | 10,26 | 11,94 |
| WLAN2 → WLAN1 | 8,16 | 10,22 | 12,12 |
| WLAN1 → WLAN2 / WLAN2 → WLAN1 simultaneously | 3.27 (one way) | 10,76 | 6.15 (one way) |
| WPA2-AES | |||
| WLAN1 → WLAN2 | 7,48 | 9,98 | 12,12 |
| WLAN2 → WLAN1 | 4,37 | 9,95 | 11,27 |
| WLAN1 → WLAN2 / WLAN2 → WLAN1 simultaneously | 0.71 (one way) | 8,4 | 8.51 (one way) |
| Direct adapter connection, 802.11 b/g (for comparison) | |||
| WLAN1 → WLAN2 | 23,53 | 27,79 | 31,7 |
| WLAN2 → WLAN1 | 14,82 | 26,95 | 32 |
| WLAN1 → WLAN2 / WLAN2 → WLAN1 simultaneously | 8.25 (one way) | 27,75 | 21.62 (one way) |
Login to the interface
You can also watch a video tutorial on setting up a router:
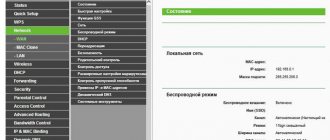
After connecting, you need to get into the settings themselves. For this, the router has its own network interface. To open it, turn on the browser on the computer (to which the router was connected). Any of the existing ones will do. In the address bar, type the standard address - 192.168.1.1 and press Enter. An authorization window will open.
If an error occurs, check whether the router is turned on and whether it is connected properly. It also happens that people mistakenly write commas instead of periods between numbers.
In the “Username” field enter the word admin, in the password field - the same. Click on “Login” and get to the settings interface. The quick setup offer should be ignored - not everything can be configured there, and besides, you need to immediately learn how to work with the main settings menu.
⇡#Introduction
Yota sells customers several different devices - routers and modems - to access its WiMAX network. Most of them are either regular mass models or products of OEM manufacturers under the Russian brand (Yota Jingle and Yota Egg). The new products that were included in the 3DNews test laboratory were developed by the provider itself. Yota One is a USB modem for one user, and Yota Many is a wireless router for several people.
Yota One is sold at a price of 2,900 rubles and will coexist with cheaper models Samsung SWC-U200 and Yota Jingle. Yota Many costs 4,900 rubles and is designed to completely displace the well-known “egg” as soon as the latter’s stocks run out. The advantages that justify such prices, which are quite high for the corresponding classes of devices, are a lot of little things that make installation and operation simpler and more convenient. The company received five international patents for the technical solutions used in Yota Many: three for design, two for operating algorithms.
Yota One and Yota Many are produced at the facilities of the Chinese company Quanta Group. The main components, the WiMAX controller and the Wi-Fi access point chip in Yota Many, are produced by GCT and Atheros, respectively.
| Yota One | Yota Many | ||
| Wireless protocol | IEEE 802.16e | Wireless protocol | IEEE 802.16e |
| Frequency range, GHz | 2,5-2,7 | Frequency range, GHz | 2,5-2,7 |
| Transmitter power, mW | 200 | WiMAX transmitter power, mW | 200 |
| Connecting to client devices | USB 2.0 | Connecting to client devices | USB 2.0, IEEE 802.11b/g (2.4 GHz) |
| Power consumption, W | 2,5 | Wi-Fi transmitter power, mW | 3 |
| Overall dimensions: LxHxD, mm | 69.0x26.0x10.0 | Battery capacity, mAh | 1500 |
| Weight, g | 17 | Battery life, h | 6—24 |
| Warranty period, years | 1 | Overall dimensions: LxHxD, mm | 90.0x60.0x13.0 |
| price, rub. | 2 900 | Weight, g | 75 |
| — | — | Warranty period, years | 1 |
| — | — | price, rub. | 4 900 |
Changing the default password
The admin/admin login and password may seem unreliable. If necessary, you can easily change them, but you need to be careful - you will have to go to the settings page infrequently, and therefore new login data is easily forgotten. And to reset them, you will have to reset all the router settings entirely. But if many people will use the router, then for security reasons it’s still worth changing the login and password.
To do this, go to the “Administration” section. Enter new values in the “Username” and “Password” fields, repeat the password in the next field and save the settings.
And immediately write them down somewhere on a piece of paper so as not to forget!
Which Asus router is suitable for connecting a 3G/4G modem to it?
First of all, two facts must be taken into account:
- Not all routers that have a USB port can work with cellular modems. I will list the main most popular and widespread models in Russia: RT-N10U B, RT-N14U, RT-N18U, RT-AC55U, RT-N56U, RT-AC51U, RT-N65U, RT-N66U, RT-AC52U, RT-AC56U , RT-AC66U, RT-AC87U, RT-AC3200, DSL-N17U
- Not every router will work with every modem, even if it supports this type of device
Supported modems for Asus router
Accordingly, if you decide that you want to connect a 3G or 4G modem to your Asus router, then:
- Firstly, it must have a USB connector. ASUS models with this port are designated by the letter “U” at the end of its number. For example, RT-N10U, RT-N14U, RT-N56U, RT-AC51U, RT-AC66U and so on
- And secondly, you need to check that the model of the modem itself is supported by the Asus router - you will find a list of all working options on the company’s official website.
How to connect a 3G-4G modem to an Asus router? Step by step diagram
- Connect the router to the network
- Insert the modem into the USB port
- Activate WiFi mode on it
- Connect to the router from a computer, laptop or phone
- Go to settings
- Set up a connection via 3G/4G modem
Setting up different connection types
The type of connection will depend on the provider. This information, as well as data for accessing the Internet, needs to be obtained from him. This is configured in the “Advanced Settings” section, in the “Internet” (“WAN”) item.
If the connection type is PPTP, then you need:
- Select the appropriate line in the “WAN connection type” item.
- Enter the login and password from the agreement concluded with the provider.
- Enter the hostname and server address.
- If the IP address should be assigned automatically (i.e. the address is dynamic), check the “Yes” switch in the corresponding field. If the address is static, select “No” and enter all the data in the section yourself.
- The remaining parameters can be left as default.
- Click “Apply” to save the data.
Some providers, for example Beeline, use an L2TP connection. It is configured like this:
- Select the desired type and leave “Yes” in the WAN, NAT, and UpnP enable fields.
- We get the IP address automatically - put “Yes” in this field.
- Enter the username and password from the agreement.
- If the provider has specified DNS data, enter it; if not, then enable automatic retrieval.
- VPN server - enter data if available.
- Hostname - you can enter anything in Latin letters.
- Save the settings.
Rostelecom, Dom.ru and others access the Internet via PPPoE, you need to configure it like this:
- Select the connection type, enter your login and password.
- IP address - automatically.
- Enter the DNS server and, if necessary, the MAC address of the network card by which the connection is identified.
- In the MTU field enter 1472.
- We apply the entered data.
Each network provider connects differently, so it is advisable to first obtain all the necessary information from the technical support service.
⇡#Design, ergonomics
Unlike the white devices with smooth shapes that Yota has preferred until now, the new products look strict and solid. The Yota One and Yota Many cases are made of durable plastic with a dark grainy surface. The signature dancing figure serves as an indicator that lights up blue when the modem detects a wireless network. On the side of the Yota Many there is also a number of bright luminous dots that reflect the charge level of the built-in battery.
Compared to the “egg,” the new router is indeed noticeably lighter and more compact.
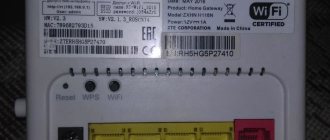
Yota One is equipped with a rotating block, on one side of which there is a USB plug, and on the other - a micro-USB port. The Yota Many router also has them, since it is charged from USB and can operate in modem mode. Under the plug there is a sticker with the device serial number and MAC address, which is used as the default password for the Yota Many secure network.
Using the holder from the Yota Many kit, you can attach it where the wireless network is best received, for example, on a window glass. The holder attachments (suction cup and three sticky “tablets”) are attached using fabric Velcro.
Setting or changing your Wi-Fi password
An equally important step when setting up the ASUS RT-N16 is setting a password for the wireless network. Without this, anyone within the connection radius will be able to successfully connect to Wi-Fi and use the “free” Internet at their discretion.
To set your password and protect your network, you need to:
- Go to the “Wireless Network” setting (from the “Advanced…” item).
- In the “General” tab, enter the name of your network. This is done in the SSID field, only Latin letters and numbers are used.
- In the “Authentication Method” item, select WPA2-Personal.
- The “WPA Pre-Shared Key” field is responsible for the password for the wireless network. Enter it and don’t forget to write it down separately just in case.
- Click “Apply” to confirm.
Possible problems
When connecting the router using Wi-Fi, the network may not be created, which is indicated by the absence of a lit blue indicator.
This happens because there is no signal or the speed is too low.
Sometimes the reason is that the option to turn off the wireless connection automatically is enabled.
To determine what the problem is, conduct a speed test (there are special programs for this) and connect the modem to the computer using a cable.
If you are using Windows XP SP2, the wireless connection may also not be available because this operating system does not support WPA2 encryption.
- System update;
- Installation of RNDIS drivers and wired connection.
If the speed does not meet the required value, you should contact the Yota operator and resolve issues with its technical support.
Although usually such problems do not arise with this provider, and the speed test shows normal results.
Source
Recommend
Get the profession “Web developer” and earn from 120 thousand rubles
Changing the internal address of the router (local network)
This is not used often, but just in case you need to be able to change the standard router address. By default, its value is 192.168.1.1, but if you have to connect other routers on the network, then such a common address will cause conflicts in the operation of network devices.
Changing the address is simple. In the additional settings section we find the “Local network” item. Now we change the address - just change one digit, the last or penultimate one. For example - 192.168.1.3. Click “Apply”, after which the router’s web interface will be available at the new address.
Working with non-original modems
To connect Asus devices and the Internet from Yota, you can use other modems that support 4G. If the device does not block from operators other than certified ones, you will be able to do this. If there is a blocking, then the 4G modem is unlocked to connect to the Yota SIM card.
Yota supports 4th generation modems from the following brands:
- ZTE MF821D – will have to be unlocked;
- ZTE MF823D – works fine;
- ZTE MF825 – works fine;
- Huawei E3272 – works fine;
- Huawei E392 is the most popular.
Let's look at them in more detail.
Saving and restoring settings
Now that all the settings have been completed, you can also save them to a separate backup file. And in the future, if there are any problems or resets of the router, you will not have to configure it for a long time. It is enough to download such a file and all configuration data will be quickly restored.
To save we do this:
- Go to the “Advanced settings” item.
- Select "Administration".
- Open the tab for saving and restoring settings.
- Click on the “Save” button. We choose a place to save and get the treasured file for quick recovery.
Note! If you need to restore settings from this file, you need to click the “Select file” button, and then specify the path to the settings file and select “Download”. But if you click the “Restore” button, the router will be reset to factory settings.
Asus RT-N18U
This model is also in great demand among Russian users. It costs around 4,000 rubles - this is the optimal price between the two previous models. The router develops connection speeds of up to 600 Mbit/sec and perfectly picks up weak signals, which is especially suitable for the Internet from Yota, where there are not enough fixed mobile towers. The signal is amplified by 3 additional antennas. When connecting computers via a LAN cable, the speed doubles. The Yota modem is connected via a USB port on the case. There is one high-speed USB 3.0 port.
To make a choice, you need to make a list of priorities and choose the appropriate model. Any device from Asus will work perfectly if it is original, and can be combined with Yota modems if it is also the latest modification, as is the case with the above presented series. Connect the router to your devices through the connection settings and choose the best offers for Internet packages from Yota in your region.
Source
Software update or firmware change
Sometimes the user has to update the router firmware or install a more stable and efficient version. The latest version can always be downloaded from the official website from the “Drivers and Utilities” section. To avoid damage to the device, it is not recommended to use third-party firmware.
To install the firmware, you need:
- Unpack the downloaded archive, extract the files into a separate folder.
- We go to the router interface (192.168.1.1, if it has not been changed.).
- Enter your username and password.
- In the “Advanced settings” item, select the “Administration” sub-item.
- Find the “Firmware Update” section.
- Click on “Select file”, specify the path to the unpacked firmware file.
- Click “Submit” and wait for the router software update process to complete.
- We configure the router again.
We have covered the main points. If something doesn’t work out, or you have questions, be sure to write. Comments are always open for you and there is an online chat.
Connecting a 3G-4G modem to the Asus RT-AC68U Router
Connecting a 3G or 4G modem to a router allows you to solve a problem that is more typical for a private country house than for an apartment - the inability to connect to regular cable Internet. At the same time, the need to access the network from several devices at once - a computer, laptop, smartphone - does not disappear anywhere, which means the only universal solution to this issue is to use a router with a USB connector. In this article we will figure out how to connect a 3G-4G modem to an Asus router.