Using an operator
This is the simplest way to correct the situation and activate mobile Internet. All you need to do is call 679, explain the essence of the problem and tell the operator your phone model.
After this, all you have to do is receive an SMS message with automatic parameters for your phone and agree to accept them. All necessary settings will be made to the device without your intervention. At the end of these steps, you should be sure to restart your mobile phone.
If, after receiving an SMS with automatic options, you still cannot start the Internet on your phone, you should resort to the manual setup method. This process is slightly different depending on what operating system your device is running.
Android up to version 2.3 and less
For mobile devices with Android 2.3 or an earlier version installed as the operating system, to successfully activate the Internet manually, follow these steps:
- In the phone menu, click on “Settings”, select the “Wireless networks” tab, then go to the “Mobile network” section - the “Internet access points” line.
- By pressing the additional menu activation key, select the “Create APN” tab.
- In the “Name” line, enter: Tele2 internet.
- In the “APN” field, write in Latin letters: internet.teleru.
- Next to “Authentication Type”, put: No.
- In the “APN Type” section, put: default, supl.
Leave all other lines blank. Finally, click “Save”, restart your phone and try connecting to the Tele2 network.
Android 3.x, 4.x, 5.x
The settings for these versions of Android are the same as for the previous case. To get to the place where you need to install them, go to the menu, go to “Settings” - “More”. Next, click on the “Mobile network” tab, the “Access points” line. In the additional menu, select the function: “Create a new access point.”
For these Android modifications, you will need to fill in only two fields to successfully activate the access function to the World Wide Web: Name - Teie2 internet and in the "APN" line write in English letters - internet.tele2.ru.
Before you start using the Internet, don’t forget to restart your device for the new settings to take effect.
Manually setting mobile Internet parameters on an iPhone or iPad running on the iOS operating system is also not difficult. You need to open the menu, the “Settings” section - the “Cellular Communications” tab - the “Cellular Data Network” item, and write in the “APN” field in small English letters: internet.tele2.ru. Lines that prompt you to enter a password and username should be left blank.
Windows Phone
In devices based on Windows Phone, the access point is registered in the same way: in the “APN” line in small English letters: internet.tele2.ru. You can also get to it through the settings by going to the “Data transfer” menu item.
The settings will take effect after the phone restarts.
If after these manipulations you are still unable to connect to the Tele2 mobile Internet, do not rush to get upset. Double-check that you have entered all the parameters correctly. If you find an error, correct it, and do not forget to restart your phone after that.
Firmware problems
a luxury smartphone without a network turns practically into a brick, in the best scenarios, into a Tetris-type toy, which makes it mandatory for the user to search for the causes of the problem, depending on which the methodology for “treating” the iPhone will vary. Often, users diagnose the problem by the following “symptoms” of a failure:
- The smartphone periodically loses the network.
- The iPhone regularly does not recognize the SIM card.
- The phone does not respond to the SIM card when trying to activate it for the first time.
- The device writes “No network” if there are no previous problems of this kind.
- The failure was preceded by the phone being dropped or damaged, and there was a possibility of moisture getting into the device.
Any of these precedents makes the owner panic, since financial problems with such an expensive device often foreshadow significant waste; sometimes it is simply impossible to solve the problem on your own, which requires a trip to the service center for help from specialists.
The fact that the Apple gadget does not see the SIM may be the result of an iOS software glitch, which caused the firmware of the cellular modem to fail. It will not be possible to identify such a malfunction without special equipment at hand. However, if the user tried to install several cards into the gadget and the device did not recognize any of them, there is no need to rush to the service center. First you need to try to change the firmware on your iPhone.
To replace the firmware, you must use iTunes. The user needs to connect the gadget to the PC, go to the device management menu (1) and click on the “Restore iPhone...” button (2).
iTunes itself will download the latest official firmware and install it on your smartphone. If the user wants the iOS on his gadget to remain in the current version and not be updated, he should independently find the appropriate firmware on the Internet (IPSW file format) and download it to the mobile device by pressing the combination “Restore” (in iTunes) Shift (on the keyboard ).
To replace the firmware, it is better to use the latest version of the iTunes media combiner.
If flashing the firmware did not solve the problem with the SIM, most likely the iPhone is broken.
Sometimes the answer to the question “why doesn’t the iPhone read the SIM card” is an incorrect update of the device’s firmware. To correct the situation, the smartphone should be rolled back to factory settings. For this:
- open iTunes on your computer;
- connect your smartphone to your computer using a cable;
- when prompted for a password, enter;
- in the program, select the specified device;
- click the “Restore” button and then confirm your choice;
- wait for the recovery to complete.
The smartphone will turn on, but you will have to enter all the information again - the iPhone will return to the state of a new device.
Setting up Tele2 Internet on iPhone
Anyone today wants to use the mobile Internet. This is very convenient because from your phone or smartphone you can not only go online to view news, but also check your email, use social networks to connect with friends, or exchange messages through a free application, but which requires the Internet. In addition, using the Internet you can control your personal business. Also today there is a trend that many people use iPhones for communication, but not many know how to set up the Internet on an iPhone with the tele2 operator. We are talking about setting up Internet tele2 yourself. This article will help you understand this issue and make it easier to set up Internet access for your iPhone.
How to identify the problem
Problems with unlimited mobile Internet are quite easy to distinguish from any others. Main symptoms of problems:
- you can't access the Internet on your iPhone (via 3G, LTE or Wi-Fi)
- Modem mode does not turn on (or iPhone does not work as a Wi-Fi access point)
- The Internet works intermittently or when there is a connection icon on the mobile phone screen, pages are not displayed
If you encounter a system error, just restart your smartphone - after turning on the unlimited Internet function should work as usual. Switching to Airplane mode and then returning to normal mode also sometimes helps. If simple steps do not help, the error should be looked for in the phone settings, software or hardware.
Getting automatic settings
The simplest method of accessing the network is to order automatic settings for the device from the tele2 operator. To place such an order, you must use one of a couple of methods:
- Subscribers can contact the telecom operator using a short number and ask the operator to send parameters to the device;
- You can independently order the necessary parameters through the self-service center, namely through your personal account, which can be accessed on the company’s website.
SIM is locked
Also, the iPhone does not see the SIM card if it is locked, that is, designed to work with a specific operator’s network. In this case, other networks will not be recognized / so you should only buy models marked “SIM-Free”. There are two ways to solve the problem with a locked SIM card:
- use the R-Sim chip (this method will lead to loss of warranty, and there will also be problems with communication and Apple-branded applications);
- contact the operator for whose work the smartphone was designed.
In the second case, you will have to be patient, but the unlocking will be “clean” forever. It is also worth noting that you will have to pay several thousand rubles for the procedure. Only scammers perform such work quickly and cheaply.
Now you should understand each method in detail
To receive data through a telecom operator, you will need to dial the short and toll-free telephone number 679. After this, the mobile operator’s system itself will begin checking the data against its database for a specific model. As a rule, in almost 100% of cases the necessary parameters are in the operator’s database. If the settings are successfully found, the operator will send the data as a text message. The subscriber will also know that a setting for the phone has been found thanks to an alert. After the request is sent and after a certain period of time, an SMS message will be delivered to the device, which will need to be saved. Next, the subscriber needs to reboot the device to correctly set the parameters on the phone itself. Now clients can check and go online when necessary.
If using a personal account, subscribers will need to go to the Tele2 company website. Then go to the tab with your personal account and register in it, if this action has not been done previously. Then you need to log in to the system, and only then order the necessary data for your mobile device. To do this, you must initially select a phone from the list provided. The necessary parameters are sent to the mobile phone, and the client must, like the previous method, save the data and restart the iPhone. After this, you can surf the World Wide Web.
Setting up network access manually
Sometimes automatic settings are not installed or they are installed incorrectly and access to the network still remains closed. In this regard, some subscribers need to configure the iPhone themselves, manually. In such a situation, you will need to use some data that should be entered in the phone menu itself. Such data to be filled out by the tele2 provider includes:
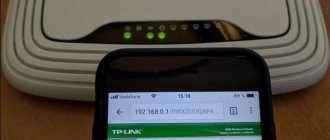
- Customers should go to their phone settings and go online. Next, you should register an access point to access the network, or as it is called on some APN models. It indicates internet.ru;
- In the columns where the user name and password are indicated, subscribers do not need to write anything; these columns can be left empty and unfilled;
- In the column with the profile name you should write Tele 2 Internet;
- For the line with channel and connection type, GPRS is selected;
- The line with the proxy server should be in the off position;
- And https://m.tele2.ru is used as the home page.
If certain iPhone models have other lines, they should not be used and nothing should be written in them. It's just better to skip them and leave them unchanged. After the data is registered, you can restart the device and try to access the Internet.
Does iPhone 5 and other models support 4G or not?
The spread of technology has come very far, but still not all smartphone models support its operation. We will discuss which iPhones support 4G, that is, they have a built-in special module.
But that's not all - depending on the newness of the device, the throughput also changed, becoming better and better from generation to generation. So, from the list below you will find out whether the iPhone 4S supports 4G and answers to your other questions:
- 5, 5c, 5S – up to 100 Mbit/sec;
- SE, 6, 6 Plus – up to 150 Mbit/s;
- 6S, 6S Plus – up to 300 Mbps;
- 7, 7 Plus – up to 450 Mbit/s;
- 8, 8 Plus, iPhone X, iPhone XR – up to 600 Mbps;
- XS, XS Max – up to 1 Gbit/s.
Now you know whether the iPhone 5 supports 4G or not, as well as the characteristics of other generations of devices. Please note that these are average figures and may vary depending on the load and distance of the signal towers, as well as the width of the channels.
Setting up specifically on iPhone phones
Each iPhone model has its own differences in setting settings. In this regard, the Internet settings may be slightly different, but the essence remains the same.
For example, if the subscriber owns an iPhone 4, 4s, and iOS 8.4 is installed on it, then in this case you should go to the menu and go through the settings section. Next, go to the cellular connections tab and go to the data transfer section. The very first inscription in the menu that opens should be: “Cellular data”. At the bottom of this column there is a form with three columns, where subscribers only need to register an access point. The data for it is described in the material above. After this, you need to save the settings and the tele2 provider will be able to provide access to the network, but you need to remember that the device will need to be restarted. On some iPhones, the inscriptions in the columns may differ, but their body is filled in by analogy.
Clients who are setting up the Internet need to remember that along with the installed data, MMS messages must also be set up. Thanks to this you can receive and send multimedia SMS. You also need to remember that for correct installation of settings and operation of the Internet, it is recommended to use only new SIM cards that can provide access to 3G and 4G networks.
How to enable tethering mode on iPhone
- Go to Settings.
- Go to Modem Mode.
- Activate Modem Mode on your iPhone by moving the slider.
After this, the mobile device will turn into a mobile access point and begin to “distribute” the Internet. You can connect to it via Wi-Fi using the password that is displayed in the mode settings.
Be careful: the enabled wi-fi modem mode is not displayed anywhere. But the battery on your phone drains faster.
When another device connects to you, you will see this message in the status panel.
Basic ways to set up the Internet
There are several main options for entering network access parameters into the system. These include:
- Automatic setup that occurs when the card is activated or data is requested from the operator.
- Manual, which involves creating a connection profile yourself.
Automatic setup
Often, after activating the SIM card, you receive a message containing the connection profile settings: basic values and their parameters. To install, all you have to do is click on the “Save” button.
But if, after activation, the card was moved to another device, it may be necessary to reconfigure it. You can do this by calling the special number 679. Following the answering machine prompts, you need to select your phone model and wait for a message.
Manual setting
In some cases, Tele2 services cannot provide the subscriber with a file to activate automatic parameters. This is due to the fact that different models have their own characteristics. Not all devices are in the operator’s database. Some of them have not yet been included, while others, on the contrary, have been removed from the list due to the fact that the model is outdated or discontinued. In this case, the settings will not be sent. You can solve the problem by manually entering all the necessary data.
This is done in the following way:
- Find Internet settings on your phone. They are often found in the Applications menu.
- Review the existing “Internet Profiles” and, if the “Tele2” profile is missing, create a new one.
- Please fill it out as follows:
- Profile name – enter any name convenient for you, as standard you can call it Internet Tele;
- We enter the address of the page that will be considered home. For Tele2: m.tele2.ru.
- The “access point” looks like: internet.tele2.ru.
- The “connection type” for devices is often GPRS.
- We disable the proxy server, we don’t need it.
- The fields “Username” and, accordingly, “Password” do not need to be filled out.
- After saving the profile, you must select it as the main one.
Android devices
The methods for entering data are slightly different for Android.
For proper operation you need:
- Find “Data transfer” in your phone settings.
- For further work, you need to enable “Mobile data”.
- After this, we return to the “Settings” menu again. And immediately below the previous item we see a small collapsed menu called “More...”. Let's reveal it.
- Open “Mobile networks”, select “APN access points” from the list.
- Open the context menu, the call button is at the top of the screen, and create an access point.
- Next, for versions above 2.3, enter:
- The name of the network is whatever is convenient for you.
- APN takes the value internet.tele.ru.
- Authentication – no.
- The APN type is default.
For OS below 2.3:
In addition to the above settings, we add;
- MCC – 250.
- MNC – 20.
- We save the entered data. Place a checkmark next to the created profile and reboot the device.
Entering parameters on iOS is done like this:
- For versions below 7.x.x, you need to open the “Settings” menu. Find “Cellular” in the list. Next, you just have to select the “Mobile data network” sub-item and set the APN parameter to internet.tele2.ru.
- For newer models, do this as follows: enter “Settings” – “Mobile communications” – “Cellular data”. Next you need to enable 3G. Then select “Cellular Network”.
Contacting the operator
If you have problems setting up access, you should contact your Tele2 operator. There are several options in which you can get specialist advice.
- Contact the Call Center operator at 611. After connecting, you need to tell about your problem and ask the managers to help.
- At the service center in your city. When applying, you must have your passport with you. There they will check your phone and help you configure it according to basic parameters.
- On the Tele2 website in the “Help” section. To do this, go to tele2.ru/help, then go to the bottom of the page and select “Online consultation” on the website.
The connection was not without problems
Since the service was launched only today, employees do not yet know how to quickly connect it.
To apply for a virtual SIM card, you need to come to the salon with a passport. And already at this moment the first problem arose.
To connect eSIM you need to scan the QR code that is set by the Tele2 program. For about 15 minutes the seller could not set up my tariff , but then the program skipped everything.
In general, it is curious that not all employees know about this technology. In technical support, only a senior specialist was able to tell me the address; other operators did not know what they were talking about and seemed to have heard the word “eSIM” for the first time.
Tele2 has a big minus for this. How can you even allow tech support not to know what they are dealing with?
Well, okay, that’s not about that now.
Important : you can connect eSIM from Tele2 with any tariff, but not lower than “My Online” for 400 rubles per month.
It includes 15 GB of traffic and 500 minutes of calls. When registering, they prepare a physical SIM card for you to bypass the ban on SIM cloning. In fact, they don’t give you the card itself, they simply turn it off and configure it as an eSIM.
Questions from subscribers
How to request Internet settings?
By dialing 679. After the system answers, select your device model from the list provided.
Is it possible to set up the Internet via SMS?
There is no special command for making a request by sending a short message. But all settings come in the form of system messages that must be activated to complete the setup.
What to do if the Internet settings did not arrive?
You can try setting up your phone manually or consult your operator by dialing 611.
Often the settings come when you turn on the SIM card for the first time. There are situations when they do not come to your number or do not match the device. In this case, order them from your operator or manually configure your device. If unsuccessful, you must contact the operators of the contact center or service department in your city.
Tele2 personal account in the mobile application
In addition, in the application you can find out about the status of your personal account. The app offers more flexible expense control with many new options. You can view your balance, study all recent payment receipts, or order full details of your personal account, where each transaction, both outgoing and incoming, is indicated. To study the details, you need to go to the “Expenses” section.
You can also:
- Transfer money within the Tele2 network, that is, you can easily top up your friend’s phone from your LSA (personal account) directly from the application on your smartphone;
- Block your SIM card if it is lost (or stolen). This can be done from the tariffs and services section.
Correct Internet settings on Tele2
Recently, more and more often, mobile operators have already included all the settings in their SIM cards from the very beginning, and the subscriber subsequently does not need to carry out additional steps for manual configuration, for example, the Internet.
But there are still cases where the client’s phone model does not go through the automatic settings and you have to enter everything yourself. Let's take a closer look in this article on how to properly configure the Internet on Tele2.
So, in order for your mobile device to be able to access the network on its own, or through a computer, you need to set up manual settings, which in the end should look like this:
home page: https://m.tele2.ru; proxy server: disabled; access point APN: internet.tele2.ru; username and password: leave the cells blank.
If you have any questions about this article, do not hesitate to ask in the comments. We will try to respond promptly.
If the operator does not support VoLTE
If your operator does not support VoLTE and uses GSM, you will see one of the following options.
- LTE or 4G: Enables cellular data over an LTE or 4G network when available.
- 3G: Enables cellular data over the 3G network when available.
- 2G: Enables cellular data over the 2G network when available.
Depending on your cellular operator, the 4G icon may indicate a UMTS or LTE connection. If the operator does not support VoLTE and uses the CDMA standard, only the Enable LTE option will be available. It enables cellular data over the LTE network when available.
Source
Internet settings on Tele2 for Android devices
- For Android devices version up to 2.3. Go to the menu and find the basic settings. In them, go to the wireless communications tab, then to mobile networks and select an Internet access point. Now you register: Name: TELE2 Internet, APN: internet.tele2.ru, MCC: 250, MNC: 20, APN type: default. Leave all other fields blank. Save the settings, restart your phone and try to access the Internet.
- For devices based on Android versions 3x, 4x, 5x, 6x and 7x. Go to the menu, then to settings, find the item there and go to it. Next, select the mobile network, access points (APN) and create a new access point. Of all the fields, we fill out only two: indicate the fictitious name of the network and APN: internet.tele2.ru . We save the settings through the menu, reboot and everything should work.
Internet settings on Tele2 for Apple iPhone and iPad
If you use an iPhone or iPad, in general your device runs iOS, then in this case use the following method. For software versions up to 7.xx and higher than 7.xx there are some differences, but they, one way or another, boil down to the fact that you need to go to the menu, settings, cellular communications, data parameters, cellular data network and specify the APN : internet.tele2.ru . In this case, the username and password fields must be left empty.
Instructions for correctly setting up SMS and MMS messages on Tele2 are in this material;
What to do when Modem Mode on iPhone disappears? [Instructions]
Recently, one nice lady (Katya) approached me with a request to help me deal with her problem. The fact is that after updating to iOS 8, the Modem mode item completely disappeared the Settings .
This is not the first time this has happened and I have personally encountered this before. There is nothing wrong with this, and correcting this injustice is quite simple. Today I will share with you my action plan that will help you return the missing Modem Mode item on iPhone .
Apple's support site says something like this: "The availability of the iPhone Tethering feature depends solely on whether your carrier supports this feature or not."
Maybe the bourgeoisie have it this way, but the CIS countries, as always, have their own “laws of physics”. In any case, this page lists a number of operators (and their countries of presence) that support Personal Hotspot.
In order to return the missing Modem Mode item to the iPhone, we proceed according to the plan below:
STEP 1 - On your iOS device, go to Settings > Cellular > Cellular Data Network.
STEP 2 - Scroll the screen to the MODEM MODE and enter the word internet in the APN .
STEP 3 - Now go back to Settings and, I hope, you will see the Modem Mode item appearing (if a miracle does not happen, just restart your iPhone, and then check Settings again).
The method described above works in 90% of cases. If you are in the lucky 10% of people, try the following:
- Hard reboot iPhone (press and hold POWER and HOME buttons simultaneously)
- Reset network settings in Settings > General > Reset > Reset network settings
There have been cases when people asked the question “But my modem mode item is not active and is highlighted in gray. I can't click on it. What to do?".
In this case, you just need to go to Settings > Cellular and activate the slider next to Cellular data .
In general, the Modem Mode function is very unpredictable. I wrote in more detail about Personal Hotspot connection earlier in a separate article. It happens that you just can’t get it to work.
It happens that you connect to an access point, and after a couple of seconds the connection is lost, and so on in a circle.
It also happens that the phone and computer seem to be connected, but there is still no Internet on the computer.
So my friends, try it, experiment and write back in the comments.