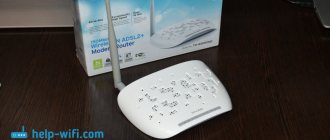
DSL 2640u is a rather ascetic and not very modern device. However, many Rostelecom subscribers have this particular router model. The model is designed for ADSL Internet connection operating over a telephone line. It is installed in places where there is no access to fiber optics. Let's discuss how to configure the d link dsl 2640u router under Rostelecom.
These instructions are also suitable for other models in the line: dsl 2640 NRU, dsl 2640 C4. Although all of them are designated by a different revision number and differ from each other in terms of hardware, they have almost the same interface.
Firmware versions
The DSL-2640U router can be found with two types of interface, which depend on different firmware versions. You can distinguish old and new firmware by color. The interface of the old version of the firmware is made in white and blue, and the new version is in dark gray and black.
Bridge mode
A settings window will open where you need to specify the Bridge value in the “Connection type” parameter, “VPI” - 0, “VCI” - 35.
Confirm the settings by clicking the “Save” button. In the list that appears, you will see the connection you created.
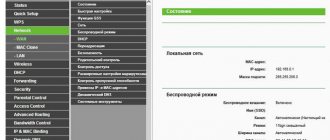
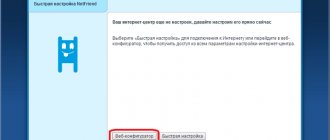
Login to the router admin panel
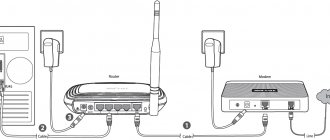
To set up your router, you first need to connect it to your computer, telephone cable and power outlet. Once the connection is complete, you can begin setting up device configurations. All settings are made using the router web management interface. To log into the management system of the DSL-2640U router, follow the instructions:
- Open an internet browser on your computer.
- In the address bar, write the device address – 192.168.1.1.
- Press Enter.
- Next, you need to log in to the system. To do this, enter the value admin in both username and password fields.
Restoring factory settings
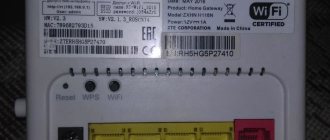
The D-link modem is equipped with a Reset button on the rear panel. It allows you to reset the router settings to factory settings.
- First, check the operation of the “Power” indicator (in active mode it should light green).
- Press and hold the “Reset” button for five to seven seconds. Release the button and wait until all indicators turn off. After this, the D-link router returns to its default settings. The reboot process begins.
Found a typo? Select the text and press Ctrl + Enter
Setting up an Internet connection
Most often, Rostelecom provides the Internet to its subscribers via a PPPoE connection, so this article describes the setup based on it. The settings items in different firmware versions are also located differently, so we will describe the settings process for each option separately.
Old firmware version
In the main menu of the interface, select “Network”, then “Connections” and click “Add”. In the window that opens, set the following parameters:
- In the “Connection type” item, select PPPoE.
- Enter the values for the “VPI” and “VCI” parameters. You can find them out from Rostelecom technical support, since this data is individual for each region of the country.
- Enter your username and password to access the Internet. This information is usually provided by the provider when concluding a contract for the provision of services. The password must be entered in the next field to confirm it.
- In the next paragraph, come up with and write the name of your connection.
- In additional parameters you need about and "IGMP".
- In the “LCP failures” field, enter the value 2, and in the “LCP interval” field - 15. Thanks to these settings, if the connection is lost, the device will try to connect to the network 2 times, and if the attempts are unsuccessful, it will pause for 15 seconds.
New firmware version
After successful authorization, the main interface page will open on your screen, which contains information about the router and several buttons. To further configure the device, you need to switch to the advanced control mode using the corresponding button at the bottom of the screen.
- Next, select “WAN” in the “Network” section. In the window that opens, delete all existing connections; to do this, select them and click “Delete”.
- In the “WAN” item, click the “Create” button.
A window will open on the screen in which specify the following parameters:
- Connection type - PPPoE.
- “Interface” - DSL (new).
- The values of the VPI and VCI parameters for your region, which can be found in Rostelecom technical support or searched on the Internet.
After completing the steps, setting up the Internet can be considered complete. If you do not plan to connect an IPTV set-top box, you can reboot the device and use the Internet. To reboot, use the corresponding button in the “System” menu at the top right of the D-link logo.
Auto-tuning
If you select the automatic setting using the installation disk, the sequence of actions after inserting the disk into the CD-ROM and starting the program will be described on the monitor. For proper configuration and correct operation of the D-Link DSL-2640U device, it is important to strictly follow all recommendations and be careful when implementing them.
PC setup
In order to ensure proper uninterrupted operation of the device, it is necessary to set it to automatically retrieve the IP address. To do this, follow the following sequence of steps: “Start” → “Control Panel” → “Network and Sharing Center”. After the transition, in the pop-up window on the right, select the “Changing adapter settings” section.
Further actions are as follows: in the list of connections, find and right-click on the item “Local Network Connection”. Designate the sub-item “Properties”. In the window that opens, select “Internet Protocol Version 4 (TCP/IPv4)” and click “Properties”. O and “Get DNS server address.”
Setting up IPTV television
Rostelecom is actively offering subscribers an IPTV service called “Interactive Television”. To configure IPTV on the DSL-2640U router, you must do the following:
In old firmware
- In the main menu, in the “Network” section, select “Connections”.
- In the “Connection type” column, set the value to “Bridge” and enter the VPI/VCI values (these values will differ from those you entered for the Internet connection). Depending on the region, IPTV may require one or two connections to operate. If two sets of parameters are needed, then repeat the procedure again.
- Now that the connection has been created, we need to group the ports. To do this, go to the “Advanced” section and select “Interface Grouping”.
- Add a group using the appropriate button at the bottom of the page.
- Come up with and enter a name for the group in the “Name” field.
- Move from the left column to the right two bridge connections and ports for the set-top box (usually one, for example, LAN2).
In the new firmware
- Open "Advanced Settings", then in the "Network" section, go to "WAN".
- Click Add.
- In the “Connection Type” item, select “Bridge”, and in the “Interface” drop-down menu, set the value to “DSL (new)”.
- Specify VPI and VCI (these values will be different from those you entered for the Internet connection) and save the created connection. Depending on the region, IPTV may require one or two connections to operate. If necessary, create a second similar connection for another VPI/VCI pair.
- In the "Advanced" section on the "Advanced Settings" page, click "Interface Grouping".
- Click the “Add Group” button.
- Specify any name for the group to be created and check the boxes for the required ports and bridge connections.
- Click Apply.
Setting up WiFi on a DSL 2640u modem Rostelecom
Go to “Wi-Fi” - “General Settings”. Pay attention to the SSID field; in fact, there should be the name of your network, which will be visible to those connecting.
After that, enter the “Encryption Key” (in other words, this is the password when connecting to the network). Enter and click “Save”. Also reboot the router and wait a couple of minutes. At this point we can assume that Rostelecom has been configured for DSL 2640u.
You can use the device to its full potential. If something still doesn’t work for you, contact technical support.
If you need to also activate IPTV
For example, let's take the same router model.
To set up IPTV, you will need to create a couple of additional connections; set the mode to “Bridge”. Register the VPI and VCI of the region again - you already know where to get them. Click on the “Save” button.
For example, for Krasnoyarsk the value is paired (1/35, as well as 1/36), in this case it is necessary to create a pair of “Bridge” connections. Therefore, one more thing is added. When these parameters are not paired in a region, it will be quite simple to create a single connection.
It turns out that we have 5 connections (one of them is LAN, don’t forget). But that is not all! For good operation of the Internet and television, you need to create a group of interfaces. In other words, pass traffic from the TV into the LAN port, and leave access to the Internet in the remaining ports. It's easy enough.
Go to “Advanced”, then “Interface Grouping” and add a group
Create your own group for television. “Name” - you can enter any name here. Move “LAN4” and a pair of “Bridge” connections from the column from left to right. Save the result.
The Internet will be in the first three LAN ports, as well as via WiFi, but TV will be in the remaining one. Click "Save and Reload" (located in the top right corner). After the reboot is completed, you can connect all the corresponding cables. Wait at least a couple of minutes so that the device has time to adjust to the new settings.
Wi-Fi setup
Distributing wireless Internet will make life easier for owners of various gadgets (smartphones, tablets, laptops, etc.). And our D-Link DSL u2640 makes it possible to deploy such a network: so let’s take advantage of this.
Select the “wi fi” tab in the “advanced settings” section. Then click on the “basic settings” button and start creating.
In the special fields you have to enter the following values:
- In the “enable wireless connection” box, check the box.
- In the SSID field, enter the name of your network - the one that devices will see when connecting to it.
- Filling out the “country” field should not cause you any particular difficulties.
- In the “channel” tab you can leave the value “auto”.
Then we go to the security settings of our wi fi network (located next to the “basic settings” button of the “Wi Fi” tab) and do the following:
- We select the encryption method with which data will be exchanged between your devices and the router.
We recommend not choosing low security levels WEP and WPA (that is, start with WPA2 and higher), since if you have special software, neighbors can easily find out the password.
- We come up with and write down a password in the appropriate window, by entering which you can access the Internet using a wireless network.
Click on the “change” button, saving the modem configuration. Finally, go to the “system” tab located in the upper right corner and select the “save” button. and reboot).
This completes the setup of D-Link DSL u2640. It is possible to make it possible for several personal computers to access the Internet through Lan sockets, but a router may be necessary if their number exceeds the free sockets. It is best to leave the router setup to a professional.
Other firmware version:
What to do if the setup fails
In cases where, after all these manipulations, it was not possible to set up the modem yourself, even if all the instructions were strictly followed, you need to call the Rostelecom technical support service by dialing 8 800 100 0 800.
The company's specialists will listen carefully and help resolve this problem. If it cannot be solved, a specialist will be sent to the house, who will carry out all the setup work absolutely free, quickly and professionally.
0 0 Votes
Article rating