Regardless of what 3G modem you have, setting it up and establishing a connection is divided into two stages. The first stage is installing the modem software on your laptop or computer. This means that before purchasing a 3G modem, make sure that it works with your operating system. The second stage is setting up the Internet connection itself through this modem - “choose a 3G modem”.
For convenience, we have written instructions for setting up a modem for each operating system separately, and also made a table with settings for 3G operators. When setting up a 3G modem connection, take the data from the table!
| Operator | Call number (dial) | Login | Password |
| Intertelecom | #777 | IT | IT |
| PEOPLEnet | #777 | 8092ХХХХХХХ@people.net.ua Where X is your phone number | 000000 |
| Ukrtelecom (TriMob, UTEL) | *99# | utel | 1111 |
| Kyivstar | *99# | Leave blank | Leave blank |
| Lifecell | *99# | Leave blank | Leave blank |
| Vodafone | *99# | Leave blank | Leave blank |
| MTS Ukraine | *99# | Leave blank | Leave blank |
| MTS Connect | #777 | mobile | internet |
Setting up a 3G modem on Windows XP
- Install drivers (software) for the modem from the disk
- Reboot your computer
- After reboot, install the modem into the computer's USB port
- Go to the “START” menu - connection (right key) - open - create a new connection
- New Connection Wizard
- Connect to the Internet
- Setting up a connection manually
- Via a regular modem
- We select our modem from the list; if there is only one modem, the system will select it itself
- Service Provider Name – At your discretion, this item has no effect
- Phone number (or dial-up number) – taken from the table
- Username – taken from the table
- Password – taken from the table
- Password confirmation - take it from the table
- Check the box “add a connection shortcut to the desktop” so as not to search in the network environment
In the connection itself, go to the “Properties” tab, check whether our modem is selected, if not, put a checkmark next to the desired device. Click “Configure” and select the highest speed – 921600 Bit/sec. and check the box only for “Hardware flow control”. Next “OK”, “OK” and “Call” - the process of connecting to the Internet will begin.
Ready! In the future, to connect the 3G modem to the Internet, we will use this type of connection. It can be found on the desktop (if added) or in the network environment settings.
Official program
Let us immediately note that customers have two types of modems at their disposal - MTS Connect 4G or 4G LTE Wi-Fi. The main difference is that the second device is capable of working as an access point and distributing the Internet to different devices (up to ten). In addition, it supports 2G communication, which is not the case in the first modem from MTS (it only works with 3G and 4G). The equipment of the devices is almost the same. In the box you can find the product itself, a SIM card and a warranty card.
Connecting and setting up an MTS modem does not cause difficulties for users, because the necessary software is already inside the product and there is no need to search for it. Before installing the device into the PC or laptop slot, insert the SIM card into the special slot, having first removed the special cover.
Installation
At the initial stage, install the software on your computer/laptop. For this:
- Click on the My Computer button.
- Double-click on the Connect Manager program logo.
- Select Russian and follow further prompts.
- At the final stage, uncheck the option to make a third-party site your home page.
Settings
Now you can proceed to setting up the 3G modem from MTS and setting the necessary parameters. The algorithm of actions is as follows:
- Double-click on the Connect Manager picture on your desktop.
- In the menu that appears, click on Settings.
- In Launch Options, check the two boxes provided (optional). These settings do not affect the quality of the connection and depend only on user preferences.
- Go to the interface section. There are few settings available for the MTS 3G modem. For example, you can change the design language. However, don’t be surprised if the device freezes for a while. For convenience, check the box Display statistics in a separate window, which allows you to evaluate Internet consumption. Please note that the graph will only appear when the connection is active.
- The next step is settings for the MTS 3G and 4G modem. In the section of the same name, you must set the most important parameters for communication. In particular, the internet.mts.ru access point, login and password (in both cases mts) and the dial-up number (*99#) are installed. If after this setup the Internet does not work or the parameters are different, click on the “plus” and add a profile. In the future, you can change the settings at your own discretion.
- Go to the network section. Here you configure the MTS 3G or 4G modem depending on the type of connection. Modern devices support different types of G network (2, 3 and 4). Here you can disable automatic network selection. But this option is ineffective without changing the device’s firmware, because initially it will only work with MTS. To make changes to the Internet settings for the MTS modem, you must disconnect the connection. Please note that the list may change based on the user's location and current coverage area.
- Set a PIN code. When working with an MTS modem, take care of the safety of your work on the Internet. In this section you can request a PIN code when connecting. In this case, only the user will be able to access the Internet. Please note that this data is stored in the SIM card memory. Therefore, before setting up the MTS 3G modem, take this feature into account.
- Set the settings in the SMS section. Connect Manager software provides the function of sending SMS from a phone number. Enter the Incoming SMS Settings section to enter the settings for informing about newly received messages. Here you can change the sound, turn it off or get rid of alerts.
The last item is the About the program section. Here you can view the software and firmware version, read information about the product and write down its IMEI. For convenience, links are provided to get help, go to the MTS Connect page and to the Internet assistant.
This completes setting up the MTS modem connection using the program. Note that it is better to set the network selection automatically, which allows you to avoid unnecessary actions in the future.
Setting up a 3G modem on Windows Vista
- Install drivers (software) for the modem from the disk
- Reboot your computer
- After reboot, install the modem into the computer's USB port
- Go to the “START” menu - control panel - click home page - Networks and Internet - Connect to the Internet
- Check the box "no, create a new connection"
- Select “Switched”
- We indicate the modem (put a tick on it), if there is only one modem, the system will select it itself
- The number to be dialed is taken from the table
- Username – taken from the table
- Password – taken from the table
- Connection name – At your discretion, this item does not affect anything
- To plug
- You can skip the process of checking Internet access by clicking on “Establish this connection anyway.” (This connection has been added to the list of connections)
In the connection itself, go to the “Properties” tab, check whether our modem is selected, if not, put a checkmark next to the desired device. Click “Configure” and select the highest speed – 921600 Bit/sec. and check the box only for “Hardware flow control”. Next “OK”, “OK” and “Call” - the process of connecting to the Internet will begin.
Ready! In the future, to connect the 3G modem to the Internet, we will use this type of connection. It can be found in the networks access panel (bottom right, near the time) or in the network environment settings.
Check list
If something doesn’t work, check again that you did everything correctly and in the right sequence:
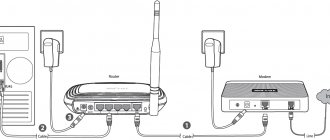
- You have a router and an Internet cable from your provider.
- You have correctly connected the cables to the router and turned it on to the network.
- The router is new or you have performed a factory reset.
- You connect via cable / You connect via Wi-Fi
- The computer connected to the router is configured to automatically obtain an IP address / You have found the network name (SSID) and login password
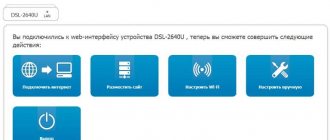
- You found the web interface address, login and password or used the most common ones (192.168.0.1 or 192.168.1.1, password/login: admin/admin)
- You have successfully logged into the web interface, found and launched the quick setup
- You have specified the parameters received from your provider: connection type, login and password for logging into the Internet.
- You have set the parameters of your Wi-Fi network: network name (SSID) and password to enter it.
Setting up a 3G modem on Windows 7
- Install drivers (software) for the modem from the disk
- Reboot your computer
- After reboot, install the modem into the computer's USB port
- Go to the "START" menu - Control Panel - Network and Sharing Center - Set up a new connection
- Setting up a telephone connection
- We select our modem from the list; if there is only one modem, the system will select it itself
- The number to be dialed is taken from the table
- Username – taken from the table
- Password – taken from the table
- Connection name – At your discretion, this item does not affect anything
- Click “Connect”
- You can skip the process of checking Internet access by clicking on “Establish this connection anyway.” (This connection has been added to the list of connections)
In the connection itself, go to the “Properties” tab, check whether our modem is selected, if not, put a checkmark next to the desired device. Click “Configure” and select the highest speed – 921600 Bit/sec. and check the box only for “Hardware flow control”. Next “OK”, “OK” and “Call” - the process of connecting to the Internet will begin.
Ready! In the future, to connect the 3G modem to the Internet, we will use this type of connection. It can be found in the networks access panel (bottom right, near the time) or in the network environment settings.
Common problems and solutions
When setting up an MTS modem, users encounter two main problems - lack of access or low speed. Let's briefly look at ways to solve these problems.
If you do not have access to the Internet, take the following steps:
- Make sure you are in 3G or 4G coverage area. To do this, look at the MTS card on the operator’s website.
- Disconnect and connect the modem by removing it from the connector.
- Close Connect Manager and log in again.
- Restart your PC.
- Uninstall the Connect Manager program through the Control Panel, and then install it again.
- Dial technical support -
0890 or8-800-25-008-90 to receive help from specialists.
If the speed is low, try the following:
- Take the MTS modem using a USB extension cable to the highest point.
- Use a homemade antenna and place the modem in it.
- Connect the device to the router port to strengthen the signal.
- Do not run your browser and torrent program at the same time.
- In the web explorer settings, remove unnecessary parameters, for example, JavaScript, loading images and others.
In the process of using the MTS modem, other difficulties may arise. So, if suddenly the connector does not work. If you suspect the quality of the contacts, try connecting the product to another PC or laptop. Another typical problem is a conflict with already installed software. This is possible if a program from Beeline, Megafon or another operator is already installed on your computer. To solve the problem, the old software must be removed.
Setting up a 3G modem on Windows 8
- Install drivers (software) for the modem from the disk
- Reboot your computer
- After reboot, install the modem into the computer's USB port
- Go to the START menu - Control Panel - Network and Sharing Center - Create and configure a new connection or network
- Internet connection
- Dial-up connection
- We select our modem from the list; if there is only one modem, the system will select it itself
- The number to be dialed is taken from the table
- Username – taken from the table
- Password – taken from the table
- Connection name – At your discretion, this item does not affect anything
- Click “Connect”
- You can skip the process of checking Internet access by clicking on “Establish this connection anyway.” (This connection has been added to the list of connections)
In the connection itself, go to the “Properties” tab, check whether our modem is selected, if not, put a checkmark next to the desired device. Click “Configure” and select the highest speed – 921600 Bit/sec. and check the box only for “Hardware flow control”. Next “OK”, “OK” and “Call” - the process of connecting to the Internet will begin.
Ready! In the future, to connect the 3G modem to the Internet, we will use this type of connection. It can be found in the networks access panel (bottom right, near the time) or in the network environment settings.
buy a 3G modem on our website in the “3G MODEMS” section
AUTHOR: Sheremet Alexander
How to update modem drivers
If all the steps have been completed, but the network does not appear on the laptop, then you need to install or update system drivers. To do this, you need to find files on the Internet that are optimized for specific computer equipment.
You need to download drivers from the company's official website. Once they are installed on the device, the connection should appear. If your computer has drivers, sometimes it is enough to update them through the Device Manager.
How to update modem drivers
Concept of 4G and LTE
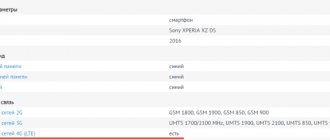
Many users often ask if there is a difference between 4G and LTE. Both standards belong to the same generation. The first protocol provides Internet speeds of up to 1 Gb/sec. In turn, LTE can support connections up to 100 Mb/s. The latter is an intermediate option for the development of fourth generation networks.
4G works on every second smartphone
Many budget smartphones are equipped with controllers that support LTE Advanced. Thus, owners of such devices have questions, for example, how to enable LTE and configure settings for a better signal.
How to force 4G mode so that your phone or modem can only receive in this mode
In order for a smartphone to make a forced connection to the fourth generation network, you must set the appropriate parameters for the connection:
- Open system “Settings” or “Options”.
- Go to “Wireless networks” or “Manage mobile networks”.
- Select the “Mobile Network” tab.
- Find the “Network Type” item in the list.
- In the dialog box about.
Important! This method will only work if there is stable 4G or LTE coverage in the area.
How to enable LTE and 4G
How to enable incognito mode in Yandex on an Android phone
If you have a problem with how to enable the 4G network on your Android smartphone, you must use the following instructions:
- Using the control gesture, swipe down to bring up the quick launch curtain.
- Find the “Data transfer” or “Internet” parameter (depending on the version of the operating system) and activate this item by clicking on the icon. After this, the inscription “4G” or “4G+” will appear in the active area of the status bar on the signal reception icon.
Note! In some situations, if the phone cannot catch the network correctly, the 4G icon changes to 3G or H+. In this case, converting the mobile phone parameters to forced operation in 4G will help.
Step-by-step instructions for forcibly turning on 4 G:
- Open system “Settings” on your smartphone.
- Find the “Wireless networks” or “Mobile network settings” section (depending on the version of the installed operating system or firmware).
- Open the “Mobile network management” item.
- Select the “Network Type” section. The Best Use dialog box appears.
- Set the "4G Only" option.
Important! Many users often ask how to switch from 3G to 4G. You can set forced settings, but if the signal is insufficient, it will be impossible to receive or make calls. You will also not be able to use the Internet; pages will not load.
Enable LTE on your phone