How to delete a phone number on Android
Removing a contact from your phone book is easy. To do this, follow these steps:
Step 1 . Launch the Contacts (may also be called People depending on the OS version)
Step 2 . Touch and hold on the contact you want to delete until the context menu appears.
Step 3 . Click the "Delete" button and then confirm your selection.
Removal from other sources
If there are no problems with clearing the SIM card of unnecessary entries, then the question of how to delete individual contacts on Android synchronized from other applications often leads to a dead end. A deleted contact constantly returns back to the phone book, so many users simply stop contacting it. The problem is solved by disabling synchronization.
- Open your phone book.
- Call the context menu and select “Accounts”.
- Uncheck "Synchronize".
After turning off synchronization, you can safely delete entries from your book and applications without worrying that they will come back.
On some phones, it is worth considering that it is not always possible to get into the phone book from the call menu. Therefore, if you want to delete a number from those recorded, you will need to go to contacts, which may have different names - “Phone Book”, “Contacts”, and sometimes there may be names with abbreviations in the Russian version. The process itself is similar - open the desired contact, go to settings, and confirm the deletion.
How to delete contacts from a SIM card
To delete contacts from a SIM card, you must first configure their display. The sequence of actions is as follows:
Step 1 . Launch the Contacts .
Step 2 . Press the Menu button on your smartphone.
Step 3 . The application settings will open, click the “Display” button.
Step 4 . Set the “SIM Card Contacts” checkbox to the “Enabled” position.
Step 5 . Return to the Contacts , find the SIM card contacts that have appeared in the list of numbers (they will be displayed with the appropriate mark), select and delete them at your discretion.
Removing duplicate numbers
Numbers can be repeated - for example, stored in the SIM card memory and on the phone. To correct this shortcoming, use the already described application from Google.
- Go to Google on your computer and go to the list.
- In the menu on the left, click "Find Similar."
After a short scan, the service will display a list of records that have a repeating number. You will be asked to combine these contacts so as not to fill the memory with the same data.
Batch deleting contacts
Selecting and deleting each contact from the Android phone book individually is a rather labor-intensive and boring task if there are several hundred numbers on the phone. Therefore, you can use the batch uninstall function:
Step 1 . Launch the Contacts app and tap the Show More icon (represented by three dots). In the context menu that appears, select “Settings”.
Step 2 . Here, find the “Group deletion” item. Click Select All and then click the trash can icon. If necessary, you can delete only contacts from a specific group. To do this, go to the appropriate section.
On older devices the procedure will be slightly different:
Step 1 . Launch the Contacts .
Step 2 . Press the Menu button on your smartphone.
Step 3 . Click the "Advanced" button.
Step 4 . Click the "Batch Uninstall" button.
Step 5 . You will be returned to the Contacts , where you can check the boxes next to the numbers you need and delete them with one click of a button.
Possible problems and their solutions
If the contacts are not deleted, then the problem may lie in the activated synchronization of the phone book with various instant messengers, which is why the numbers may return to the list.
To disable synchronization, proceed as follows:
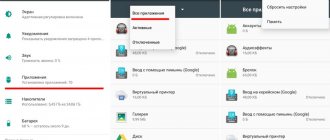
- Go to your smartphone settings and find the "Applications" .
- Find the messenger that causes contacts to return to your phone book, then select it.
- Go to section "Permissions" and open in a new window "Contacts".
- Check the box "Deny" .
Deleting contacts from your phone is done in a few clicks. But the catch is that in modern smartphones, data is synchronized with cloud services and instant messengers, so clearing the address book can be difficult. To work with numbers, system capabilities are provided, as well as programs from third-party developers.
Why do double contacts appear?
Installing different firmware on a smartphone and then synchronizing the data can lead to the appearance of double contacts on Android. As a result, the book of numbers can grow to indecent sizes, and the user will have to constantly wade through the jungle of identical contacts. This problem can be partially solved using the function of merging duplicates:
Step 1 . Launch the Contacts .
Step 2 . Press the Menu button on your smartphone.
Step 3 . Click the "Advanced" button.
Step 4 . Click the Merge Duplicates button.
Step 5 . The OS will offer to find duplicate contacts and merge them. Click the Merge button to start this operation.
Standard way to delete a contact
On phones with the Android operating system, there is an easy way to edit your contact list. To do this, you need to find an application that stores a list of them. Usually it is called “Contacts”, but it can be different. Its pictogram is a notebook with a schematic image of a person on it.
Next, the instructions will tell you how to delete a phone number on Android:
- Here is a list of contacts; find the one that is no longer relevant.
- Click on the contact you want to delete. Hold your finger until an additional menu appears.
- From the list, select “Delete” and confirm your decision.
When you click on the desired line, the operating system may behave differently. Sometimes the menu does not appear, and a line is activated at the top of the screen, which schematically displays the available actions. In this case, you need to select an icon that resembles a trash can or trash can.
Also, sometimes the interface of this application involves calling up the menu not by holding your finger for a long time, but by a special button.
In this case you need:
- select the contact to be deleted from the list;
- click on it;
- select the symbol in the form of three dots at the top or bottom in the control line;
- Select “Delete” from the menu that appears.
If none of the menu methods work, press the leftmost button at the bottom of the screen. It is used for an alternative menu call. There you can also delete a contact or change it.
Removing contacts from a SIM card
Many people save contacts on a SIM card so that they can access them when changing devices. In this case, you may face the problem of how to delete old phone numbers if they are stored in the SIM memory. If you prefer to store the numbers of friends and acquaintances not in the phone’s memory, then the sequence of actions will be different:
- Click on the menu button at the bottom of the screen (far left).
- The settings for the Contacts application will appear on the screen. In the list you need to find the line “Display”.
- At this point there are several options for displaying contacts. You need to choose the one that provides for displaying information from the SIM card in a general list. Turn this display on.
- Now go back to your contact list and edit them as you wish.
Almost every modern SIM card has service numbers, which are marked with a “Lock” icon. They can be very annoying, but they cannot be removed. These numbers are needed to call emergency services, check your balance and contact the operator's hotline.
If the SIM card only has service numbers that you do not use, then you need to disable its display in the list, then they will not interfere with you. To prevent SIM contacts from appearing in the main list, you need to disable their inclusion in the general list through the settings. This is done through the "Display" tab in the menu.
Batch deleting contacts from your phone
If you want to carry out a global wipe of contacts, you can do a mass deletion. Depending on the operating system configuration, this is done in two ways.
The simplest option for batch deleting numbers and contacts:
- Go to the Contacts or People app.
- Select any of the entries, tap on it and hold your finger.
- Cells will appear to the left of your contact list.
- Place markers in them (with short presses) opposite the contacts you want to delete.
- On the top line, select the word “Delete” or the icon that resembles a trash can.
- Confirm your actions.
More modern versions of Android have a Batch Uninstall option. To do this, you need to go to the Contacts application and call up the settings menu using the touch key under the screen (far left).
Then follow these instructions to delete contacts:
- find the “Advanced” line and select it;
- From the options in the menu that opens, select “Batch deletion”;
- activate it;
- return to “Contacts”;
- check the boxes next to the entries you want to get rid of;
- Click the delete button at the top.
These are the main ways to delete several contacts at once, but using them is not always convenient. If you want to completely reset your notebook, you need to do it differently.
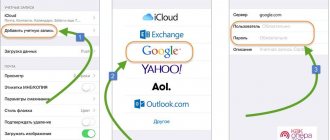
Disabling an account
If you want to completely reset your contacts list, you will need to disable the account they are synced with. This option will be useful if you are preparing a phone for sale or, on the contrary, you bought a smartphone secondhand and want to get rid of other people’s numbers. Account deactivation is carried out according to the instructions:
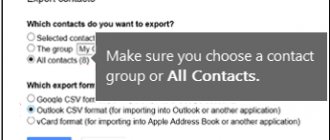
Editing Google Synced Data
If you duplicate the list of contacts in your Google account, you can not only delete it entirely, but also edit it and then synchronize the device with the account. This is convenient if you have a lot of numbers in your address book and you don’t know how to remove a phone number from your account without deactivating it. Follow the instructions:
This method does not work if you saved numbers in the phone or SIM card memory. It is only suitable for users who used a Google account and left all contacts in it.
If, after selecting contacts in the browser, the “Trash” button is not active, this means that some of the numbers in the list were saved using Google +. In this case, you need to go to Circles and delete these contacts there. After that, go to Contacts and repeat the operation.
Duplicate contacts: how to merge and delete unnecessary ones?
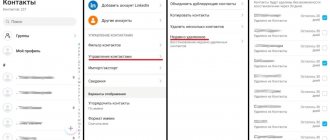
- Launch the People or Contacts application.
- Press the menu touch button under the phone display (far left).
- Find the line “Advanced” in the list.
- Select the “Merge duplicates” function.
- You will be taken to a new screen where the operating system will ask you to find identical entries and merge them.
- Confirm your decision.
Delete contacts using special programs
In older versions of Android OS, this function may not be available or may not work correctly. Therefore, you can not merge contacts, but delete them. To do this, you can use standard batch deletion, but if you have a large phone book, then manually searching for identical entries will take a lot of time. It is best to use special utilities. One of the simplest and most accessible is Duplicate Contacts. You need to work with it according to the instructions.
How to Delete Duplicate Contacts in Google Contacts
If your phone is synchronized with a Google account and the information is stored on its server, then you can delete duplicates differently. The steps will be similar to those you followed to edit the list. You will need to do the following:
- Go through your browser to google.com/contacts.
- Enter your login (your Google email) and password for the account you are using.
- Go to the “All Contacts” tab and select the “Find similar contacts” line.
- Now you need to select your takes. Delete them through the top line with the “Trash” icon.
If some of your contacts were synchronized from Google +, then similar actions need to be carried out in the “Circles” tab. In order for the contact list to be displayed correctly in the phone memory, you must complete editing using synchronization. It must be done through “Settings”. Make sure your account is activated and participating in synchronization. Some custom firmwares disable it.
Now you know how to remove a phone number from the main list on your smartphone. We told you about all the methods that work on Android OS. Share information with friends, ask questions and share your observations in the comments. Feedback is welcome!
Screenshot_2020-01-07-13-00-22-732_com.android.contacts.jpg (216.58 KB, Downloads: 0)
| There is no such item in the phone contacts menu |
Sadbikun_1581250527 | from Mi 9 SE
Screenshot_2020-01-07-13-00-22-732_com.android.contacts.jpg (216.58 KB, Downloads: 0)
2020-01-07 18:02:50 Upload
4171448712 Reply | from Redmi 8A
Sadbikun_1581250527 in the “contacts” menu at the top right, select “settings” there. enable “SIM card contacts” and contacts from the SIM card will appear in the list or contact filter. can be deleted.
Why not subscribe?
How to Delete Duplicate Contacts on Android
Google tools or third-party applications such as Duplicate Contacts . Let's consider both options.
Google Contacts
Step 1 . Launch your browser and go to contacts.google.com.
Step 2 . Google account information .
Step 3 . Click the "Find Similar Contacts" button.
Step 4 . Select duplicate contacts and delete them.
Duplicate Contacts
Step 1 . Install and launch the Duplicate Contacts .
Step 2 . The program will scan your contact list and show whether there are duplicate numbers on your smartphone.
Step 3 . Select and remove duplicate contacts.