Benefits of synchronization
The main advantage of the function is the preservation of important data, including user files. The synchronization process involves transferring information from one device to an online profile of the Google service, through authorization through which it becomes available on any connected device.
What synchronization gives:
- saving user data;
- access information from different devices through one account;
- the ability to recover lost data through synchronization.
The information will be automatically updated in the service cloud when this option is activated. Updating information in the cloud is very convenient because it saves you from suddenly losing your smartphone or breaking it. This way, you won’t have to transfer data manually—just log in to the account you created.
Google offers all owners of Android devices a very convenient data transfer principle. The service has its own cloud storage (Disk) and other practical tools.
Why is this necessary?
The entire operation of an Android device is based on synchronizing the phone with a Google account - this is logical and natural. It will not be possible to work normally with the device without a user account, so creating one is the first stage of setup.
There is a user profile, it is entered into the system, and you actively use the device. But synchronizing your Google account with Android will help make your work as comfortable as possible. Why is it needed?
This function ensures simultaneous access and timely updating of information - user data will be promptly uploaded to cloud-based reliable storage. What parameters will be synchronized?
- Contacts;
- Calendar;
- Mailbox contents;
- Application data;
- Documentation;
- Bookmarks and browser settings.
The purpose of these manipulations has become clear - and now let’s talk about how to enable synchronization of your Google account with Android!
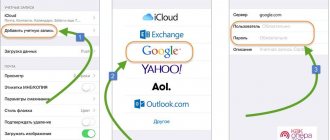
Adding a Google account
When you start working with any Android device, the system will prompt you to create an account to log into the Play Market (application store) and other services. Without it, it is impossible to download applications, so if the user previously skipped this step, you can add a profile through the device settings.
To do this you need:
- go to the menu and find the Google section;
- you can also add an account through “Synchronization” - scroll down the available options and click on “Add account”;
- Then all you have to do is follow the clear instructions.
Since an email address is required to register for the service, the device will immediately offer to register (or log in to an existing) Gmail account.
Solving problems importing Gmail contacts
- An error message is displayed. If you try to import more than 2,000 contacts at once, you will receive an error message. Open the CSV file using a suitable application (such as Excel), split your contact list into smaller CSV files, and then import each one separately.
- Contacts don't appear in Outlook. If you've imported contacts but they don't appear in Outlook, here's what you can do:
- Find the CSV file you exported from Google. By default it will be named contacts.csv.
- Open the CSV file in Excel.
- Check if there is any data in the CSV file. If the file is empty, then there was an error when exporting from Google. In this case, do this:
Delete the contacts.csv file.
- Export your contacts from Google again. When exporting, do not forget to select All contacts or the required contact group.
- After exporting your contacts, open the CSV file in Excel and check if the data is there. When you close a file in Excel, you will be prompted several times like this: “Are you sure you want to save the file as a CSV?” Always select Yes. If you click No, the contacts.csv file will be corrupted and you will have to create it again.
- Re-import the contacts.csv file into Outlook.
- Contact data is not fully imported. If not all contact information is available after importing into Outlook, open the CSV file in Excel and check that all the information is there.
- You can edit the CSV file in Excel to add names and other missing information.
- Outlook requires the column headers to be on the first row, so do not replace them with other information.
- When you save a CSV file in Excel, you will be prompted several times like this: “Are you sure you want to save the file as CSV?” Always select "Yes" as the answer. If you click No, the file will be corrupted and you will have to re-export your Gmail contacts list.
- Re-import the contacts.csv file into Outlook. When prompted in step 5 to specify what to do with duplicates, select Replace duplicates on import.
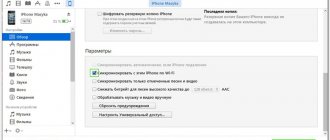
Activate synchronization
To activate:
- in the appropriate section, you must activate the automatic option and operate it exclusively via Wi-Fi, so as not to waste the traffic of your mobile hotspot;
- Next, just make sure that the account appears in the list of available accounts.
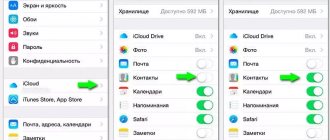
- to configure the list of data that will be automatically saved on the service, you need to go to the Google section in the menu;
- Next, click on “Google Account” and use the toggle switch to mark all the data that needs to be synchronized;
- By clicking on “More” at the bottom of the screen, we confirm the operation.
You can disable synchronization in the same settings section.
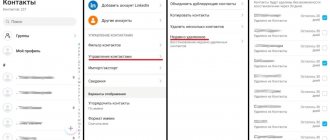
Activate synchronization: synchronize android OS contacts with google
The inclusion procedure is not particularly difficult. You will only need to activate contact synchronization once. Once the phone is synced, you can remove it. To activate, follow the instructions provided:
- Go to your gadget's settings.
- Find the “Accounts” or “Accounts” section (the name of the section may vary on different devices). Below is an example photo for Samsung phones.
- Select your Google account.
- You may have multiple accounts. Choose the one that will sync with your gadget.
- In the account settings, synchronization with Google is enabled (including photos). The line that includes synchronization is called “Contacts”. Check the box next to it. In the same section, you can synchronize other data.
After this, contacts from Android will be recorded on the cloud, and you will only need to download them to another phone. Now you know how to enable synchronization on mobile phones and tablets on Android. If you are wondering how to disable synchronization, then you just need to uncheck the items that do not need to be synchronized. These are all the steps required to disable it.
How to make corrections to Google Contacts
You can make any changes to the saved numbers through the Google Contacts website or the application on your smartphone.
The second option is more convenient because it does not require the use of additional devices - a computer. To make changes through the application, you must:
- download the application from the Play Market and install it on your phone;
- turn on the software and wait until all saved numbers that have been synchronized through your account appear in the list;
- Click on the desired contact to go to detailed information;
- In the lower right corner, tap on the pen icon to start editing.
After this, all changes will be reflected on every device connected to the same Google account.
Getting access to contacts on a PC
Synchronizing contacts with Google is a very useful function also because you can access the list of numbers from absolutely any device that supports full network operation.
In addition to Android and iOS gadgets, you can conveniently work with your contacts on a PC. To do this, the Internet giant offers us to use the Google Contacts browser solution. This service includes all the functionality of a “mobile” address book.
You can enter the browser version of Contacts in the usual way - using the “Google Applications” menu.
The service offers everything the same as the corresponding application on your smartphone: working with existing contacts, adding new ones, as well as their full import and export. The interface of the web version of Contacts is also completely authentic.
Use Google Contacts on PC
In general, the entire ecosystem provided by Good Corporation allows you to ensure maximum safety of your contacts and ease of working with them.
We are glad that we were able to help you solve the problem. In addition to this article, there are 11,829 more instructions on the site. Add the Lumpics.ru website to your bookmarks (CTRL+D) and we will definitely be useful to you. Thank the author and share the article on social networks.
Describe what didn't work for you. Our specialists will try to answer as quickly as possible.
Backup
The latest versions of the Android operating system have added a function for creating backup copies of call logs, SMS, installed applications and specified settings. This allows you to restore some information when you switch to another smartphone. To enable the function, go to the “System” section; the name is relevant for OS version 9.0.
We recommend: How to password protect an application on Android
Click on the corresponding item in the menu. The dates of the last copy will be shown, sorted by information type.
The documents will be uploaded to the Google Drive cloud storage; make sure that there is enough free space on it and that the phone is connected to a stable Internet. Click on "Start Copying".
FTP server
The point of this method is to turn your smartphone into an FTP server. To do this you will need an application such as an FTP server. The application is very simple and easy to use. We launch the application and click on the big red button in the middle of the screen, after which the server will be launched. The button will turn green and the IP address will be displayed below it. This address will need to be entered in the computer explorer (go to “My Computer” and enter it in the address bar). After this, you will have access to the data on your mobile device.
Other applications
We already know how to synchronize Android contacts with Google. However, the light did not converge on Google alone. There are a lot of other mailboxes, social networks and other communication programs on the World Wide Web that have a smartphone application and with which you can synchronize. The applications Mail.ru, Yandex.Mail, VKontakte, Odnoklassniki, Facebook, Skype are extremely popular. And you can easily synchronize with them too. We go to the same section “Accounts and synchronization” and click on the “Add new account” button. Select the required account from the list and synchronize.
Changes can be seen by going to contacts. For example, if the VKontakte application was connected, then new numbers will appear in the phone book of users for whom they are listed on the page. Perhaps some of them will even have avatars from the social network.
Transfer contacts via data transfer program
If the import method described above is not suitable because the use of an SD card is not provided, use programs such as ShareIt and the like. Their operating principle is based on the rapid transfer of data with a large “weight” between two paired devices. This is achieved by activating Wi-Fi signal transceivers on both data, so files, for example, with a volume of 1 GB can be transferred within 5 minutes.
- Install the same data transfer programs on both gadgets.
- Convert your old gadget's contacts to vcf extension.
- Connect via local network using previously installed programs to Xiaomi and transfer the “safety deposit box”.
- Unpack the file using the same principle as in the method with a memory card. But this time, the item you are looking for must be searched in the Xiaomi file system.
Methods
Synchronization is a built-in feature in the Android operating system. It is useful if the user has several gadgets and it is important for him to quickly transfer the phone book or other personal information from one device to another. Recording the numbers of your friends and colleagues in the cloud using Google services is a guarantee that they will be saved regardless of failures or flashing of the gadget, or its loss.
You can synchronize both contacts from Google to Android, and in reverse order.
The only nuance in using the system is the presence of a mailbox in the Google Mail system. You can register your email for auto synchronization in Android in a matter of seconds.
Using a Google Account
You can import from Google to your phone by setting up synchronization between accounts. To do this, on the smartphone screen, select the “Settings” menu item and go to “Accounts”. Sometimes, instead, the item may be called “Synchronization”, displayed separately.
Add an account and enter the email address of the Gmail account you registered earlier. At the same time, on your smartphone, you need to go to “Contacts” and select the “Export/Import” option. The device itself is indicated as the source. You need to find a Google account in the storage.
A dialog box prompts you to select what you want to transfer.
When you add each new item to the phone book, it will automatically be entered into the Google cloud, provided there is an Internet connection.
How to view subscribers on Google
If you don’t have a mobile phone at hand, but urgently need a number, you can look it up in the Google service. Before viewing the subscriber book, the device and account must be synchronized.
To view, go to your mail (personal account) gmail.com and select “Contacts” in the drop-down menu. Here you can get acquainted with all synchronized devices and phone book positions, if necessary, change it or transfer it to another phone.
How to transfer using a SIM card
Google services are not the only way to save information and transfer it to a new device. A SIM card is also suitable for these purposes. To do this, you need:
- insert the SIM card into the old smartphone, go to “Contacts”;
- transfer from the smartphone to the SIM of each subscriber individually or by selecting all at once. With this method, there is a limit of 250 memory cells on the SIM card;
- place the mobile phone card in a new Android device;
- transfer phone numbers using the “import contacts” menu.
The disadvantages of this method include the fact that it has many limitations. The length of the name, the transfer of not the entire amount of information and the limitation on the number of transferred numbers - all this complicates the transfer.
Transfer using SD card
A memory card can also be used not only for storing, but also for transferring the necessary data. The method involves using the Gmail service.
To use this method, you must be logged into your Google account. After that, on the PC, select the “More” - “Export” menu. Instead of the *.csv file type, select the vCard resolution. We save the database of numbers in the device memory in the Contacts directory.
Importing is simple - you need to insert the SD card into the device, and select “Import” in the book menu. The map is indicated as the source.
Importing contacts through the application
The most convenient way to quickly and efficiently transfer personal information is to use the MOBILedit program. You can download it from the official website - the developers distribute the utility free of charge.
Using the program, you can import phone numbers from a variety of sources in any user-friendly form. MOBILedit is installed on a personal computer.
Next, the USB cable is connected to the PC connector, and its other end to the mobile phone. You can display the necessary phone numbers without a cable, using the same Google services or bluetooth.
- after establishing a connection between the computer and the mobile phone, you need to go to the Phonebook menu, and then select the “Export” item;
- Select “Import” and “Save data” on the cell phone.
Whichever method the user chooses, the system recommends saving the contact information as a CSV file. At any time you can transfer the phone book or edit the file using Excel.