Thick notebooks with phone numbers of relatives, friends, neighbors and acquaintances are a thing of the past - from now on, contacts have long been stored electronically, on the internal memory of your favorite smartphone (where additional parameters can be easily set - for example, addresses, birthdays, nicknames and even photographs) . And here’s a strange nuance: losing a notebook even several years later is a difficult task. But a dusty “little volume” with written and long-yellowed pages will be found - either in an old chest of drawers or in a desk.
With smartphones, everything is much more interesting - there a technical failure can affect data loss, after resetting the settings to factory settings, and even updating the operating system. There are many reasons, and therefore it is much easier to figure out exactly how to restore contacts on Android!
Method 1: Google account
This method will be effective if data backup to your Google account and automatic synchronization were enabled on your smartphone (or the contacts were transferred intentionally by the owner of the smartphone).
How to check the presence of contacts in a Google account?
To make sure there is a list of contacts in the Google account to which the device was linked, you should:
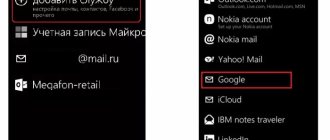
- Go to the Google account login page in any browser and log in.
- Click on the 9-dot icon in the right corner of the window and select Google applications "Contacts".
If the numbers were saved automatically, they will be displayed in the same way as they were recorded in the phone book.
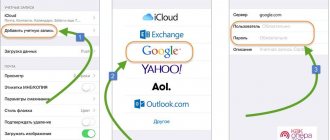
Transfer numbers from Google account to smartphone
The easiest way to transfer numbers from your account to your smartphone is from the Google Contacts application.
Download Google Contacts on Android
To restore the phone book:
- Launch the Google Contacts application on your smartphone and open the menu with an icon in the form of three horizontal stripes.
- Through “Settings”, go to the “Contact Management” section and select “Restore”.
- Select the desired address from the drop-down list and just below the backup version (the item “In use now”), click on the gray “Restore” button.
If the numbers still do not appear in the phone book, it means that you need to synchronize:
- Go through the “Settings” of your Android device to “Accounts”.
- Log in to your Google account and move the sliders next to the “Contacts” items (usually there are two) to the “On” position.
To see numbers that were previously missing from your phone, you should restart the Contacts application after synchronizing.
There are no numbers in your Google account
If the window is empty, there are two reasons:
- Synchronization and backup on the device have been disabled. In this case, recovery from Google account is impossible.
- Another synchronization took place and the list was updated, that is, all numbers were deleted in the same way as in the storage on the smartphone.
To return numbers, you can cancel changes:
- Click on the gear icon and select “Cancel changes”.
- Mark with a dot the time range to which the changes should be rolled back and click “Restore”.
Or restore phone numbers from the Recycle Bin:
- Go to the “Cart” through the menu located on the left.
- Select a checkmark for all contacts that were accidentally deleted from your phone and click “Recover.”
If automatic synchronization is enabled on your device, then after you restore the numbers from the Trash in your Google account, they will also appear on your smartphone. If automatic synchronization is disabled, you will have to transfer contacts to your smartphone using the method described above.
You can cancel changes and restore numbers from the Trash only if no more than 30 days have passed since they were deleted!
What does it mean to “restore” contacts?
- This means that you can get back contacts that were deleted in the past.
- This means that if any changes were made to the contacts, you can return them to the state that was before these changes.
You can “roll back” for any time, within 30 days . See, for example, it turned out that for some reason the changes made to one or more contacts were incorrect. What to do? If you don’t have a Google account, then that’s it, you don’t need to do anything. The data that was there before the changes has disappeared.
- Google account contacts: how to find, save, move, delete, restore, synchronize + Reviews
But when the data is stored in Google Contacts, everything happens simply. After any of your actions, any changes, the service makes a backup and stores both options in the database - “before” and “after”. He stores this information for you completely free of charge, for a calendar month. So all that remains is to find the record that contains the lost information.
Method 2: Backup
If the data backup function is enabled on your Android smartphone, then you can restore deleted contacts on your phone like this :
- Go to Google through the Settings app.
- Go to the “Install and reset” section and select the “Restore contacts” command.
Selecting a reservation location
How you back up your data may depend on the type of media you use as your destination. Here are some options.
External drives
Connect the external drive to your computer and get started. Of course, discs come in different shapes, sizes and configurations. A standard drive won't cost much, but it won't do anything except sit and wait for you to do all the work. Almost all drives today use connectors such as USB 3.0 or USB-C to achieve incredibly high data transfer speeds.
Perhaps your biggest decision will be whether to upgrade to faster but more expensive solid-state drives (SSDs). Unlike HDDs, SSDs have no moving parts, which means fantastic performance, which is always a plus when you need to copy a lot of data
CD/DVD/Blu-Ray discs
The old way of backing up is to copy your files to a shiny disk. The disadvantages remain capacity and speed; The new downside is that it's becoming increasingly difficult to get a computer with a drive these days.
Dual-layer Blu-ray discs (BD-R) store up to 50GB, but the prices match that. And even with that capacity, disk backup will seem infinitely slow compared to fast hard drives and flash drives. Who wants to constantly swap disks?
Pros: Disk media is cheap (if it's available) and very portable (it's always a good idea to keep backups of your data offsite).
USB flash drives
Small USB drives are almost as cheap as disks. Their advantage is that they are ultra-portable. Maybe too portable as they are easy to lose. But hiding one multi-GB flash drive in a safe is easier than storing optical or hard drives. Some USB drives are even designed to be data secure, making them a safer place for your data.
Of course, you'll want to get a drive with the maximum capacity, usually 512GB, to back up everything, especially if you're creating an image of the drive. It can be expensive, but the convenience is worth it.
Network Attached Storage (NAS)
A NAS device is a drive (or drives) that sits on your network so everyone on the network can access it. NAS is sometimes called a home server. They're not always cheap, and some don't even have built-in storage - you'll have to buy the drives separately. But it is convenient to work with network storage on an ongoing basis.
A NAS can do much more than back up a few files. Many people may back up multiple computers at home or in the office. Streaming media from a NAS to a device such as a games console or smartphone is common; Network and Internet file sharing is also the norm.
Most NAS units have FTP, online remote access, security controls, and various RAID configurations to determine how the drives store your data (redundant or distributed across the drives). Some have multiple Ethernet, Wi-Fi and USB ports. Some capture input from networked digital video cameras. The options seem almost endless, so it's worth choosing the right one for your home or office.
Copy to the cloud
Cloud direct backup is nothing new. Carbonite and its competitors have been providing direct backup of files from your computer to the Internet for many years, usually in the background and completely unnoticed. There is usually a free tier of service and a subscription fee for backing up additional content (the amount depends on the service).
If you only have a few small files to store, and you probably have a Google/Yandex account, then use Google Docs or Yandex.Disk. Adding files or entire folders is as easy as dragging them into the Documents list if you're using the Chrome browser.
Method 3: Import from SIM card
Some phone numbers can be stored in the phone's SIM card memory. They can be copied to the phone book.
But! The SIM card can only hold 200-250 numbers with names no longer than 15 characters, so they will have to be edited manually later. Plus, some numbers cannot be moved.
To copy numbers from a SIM card:
- Go to settings through the Google Contacts application menu and in the “Contact Management” section select “Import”.
- Mark the desired SIM card with a dot, click OK, check the numbers, and start copying with the “Import” command.
Tenorshare Data Recovery
It's a paid app, but it's definitely worth spending money on if you need to get back long-deleted contacts. The peculiarity of Tenorshare Data Recovery is that it does not require Root rights to work, plus it is quite effective. Works with almost all models of mobile devices.
It works like this:
- Enable developer mode on the phone.
- Install Tenorshare Data Recovery on your computer.
- We launch the program, connect the phone to the PC.
- We launch a quick or deep scan.
- Based on the scanning results, the user will be offered materials for restoration. Select contacts.
The data you need will again appear in the address book.
Method 4: VCF file
Practice shows that people intentionally or accidentally often export contacts to the internal memory of the device or to an SD card, where they are saved as a contacts.vcf file. To get them out of there and return them to the phone book, you should:
- Go to the standard “Contacts” application on your phone and through its menu (the icon in the form of three vertical dots) go to the “Import/Export” item.
- Select “Import from vcf file” and if such a file is available on the device, the application will find it. All that remains is to tap on the file and start the recovery.
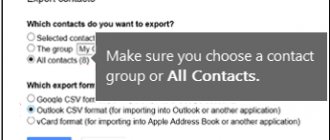
How to Import contacts from a CSV file
Two important details to know.
- When importing data, all existing contacts are kept safe and sound. Even if some of the imported contacts are exactly the same as existing ones, no merging or substitution occurs. Identical contacts are “twinned”.
- All imported contacts, including duplicated ones, are placed in a separate group with a name that includes the import date “Imported DD.MM.” You can rename this group or completely delete it like any other.
Imported contacts are placed in a separate group
. So, to import contacts:
- In the control panel, click “More”.
- In the list that opens, select “Import”. The Import Contacts pop-up window appears.
- Select a CSV file.
- Click Import.
Import Google Contacts
Method 5: messengers
You can partially restore contacts on your phone after deletion from WhatsApp, Viber or Telegram . To do this, you need to install the messenger you used previously on your smartphone and log in using the number linked to your previous device. Some names in chats will remain unchanged, but the identity of the remaining numbers will have to be determined by photographs, correspondence, or alternative methods.
To save a number, for example, from WhatsApp:
- Click on it to go to a personal chat and click on the three dots in the upper right corner.
- Consistently use the “Add” and “Create new” commands.
The algorithm of actions in other messengers is similar. You'll have to add each person manually, but it's better than nothing.
Third-party programs for data recovery on Android
In which folder on Android are contacts and phone numbers stored?
There are many applications on the Internet that can recover lost information from smartphones running the Android operating system. We are talking about various utilities that effectively perform their assigned functions. The most common of them will be discussed below.
Wondershare Dr. Fone for Android
The program works great on smartphones equipped with Android OS. However, some phone models may have problems.
Wondershare Dr app. Fone to scan system
The application has the following features:
- The full version is paid. Users also have access to a free demo version, which allows them to verify the capabilities of the software.
- Independently installs root rights on the smartphone.
- Not demanding on the technical characteristics of the gadget. Runs even on weak phones with 1 GB of RAM.
- Features increased operating efficiency. Wondershare Dr. Fone finds deleted contacts, videos, photos, messages, as well as documents of various formats.
- An Internet connection is required for the application to function.
- Wondershare Dr. Fone only works on Windows 7, 8 or 10.
The utility has a simple interface and operating principle:
- The application must be downloaded to your computer.
- Connect your smartphone to your PC using the USB cable that comes included.
- The utility detects the device connected to the PC and installs root rights on it.
- After performing this action, the device is scanned.
Note! There are often problems with installing root access. In most cases, it is difficult to determine the cause of their occurrence.
EASEUS Mobisaver
Free software designed to return previously uninstalled files from the phone's memory. Doesn't always find photos and videos, but usually there are no problems finding numbers.
EASEUS Mobisaver application for searching erased information
At the end of the scan, EASEUS Mobisaver displays detailed information about the actions taken on the gadget screen. Any found file can be either restored or saved in the device’s memory.
Important! A distinctive feature of this program is the need for root access on the smartphone. Moreover, the user must independently obtain this right by downloading certain applications.
7-Data Android Recovery
Another popular program that can return lost information to a smartphone. The application does an excellent job of searching for deleted contacts, messages, photos and videos, and documents. You can always download it from the official website. However, recently the software became paid.
The principle of using the application is to perform the following actions:
- Download the utility to your smartphone via Google Play Market.
- Connect the gadget to the computer via a USB cable.
- Open the 7-Data Android Recovery window and click on the “Next” button.
- Select the appropriate device storage. This can be either internal or external memory.
After this, the scanning process of the selected drive will begin. This procedure may take several minutes. During this time, the application searches for all deleted or formatted files. The result of the work is visible to the user on the monitor.
7-Data Android Recovery App
After the search is complete, all the information that was found will be displayed. You can preview folders before restoring.
Important! The selected files must be moved to a separate folder on your PC, after which they can be copied to your smartphone.
Recycle Bin
A program that recovers deleted files from any time ago. The utility is able to return files even if they were uninstalled several months ago. Recycle Bin has several advantages:
- Low energy consumption of the smartphone. When it works, the battery charge is practically not wasted.
- Great functionality. You can select several scanning options depending on your goals.
- After the information is restored, the Recycle Bin does not need to be deleted. It will serve as a basket for Android OS.
- Has a simplified interface. There should be no difficulties during the work.
- The application is downloaded for free in its full version.
Undeleter
Universal software that allows you to understand how to recover deleted contacts on Android. When downloading a demo version, the user will be able to evaluate the main capabilities of the product, check its performance on the installed version of the operating system, and find some of the files.
Note! Undeleter is fast. Scanning a smartphone is completed in a few minutes. In this case, a positive result is guaranteed.
Undeleter application scanning the system
The utility gives the user the following options:
- returning files regardless of their location;
- saving files to Dropbox.
Moreover, if you use this software to delete a found file, it will not be possible to restore it again. The application will not be able to “resurrect” damaged or formatted data. This will cause a scanning error.
Method 6: Backup & Recover contacts
Backup & Recover contacts application is designed to recover data deleted from an Android smartphone.
Download Backup & Recover contacts from Google Play
To restore data:
- Launch Backup & Recover contacts on your smartphone and agree to the license terms.
- Give the application the required permissions.
- Launch the Restore tool.
- Wait for the scan to finish, click on the found file and start recovery with the Recover All button.
Method 8: Cellular Operators
Some mobile operators, for an additional fee, provide a service for backing up and restoring deleted data , including contacts that have disappeared from the SIM card. If the service has not been activated in advance, you will not be able to use this function. But mobile operators can still help by providing the subscriber with call details for a certain period of time.
The details will only show numbers without names, but by calling them all, you can restore most of your contacts.
How to save current contacts
It is quite possible that you are not sure for what period of time you need to return the data back. Then, it is better to first save what you have at the moment, and then try to “roll back” for different periods in search of the desired option for recording data. Go to Contacts.
- In Control Panel, click More.
- Select "Export" from the drop-down list.
- An export settings window will appear, indicate in it which contacts you want to save, click “Export”. It’s better to save everything. The result of the action will be the creation of a CSV file.
A copy of your current database is ready.
Backing up Google Contacts
Now, feel free to travel into the past, look, find the moment in the recording that you need!