Installation and configuration of MTS satellite TV
On this page you will find the following information:
- What you need to know before purchasing equipment
- How to install and configure an antenna without using expensive equipment
- How to authorize equipment
- How to set up an interactive MTS set-top box
- How to set up an MTS HD set-top box (for linear TV)
- How to set up a cam module for MTS satellite TV
- The most informative video instructions
That is, here you can get all the information on how to install and configure MTS satellite TV yourself, including installing the antenna yourself.
Useful links:
Features and functionality of the MTS set-top box
The main capabilities of the equipment include:
- high picture resolution (Full HD and 4K), which is not available from cable operators;
- viewing programs on 5 devices simultaneously;
- over 150 channels;
- combining the set-top box not only with TV, but also with smartphones, tablets, and PCs;
- online content collection;
- viewing sports and information events at any convenient time;
- the ability to connect to the Internet not only from MTS;
- Convenient payment for services from an account or bank card.
Such benefits attract millions of users, despite the fact that the service has only recently been launched. Many people switched from satellite and cable TV to MTS set-top boxes, taking into account the minimum costs for connection and maintenance.
Before purchasing an MTS satellite dish
Satellite television is one of the most undemanding TV connection options for the installation location. Indeed, it can be installed almost anywhere in Russia. But there are still minor limitations to the technical connectivity. In addition, before purchasing a set of equipment, be sure to determine the type of equipment.
Check if your region is covered
The coverage area of the MTS satellite includes all regions except the Chukotka Autonomous Okrug and the Kamchatka Territory. Below on this page you will see a map where the reception area is marked in color. If your region is within the satellite coverage area, then there will be a signal.
Decide where to install the antenna
It is necessary to select a location for installing the antenna so that it “looks” at the ABS2A satellite, and there are no visible obstacles in the form of trees, walls of a neighboring house, etc. on the path from the satellite to the antenna. You can determine the direction of the antenna using the SatFinder smartphone application.
MTS satellite TV coverage map
If everything is fine, and your region is in the signal reception area, and you can easily place the antenna and point it at the desired satellite, select the equipment - antenna and receiver.
Antenna diameter
If you live in the Kaliningrad, Amur, Leningrad, Vologda, Arkhangelsk regions, Khabarovsk Territory, Primorsky Territory, the republics of Sakha, Yakutia, Komi, Karelia or Yamal-Nenets Autonomous Okrug, then you will need an antenna with a diameter of 0.9 m. For other regions of the Russian Federation, an antenna of 0.6 m is suitable.
If you purchase a complete set of MTS equipment (which already includes an antenna), you can’t go wrong: in each region only sets with the required diameter are on sale.
Set-top box or cam module
If your TV is equipped with a built-in DVB-S2 tuner, has a CI+ slot and supports HEVC channel encoding, then you can use the cam module. In other cases, a TV set-top box will do. You can check the required parameters of your TV in its technical specifications.
If you connect several TVs, a set-top box or module is required for each of them, and one antenna is enough. Also in this case, purchase a converter with a number of outputs no less than the number of connected TVs.
Installation and configuration of MTS satellite antenna
A set of equipment has been purchased, a place for the dish has been determined - let's start assembling and installing the satellite dish!
Before setting up MTS satellite TV, check whether you have all the necessary equipment:
- Set-top box or cam module with a smart card for each connected TV
- Antenna Bracket for antenna (included with antenna or separately)
- Converter with the number of outputs corresponding to the number of connected TVs
- Coaxial cable
- 2°F connector
- Set of keys and screwdrivers
- Plug for connecting the cable to the TV (required in some cases)
For convenience, we recommend purchasing a complete set of MTS equipment; it already contains everything necessary for installation. However, if you wish, you can purchase a third-party antenna, converter, cable and connectors separately.
Assembly
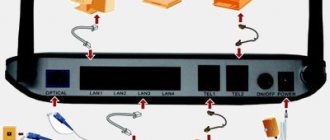
Download the instructions and use them to assemble the antenna, choosing any convenient place for this. Carefully tighten the nuts without damaging the housing or fasteners to the bracket. There is no need to tighten the mounting to the wall bracket and the plate angle adjustment nuts. Assemble the two-piece bracket separately and do not attach it to the antenna itself. The converter can be connected to the dish now (or done when you install the antenna), but the cable will need to be connected later.
Antenna assembly diagram
Antenna assembly video
Mounting the antenna to the wall
Before purchasing equipment, we recommended choosing a suitable location for installing the antenna using a special application. Find in this place the most flat surface for attaching the bracket. Attach the bracket, circle the mounting holes with a pencil or marker, and after drilling them, attach the bracket using dowels. Tighten the screws until the bracket is attached to the wall as firmly as possible (apply pressure to check the strength). Next, “put” the antenna on the bracket, tighten the nuts on the fasteners and adjust the angle of the mirror as vertically as possible. If you have not done this before, install the converter in the holder with its head facing the plate. Strip the cable and install F-connectors on it (detailed instructions are here). Connect the cable to the converter.
CAM module for MTS TV
Many models of modern TVs, receivers and tuners are designed to use expansion modules. MTS uses this device format. The CI module is most convenient for TVs, since it does not require a separate outlet and is completely hidden in its housing. The expansion device can be installed in set-top boxes of third-party operators. Thus, using the MTS CAM module, the user makes an optimal investment and gets more freedom of action in choosing digital TV channels. You can configure the device on an LG TV, set-top box, or receivers from other manufacturers with your own hands. To do this, just specify the satellite parameters.
What is the MTS CAM module
The MTS TV module itself is a functional block that can be integrated into electronic device circuits to perform certain functions. In the case of a specific solution from this provider, this is:
- reading smart card;
- performing authorization in the broadcast network;
- issuing codes to decrypt streaming.
If you simply plug the antenna cable into the set-top box, you will not be able to receive the image and sound of MTS broadcasts: the system will write that the channel is encrypted. However, if you connect the MTS TV module to a third-party TV or set-top box, it will act as a key part of the streaming decryption system.
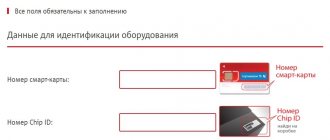
Smart card: general information
The card is provided by cable and satellite television operators and has its own personalized number for each user. This number can be used to make payments for services provided, and can also be used as subscriber identification when contacting support.
You can connect the Smart card to the TV using the CAM module into which it is inserted, or use a special receiver. A large number of providers offer to connect to TV channel viewing services using a smart card. Particularly popular are: MTS, Tricolor and NTV-plus.
What TVs can it be installed on?
TVs in which the MTS TV module works can be identified by their characteristics. First, the model must have a CI slot for installing block extensions. In addition, the device must:
- have a satellite tuner with DVB-S2 signal format;
- support H.265 (HEVC) encoding algorithms.
You can determine whether the MTS module will work in a particular TV using the characteristics of the latter, given in the device passport. Subscribers can use the global online trading platform Yandex.Market. To display all device models suitable for installing the MTS module, just type TV in the search bar and press Enter.
On the search results page, in the right column at the bottom there is a button “All filters”. Press it, then select in the TV parameters the presence of a DVB-S2 tuner, CI slot, HEVC decoding system. Then click on the “Display selected” button. Yandex.Market will display all TV models in which the MTS module itself works successfully.
How to connect and configure the CAM module
Setting up the MTS CAM module on the TV is not required. It acts only, to put it simply, as a subscriber identifier and a key for decoding the broadcast stream. The parameters for working with the satellite must be registered on the TV. To do this, go into its settings. Here you need to find the satellite television parameters block. How exactly to do this depends on the TV model and is described in its operating instructions.
The satellite parameters indicate:
- the correct time corresponding to the module used (time zone according to the agreement with the provider);
- satellite name ABS-2A, 75 degrees East;
- for the transponder, the frequency is 11920 MHz, modulation 8PSK, flow rate 45000 per second;
- the search type is set to network;
- The settings are saved and the TV is turned off.
To configure the MTS CAM module, a smart card is inserted into it. It is important to do this correctly, so it is recommended to act carefully and strictly according to the provider’s instructions. After this, the device is placed in the CI slot of the turned off TV. The TV is turned on and automatically searches for satellite channels.
Source
Initial setup of the set-top box
When activating for the first time, you must wait some time. It is needed to boot the system and set up signal reception. Then turn on the TV receiver and switch it to AV or HDM mode. After the language is initialized, the system will begin to select the screen configuration (4:3 or 16:9). The next step is to find cable channels. The search will start automatically. To confirm, click “OK”. At least 150 programs will be found in a standard system.
If there are significantly fewer channels, you need to check the following:
- activation of the filter, which is removed after discussion with the provider;
- integrity of the antenna cable and splitter of the MTS set-top box;
- Freezing of the image, accompanied by extraneous noise and interference.
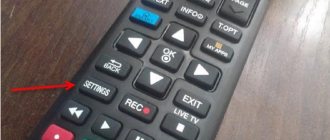
To sort, go to “Menu” - “Installation” - “Sorting” - “MTS”. The next step is to update the software by visiting “System Settings”. Enter 0000 in the “PIN code” column and wait for the device to reboot.
After updating the receiver, you will need to install a smart card. The slot is located on the right; first you need to remove the “flash drive” from the retaining frame. Install it with the contacts down, with the beveled corner outward, as close as possible to the back of the console.
In the menu, check whether the card is recognized by the device by going to the system settings of conditional access and connection status. If connected correctly, the last reading will be DO4-4. The error is identified as EO6-4. The second option indicates that the card was installed incorrectly or is damaged.
To correct the problem, the element is removed and reinserted correctly. If after this all the specified information appears, the receiver connection is considered correct.
CAM module for cable digital TV
This is a device for watching digital TV without using an HD set-top box. To use the CAM module, you need a TV equipped with a DVB-C receiver with a built-in CI connector (CI slot) - as a rule, these are TVs older than 2012. For other TVs, an HD set-top box or interactive IPTV set-top box is suitable.
The CAM module is mounted on the back panel of the TV in a special connector. You continue to control the TV with your usual TV remote control.
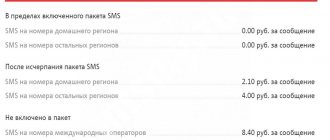
Rental cost: 110 rub./month Purchase cost: 1300 rub. Free or for 10 rubles/month. when connecting to the “Home Internet + TV” tariff
useful links
General article about CAM modules: here you can learn more about the differences between a CAM module and a set-top box, as well as about the principles of operation of the device.
CAM module for satellite television: prices and technical requirements for the TV.
Setting up MTS television equipment
The next step is setting up the television. The process differs depending on the equipment used.
HD set-top box
To set up an HD set-top box, you need:
- Turn off the power, install a smart card in the special slot, and plug in the device.
- Turn on the receiver and TV.
- On the TV, select the desired connector (HDMI or AV) to see the image from the set-top box.
- Depending on the model of the set-top box, the user will immediately begin searching for channels or will see a setup wizard. In it he will select the menu language, picture size, set the parameters of the satellite, transponder and LNB. After making these changes, he will be able to tune the channels on the TV.
- After the search for TV channels is completed, the TV will begin broadcasting the first channel found.
Next, you will need to activate the equipment.
You can read more about setting up a specific set-top box in the user manual that comes with the device.
CAM module
To set up a TV with a CAM module, you need:
- Disconnect the TV from the network, connect the antenna cable.
- Install the TV module into the CL slot of the TV, place a smart card in the module.
- Connect the TV to the network and start it.
- Open settings, go to search for satellite DVB-S2 channels.
- Select the desired satellite or add a new one with the parameters indicated below.
- Search for channels.
When adding a new satellite, use the following parameters:
- Satellite – ABS-2;
- Modulation – DVB-S2, 8PSK;
- Home transponder frequency – 11920 MHz;
- Symbol rate – 45000 Msymbol/sec;
- LNB polarization – vertical;
- LNB local oscillator frequency – 10600 MHz;
- LNB power – on;
- Tone 22 KHz – active.
After completing the channel search, activate the equipment.
Setting up the CAM module
To use the cam module you need
- Connecting the apartment to the MTS digital cable television network.
- The TV has: - a built-in digital tuner that receives a signal in DVB-C format, - a built-in MPEG-2/MPEG-4 and HEVC decoder, - a CI+ (Common Interface+) slot for installing a CAM module.
As a rule, all TVs younger than 2013 allow you to install a cam module (for Samsung TVs - starting from 2009, Philips - from 2011). Setting up the cam module to receive signals from any digital television operators is identical, since you are not setting up the cam module, but the TV itself. Below are the cam module settings for the main brands of TVs.
Installation
Attention! The CAM module for cable television is configured by an MTS technician free of charge upon connection.
This instruction can be used if you bought a new TV and are reconfiguring the module for it. In other cases, we recommend calling an MTS technician.
- Disconnect the TV from the power supply.
- Carefully insert the CAM module without the access card. Make sure the module is completely seated in the slot.
- Insert the access card into the CAM module with the logo from the TV. The side of the card with the chip should face the CAM module. The edges of a correctly installed access card should not extend beyond the device. For MTS television, the card must be activated.
- Plug in your TV. After turning on, information about the presence of a CAM module will appear on the TV screen.
ERROR CODES FOR MTS CAM MODULES
E06-4
Smart card: inserted incorrectly, has dirty contacts, is faulty, or belongs to another operator. Check that the smart card is installed correctly or carefully clean the contact pad of the smart card.
E04-4
The set-top box is set to a scrambled channel. The smart card is not inserted or inserted incorrectly.
E16-4
The funds in your personal account have run out or a channel has been selected for which there is no subscription. Top up your personal account or switch to a channel that is included in the purchased package.
E19-4
The TV with the installed module was turned off for a long time. Leave the TV on for 30 minutes
E120-4, E30-4, No error code
There is a problem with the interaction between the TV and the CAM module via the CI+ protocol or the date and time are set incorrectly on the TV. Check the date and time set on your TV. If changing the date and time did not solve the problem or they are set correctly, then switch the TV to channel 16, remove the CAM module from the TV, insert the CAM module back into the TV. If the problem persists, reset the CAM module settings through its menu to factory settings.
A CAM module (or conditional access module) is a device for decrypting encrypted channels (in this case, MTS satellite TV channels). The module is used instead of a TV set-top box, is installed directly into the TV itself and does not take up additional space.
Price
2400 rub. without antenna (cam module only)
2990 rub. complete with 0.6m antenna
3490 rub. complete with 0.9m antenna
There is no need to purchase a smart card; it is included in the kit. The indicated prices are valid when purchasing under the current “Together is not luxury” promotion.
Installing the CAM module
p, blockquote 1,0,1,0,0 —>
Installation of the CAM module
p, blockquote 2,0,0,0,0 —>
The CAM module from MTS is not customizable equipment, but a cartridge for interacting your TV with its digital decoder with an MTS SMART card, which is used to control digital channels.
p, blockquote 3,1,0,0,0 —>
p, blockquote 4,0,0,0,0 —>
Instructions for installing the CAM module:
1. Unplug the TV, turning it off.
p, blockquote 5,0,0,1,0 —>
2. The Smart card itself must be inserted into the module so that the contact pad on the card is on the side of the module with the TV image.
3. After assembly, this module with the installed card must be installed in the CI/PCMCIA connector of your TV according to the instructions. Pay attention to the location of the slots on the module and on the connector of your TV receiver, they must match
. 4. Turn on your TV. If the module is installed correctly, the message “CAM module is inserted, wait for verification” or something else will appear on the screen if you have a TV model different from ours.
Note!
p, blockquote 6,0,0,0,0 —>
- After installing a SMART card to watch MTS digital television, you need to configure digital channels on the TV itself!
- Be sure to insert the SMART card all the way into the CAM module!
- Basically, most TV models have a shortened CI/PCMCIA connector, as a result of which the module is partially visible - do not try to insert it further!
Share “Installing the CAM module”
Related notes:
Post navigation
If the equipment is owned
If you have already purchased MTS equipment, you will not be able to change it. The company does not replace your working device. But you can buy a new one, or rent one.
If the device is faulty (for example, it does not turn on at all), then there is an option to replace the MTS set-top box with a new one, or with a CAM module. In this case, a warranty claim will occur. But the device must meet all the conditions specified at the beginning of the article. There should also be no visible signs of violation of the operating and storage conditions of the gadget.