Most likely, most users do not even realize that their routers have such technology as WPS (or QSS). In short and in simple language, WPS (Wi-Fi Protected Setup) is a technology that is designed specifically to simplify the connection of devices to a Wi-Fi network. Using WPS, you can connect devices to your Wi-Fi router without having to enter your wireless network password. Which is very convenient.
Almost every modern router has a WPS button. The same section is in the router settings. And many are interested in the question, what is this WPS button for, what is it even, and how to use this technology. We will consider all these questions in detail in the article.
I’ll show you how to connect different devices to a Wi-Fi network without entering a password (laptops, Android mobile devices), and how to configure (enable or disable) WPS on different routers (TP-LINK, ASUS, D-LINK, ZyXel).
How WPS mode works
Now that we have found out what WPS is, it is worth talking about the algorithm of this technology. To create a wireless network, the user needs to configure the router's access point and connect to the local network of their device by entering a security password.
WPS greatly simplifies this procedure. The controller generates a random password automatically and then transmits it to the device that connects to the network via Wi-Fi Protected Setup. Thanks to this, you do not have to independently search for your network among others and manually enter a password
The WPS protocol is supported by Windows operating systems and most mobile gadgets running Android OS. On those operating systems that do not have built-in utilities, you can download a special driver that expands the functionality of the system.
How to connect a mobile phone or tablet computer
You can connect VPS on devices with Android OS in a similar way. You need to go into the Wi-Fi settings and open the list of all available networks. Here you will see the VPS icon, which you need to click on. Depending on what version of Android you have, the visual menu interface may differ. For example, if you use the Samsung Galaxy S8 model, you need to enter the settings and then select “Connections”. Next, select Wi-Fi, you need to make sure that Wi-Fi is activated. Then click on the 3-dot symbol and select “Advanced”, then find the “More” item and click on it.
All available items will open in front of you, among which will be the necessary one - the VPS button. After you click on the icon, you need to press the VPS button on the router. We wait while the connection is established. You can connect any other devices in the same way. Please note that mobile devices based on the iOS operating system do not support this technology. On models of Asus brand devices, developers have provided the possibility of using a simplified mode. This assumes that the VPS button can only be used to disable or enable Wi-Fi.
Using WPS (QSS) on a router
You can connect devices to the router using WPS either hardware or software. It all depends on the gadget you connect to the wireless network.
Hardware connection: what is it and how is it used
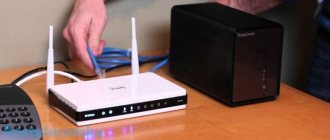
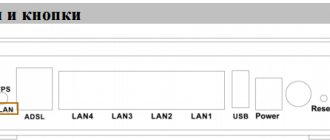
The first option involves only two actions: you need to press the buttons with the corresponding designation on the router and on the connected gadget. The WPS button on a router is usually located on the back panel of the device.
In some cases, the button is combined with the reset function (RESET). If you do not want to reset the router to factory settings, do not hold it for more than 5 seconds. The corresponding light indicator on the front panel of the router will notify you that the WPS function is activated.
Software connection of mobile phone/tablet
The Android operating system includes a connection function via WPS. To use it, follow the instructions below, namely:
- turn on Wi-Fi and go to the list of available wireless networks;
- find the WPS button icon (indicated by two rounded arrows) or call up the function menu, and then find this item;
- activate WPS on your phone, then a search bar will appear on the screen;
- Press the button on the router immediately after this.
If everything is done correctly, the smartphone will connect to your local network.
Connecting a Windows device
You can use Wi-Fi on your laptop after establishing a connection with the router via WPS. To do this, you need to follow several steps:
- In the Windows notification area (lower right corner), click on the wireless networks icon. In the list that opens, select your Wi-fi network.
- Click the "Connect" button. A message will then appear asking you to enter your password.
- Instead of entering a password, press the button on the router. Wait for the automatic connection to the router.
If you need to disable this protocol on routers, simply press the button (if it is not there, you can only disable WPS on the router through the settings).
Indication
Typically, the WPS function has a light indication that allows you to understand what is currently happening with your device. The WPS button itself can be equipped with a light indicator. Or (this primarily applies to routers without a button) the indicator is placed on the front panel.
When the router is connected to the network, the WPS indicator lights up and goes out after a few seconds. If there are no active connections, then WPS on the router is off.
When you press the button, the indicator starts flashing slowly . This means that a connection is being established.
If the WPS mode indicator on your router blinks quickly, it means that the connection has failed or timed out.
If the indicator is on without blinking, it means the connection has been successfully established and is working stably.
It may happen that when you press a button, the indicator lights up and goes out or does not light up at all. Most likely, your WPS function is disabled. Go to the web interface of your device and turn it on in the wireless network settings.
What to do if there is no WPS button on the router: examples of activation
Many models do not provide hardware enablement of the Wi-Fi Protected Setup protocol. This means that the connection occurs through the WEB interface. To do this you need to do the following:
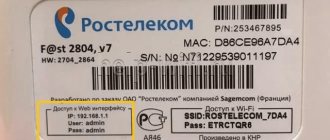
- Go to your router settings. In the search bar of any browser, enter the address 192.168.0.1. If you do everything correctly, you will be redirected to the router setup page.
- Enter your login/password – admin/admin (if you did not change it manually).
- Go to the WPS or Security section (depending on the router model).
- In the window you will see an eight-digit PIN, which you will need to enter in the password field.
After completing these manipulations, you will be able to use Wi-Fi without any problems. Often the eight-digit PIN combination is indicated on a sticker that is attached to the modem case.
There is an alternative option for connecting mobile devices:
- In the list of active networks on your smartphone, select “Login by PIN WPS” (may not be available on all models).
- You will see the connection code. Write it down. Don't turn off search.
- In the router settings, click “Add device”.
- Enter the code you wrote down earlier in the field and click “Add”.
When you enter the correct combination, your mobile phone or tablet will be connected to the network. This function allows you to connect any devices that support this protocol to Wi-Fi.
How to disable WPS through settings
To deactivate, you need to click the “Disable” button in the corresponding section of the router or select the Disabled item.
Activation and deactivation
Users often face the need to enable or disable the WPS option. To do this, you will need to go into the device settings. To get to the device menu, you need to open any browser that is installed on your PC. Then you should enter the IP address of the device. The system will ask you for a username and password. The router address can also be found on the label. In the authorization window, enter your username and password. The default values are admin and admin. After entering this information, press Enter and enter the device settings. Now you need to find the section with advanced settings. Here we find the Wi-Fi item and click on the arrow. You should select the UPS from the list. When the window opens, you can enable or disable the option at your discretion. The procedure for enabling and disabling VPS has the same principle on different devices: Huawei, Keenetic, TP Link, Zyxel.
Other WPS Features
On some modems, the wi-fi protected setup button can be used to enable/disable signal distribution. For ASUS products, a special Wrt utility from ASUS has been created, which will allow you to reprogram the assignment of this key.
Wi-Fi Protected Setup technology adds significant convenience to the use of wireless networks, but its use is a big security risk. If your passwords fall into the hands of attackers, your network will naturally become vulnerable. If you don't use this feature, we recommend turning it off completely.
Advantages
The key advantage of VPS technology is ease of use. It was created to simplify the process of using a wireless connection. To use it, there is no need to enter a password every time you access the Internet. The VPS will automatically set the name of the network and create an access key. Simple connection is made by pressing just one button. The connection is completed in just a few seconds and does not require any complex actions from users.
Thanks to WPS technology, users receive a stable connection and good connection speed. But these benefits are only available for routers with a hardware connection option. Therefore, if your router model does not have a VPS button, you will still have to work through the control panel and make settings in the control panel. And on user devices you will need to enter a password to access. The security issue has not yet been resolved by the developers. Since the access code consists of 8 digits, it is quite easy to hack. For this reason, connecting via VPS cannot be called absolutely safe. To protect your network from unauthorized connections, it is better to use more reliable authorization methods.
Summarizing
You can often come across the opinion that connecting using WPS technology is extremely dangerous and its use is strictly not recommended.
In reality this is not entirely true. Fast connection has a number of advantages. And you will only have to worry about security if you disable authentication and do not require connecting devices to enter a password or PIN code.
For home use it's even easier. After all, WPS can be configured so that connection becomes possible only when you press a button. In other words, no one else without physical access to the router will be able to connect to your network. But for an office or room where the router is publicly accessible to many people, it is better to use a connection using a password.
As for hacking, 2 methods are usually used:
- PIN code selection. That is, the connection is made by selecting random combinations. The PIN code is a combination of numbers only, due to which the list of possible options is noticeably reduced. There are programs that automatically select combinations. On average, this can take them from several hours to several days.
- Database. They are usually publicly available or offered to users for a small fee. These are sets of standard PIN codes provided by manufacturers of various routers. Most often, users, having activated WPS, do not consider it necessary to change the standard pin, which is why the likelihood of hacking increases significantly.
To control the access of everyone who connects to your wireless network, you don't need to use WPS. Just turn it off.
It is also worth noting that modern routers have begun to use PIN codes, which include not only numbers, but also letters. Due to this, the level of security was significantly increased.
That's all. Thank you all for your attention! Subscribe, leave comments, ask relevant questions and tell your friends about us!
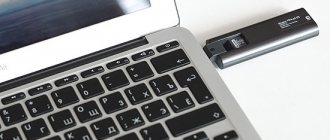
Connecting a computer with an external Wi-Fi adapter
There are two types of adapters that allow you to connect your computer and router. External ones, as a rule, are a miniature device with a USB connector and an antenna.
Internal - made in the form of an expansion card with a PCI or PCI-Express interface. They are installed in the corresponding slots on the motherboards.
This is what the expansion board looks like inside the system unit. Installation is carried out only when the computer is de-energized. It is also important not to forget to secure the adapter bar with a bolt. The principle of device initialization in the operating system is the same for Wi-Fi adapters of all types. As a rule, everything happens automatically: Windows finds the required driver on its own. But it happens that the system cannot find the correct software either in its library or on the Internet. Then you have to install it manually, either using the disk supplied with the equipment, or by downloading the driver to an Internet-connected device and then transferring it to the target computer. Installing the driver is simple. After launching the installer, you need to click “Next” sequentially. If the required driver was found, after a reboot the wireless network will work and you can begin the setup described above.
Advantages and disadvantages of technology
The main advantage of the technology is logging into Wi-Fi without entering a password. It is enough to perform a few simple operations. It is also important that there is no need to constantly keep the password in your head. And also reducing the risk of hacking and connection to the home network of strangers due to a very simple password created by an inexperienced user. There is no need to enter a combination of numbers, letters of different case and separating characters over and over again when adding new devices to the network. The protocol is convenient, but has some security vulnerabilities. Without going into details, it will be enough to say that when using a special hacking method, it is possible to select the correct PIN code in a few hours. Manufacturers protect their network equipment by releasing special firmware that can slow down the ID selection process many times over. In this way, an acceptable level of security is achieved, but the fundamental possibility of hacking remains. For home use, the technology can be considered acceptable, but for a large enterprise or bank it poses a real danger.
Setting up the router
Setting up a WPS connection on a router is a quick way to connect devices that support the technology. For it to work correctly, you need to perform the following steps in the admin panel of the access point.
On the start page, go to the corresponding item in the menu on the left.
In the window that opens, to authorize using a PIN code, you must select “Add device.” In addition, here you can deactivate the function, change the PIN or create a new one.
After which the page for entering the security key generated by the Android phone will open. You need to enter it in the appropriate field and click “Add”.
If you activate the switch “Press the button of a new device within two minutes”, and then click “Add”, the router will go into pairing mode using a passwordless protocol, just like when you press a key on the device. In this case, on mobile equipment you need to select a connection using the button.
Where is the PIN
It has already been said that connections via WPS can be made without passwords, or using a standard PIN code. This raises a completely logical question. And it concerns where to find the PIN code for connection.
But there is absolutely nothing complicated here. If, when activating WPS technology, the connected device asks for a PIN code, then simply turn over the case of your router. Most often, the necessary information is indicated on the sticker there. Less often on the back panel. In addition to the PIN code, the network name, MAC address, passwords and other important and not so important information are also written here.
Connection on Android devices
On mobile devices there is no button to activate passwordless access. Therefore, the connection must be configured through the Wi-Fi settings menu.
Useful video about WPS vulnerability:
Let's consider the sequence of actions for a smartphone running Android 7.0 Nougat OS.
First you need to go to the Wi-Fi configuration and click on the icon in the upper right corner, then select “Advanced” from the drop-down menu.
In the window that opens, select the connection type. There are two options: by button and by PIN code. Select the button, a window will appear, as in the picture on the right.
To establish a connection, you need to follow the system's recommendations and press the secure settings switch on the router.
Connecting Android smartphones
The menu of smartphones and tablets running the Android operating system is somewhat different from its counterpart in Windows, but not fundamentally. You can get to the thematic connection section and view available networks through the main settings. The “Wi-Fi Networks” section will display a list of detected access points. There you will need to select yours - and by long pressing to bring up the context menu, activate the WPS connection.
The connection process will begin, which is completed by pressing the already known button on the router.
On tablets, the appearance of the dialog box may vary slightly.