Having purchased for the first time in his life a brand new, or perhaps even a used, mobile device, be it a smartphone or tablet, an ordinary user, without special knowledge of IT technologies, in other words, a beginner in this business begins to be puzzled by characteristic questions. Among the pitch cloud of all sorts of “why?”, “why?”, “where?” The topical task of the day—how to make email on a phone—glows with a special exclamation in his mind. Actually, how to register it or set up an email account that was and is being used on a PC? After all, nowadays communication via e-mail is no less relevant than communication via a cellular network.
So, dear reader, this article is designed to help you create and configure email on your “mobile assistant”. It discusses various solutions for Android and iOS platforms (iPhone, iPad).
How to make an email on an Android phone?
To create a new mailbox in the Google search engine, you will need to register a user account. Completing the procedure will require the following actions:
- Open the settings of your mobile device and go to the “Accounts” section.
Click the “Add account” line.
Select “Google” from the list provided.
At this stage, you can enter an existing e-mail or create a new account by clicking the appropriate button. Further actions are described in the context of registering a new profile. Enter your first and last name.
Create an email address. If the entered value is already taken, you should add a few digits or try a different address. Create a password and enter it in two lines to prevent incorrect entries.
Provide your mobile phone number (required to increase the security level of your account).
Accept the terms of use of the service.
Log in to your newly created account by entering your email and password.
Set up additional options: receiving newsletters, participating in the Google Product Improvement Program, etc. The mailbox creation is complete. You can open the Gmail app and start using email.
Yandex Mail
Users note the simplicity of Yandex.Mail, as well as its wide functionality. Let's create and configure mail on Android using the Yandex application:
- You need to go to the Play Market and enter in the search bar: “Yandex Mail" Select the envelope icon and open the download page. Press the button " Install" and wait for the application to load.
- We open the Yandex.Mail application, where we are introduced to the main functions.
- The device from which the screenshots for this instruction were taken is already synchronized with Yandex mail. But when you first log in, a window with the sign will appear big plus, which you need to click to create a profile. If all accounts linked to a number are displayed, then you need to do swipe right on the profile icons until a big plus appears. When you click it, the registration start page appears.
- Under the yellow “Login” button, click “Create a new account».
- Fill in Basic data: first name, last name, login and password.
- The key feature is the mandatory completion of the phone number . It receives an authorization code, by entering which you can use postal services.
Yandex.Mail has one of the fastest and easiest registrations. As for the email client, it has many features that make working with mail more interesting: design changes, simple settings, and the ability to work with other mailboxes.
Setting up Rambler mail
Once upon a time, the Rambler resource was one of the most popular in RuNet. But his best times are in the past. Now very few people visit the site. But still, some users still have a mailbox there. So why not add it to Gmail? The task, however, is not an easy one, since everything will have to be done manually, but it is worth it. All mailboxes will be collected in one place. To add a Rambler account to Gmail, you need to do the following.
- Step 1. Launch Gmail on your smartphone.
- Step 2. Swipe to the right and go to settings.
- Step 3. Click the well-known “Add account” button.
- Step 4. In the list of services, scroll to the end and select “Other”.
Step 5. Enter Rambler's mailing address and click "Next".
Step 6. Enter the password and click “Next” again.
Step 7. Enter the name of the servers for outgoing and incoming messages (by default pop.rambler.ru and smtp.rambler.ru, respectively). We also register ports 995 and 465.
- Step 8. Name the account somehow to display its name in the client and click “Next” again.
- Step 9. Allow the application to host the server by clicking the “Allow” button.
As you can see from these instructions, setting up Rambler mail on a phone with Android and Gmail on board is quite a task. However, now you can be absolutely sure that all letters will arrive on your smartphone on time. The only thing that would be great would be to add a Yahoo account. Why not. That's what we'll do right now. It is worth warning that this is also not an easy task.
Create an account on Rambler
Rambler is another common email service. In order to create an email, you need to download the application via the Play Market.
Then open the downloaded file and in the authorization window that appears, go to the “ Registration ” link (located at the bottom).
Enter the data, paying special attention to the password . It must include a minimum of 8 characters, 1 capital letter, 1 lowercase letter and 1 number.
The box has been created, all that remains is to configure Rambler.
The Rambler client stands out due to the presence of a virtual keyboard, which greatly facilitates work in some situations. Registration is fast and convenient, the application interface is standard. However, the main drawback is the limited investment, no more than 20 MB.
How to set up mail on your phone
It is creativity that allows us to enjoy cinema, paintings and learn...
Computers How to enter BIOS on a laptop. Instructions for Samsung, Sony, Acer, Lenovo, HP models
Often new laptop owners have the following question: “How to enter the BIOS on a laptop?” A similar procedure in this case differs significantly from conventional system units. In the last word...
Computers How to install GTA on Android: instructions for beginners
Today we will look at the question of how to install GTA on Android. This information is, as a rule, of interest to new owners of devices on the specified platform. The described installation methods can be used…
Internet
Setting up mail on Android: detailed step-by-step instructions
The setup procedure will be discussed using the example of a smartphone with Android 4.2.2.
For other versions, the sequence does not change significantly, so the instructions can be considered universal. Open your standard email application. It is natively present in any Android gadget.
Mail application
The Account Settings page will open.
Account Setup
In your case, the list of services may differ. Select your email service from the menu that appears, or click the “Other” button to set up synchronization with another service.
The mail connection settings page will open.
Connecting to mail
Enter the requested information and click next.
Entering data
The program will ask you to specify the account type. Check with your email provider. Most services work through POP3. This is the best option.
We indicate the data
A menu similar to this will open. Enter the necessary information according to the example (usually, if you connect to popular email services, it is filled in automatically), and then click Next.
The system will check the settings.
If everything is entered correctly, you will see a list of incoming messages.
This completes the mail setup on Android. Follow the instructions and everything will definitely work out. If something goes wrong, be sure to tell us about it in the comments. Happy setup!
Setting up other services
Not all users use Google's email service. Services from Mail.ru and Yandex are widely used. Fortunately, Google specialists also understand this, and therefore provide owners of Android devices with the opportunity to independently configure the email they need on their gadget.
Mail.ru
- Find the Mail icon in the list of applications and launch it.
- Select mail operator mail.ru
- Enter your personal account details on mail.ru - address and password. Click Next.
Now you need to configure your incoming mail:
The following window will appear in which you need to configure outgoing mail:
The account name does not matter. After selecting it, click “Finish” - mail.ru mail is installed.
Yandex Mail
You can configure your Yandex mailbox in a similar way. In fact, only the connection servers change. For Yandex mail, the incoming server will be pop.yandex.ru, the outgoing server will be smtp.yandex.ru. Otherwise the process is completely identical.
You don’t have to perform these steps to set up your mailbox, but simply download a special application. The Yandex company is actively promoting it and in every possible way contributes to the emergence of new users. With the installation of this application, all questions about synchronizing and managing your mail from a mobile device become irrelevant.
Unusual Yahoo email client
To register a Yahoo mailbox from your phone, download the application.
Open it and select among the proposed Yahoo options.
In the page that appears, select the “ Register ” tab.
Fields appear in which you need to enter the necessary data. The telephone number must be indicated, as a confirmation code will be sent to it.
Important! The password must not coincide with the username, otherwise the process of filling out the data starts all over again.
check the phone number again and enter the code received in the SMS in the next window.
The application congratulates you on registration and sends you to your account page.
Yahoo turned out to be a very original email client: an unusual purple theme, descriptions mixed with humor and ease of registration make it very useful and easy to use.
Setting up a mailbox through the Mail application
To create mail on another server on devices with the Android operating system, there is a special standard “Mail” application. You can download other programs from the market, the configuration of which follows the same principle as the standard one.
- Sign in to the Mail app
Mail app
- First you need to enter your email address and click the “Manual setup” button
- In the second stage, the system will prompt you to select an account type. He selects depending on the domain on which the mailbox is registered. In the case of working with mail.ru, you need to select “Personal (IMaP)” when there are no accounts in the system or Personal (POPZ) for those smartphones on which accounts were previously created.
Select account type
- Then enter your password
Entering your password
- After this, you need to configure the mail server and enter or replace the following data for “Personal (IMaP)”
- IMAP server - imap.mail.ru;
- Security type - SSL/TLS;
- Port - 993
"Personal(POP3)"
- POP3 server - pop.mail.ru;
- Security type - SSL/TLS;
- Port - 995
Data for "Personal(IMaP)"
- After checking the settings, you need to set up your account, and then click the “Next” button.
Click the “Next” button
- The next step is to come up with a name for the account and a signature
Account name and signature
- After completing the settings, the user gets to his mail.
Mailbox
Thus, you can configure mail to any address, changing only the server name and some other data.
You might be interested:
Adding and setting up email
You can add an email on your Android device in various ways.
Via the menu
1. Open the Settings menu.
2. Go to the “Accounts” section.
3. Click "Add...".
4. Select the account type (mail service).
5. Log in: in the panel that opens, enter your email login and password.
Connecting a Google account
You can add another Gmail account to your phone as follows:
1. Open the settings menu and select the “Google” section.
2. In the profile of an already connected account, tap login (address under the avatar).
3. In the additional panel, click “Add...”.
In the Mail app
To add an email, you can also use the Mail system application:
Important! The interface and settings of the application may differ on Android devices depending on the firmware features, OS version, and phone manufacturer.
1. On the home screen of your device, tap the “Mail” icon (or in English – Email).
Important! On some Samsung phones, the email client icon is located in the Samsung folder on the Applications screen. On Lenovo devices, the “Email” icon may also be on an additional screen or in a directory with other programs.
2. Enter your full mailbox address (@) and password.
3. To connect automatically, click “Next”.
To set up your email yourself, click the Manual (or Manual Setup) button.
Warning! Setting email connection parameters is recommended only for experienced users.
In the panel that opens, enter values depending on the protocol used.
For POP3 you can use the following settings:
Incoming server:
- host: POP3;
- port: 995;
- SSL: on
Outgoing server:
- host: SMTP;
- port: 465;
- STARTTLS:on
4. After connecting, specify the frequency of checking incoming emails (interval in minutes), if necessary, enable notification display and synchronization.
5. Give the profile a name (for example, “work”, “for registration in games”). Click Next.
How to Create a Gmail Email on Android Phone
Any search engine is a large service with different services. For example, Google has its own mail, online maps, online chat for negotiations, translator, cloud service and much more. By creating one account, we get access to all these services and tools for free. All you need is to create your email and set up your account a little. This is what we will do now.
Android mobile phones require Google account information to log in. If you have a smartphone with this OS, then most likely you already have mail from Google. In any case, we will create an additional mailbox in reserve.
Procedure for creating your email address via smartphone:
- You need to open the Play Market and search for the Gmail application. Install it on your phone;
Open Play Market on Android
- Now you need to click on the “Create an account” button or add an account if you have already logged into one of yours earlier;
Download the Gmail app
- The application prompts us to log in with an existing account or create a new one. Click on the link below;
Click on the "Register" link
- Enter your first and last name into the form, not necessarily your real name. This information will not be verified;
Enter your first and last name in the registration form
- Enter your date of birth, no one will check this data with us;
Enter your date of birth in the form
- Next, the page prompts you to enter the name of your future account and options based on the data you have already entered on Android. This name will be your email until the sign @
. Think before you enter it. This can no longer be changed;
Create or choose a Gmail mailbox name
- Enter your mailbox password.
Enter your Google account password
Then the system will prompt you to add other data to protect your account from hacking. But adding another mailbox or phone number is not a prerequisite for creating mail. Complete the box creation by agreeing to the privacy policy.
How to open a mailbox on Android on Yahoo
Yahoo is one of the oldest mailboxes, which was founded in 1995. The Yahoo search engine was at one time the second most popular search engine on the entire Internet. In recent years, the service has been gaining popularity. You can create an email account in the web version, and then log in to the Yahoo application on your phone.
Click on the letter icon on the Yahoo home page
Open the main page of https://www.yahoo.com/ and click on the Mail icon:
- The form asks us to log in. But we need to create a new box. Therefore, click on the “Create an account” button below; Click on “Create an account”
- A form will appear that we have to fill out on your Android phone. There is no need to use your real first name, last name, date of birth, etc. You can change them at any time in your personal account. The main thing for us here is the “Mail Address” field, come up with it and enter it; Fill out the Yahoo registration form
- You won't be able to create a Yahoo mail without entering your phone number. Therefore, select a country from the list and indicate the number;
- Click on the “Get key...” button. A confirmation code will be sent to your phone, which you need to enter in the verification field. Enter the key in the form to continue registration
Yahoo mail has been created. Now you can use it on your computer and phone. To do this, download the mobile application using this link and log in.
Recommended reading: How to synchronize your phone with your computer.
Registration
Gmail
Gmail is the native email for Android phones. Both the device and the email are from Google. If you don’t have one, be sure to register. Provides access to all functions and services of the operating system. Simply necessary.
To create an account:
1. Open any browser on your phone. For example, Google Chrome.
2. Enter a request for the name of the service in a search engine. Go to offsite.
Advice! To quickly go to the login page, use the URL – https://www.google.com/intl/ru/gmail/about/#.
3. Click "Create an account".
4. Enter your first and last name, username (email address), and in the two subsequent fields - password (for verification).
Advice! Use a complex key to log into your mail. A hack-resistant combination is at least 10-15 characters long, using lowercase and uppercase letters, numbers, and special characters.
5. Click Next. Enter your phone number, enter the verification code to confirm rights to the device. Follow the site's instructions to complete your registration.
Yandex
When registering Yandex.Mail, an account is created in this system. In fact, they are one and the same. If you log in using your email credentials, more opportunities appear on Yandex services.
Important! Remote file storage "Disk" is available only to registered users
In the application
If you want to receive new mail through the application:
1. Open Google Play. In the search bar, type - Yandex mail.
2. To download and install the application, go to its official page. Click Install.
3. Launch Yandex.Mail (the icon will appear on the home screen).
4. Under the list of services, tap the link “Start...”.
5. Dial your mobile number. Click Next.
6. Activate using the code. Enter other required information to complete registration.
On the site
In order to create an email on the site, open the browser.
Advice! If Yandex is blocked by your provider, set up a network connection through a proxy before following the instructions. This can be done using a browser add-on or application.
Next: 1. Go to the page – https://mail.yandex.ru/.
2. Click “Create an account”.
3. Fill out the form (name, login, password, phone number). We send the data.
Mail.ru
Mail.ru is not only mail, but also a social network, games, dating and many other interesting services. All functions of the portal in full are only for owners of a mailbox on mail.ru.
As with Yandex, there are two registration methods to choose from.
In the application
1. Download and install “Mail.ru Mail” via Google Play.
2. To open an application, tap its icon on the home screen.
3. In the login panel, click the “Create...” link.
4. Provide personal information. Put a “bird” in the line “I read...”. Tap "Next". Follow the service instructions to complete registration.
Advice! In the line for entering the mailbox address, you can change the domain. For example, from “@mail.ru” to “@inbox.ru”.
Yahoo!
Yahoo mail is not as popular in RuNet as Yandex and Gmail. However, in terms of functions it is in no way inferior to top-end analogues. Equipped with unique options: enabling the “Do not disturb” mode (from 21.00 to 7.00) for push notifications, advanced search for correspondence, PIN code protection, etc.
In the application
In the Yahoo! email application is created like this:
1. Install “Yahoo Mail” through the Play Store. Launch it.
2. Tap the “Register” link.
3. Fill out the form fields. Click Continue.
Important! When entering your phone number, be sure to select your country code from the drop-down list
On the site
1. In your browser, open the page – yahoo.com.
2. Tap the “Letter” icon in the top panel.
3. On the authorization tab, select “Create an account.”
Rambler
Rambler does not have an official email application for Android. Registration is available only on the offsite.
1. In any mobile browser, open – https://www.rambler.ru/
2. Click: “Login” → “Registration”.
3. Enter the required information in the form.
Links to websites, mobile applications of postal services:
| Login to the site | Mobile application on Google Play | |
| Gmail | https://www.google.com/intl/ru/gmail/about/# | https://play.google.com/store/apps/details?id=com.google.android.gm |
| Yandex | https://mail.yandex.ru/ | https://play.google.com/store/apps/details?id=ru.yandex.mail |
| Mail.ru | https://mail.ru/ | https://play.google.com/store/apps/details?id=ru.mail.mailapp |
| Yahoo | https://login.yahoo.com/?.src=ym&.lang=ru-RU&.intl=ru&.done=https%3A%2F%2Fmail.yahoo.com%2Fd%3F.src%3Dfp | https://play.google.com/store/apps/details?id=com.yahoo.mobile.client.android.mail |
| Rambler | https://mail.rambler.ru/ | —— |
Google Services
There are a large number of services of this company. To work with each of them, a Google account is useful.
| Service | Description |
| Gmail email client | There are many mail services - Yandex, Mail.ru and others. However, the Google client occupies a special place among them. Google mail is very functional and, like any other service of this company, is accessible from any device with an Internet connection. |
| Google Contacts | Another interesting social feature that greatly simplifies life for everyone who uses several devices at once (for example, a laptop and a smartphone). It allows you to link people’s contact information not to a specific device, but to the cloud storage of a separate Google account. This is incredibly convenient for several reasons. Firstly, it becomes almost impossible to lose such contacts. Secondly, you can access them even from a newly purchased phone; you don’t have to transfer all your contacts using some lengthy and labor-intensive methods. |
| Google Play App Store | Probably one of Google's most famous developments. This store makes it incredibly easy to download a variety of apps and games for your device. You just need to have a Google account. Such applications must be tested for quality and safety, scanned by an antivirus, and only after that they go on sale. Although it's a store, there are a lot of great apps you can get for free. They will help simplify your work with your smartphone and add necessary functions that are not included in the basic configuration. |
| Google Chrome browser | It’s good to work and study information on the Internet. And doing this through a browser, the data and bookmarks of which will be linked to all devices, is even better. A Google account will allow you to work with all the usual pages and bookmarks from any device. This is incredibly convenient in different situations - after reinstalling the system or buying a new laptop. When logging into the new system, even browser design elements will be available. |
| YouTube | The most popular video hosting in the world is under the wing of Google, and therefore having an account in this system opens up a huge number of opportunities. After logging in, you can not only watch various videos, but also rate them, write comments, add to favorites lists and subscribe to interesting channels. All information is also linked to the account and will be available from any device on which authorization has been made. |
Safety precautions
The main task of each personal account is to preserve data and protect against unauthorized access by others. It is you who must take all possible measures to protect your information from theft.
Hacking protection
Basic protections are manual precautions. These include:
- Setting a complex password. Use uppercase and lowercase letters. Set numbers at the beginning and end of the password.
- Do not use the same password for different sites. Come up with a unique one and remember it.
- Do not enter your data on suspicious resources.
- Change your password at least every 6 months.
- Enable two-step authentication (instructions below).
- Activate SMS notifications about entries. You will always know who is logging into your account and when.
- View your activity history. If you see unfamiliar actions, change your password immediately.
Two-factor (two-step) authentication
This method allows you to protect yourself from hacking by 99.9% by receiving free SMS messages when logging into your account. Reliability will be ensured if no one has access to your phone except you.
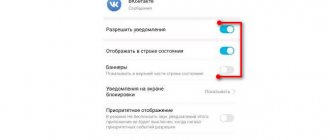
To connect or disconnect in Mail.ru, do the following:
- Let's go to the "Password and Security" section.
- Find the item “Two-factor authentication” and click “Enable“.
- After synchronizing with the servers, you will be prompted to enter your current phone number. In addition, you will be asked to enter your email password so that the attacker cannot link your phone. Enter boldly into the field as in the picture:
- Click “Continue” and wait to receive an SMS message with a confirmation code.
- Enter the code in the appropriate field and the service will be activated.
- Now we see activation.
Setting up a backup account
The backup account is another email address to which you can receive a link to restore the main one. To activate such a free service on Mail.ru you need to do the following:
- Click on the email name in the upper right corner and go to the “Password and Security” section.
- Find the item “Recovery methods and notifications” and click “Edit list”.
- In the next window, select “Add mail“.
- Enter your other valid mailbox and click “Add“.
- After successful addition, you will see new data in the list of additional addresses.
Working with a mailbox
Working in the post office requires certain knowledge. First you need to click on the “set up folders” tab. You can create folders here. The necessary services are located on the left side. “Working with letters” is important.
Here you can change the size of the lists in the folder. To group letters by sender and subject, you need to check the box on the mailbox device.
You can also set a transition to a specific page after deleting a letter. You can check the box next to “address book”. All contacts will be added to your address book. To avoid receiving mailings from the service, you can uncheck the box in the “mailings” tab.
Main interface
When you log into the service, a page with incoming emails opens. To open, you need to click on the letter with the left mouse button. Unread messages are highlighted with blue circles, and open ones are highlighted with gray circles.
The number of unread messages can be viewed under the word “inbox”. In addition, the quantity is indicated on the top line where it says “mail”.
By clicking the circles, you can mark unread messages as read. You can also set a red flag in letters. This will allow you to mark important messages. You can put a tick in the box opposite the letters. This way, you can select messages for one action, such as deleting them or putting them in the spam folder.
The “sent emails” tab contains all outgoing messages. Drafts contain letters that have been written but not sent. The spam folder contains unwanted emails as well as advertising messages. Deleted emails accumulate in the trash can.
Creating and sending letters
To write a letter, you need to press the “write letter” button. And to answer the message. You should click “reply”. After pressing the key, a message form will appear that you need to fill out.
In the window you need to fill in “from”, “to” and “subject”. There is also a hidden copy, here you can add recipients who can be familiarized with the letter, but other recipients will not know about it. You can write the address yourself or select it from the address book. A message can be sent to several recipients at once.
To see the email address, you need to hover over the recipient's name. The address can be edited. To do this, click on it with the left mouse button and make changes. To delete an address, click on the cross next to the recipient.
The following hotkeys can be used:
- Ctrl+A – to highlight an address or information.
- Ctrl+C – to copy.
- Ctrl+V - paste what you copied.
- Backspace – deleting the marked one.
Setting up a signature in a letter
To set up a signature, follow these steps: Click on the “more” tab.
Here, click on the “settings” tab and select the sender’s name and signature.
After this, the signature settings tab will open. You must write down the required signature in the column. Then click on “save”. To check, you need to look at the new letter and the signature.
Creating an Auto Reply
To create an autoreply, you need to go to the settings and click on the “autoresponder” button. The switch should be set to the “on” position.
In the “works with...” section, you must indicate the operating time. In the “working hours” section you need to enter the hours for the answering machine to work. If necessary, you can set it to “24 hours a day.” Then enter the answer text and click “save”.
In this case, an auto-reply will be sent once every 12 hours, but not for every letter.
Creating folders and automatically placing letters in the right places
A folder can be created for a specific category of letters. And you can put a password on such a folder for additional protection.
To do this, go to the “set up folders” tab. Then click on the “add folder” button. A window will open to select a new directory. If you leave it “at the top level” the folder will be organized in the general directory. To create a child directory, you must create an inbox and the folder will become a child. Then you need to click on “add”. After this, you need to select the letters that will be placed in this folder. Then the “move” button is pressed and the created directory is selected. The folder can be protected with a password.
Creating contacts and distributing them into groups
Contacts can also be grouped. In this case, the same contact can be added to different groups. The list of groups appears on the left side of the address book. To see contacts, you need to click on the group name. To add a new group, click on “create group”.
To add a contact to a group, you need to select it and click the “add to group” tab. Then you need to click “apply”.
Create a Yandex email account
- We start the search and open the corresponding application in the found ones.
- We use the “Install” function.
- When the installation is complete, click “Open”.
- The main screen appears, on which we need to “Register”.
At the next stage, we indicate your login, password, last name, first name and mobile number. After filling out the required fields, click on the “Next” button. Specify the symbols shown in the image and click “Next”.
Now registration is completed, and we find ourselves in our personal account, which allows us to manage our mail. Yandex fans also have the opportunity to use a proprietary application to work with mail with even greater convenience.
Connect to your Mail.ru email account
Mail.ru is a relatively well-known Russian service that also allows you to create personal mailboxes on the Internet. The creators of this service have also developed applications for users to conveniently work with mail on smartphones running the Android operating system. We need to install the specified program and go through the registration process according to the algorithm described below.
- Select the found application and use the “Install” function.
- When the installation is complete, use the “Open” option that appears.
To register an email on your smartphone, open the mobile version of the Mail.ru website. The “Registration” button we need is located on the main page. Click on it. Next, fill out a standard questionnaire consisting of gender, date of birth, first and last name. At the same step, we will have to come up with and indicate a variant of the future email address.
After that, specify the password for the account. And in order to be able to restore control over mail if it is lost, we have to indicate our mobile phone number. At the final stage, all that remains is to click on the “Register” button. You can use mail directly from your smartphone browser.
Mail.ru has provided a special adapted version of the interface for convenient viewing of letters on mobile devices. However, you should not forget about the mobile application, since it also copes well with its functions. If you actively use email and speed is a determining factor for you, you will most likely find the application more efficient.
Create a Rambler account on an Android phone
It's time to take a closer look at how to use your smartphone to become the owner of a new mailbox in the Rambler service. We use the algorithm described below.
- Open the found program and click on the “Install” button.
- When the installation is complete, open the application.
- At the bottom of the window, use the “Registration” function.
- Specify personal information and address for a new mailbox
At the next stage, we have to name the region of residence and a control question. The latter is necessary to be able to restore access to email if the information specified during registration is lost. At the final stage, all we have to do is inform the system that a person is working with it, not a robot, and click on the “Register” button.
Registration through official websites
In the event that you cannot download the official application for working with mail of a particular service, for example, due to an old version of Android or lack of memory, you can register through a browser by visiting the official website from the mobile version. All you need is a browser. We looked at the standard Xiaomi browser as an example, although you won’t notice any noticeable difference in other browsers.
Gmail
- Follow the link mail.google.com and on the main page click the “Create an account” tab;
- In some cases, the system may prompt you to switch to the mobile application. Then you need to click “Open web version” so that the registration process is still done through the browser;
- Select “For yourself” (for whom the account is being created);
- Enter all the data that the system requests, including your email address and password, and click “Next”;
- In the next window, you will need to indicate your date of birth, gender, your mobile number and backup email address. The last two items on our list are optional. Click “Next”;
- Agree to the terms of service by clicking “I Accept” and wait a few seconds until the data is processed;
- This will complete the registration process, and you will be taken to the mobile version of Gmail, from where you can manage your emails.
Registering a new Gmail mailbox
Mail.ru
- In your browser, go to mail.ru and click the “Registration” button at the top right;
- Enter your information, including your email name and password, then click “Register”;
- Enter control characters to confirm registration and click “Next”;
- At this point, the system will prompt you to go to the Android application, but you need to click “Continue on the site” to remain in the mobile web version.
Registering a new Mail.ru mailbox
Yandex
- Go to the website yandex.ru and click the “Login” tab at the top;
- Click the “Register” button to create a new account;
- Enter all the data requested by the system and click “Register”;
- If you do not have a mobile phone, you can click “I don’t have a phone” and indicate the security question and answer there. Just enter such information carefully and be sure to remember the data so that in case of emergency you can restore access to your mail;
- When choosing a mobile number, you will need to confirm it by indicating the last 4 digits of the incoming call;
- At this stage you will be asked to specify a profile photo. Select a photo or click “Skip”, after which you will be taken to the mobile version of the Yandex Mail service.
Registering a new mailbox in Yandex
Registering a new mailbox in yandex.ru
The budget that the founders of Yandex initially spent on opening the search engine was $10,000 back in 1997. By 2002, the search engine had already completely paid for itself thanks to contextual advertising.
How to create an email on Mail.ru for an Android smartphone
If you have not yet registered with any mail service, we recommend creating mail on Mail.ru as the easiest and fastest option. There is nothing superfluous in it, it works perfectly with other services. At the same time, you can also receive free space for your files on Mail.ru servers along with the mailbox.
Cloud Mail.ru
The popular service “Mail.ru Questions” and more will be available.
You can register your email in the web version of the site, through a mobile browser, or by downloading the application on Google Play:
- Write “Mail.ru Mail” in the search and select the service in the results;
- On the main site, click on the “Registration” button;
Click on the “Registration” button on the Mail.ru website
- Next, fill out the standard registration form, indicating the name of the box;
Enter registration details
- Enter your phone number or captcha and click on the register button.
A mailbox can be used as a service for sending and storing letters. It is reliably protected from spam and viruses. Users have the opportunity to get up to 100 gigabytes of space on the Mail.ru cloud on an Android phone. As well as transferring mail and collecting letters from all other mailboxes and mail services. There is a built-in calendar. And for developers it is possible to access the API.
Mail.ru mail
The next client on which we will register an account will be Mail.ru. You can download it through the same Play Market; its key feature is the privacy policy, according to which taking screenshots of the application is prohibited.
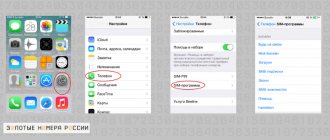
In order to create an email on your phone, you need to follow the following instructions:
- Go to Gmail, click on the inverted triangle and click on the “ tabAdd account" A list of email accounts appears, among which we select Mail.ru.
- In the authorization tab that appears, click on the link “Register».
- Let's get started filling in the basic parameters mailbox.
How to activate developer mode on Android
Note! Unlike other clients, registration with Mail.ru mail is moved from Gmail to the browser window.
- Must be entered code from the picture in the field (captcha) to prove that you are not a robot.
- After entering characters, automatically will redirect to the page registered mailbox.
Previously, the main problem of Mail.ru mail was the low level of confidentiality. It is clear that the developers have corrected this flaw, since even screenshots cannot be taken. Efficiency in tracking letters, standard design and ease of use – these are the main characteristics of the Mail.ru client.
Where can I make a mail for free?
To create an email, you need to register on some email website. There are several such sites on the Internet, and the most famous are Yandex, Gmail.com (Google) and Mail.ru.
Which one is better to make an address on? By and large it doesn’t matter - they are all about the same. And in terms of capabilities, and in terms of convenience, and in terms of safety
Some are a little better according to some criteria, others - according to others. But the difference is insignificant.
Below I have made a comparison table between these sites. But, again, the differences are insignificant. All of these sites cope equally well with their main function - receiving and sending letters to any part of the world.
| Yandex | Mail.ru | Gmail.com | |
| Simplicity and convenience | + | + | — |
| Protection against unwanted emails (spam) | + | — | + |
| Problems with mailbox and letters | Sometimes | Often | Rarely |
| Safety | + | — | + |
Testing the usability of Outlook
Internet users call Microsoft Outlook the ideal client for a corporate network. Its One Drive cloud integration, multi-box support, and extensive customization are perfect for the job. It is also highly compatible with Microsoft Exchange Server. You can create an account on a Samsung, Asus, Xiaomi or any other phone:
- The key disadvantage is immediately worth noting long installation from Play Market.
- You must specify the account with which you plan to work in the application and click the “Continue».
- The application offers enter password to access the box.
- After entering your password and confirming your account, Outlook asks for access to the main built-in mail and phone functions, after which the authenticity of the box is checked again.
- The last step before use becomes setting, consisting of 2 points.
Using USB OTG in Android
Outlook is a truly convenient application for your smartphone. Thanks to the built-in calendar, you can immediately plan meetings and transactions , and the high speed of sending messages will only save time. The only drawback is that it is impossible to block recipients sending spam. But this will soon be eliminated by the developers.
Setting up the tablet
The customization capabilities of a tablet equipped with Android OS allow you to make it truly personal. Let's look at the main features using the Samsung Galaxy Tab as an example.
When you pick up a brand new tablet, the first thing you see is the Lock Screen. By sliding the lock image with your finger, you will “wake up” the device and see the main screen of the work area. In Android OS version 4, context keys are located at the bottom of the screen, access to the main menu is at the top. Basic system management options are available from the main menu.
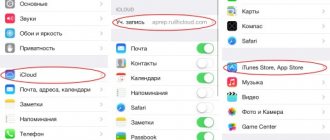
The “Personal Data” section allows you to synchronize your gadget with cloud services and manage accounts on Google services and more. If you don't have a Google account, you will be prompted to create one. This should be done at least in order to be able to download applications from the Android market. If you wish, in “Personal Settings” you can enable detection of your location or create several user accounts.
The “System” section contains settings for date, time, special features and other things, and the “Device” section will help you design the appearance of the screen.
Security, locking and unlocking
Security options, also available from “Personal Data,” allow you to manage tablet locking and encryption of user data. You can block access in several ways: from scrolling the lock across the screen, to entering a pattern key and recognizing the owner’s face. The unlocking process is usually straightforward, but if you can’t log in, the following methods are suggested.
So, how to unlock an Android tablet:
- use the Google password recovery service;
- restore from a backup (if any);
- use third-party programs to unlock tablets, for example, HiSuite;
- return to factory settings (Hard Reset).
How to use an Android tablet
Tablets can access the Internet using WiFi and a built-in 3G modem (SIM card required). If you have had to set up a network on a PC, you will not encounter any difficulties, the main thing is to know the settings of your operator. Connecting wireless devices is also possible via Bluetooth. To view web pages, Android OS is equipped with a built-in browser.
For ease of use of email, Email and Gmail clients will allow you to organize your work with several mailboxes at once. The application interface is intuitive and is similar to setting up an email client on a PC.
The Samsung Galaxy Tab tablet is convenient for reading e-books and is equipped with a program that has access to a huge library. This program, like others, is available from the “Applications” section in the main menu.
You can replenish your collection of applications (paid and free) in the Android market, where there are more than 100,000 of them. To use the service, you need a Google account.
Tablet firmware
If the gadget does not work stably or you are faced with a task (especially how to flash an Android tablet in order to improve its functionality, as well as to close system vulnerabilities), you will need to flash the device. There are official firmwares released by the Android OS vendor, and unofficial (custom) ).
Unofficial firmware is used to gain privileges that allow you to programmatically regulate the operation of hardware, increase performance, expand system capabilities, and use applications that are not available in the regular version of the OS.
If official firmware is released with the goal of making the use of the tablet more secure and stable, then unofficial firmware promises a lot, but does not guarantee anything. By installing firmware from an unknown manufacturer at your own peril and risk, the owner risks irreparably damaging an expensive device.
- Like
Using an Android phone as a Web camera
Why you need to update Android versions on your device
Instructions for charging the battery of an Android tablet
Instructions for connecting a keyboard, mouse and joystick to an Android gadget