Setting up the Internet on a phone with the Android operating system will not take much time, if the user has detailed instructions on how to connect the Internet on Android. The guide below provides instructions on the basic methods for completing the task. You can connect to the World Wide Web using mobile Internet, for which the owner of the smartphone will have to regularly pay to the cellular operator for the provision of appropriate services.
If the user does not have money on his balance, then he will find instructions on how to set up the Internet on Android using wireless Wi-Fi access points, which are currently organized in almost all public places and provide free access to the global web, for example, train stations, cafes and restaurants, shopping centers, educational institutions, etc.
Of course, a significant number of people have their own Wi-Fi routers at home, so this guide will be useful for both them and their guests. If you have a computer connected to the World Wide Web, then at the end of this article the user will find instructions on how to set up the Internet on your Android phone via a cable connection to a PC.
Internet connection options on Android
You can open access to the unlimited possibilities of the Internet in two ways - either using Wi-Fi (at first, you can experiment with free hotspots, which are easy to find in the metro, restaurants and cafes, but due to strong speed restrictions and unstable connections, It’s better to get your own router at home and set up a wireless connection) or using the settings of your mobile operator and using GPRS, 3G and LTE technologies.
If you choose the best option, then the priority, of course, is “home” Wi-Fi, and there are several reasons for this: full (or at least partial - it all depends on the provider, city and prices for services) unlimited, stable connection, the ability to not worry about traffic when downloading large files. In second place is LTE, due to speed. Well, and then 3G, at the end of the list is the outdated and almost unheard of GPRS.
Internet speed
One of the main parameters is the possible speed of data reception and transmission, so if the user is just about to purchase a smartphone for subsequent use of the Internet, it is recommended to study its characteristics. First of all, you need to pay special attention to what communication standards the device supports, for example, GPRS, EDGE, 3G, 4G (LTE), LTE-Advance.
You should also know that not every mobile operator provides 4G speed, so it is often not worth overpaying for a feature on your phone that you will never use, or you will only have access to high-speed Internet in rare cases, for example, when traveling to large cities, where This is how free Wi-Fi zones are organized everywhere.
The most commonly used Wi-Fi standard is “802.11n”. However, nowadays more and more routers are being released with support for “802.11ac”, so when planning to purchase such a router, it is advisable to make sure in advance that the smartphone also has the ability to work on this high-speed communication standard.
Wi-Fi setup and connection
And, since Wi-Fi is the highlight of the program, then you should start the setup instructions from here:
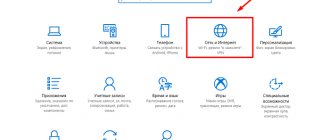
- The first step is to go to “Settings” (either from a shortcut on the desktop or in the main menu, or by calling up the quick access panel and activating the gear);
- In the “Wireless Networks” section, select “Wi-Fi”;
- Move the icon from the “Off” position to the “On” position;
- In the list that appears, find an option suitable for connection (if the network is secure, the Wi-Fi icon will appear with a special “lock” that requires you to enter a password!).
You may be interested in: Setting up mobile Internet (MTS, Tele2, Megafon, Beeline) on Android
If the entered password is correct and the Wi-Fi connection is working, then next time you will have to repeat the procedure until the icon is switched from “Off” to “On” - the network will be selected automatically, and the smartphone will immediately go through all the necessary authorization steps without any problems (of course, if the password or name of the Wi-Fi point does not change).
Interaction with unprotected networks follows the same scenario. If you have already managed to connect to free Wi-Fi in a cafe or restaurant once, then the next time you visit, no additional actions are needed.
What's better
The easiest way to connect is to use WI-FI wireless networks - they give the best signal and are the easiest to set up.
Mobile Internet is available everywhere, but connecting to it may cause problems. But access via USB should be used when there is no other choice - for example, there is no WI-FI module, and the selected operator tariff does not include network access services.
Any method of connecting an Android to the network is good in its own way. But, if you suddenly failed to connect, you should not try to use another method, but simply carefully repeat the previous one - most of the errors are associated with inattentive data entry, especially passwords.
Setting up 3G and LTE
Before proceeding with the further steps of the instructions, it is important to understand three optional, but greatly simplifying, nuances:
- 3G or LTE . A smartphone's priority is always LTE, but subject to two conditions: this technology must be supported by the device (the easiest way to study the specifications is in the network settings) and by the operator in the region chosen for connection. If for some reason none of the points described above are met, then the only way to look behind the veil of secrets of the Internet is to use the power of 3G (in some cases, you can even rely on GPRS);
- Automatic selection of parameters . Until recently, mobile operators forced all Internet lovers to manually enter network parameters, turning to consultants from the call center for help, but now the situation has changed - everything happens automatically, you just need to insert a SIM card of any operator into the SIM tray - be it MTS or Tele 2 - the data will be picked up automatically and you can immediately start using the Internet at available speeds;
- Troubleshooting . If the data does not appear in the settings automatically, then it is still too early to turn to the extended instructions - it is much easier to get the entire necessary package of parameters by sending an empty SMS to the short number of the mobile operator. Within a second you will receive a response message that will “unpack” and fill in the necessary data in the smartphone settings.
You should contact the following numbers: MTS – 1234, Megafon – SMS with the text “1” to number 5049, Beeline – 06503, Tele2 – 679. Yota SIM card owners will have to call the call center at 8-800-550-00-07.
Did the settings given in the message not work? Internet still unavailable? In this case (and not a minute earlier!) all that remains is to do all the steps manually...
3G and LTE settings for different operators
Regardless of which operator’s SIM card is inserted into the smartphone, the instructions are the same for everyone:
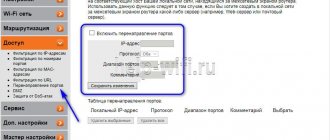
- Go to “Settings”, expand the “Wireless networks” section using the “More” button, select “Other networks”;
- In the menu that appears, click on the “Mobile networks” item, and then on the option that is somehow related to the APN (with the name of the access point, which differs for each operator in different parameters and input data). Due to the wide variety of versions of the Android operating system, the APN section can differ greatly, both in functionality and in a banal name, and therefore in some situations you will have to literally “touch”;
- Found the required item? This means that it will be possible to change the access point by working with two items at once - authentication type and APN type;
- In the first case, you will have to specify the PAP parameter (PAP or CHAP option - not suitable for domestic mobile operators, don’t even try!). And in the second (where the type is APN) enter the phrase without quotes - “default, supl”. The changes made must be saved and proceed to the next steps;
- Next you need to enter the name of the access point. Any option will do, but for added accuracy and complete clarity, it is better to choose a name that echoes the name of the mobile operator.
↑ Setting up APN for Russian cellular network operators.
- go to the Settings menu;
- select SIM cards and networks;
- tap on the Access Point (APN) item;
- select the desired access point and tap on the Add APN item;
- We enter the previously received Internet access parameters.
Internet APN parameters for the Beeline operator.
Click save!
Internet APN settings for the MTC operator.
Click save!
Having completed all the operations, check the Mobile Data Transfer activity and select the preferred Network Mode. In roaming, the Internet costs much more, so we recommend turning off data transfer if your tariff does not provide free Megabytes in roaming.
↑ Removing Internet settings on an Android phone.
Sometimes there is a need to delete a particular access point and the question arises, how to do this on an Android smartphone? Here's what you need to do:
- Go to the Settings menu and find the More item.
- Select Mobile networks.
- Tap on Access Points (APN).
- Open the menu in the form of three dots in the upper corner.
- We reset the settings.
That's all.
We hope that our instructions helped you set up your favorite gadget and faithful electronic assistant. In order to take advantage of the full capabilities of the site, please log in using social networks.
Leave your comment.
If you have any questions solving a problem on your smartphone. Leave a comment describing the problem in detail, and be sure to indicate the model of your smartphone. We will try to help you!
Mobile operator settings
That's it, the initial setup is completely completed. All that remains is to enter the APN parameters and username and password, which differ for different operators. How? All details in the instructions:
- MTS . The input parameters are absolutely standard. Access point – internet.mts.ru. The username in this case is mts, as is the password - the same mts. Important! All data is entered in capital letters, without quotes and in a pre-prepared place!
- Beeline . The scams are still the same, but the name needs to be double checked. No amateur activities - strictly Beeline Internet. Access point – internet.beeline.ru. User and password – beeline. The entered data must be saved; you can check your network connection in 5-10 minutes. If the performance is again zero, then you will have to restart the smartphone;
- Megaphone . The name of the access point is Megafon (if you enter other values, the chance of connection is reduced to 10%). APN – internet. Username and password – gdata. Short and sweet, right? This means that there should be no problems with repeating the described symbols!
- YOTA . Name - whatever you like. The APN is “internet.yota” (without quotes) and the username is “yota” (without quotes). No password is entered - the field must be empty!
- TELE2 . Access point name – any (gender should NOT be empty). APN – internet.tele2.ru. Username – Tele2 Internet (it’s worth double-checking uppercase and lowercase letters to avoid possible errors!). Password is not entered.
The entered data should be checked three times - if problems arise, then the problem is most likely related to inaccuracies - a letter is missing, dots are missing, or the name is taken from your head, but should be written as required by the operator.
In some cases, for additional accuracy, it is worth contacting the call center - perhaps the operator will provide some additional data suitable for entering on certain smartphone models (situations are different, it is better to sort out all the small nuances in advance).
Possible errors and ways to eliminate them
The list of possible problems can be divided into several categories:
- The operator's servers are not working . Such situations occur, perhaps, once in a lifetime, but if all the data is entered correctly and the SIM card is in place, then all you have to do is simply wait - perhaps in five to ten minutes everything will work. Sometimes the problems are not related to the servers, but to the coverage area - if the smartphone is not able to connect to 3G, then most likely you need to return to the process of searching for a network in a new place (especially if the attempt to use the Internet was carried out somewhere far outside the city, where the operator is basically unable to cope with the task);
- Smartphone malfunctions . There are two options here - reboot the device and try to connect again, or reset the network settings, simultaneously updating the operating system to the latest available version. The procedure will take no more than 10 minutes, and the result will definitely surprise you!
- SIM card . There are two things worth checking. Firstly, is there really any money left in the account (or free megabytes?). If yes, then you should contact the call center operators directly for answers to your questions - perhaps they will tell you what restrictions are placed on the number and how to get rid of them as soon as possible.
Secondly, you should once again carefully go through the points of automatic (send a blank message to the short number indicated on the website of each mobile operator, or you can find the relevant information on the official website) and manual network setup (again, all data must be entered as much as possible carefully - without confusing uppercase and lowercase letters, and without inventing the names of APN access points where the operator offers the necessary names!).
Is everything double checked? The last option remains - save a backup copy of the current version of the operating system to cloud storage or to your computer, then go to “Settings”, select the “Backup and reset” menu item, and click on “Reset settings”. In just a few minutes, all information from the smartphone will disappear. All that remains is to carry out the initial setup and then restore the necessary information from the backup. Then you will have to repeat the procedure for automatic or manual network setup. There is no other choice left!