Setting up MMS on Yota: for popular OS
The MMS transfer service is not very popular among Yota users. There is a rational explanation for this. Indeed, is it worth paying for the old-school type of communication when all entertainment content is now available through more convenient instant messengers? However, there are conservative adherents of this particular method of communication. It is for such subscribers that we have prepared our material.
MMS settings on Yota for Android
If your phone is not yet configured to receive MMS messages automatically, use our hint.
- Go to Settings - “More” (“Advanced”) - “Mobile network”;
- In the “Access Points (APN)” section, click on the icon for creating a new connection point.
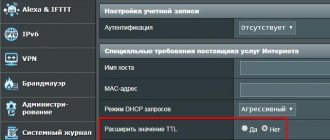
- Next, you need to fill in the required fields: In the Name line - indicate MMS.Yota APN: mms.yota Address line - MMSC: https://mmsc:8002 Proxy: 10.10.10.10 Port: 8080 APN Type (Type): mms
How to set up MMS on Yota for iOS
How to set up MMS on Yota for iOS so that your gadget receives mms? Try the following algorithm:
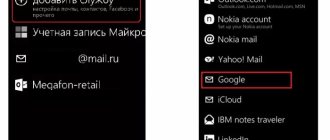
- Go to “Settings” - “Cellular”
- Data Options
- Cellular data network
- MMS. Enter the following parameters: APN: mms.yota MMSC: https://mmsc:8002 Proxy: 10.10.10.10:8080
As you can see, all the steps are as simple as possible, the main thing is not to make mistakes with the numbers.
There are a couple more important points left to make sure everything works for you:
- Correct operation of this function is possible only when a high-quality Internet connection is active on the phone.
- If you previously used a SIM card from another operator, then the APN probably already has an access point from the previous provider. It’s better to delete it, and if that doesn’t work, then just change the APN type from mms to any other. Don't forget to save all changes and reboot.
You may also need the SMS center number, which you can additionally specify during the setup process: 8-958-537-06-90.
Now you have a somewhat retro service at your disposal, thanks to which you can receive and send short multimedia files on your phone.
How can difficulties arise?
Setting up the Iota Internet on Android devices is not a difficult task, but if the smartphone or phone has left the coverage area of the mobile operator, then the gadget in some cases can automatically disconnect from the access point we previously created. This type of problem cannot be solved automatically.
If this happens, it is recommended to completely reboot the device, or try to turn on “Only 2G networks” again and turn them off - usually this simple setting helps. It is worth noting that the previously made setup of the Eta Internet on Android will not go wrong because of this. And the problem is relevant, as a rule, for those regions of the country where the coverage area of the telecom operator is relatively small.
In addition, today the telecom operator blocks the ability to distribute Wi-Fi access to the Internet from gadgets. In other words, having fast and high-speed access to the Internet, subscribers do not have the opportunity to share it with friends and family. Of course, it is possible to bypass these restrictions (but not using the standard settings menu), but this is recommended only for experienced users, since setting up the Internet on Eta on Android for Wi-Fi distribution is really difficult:
- First you need to get Root access, which can be done through various applications from Google Play.
- After gaining access, you need to install “TTL Editor” or “normal tethering unlocker”. These are applications with an extremely clear interface.
- Using these applications, you can unlock the capabilities of a SIM card on Android.
Setting up Yota for Android for Wi-Fi distribution can be much easier - just purchase a modem from a telecom operator.
Source
Automatic setup of MMS and Internet
First of all, you should make sure that MMS and Internet settings are saved automatically after turning on the device for the first time along with the SIM card. Make sure that the device receives a network signal, and that the locality in which you live is within Yota’s coverage area.
You can purchase a SIM card anywhere, but it is better to activate it in the area where it will be used most often.
If the conditions are met, then you should insert the SIM card into the smartphone. In this case, you need to turn off Wi-Fi, otherwise the automatic setup will not be able to start. After the signal is caught, the SIM card is activated, which means MMS and the Internet will start working. To manage your tariff, we recommend downloading the Eta application.
Features and how to prepare
Before purchasing a SIM card from Yota for Android or iPhone, you should consider several factors:
- the device supports 2G and LTE networks and has access to the Internet;
- in the subscriber's region, the tariff plan is active and functional.
If there are no problems with the above points, the subscriber begins setting up MMS Yota. A new SIM card is inserted into the gadget, and the mobile turns on. In a couple of minutes the MMS settings will arrive.
- note
- To monitor the balance and services, the client can download an application from the Yota company. It has the ability to change the tariff and connect additional functions.
You can buy a new card anywhere, but the user can activate it only where it will be constantly used. When installing a SIM card on an iOS system, the client often has to configure the functions themselves, and MMS is no exception. The subscriber must first find an internet access point, and then add other functions.
Manual setup of MMS Yota
You should switch to manual only if automatic fails. The steps and procedure for manually setting up MMS Yota vary. It depends on the device where the operator SIM card is installed. In any case, you will not be able to use the services without it.
For Android
When reading the instructions, please note that the names of menus, items, etc. differ in different versions of the OS. Therefore, be careful, they are often replaced with synonyms or similar words. For Android you need:
- Go to “Settings”, then “More”, after “Mobile network”, then “Access points”, and lastly – “Change/Create”.
- In order to set up MMS on your phone, enter in the “APN” column – mms.yota.
- In "MMSC" - https://mmsc:8002.
- In “MMS proxy” write – 10.10.10.10.
- In the “MMS Port” field – 8080.
- And lastly, opposite “APN Type” indicate – mms.
After all six steps, save the changes and reboot your device. After this, everything usually starts working fine.
For iOS
With iPhones, manual setup is a little easier than with Android. The fact is that for iOS only three indicators are introduced:
- In the phone settings, find the item “Cellular”, after “Data settings”, and at the end “Cellular network...”.
- In the menu that opens, go down and change the “APN” value to – mms.yota.
- "MMSC" - https://mmsc:8002.
- "MMS proxy" - 10.10.10.10:8080.
Leave all other fields blank, otherwise the connection will not be completed correctly. The iPhone needs to be restarted for the new settings to take effect. After turning on, the software activates sending pictures.
For Windows Phone
This is the last device we will look at. The principle is the same as with other smartphones - you need to create a Yota access point with special parameters.
- Go to settings, then “Network...”, after “... SIM card”, then “SIM card settings”, select “New MMC access point”.
- Enter the name of the access point - MMS Yota.
- For “WAP gateway” enter the value – 10.10.10.10.
- “WAP gateway port” – 8080.
- “Port MMS Center” – 8002.
- And opposite “MMS Center”, indicate the link to the site: https://mmsc/.
Be sure to click “Save.” Otherwise, all the information will have to be entered again, and this is tedious. After resetting, you need to reboot your phone. After this, MMS will work as usual.
General rules
Even before purchasing a SIM card from a telecom operator, you need to pay attention to the following recommendations for setting up Yota on your phone:
- If a SIM card for a smartphone or telephone was purchased in Moscow, then it must be activated in the capital (that is, activation must necessarily take place in the region of purchase).
- Before buying a SIM card, you need to make sure that the smartphone supports 2G/3G/4G standards to work in the corresponding networks.
- The best option is for the smartphone to support the LTE standard and the USIM chip at the firmware level.
- It’s also a good idea to look at the coverage map of the telecom operator in your region in advance (especially if the subject of the Russian Federation is remote from the capital).
MMS settings yota
Short description:
Client of the mobile operator Yota.
Advantages: - True unlimited Internet without restrictions on traffic volume - Communication throughout Russia without roaming, the cost of services does not change when traveling around the country - Unlimited calls within the Yota network in Russia, regardless of how long the conversation lasts - Full control of expenses in your mobile Yota application - Federal coverage throughout the country in 2G/3G/4G networks
In the application you can: - View the current connection conditions and easily change them. - Change number. — Manage services in roaming. — Link a bank card and pay for services. — Contact online support. Read more. Internet and MMS settings Developer mode in the YOTA application (Works only in version 3.6 and lower)
Android required:
4.4+
Russian interface:
Yes
Android 4.1+:
Version: 5.4.8 GP
Message No. 963, author gorand39
Version: 5.4.0 GP
Yota - Mobile operator for Android (formerly Yota Voice) (Post ACME ltd. #77806412)
Version: 5.3.3
Message No. 888, author Leshiy2020
Version: 5.3.0
Message No. 888, author Leshiy2020
Version: 5.2.0
Message No. 871, author Leshiy2020
Version: 5.1
Message No. 827, author Azekaew
Version: 5.0
Yota - Mobile operator for Android (formerly Yota Voice) (Post by dimon4ezzz #71847165)
Version: 4.7.5
Message No. 820, author And_RU
Version: 4.7.1
Message No. 816, author FlynaStar
Version: 4.7.0
Yota - Mobile operator for Android (formerly Yota Voice) (Post Muhoflu #68508058)
Version: 4.5 .5
Yota - Mobile operator for Android (formerly Yota Voice) (Post by Rakleed #67574621)
Version: 4.3.6
Yota - Mobile operator for Android (formerly Yota Voice) (Post by Rakleed #66687250)
Version: 4.3.0
Yota - Mobile operator for Android (former Yota Voice) (Post Rakleed #65277608)
Version: 4.2.7
Yota - Mobile operator for Android (former Yota Voice) (Post Rakleed #64437815)
Version: 4.2.5
Yota - Mobile operator for Android (former Yota Voice ) (Post Rakleed #63991879)
Version: 4.2.3
Yota - Mobile operator for Android (former Yota Voice) (Post stand65 #63496708)
version: 3.9.2
Yota - Mobile operator for Android (former Yota Voice) (Post Lobawka #59823595 )
version: 3.9
Yota - Mobile operator for Android (former Yota Voice) (Post Lobawka #59296681)
version: 3.6
Yota - Mobile operator for Android (former Yota Voice) (Post Shun #55825077)
version: 3.5.6
Yota - Mobile operator for Android (former Yota Voice) (Post And_RU #55073528)
version: 3.5.4
Yota - Mobile operator for Android (former Yota Voice) (Post And_RU #53429608)
version: 3.5
Yota - Mobile operator for Android (former Yota Voice) ( Post NightlyRUS #52518462)
version: 3.3.1
Yota - Mobile operator for Android (former Yota Voice) (Post blackrazor #49540254)
version: 3.3
Yota - Mobile operator for Android (former Yota Voice) (Post blackrazor #49228082)
version: 3.2 .4
Yota - Mobile operator for Android (former Yota Voice) (Post And_RU #49126922)
version: 3.2.3
Yota - Mobile operator for Android (former Yota Voice) (Post pokpok #48501124)
version: 3.2.2 Tablet
Yota - Mobile operator for Android (former Yota Voice) (Post NanowarrioR #47591243)
version: 3.2 Phone
Yota - Mobile operator for Android (former Yota Voice) (Post zembura #45876686)
version: 3.2 Tablet
Yota - Mobile operator for Android (former Yota Voice) (Post by gar_alex #45622998)
version: 3.1.2 Phone
Yota - Mobile operator for Android (formerly Yota Voice) (Post And_RU #44093743)
version: 3.1.2 Tablet
Yota - Mobile operator for Android (formerly Yota Voice) (Post by VLADFIONOV # 44094923)
version: 3.1.1 Tablet
Yota - Mobile operator for Android (formerly Yota Voice) (Post Xneon #43650175)
version: 3.0 Tablet
Yota Voice (Post Leprec0n #41650133)
version: 3.1.1 Phone
Yota Voice (Post Dgonix #43646982 )
version: 3.1 Phone
Yota Voice (Post And_RU #43380069)
version: 3.0.2 Phone
Yota Voice (Post Dgonix #42374031)
version: 3.0.1 Phone
Yota Voice (Post Dgonix #41915156)
version: 3.0 Phone
Yota Voice (Post Dgonix #41527745)
version: 2.9.0 Tablet
Yota Voice (Post by gar_alex #40956378)
version: 2.9.1 Phone
Yota Voice (Post by Shun #41246441)
version: 2.7.3 Tablet
Yota Voice (Post by klisanor #40667212)
version: 2.7.3 Phone
Yota Voice (Post by klisanor #40667200)
version: 2.7.2 Tablet
Yota Voice (Post by gar_alex #39109395)
version: 2.7.2 Phone
Yota Voice (Post by eriktrif #39108408)
version: 2.6.1 Phone
Yota Voice (Post #37542979)
version: 2.7.1.2 Tablet
Yota Voice (Post gar_alex #38319531)
version: 2.7.1.1 Tablet
Yota Voice (Post gar_alex #38319531)
version: 2.6
Yota Voice (Post #36717410)
version: 2.5
Yota Voice (Post #36452281)
version: 2.4.2
Yota Voice (Post #35840459)
version: 2.0
//4pda.ru/forum/d...__2.0_%5BTablet%5D.apk
version: 1.5.1
Yota Voice (Post #34203451)
version: 1.0.3
ru .yota.android.apk (1.91 MB)
How to configure mms in Yota if automatic settings have not been received?
Problems related to MMS settings are no longer relevant. This is typical only for older phone models. Most of the installation is automatic. To do this, you just need to install a new SIM card and wait a certain time. Since modern models are equipped with various options, in some of them the parameters are set directly at the manufacturer. Yota also provides automatic settings for mms. But it also happens that you have to do it manually. If you follow certain rules, there will be no difficulties.
When connecting to the Yota cellular operator, before you start using all the features, you need to enter certain parameters. Basically, this does not require much time and effort, but despite this, it happens differently in each device.
More on the topic
Yotaphone 2: characteristicsFeatures of the InternetYota Y1 Pro will soon be on the Russian marketKaliningradPayment for servicesInternet coverage area
In order for the YOTA device to function as expected, and to avoid any failures and annoying troubles, it will be necessary to carry out several simple measures. First, thank the Omnissiah for his gifts. Okay, just kidding, it's not necessary. But if you do this, it won't get any worse.
The SIM card is activated automatically when you turn on the new device for the first time. Well, or the old one with a new SIM card. It's not significant. Once you make sure that the device has connected to the Yota network, the APN settings will not cause any problems.
On all Yota APN , settings are made almost the same. The only difference in the algorithm of actions depends on the operating system installed on the tablet or smartphone.
Preparation before setup
Before you begin entering, you must complete the following steps:
- register the SMS center number;
- set the phone type;
- decide which operating system is installed and its version.
There are situations when owners do not know about the version and type of operating system. In this case, you should turn off and turn on the device again. During the boot process, comprehensive information about the installed system and its name will appear on the screen.
Setting up MMS for Android phones on Yota
Sometimes, the parameters are not set automatically. In this case, you need to do it yourself. First of all, you need to log in to the settings, then to the mobile communications point. Here you will need to enter the name Yota in the access point. After that, find the APN and enter mms.yota . As for the MMSC mmsc:8002 is added here . But that's not all. Next, go to the proxy address . It should be: 10.10.10.10 . Port 8080 . In addition, set the APN type to mms. After entering the parameters, the device reboots and data transfer starts. You can now send and receive. One more point needs to be remembered. Sending and receiving MMS messages is carried out only if there is an active Internet connection.
Windows phone.
- Find “Settings” and select “More”.
- Open the section called “Access Point”.
- In this section, you will need to click the “+” symbol, which will allow you to create a new access point.
- After you press the “+” symbol, a window will open in which you need to enter the following data: name – “Yota”, then APN – “internet.yota”.
- We save all the changes made.
- After the changes are saved, you will need to repeat the same procedure again and make sure that the status for this access point is set to “active”.
As you can see, setting up APN for any operating system will not take much time and does not require any specialized knowledge. And, if everything is done correctly, it will not cause any particular difficulties. If something does go wrong, you can always contact technical support specialists and they will clearly explain what exactly went wrong and what exactly should be done about it. You can write to consultants on the official website in the “Support” section (https://www.yota.ru/support), call or send an SMS with a question to the short number 0999.
Sources used:
- https://fb.ru/article/255544/yota-nastroyka-interneta-avtomaticheskaya-i-ruchnaya
- https://yotazone.ru/nastrojka-yota/
- https://yota.info/tochka-dostupa/
Setting up on iOS devices
Now many people prefer Apple devices with iOS. To enter parameters with such an operating system, you need to go to settings and turn on cellular data in the cellular connection point. Then set the data transfer type to mms. Further actions are performed in the same way as in the Android operating system. The remaining fields are left blank. Just like with Android, a reboot is performed, data transfer is turned on, and mms are sent or received.
For a long time now, people have not experienced any problems entering parameters. To correctly configure MMS in Yota, you need to know the required values. With such information, every phone owner can do this without any problems.