Wink is a modern service owned by Rostelk, which is already used by many subscribers to watch films, television programs and other multimedia educational and entertainment content. This service combines the tools of online television and cinema, and allows you to view content for every taste. Good price, excellent quality, synchronization on all devices (you can use Wink on TVs, smartphones and computers) have made this service a leader in its activities.
Like any modern and relevant service, Vink is constantly evolving. Therefore, users often notice certain changes in the interface or operation of applications. The updates are designed to make the service better, but any changes may not be understood by some users - after all, no one is used to the new one yet. In this article we will answer the question of how to return the old familiar interface of the Rostelecom Wink service.
Standard connection setup diagrams and equipment
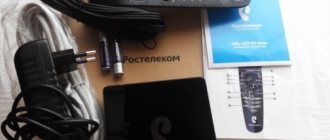
We will tell you how to set up a Rostelecom TV set-top box via a router, because data is received and transmitted via the Internet. First, let's find out what is included in the basic package of the console:
- The device itself;
- Power unit;
- AV cable and tulip wire;
- Rostelecom remote control;
- Cables: network and composite;
- Connection instructions and warranty document.
If you want to watch videos in the best quality, you can request an additional item - an HDMI cable. By the way, this cable can be purchased separately at any time at any hardware store.
To set up a TV via the Rostelecom set-top box, you will first need to connect it to the router:
- The most basic option is an Ethernet cable. Just plug it into both devices and you will be happy;
- You can set up communication via WiFi, but then make sure that Rostelecom offers you an IPTV receiver that supports this feature. By the way, you will also have to buy a suitable router;
- A more expensive option is to buy a special adapter for the socket - PLC.
Connection problems
It happens that even if installed correctly, the television still does not work. In this case, you should perform a five-point check:
- Account verification. In case of debt, the television will not work in any case.
- Inspect cables for tightness of connector contacts.
- Inspect cables for integrity/damage.
- Reboot the system (just unplug the device for a few minutes).
- Reboot the router. Usually routers have a special button for this, but even if there is none, we use the method from point 4.
If all else fails, you should contact the customer support hotline and report the problem. The engineer will tell you what's wrong and give instructions for further action.
If there is a connection problem, call the Rostelecom support hotline
Note! In order for the operator to provide information about the status of your account and other things, he will request data from the owner for whom the contract was drawn up, so be prepared to announce your full name. and passport data.
That's probably all. The setup and connection process is quite simple. Attached is a video tutorial on setting up a router and connecting Rostelecom TV through a router.
How to configure the receiver?
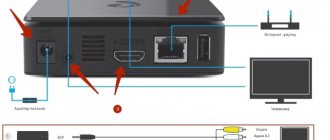
So, you unpacked the IPTV device, turned on the TV, router, and connected everything with cables. Now connect the power supply to the network and wait until the LED lights on the set-top box light up. Now let's try to configure the Rostelecom set-top box on a TV, for example, Samsung:
- Select the connection type on the screen: HDMI or AV Video Input;
- Find a sticker with your username and password on the receiver box. They need to be entered into the form that appears on the screen;
- You may be required to enter a PIN code (if parental controls are enabled) - try four zeros or four ones. If this does not work, contact Rostelecom technical service.
- Done, then the system itself will receive all the settings via the Internet and successfully integrate them into the set-top box.
If you use a third-party router, you will have to do additional configuration:
- Open any browser and enter the IP address of the router in the address bar. It can be found on the box of the device or through the “Control Panel” of the computer in the “Network and Internet” section. Go to “Connection Properties” and click on the “Internet Protocol 4” line. By the way, this IP is most often suitable: 192.168.0.1.
- Next, you need to enter your username/password (also found on the sticker on the box of the router, or try the universal admin/admin pair);
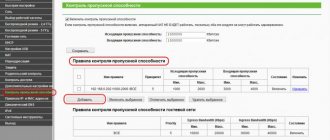
- When the interface expands, find the “Network” section and select “IPTV”;
- In the “IGMP Proxy” form, select the “Enable” line;
- Set the mode to “Bridge”;
- Find Lan 4 port;
- Click "Save".
How to set up a Rostelecom set-top box
After connecting the cables and the power supply, the LEDs should light up. When loading, the TV will ask you to select an image source. Depending on the connection type, click "AV Video Input" or "HDMI". If there are several HDMI connectors, you must select the one to which the set-top box is connected.
The device receives all settings via the Internet, so all you have to do is enter the password and login from the contract. The information is duplicated on a sticker on the console. After confirmation, the receiver may prompt you to enter a PIN code. This happens when parental controls are enabled. Most often, the combination 0000 or 1111 is suitable. If the set-top box produces an error, you will have to contact technical support.
To disable the PIN code request after activation, go to settings, select “Parental Controls” and click on the “18+” line.
Pre-configuring the router
If you are using old or third-party equipment, you will need to configure the Rostelecom TV set-top box through a router. The interface of models from different manufacturers may differ slightly, but in any case you should follow the same algorithm.
- Enter the router's IP address in your browser. The most common combination is 192.168.0.1. Otherwise, you can find the address on a sticker on the router, in the contract, or in the “Network and Internet” section in the control panel. The required combination is located in the connection properties in the “Internet Protocol 4” line.
- Enter login and password. If you have forgotten the details, try the "Admin" combination for both fields.
- Select the “Network” section, and then the “IPTV” tab.
- Change the value in the "IGMP Proxy" field to "Enable".
- In the line below, set the mode to “Bridge”.
- Select the “LAN-4” port.
- Save your changes.
Now you can proceed to connecting the receiver.
View on multiple devices
When connected to one set-top box, all TVs and computers will broadcast one program. You will need multiple devices to watch different channels. How to connect a Rostelecom set-top box to a router if there are two receivers? Routers have multiple LAN connectors, so there won't be any problems.
How to watch Rostelecom IPTV channels without a set-top box for free
It is possible to set up IPTV on an LG Smart TV without a set-top box. This can be done with a built-in operating system and application store. The main condition is that the device must have Internet access.
- Click on the "Home" or "Smart" button.
- Launch Smart World.
- Through the search bar or the popular applications section, find the SS IPTV utility.
- Complete the registration procedure or enter your ID and password.
- Allow the program to access additional features.
- Launch the utility through the applications menu.
- To download a playlist, select Settings and go to the General tab.
- Click on the "Get code" button. It must be entered on the official application page. The code is valid for 24 hours.
- After adding the device to the resource, select the playlist on your computer and save it.
If you did everything correctly, a “My Playlist” button will appear on the main screen of the application. After the transition, you will see a list of available channels.
Factory reset
If something goes wrong, read how to reset the Rostelecom TV set-top box to factory settings. Sometimes this simple but effective solution turns out to be very useful.
- Turn on the receiver and click the “Menu” button on the remote control;
- In the window that opens, scroll down the list to the “Def.Settings” item;
- Having highlighted the desired line, click the “Right” key on the remote control;
- Click "OK", then scroll to the line "Save&Quite" and click the "Right" key again;
- Click OK again and wait for the reboot process to complete.
On some devices, rebooting can be done faster - just hold down the ON key on the remote control for 15-20 seconds. After the reboot, you need to enter code 977 and wait until the lights on the case blink 4 times.
If you need to reset to factory settings not the Rostelecom TV set-top box, but the router, just click on the Reset button on the back wall of the router. Hold the key pressed for 15-20 seconds until the lights on the case blink. On some models, the reset key is recessed into the box, so you will have to use a needle to press it.
How to restore the remote control
After resetting the settings, you need to pair these devices again. This is again done through the programming mode. Use the following instructions:
- Turn on the TV and set-top box.
- Press the “OK” and “TV” buttons on the remote control.
- If the LED blinks 2 times, then the programming mode has been successfully launched. Enter code “991“.
- Now you need to press the channel switch button one by one until the set-top box responds, namely, turns off the TV. If this happens, then press the “OK” button to save the settings.
The automatic mode of reprogramming the remote control is described above. The system itself selects all the codes from the database until it finds one suitable for the job. You can carry out this procedure yourself, but you need to know the code suitable for your TV model. Full table of combinations:
The manual procedure is as follows:
- Turn on the TV and set-top box.
- Hold the “TV” and “OK” buttons on the remote control together until the LED blinks 2 times.
- Enter the code found in the table on the official website.
- Try changing the channel or turning off the TV. If everything works, save the settings by pressing “OK” for a couple of seconds.
How to set up display on multiple devices?
First of all, you must understand that one receiver is not capable of transmitting different pictures to two devices. In other words, you can connect a second TV to one set-top box, but in this case the same content will be broadcast on both screens. By the way, if you perform any actions using the remote control, they will be performed synchronously on both TVs. That is, even the volume level on both TVs will be the same. In this case, however, you can adjust the desired volume on the TV itself.
If everything suits you, check out how you can set up a Rostelecom set-top box for two devices:
- As we said above, there are 2 types of connection, via HDMI and AV Input cable;
- Connect the main TV using HDMI, and the secondary TV via AV;
- For the third TV, you can use a tulip wire - it also comes with the set-top box.
Make sure your TVs support the required connection types and have the required connectors. Check if the wires are long enough. Then feel free to connect and make settings using the methods described in the previous sections.
If you want to watch different channels on two devices, you will have to buy a second receiver. To set up a second Rostelecom set-top box, use instructions similar to the first. As for routers, they are also usually equipped with at least 2 LAN connectors, so you only need to buy a second Ethernet cable.
Common configuration errors and ways to solve them
In conclusion, let's look at what problems users most often encounter when setting up a Rostelecom receiver.
So, now you know how to set up the Rostelecom IPTV interactive TV set-top box and are familiar with all the possible difficulties. In conclusion, we will give some tips. First, carefully check the integrity of the device’s contents while still in the office. Secondly, carefully study the user manual for connecting, setting up and using the receiver. Thirdly, do not be afraid to contact the support service - there are responsive people who work there and are always ready to help you. Not for free, of course.
Setting up a Rostelecom set-top box seems to many users to be a very complicated process. In fact, the algorithm of actions is simple and quite within the capabilities of any person, even those far from the world of technology. In this article, we will tell you how to set up the Rostelecom set-top box for your TV, and we will provide detailed instructions with which you will definitely cope with the task.
Rostelecom digital TV is a very convenient thing with a bunch of cool features. For example, the broadcast can be paused, recorded, and viewed on several devices at once. To ensure that using the receiver does not cause you inconvenience in the future, we recommend that you immediately learn to understand its settings. Therefore, put the technician’s phone away for now and take out your set-top box - we’ll connect it ourselves!
Standard connection setup diagrams and equipment
We will tell you how to set up a Rostelecom TV set-top box via a router, because data is received and transmitted via the Internet. First, let's find out what is included in the basic package of the console:
- The device itself;
- Power unit;
- AV cable and tulip wire;
- Rostelecom remote control;
- Cables: network and composite;
- Connection instructions and warranty document.
If you want to watch videos in the best quality, you can request an additional item - an HDMI cable. By the way, this cable can be purchased separately at any time at any hardware store.
To set up a TV via the Rostelecom set-top box, you will first need to connect it to the router:
- The most basic option is an Ethernet cable. Just plug it into both devices and you will be happy;
- You can set up communication via WiFi, but then make sure that Rostelecom offers you an IPTV receiver that supports this feature. By the way, you will also have to buy a suitable router;
- A more expensive option is to buy a special adapter for the socket - PLC.
Direct Internet connection
A direct connection means that an Ethernet cable from your provider, extending from the corridor, is connected to your computer via a network card.
A direct Internet connection looks like this
Insert the cable into the network card slot (for desktop computers it is located on the back panel, for laptops it is usually on the side). An image of a monitor with a yellow exclamation mark will appear in the system tray (the tray with icons in the lower right corner of your PC screen). This means that the computer has recognized the connection - all that remains is to configure it.
If the icon does not appear, this indicates that the network card is not working - you need to update the drivers or check the integrity of the cable that you connected to the computer.
Connection from Rostelecom is usually made using the PPPoE protocol. Sometimes the user also enters into an agreement to use a static IP - more about setting it up below.
Via PPPoE protocol
Before setting up a connection, open an agreement with your provider. It must contain your login (username) and password. Found it? Then let's start setting up:
- Right-click on the monitor icon with the exclamation mark. Select Network and Sharing Center from the pop-up menu.
- A window with Internet connection settings will open. Select "Create a new connection."
The button we need is located exactly in the center of the window
In the new window, select the very first line (“Setting up an Internet connection”) and click the “Next” button.
Through this menu you can also connect to a wireless network
Now select “Set up a high-speed connection (PPPoE connection)” and click “Next” again. The setup wizard will now ask you for a username and password. We have already found this data in the contract - enter it. Please note that these lines are case sensitive - that is, if a letter in the contract is written in capitals, then you need to enter it in capitals, not lowercase. You can name the “Connection name” field at your discretion - for example, “My home Internet”. Click "Done".
If you have entered all the data from your provider correctly, the yellow exclamation mark in the corner will disappear and the Internet will connect.
How to configure the receiver?
So, you unpacked the IPTV device, turned on the TV, router, and connected everything with cables. Now connect the power supply to the network and wait until the LED lights on the set-top box light up. Now let's try to configure the Rostelecom set-top box on a TV, for example, Samsung:
- Select the connection type on the screen: HDMI or AV Video Input;
- Find a sticker with your username and password on the receiver box. They need to be entered into the form that appears on the screen;
- You may be required to enter a PIN code (if parental controls are enabled) - try four zeros or four ones. If this does not work, contact Rostelecom technical service.
Interactive TV from Rostelecom: general information
This technology involves transmitting a television signal via the Internet. A broadband Internet cable has high throughput, so it guarantees a high quality signal. It is also possible to obtain high-resolution images and connect several TVs.
RTK offers the user a service with a wide package of additional options. By purchasing IPTV, the subscriber receives 20 digital public channels, as well as thematic packages, the number of which depends on the selected tariff plan. The image resolution can also be different - there are publicly available channels in standard SD quality, high HD, as well as Ultra HD and 4K.
The availability and number of additional services also depends on the chosen tariff. The provider offers a large number of useful options, including parental controls, viewing control, recording content to external media, archiving programs, video rental, karaoke, multiscreen and others.
The branded equipment set consists of:
Factory reset
If something goes wrong, read how to reset the Rostelecom TV set-top box to factory settings. Sometimes this simple but effective solution turns out to be very useful.
- Turn on the receiver and click the “Menu” button on the remote control;
- In the window that opens, scroll down the list to the “Def.Settings” item;
- Having highlighted the desired line, click the “Right” key on the remote control;
- Click "OK", then scroll to the line "Save&Quite" and click the "Right" key again;
- Click OK again and wait for the reboot process to complete.
On some devices, rebooting can be done faster - just hold down the ON key on the remote control for 15-20 seconds. After the reboot, you need to enter code 977 and wait until the lights on the case blink 4 times.
If you need to reset to factory settings not the Rostelecom TV set-top box, but the router, just click on the Reset button on the back wall of the router. Hold the key pressed for 15-20 seconds until the lights on the case blink. On some models, the reset key is recessed into the box, so you will have to use a needle to press it.
Alternative firmware
Before you start, you must also prepare a bootable USB flash drive:
- Select a flash card no larger than 8GB.
- Format it in FAT system
- Create a folder “mag250” on the media.
- Transfer the Bootstrap and imageupdate files to it.
Alternative firmware via the console menu
Stages of work:
- Open the “Settings” section in the device menu.
- Press the “SETUP” button.
- Select the “Software Update” section.
- Find “Update via USB”.
- Click "Start".
- Check the integrity of the data on the media.
- Click "Start".
After the update is completed, the bailiff will reboot on its own.
Alternative firmware via BIOS parameters
The flashing process from BIOS is similar to the method described above with the standard version.
- Open the BIOS (while turning on the device, press and hold the Menu button).
- Open "Upgrade Tools" and "USB Bootstrap".
- Insert the removable drive into the special USB connector on the receiver body.
- Click "OK".
- Wait until the firmware is installed and the system reboots.
If at any stage an error message appears, you need to delete the files from the memory card and rewrite them again. Or use another firmware method.
In the modern world, not a single person can do without watching television programs, reality shows, films and series. But not everyone has the opportunity to connect expensive tariff plans and additional packages to their equipment. An alternative (modified) firmware for the Rostelecom set-top box will retain all the main functions of interactive TV - recording, rewinding, pausing, but will also add many others to the main channels.
How to set up display on multiple devices?
First of all, you must understand that one receiver is not capable of transmitting different pictures to two devices. In other words, you can connect a second TV to one set-top box, but in this case the same content will be broadcast on both screens. By the way, if you perform any actions using the remote control, they will be performed synchronously on both TVs. That is, even the volume level on both TVs will be the same. In this case, however, you can adjust the desired volume on the TV itself.
If everything suits you, check out how you can set up a Rostelecom set-top box for two devices:
- As we said above, there are 2 types of connection, via HDMI and AV Input cable;
- Connect the main TV using HDMI, and the secondary TV via AV;
- For the third TV, you can use a tulip wire - it also comes with the set-top box.
Make sure your TVs support the required connection types and have the required connectors. Check if the wires are long enough. Then feel free to connect and make settings using the methods described in the previous sections.
If you want to watch different channels on two devices, you will have to buy a second receiver. To set up a second Rostelecom set-top box, use instructions similar to the first. As for routers, they are also usually equipped with at least 2 LAN connectors, so you only need to buy a second Ethernet cable.
Common configuration errors and ways to solve them
In conclusion, let's look at what problems users most often encounter when setting up a Rostelecom receiver.
So, now you know how to set up the Rostelecom IPTV interactive TV set-top box and are familiar with all the possible difficulties. In conclusion, we will give some tips. First, carefully check the integrity of the device’s contents while still in the office. Secondly, carefully study the user manual for connecting, setting up and using the receiver. Thirdly, do not be afraid to contact the support service - there are responsive people who work there and are always ready to help you. Not for free, of course.
To watch cable channels, you should set up an IPTV set-top box. In addition to communication services, the company also provides cable television with many channels, among which every TV viewer will find something interesting for themselves. In this article we will describe instructions for setting up and further using the Rostelecom TV set-top box.
How to connect the device to your TV?
Before connecting the set-top box to the TV, let's see what is included in its package:
- console;
- power unit;
- cable for connecting to the router;
- remote control;
- tulip cable;
- HDMI cable;
- batteries.
Important: An HDMI cable is not always provided, so it is recommended to clarify this issue immediately before purchasing the set-top box.
The procedure for connecting and setting up a Rostelecom TV set-top box is simple and does not require any special skills. First, connect the power supply cord to the appropriate connector on the device, without inserting it into the outlet yet. Next, connect the Internet cable with one end to the device and the other to the router.
In order for the image to be displayed on the screen, you must connect either an AV or an HDMI cable. If the kit does not come with an HDMI cable, but the TV supports this technology, then it is recommended to purchase one to get a better image. So, we sorted out the wires.
Return back to the new Wink interface
Experimentation is a good thing, and if you enabled the Wink interface, then you wanted to go back to the old interface, and then you wanted to try Wink again, then you can do that too. Moreover, you can move from one interface to another in an unlimited number, but there are nuances, more on them below. Therefore, try and choose the best option for you.
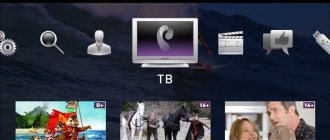
So, to go back to the new Wink from the strictly interface, do the following:
- Open the “Interactive TV” menu section and click on “Try Wink”.
- Then click "Go to Wink".
- A message will appear indicating that the device needs to be rebooted. Click "Yes" to begin the reboot.
- The TV box will boot with Wink. If you need to synchronize devices, you should create an account. You can do this directly on your TV. Click "Activate".
- Enter your phone number. An SMS will be sent to it and this number will serve as a login in the future to log into your Wink account on any device. Click "Next". When the code arrives, enter it in the appropriate field.
- Click "Agree".
Now you can install Wink on other devices and log into your account using your phone number and code via SMS, which will be sent with each authorization.
Read more about activating Wink on popular brands of TVs: How to install Wink on LG and Samsung Smart TVs.
Additional device features
After setting up and connecting the Rostelecom set-top box to your TV, you will probably want to take full advantage of its rich functionality. After watching the video you will learn how to use the Rostelecom set-top box in full.
One of the most useful features of the device is support for TimeShift. You can always stop the TV broadcast and continue watching in the place where you stopped at a time convenient for you.
Rostelecom has a large database of films that you can watch at any time by selecting the appropriate menu item on your device. The console also has many useful services, including weather forecasts, exchange rates, social networks and world maps. This wide range of features makes your TV something more and allows you to enjoy multimedia entertainment to the fullest.
About the new interface of the Wink TV service
The Wink interface was developed by the Rostelk division of JSC Restream. Wink is a more advanced cross-platform application that allows you to synchronize, with one account, watch TV shows and movies on all available devices - not only TVs, but also mobile devices and computers. In addition, Wink has many other useful and modern features.
It will not be possible to upgrade all TV set-top boxes to Wink one time due to their large number. Therefore, this update is happening gradually. As a result, all modern TV set-top boxes will have the Wink platform, and now in some Rostelkom branches only set-top boxes with the new interface are on sale.
At the moment, you can get a set-top box with Wink in those branches where the transition to the new interface has already been made. Or you can update your TV set-top box to a new version and firmware. If Wink is supported by your device, the update will occur automatically.
Below we will look at what to do if your TV set-top box has received an update with a new interface, but you don’t like it and you would like to return everything back.
This may be useful: TNT Premier authorization by code on the TV.