Many home Internet users from Rostelecom encounter the same problems: the Internet suddenly disappears, any port is unavailable, the firmware is outdated, etc. Moreover, if you have no experience in setting up modems and routers, it can be quite difficult to figure everything out right away... Therefore, from month to month in Yandex and Google the statistics of requests like “the settings of the Rostelecom router have gone wrong” do not decrease. And, although there are quite a lot of answers to this question, complete information has to be collected piecemeal from different sites, typing additional phrases like “how to enter the settings of a Rostelecom router” into the search bar. In this article we will look at the full setup cycle and give answers to two main questions: how to open ports on a Rostelecom router and how to reflash or update the firmware on an existing router.
How to open ports on a Rostelecom router
Ports closed in standard settings are part of the Internet connection security policy. By opening them all or partially, the user disables the internal firewall provided in the device’s firmware. If this risk is justified, you can continue. Opening methods will be shown using the example of the Sagemcom 2804 v router, which is widely used by Rostelecom subscribers
Opening all ports
The first simple way is to activate the “demilitarized zone” option in the router settings. This is done in the “Advanced Settings” section of the main menu: you need to select the “NAT” item, and in it – DMZ host. In the IP address field, enter the local IP of this computer and save the changes.
If only one computer works from the router, you can use the second method: configure the router in “bridge” mode, and create a PPPoE Internet connection directly on the computer, using your login and password specified in the agreement with the provider. In this case, the user will be able to run any programs and client applications without fear of encountering the above problem.
Setting up a Wi-Fi connection on a Rostelecom router
If automatic configuration does not help to gain access to the Internet, the user will have to configure the Rostelecom router independently.
To configure the connection, follow these steps step by step:
- Enter the router setup address and log in.
- Log in.
- Open the manual settings tab. Basically this menu is called "Interface Setup" or "Wireless".
- You must provide all required data: AES, WPAPSK, access key.
- Save all changes made.
After the configuration has been completed, all that remains is to click “Continue” and use the wireless connection to the network.
User speed control
Connecting and setting up a router from Rostelecom
This function is necessary for uniform distribution of Rostelecom Internet channel traffic between simultaneously working users. To complete the task, in the “Bandwidth Control” tab, in the “Control Parameters” item, check the box for enabling bandwidth control.
For the Rostelecom FTTx line, check the “Other” box, leave the default band values and press the “Save” button.
On the next page of the list of rules, click on the “Add” button. In the form that opens, enter the local IP address and the maximum input and output speeds for the selected device. These speeds, expressed in kbps, determine the bandwidth.
Execute the “Save” command.
Selected models
All Wi-Fi router models come with instructions on how to properly configure the device. The general algorithm that allows you to establish an online connection is considered the same, but there are personal characteristics of each brand of router.
The first of the D-Link products you can consider is the Dir 615 brand router - its configuration is carried out through a special web interface. Before entering it, the system will prompt you to fill out the “Login” and “Password” fields - you must write “admin” in both of them. Having entered the interface, you must immediately change the language to Russian in the corresponding tab. At the bottom there are “Advanced settings”, which you need to click on. On the screen that appears, you need to select “WAN” directly under the “Network” heading. An “Add” button will appear on the bottom right side, where you need to select the type of PPPoE connection, the “Internet” port, enter the network name, password and login. In the field under the name “Service name” indicate “Internet” in English, the LCP interval is set at 15, and the dips are 2.
To configure D-Link Dir 300, to enter the Internet interface, you need to select “WAN” under the “Network” tab. After this, a page familiar from the Dir 615 model will appear. The difference from it is that in the “Port” section you need to indicate not “Internet”, but Ports: 5, 2 (such numbers may vary). You do not need to enter any other information except the provider’s password and login.
If we consider the DIR DSL series, then in the interface you need to click on “Click 'n' Connect”. After this, the system will begin to configure ADSL. One by one, you need to select the PPPoE type, specify 0 and 33, respectively, in “VPI” and “VCI”, click “Next” - a connection message will appear. Other fields should be filled out in the same way as in other D Link devices.
Opening ports on the Rostelecom router
The provider has several models and modifications of equipment, at the moment one of the current ones is Sagemcom 1744 v4, so we will take this device as an example. Owners of other routers just need to find the same settings in the configuration and set the appropriate parameters.
Step 1: Determine the required port
Most often, ports are forwarded so that some software or online game can transmit data over the Internet. Each software uses its own port, so you need to know it. If, when you try to launch the software, you do not see a notification about which port is closed, you need to find it out through TCPView:
- Go to the program page on the Microsoft website.
- Click on the “Download” section on the right to start downloading.
Wait for the download to complete and open the archive.
Find the file “Tcpview.exe” and run it.
You will see a list of software installed on your computer with all the necessary information. Find your application and find the number in the "Remote port" column.
All that remains is to change the router configuration, after which the task can be considered successfully completed.
Step 2: Change router settings
Editing the router parameters is done via the web interface. The transition to it and further actions look like this:
- Open any convenient browser and go through the line to the address 192.168.1.1.
To log in you will need to enter your username and password. By default they are set to admin . If you previously changed them through settings, enter the data you set.
At the top right you will find a button with which you can change the interface language to the optimal one.
Next we are interested in the “Advanced” tab.
Move to the “NAT” section by left-clicking on it.
Select the "Virtual Server" category.
In the server type settings, set any custom name to guide your configurations in case you need to open many ports.
Scroll down to the lines “WAN Port” and “Open WAN Port”. Here enter that number from “Remote port” in TCPView.
All that remains is to print the network IP address.
You can find it out like this:
- Launch the Run tool by holding down the Ctrl + R key combination. Enter cmd there and click OK.
In Command Prompt, run ipconfig.
Find the “IPv4 Address” line, copy its value and paste it into the “LAN IP Address” in the router’s web interface.
Save the changes by clicking on the “Apply” button.
Step 3: Check the port
You can verify that the port was successfully opened through special programs or services. We will look at this procedure using 2IP as an example:
- In your web browser, go to the 2IP.ru website, where you select the “Port Check” test.
Type in the line the number that you entered in the router parameters, then click on “Check”.
You will be notified about the status of this virtual server.
Owners of Sagemcom 1744 v4 sometimes encounter the fact that the virtual server does not work with a certain program. If you encounter this, we recommend that you disable your antivirus and firewall and then check if the situation has changed.
Today you were introduced to the procedure for forwarding ports on a Rostelecom router. We hope the information provided was useful and you were able to deal with this issue with ease.
How to check that everything went well?
Above we looked at how to open ports in a Rostelecom router or modem. But this is only the beginning, because it is necessary to check the correctness of the solved problem. The website 2IP.ru will be useful for this. Take these steps:
- follow the specified website link;
- select the port check section;
- enter in the proposed line the number that was specified in the router parameters;
- click on the “Check” button;
- get information about the real state of the server.
Based on the available data, we can draw a conclusion about the success of the work.
How to change router settings
Today, all modern routers produced by Rostelecom for customers have approximately the same interface. However, there may still be minor differences between models. If in your case the interface is slightly different, then still adhere to the algorithm, it will be the same in all cases. Follow these steps:
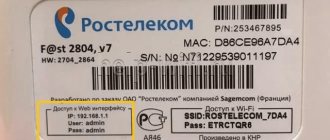
Open any browser and go to your router settings. To do this, enter IP “192.168.0.1” in the address bar
It is important to note that this address may differ (192.168.1.1, 192.168.1.254, etc.). Therefore, it is best to look at the desired combination on the sticker on the back of the device.
Next you need to log in
The most commonly used combination of login and password is admin/admin. Again, it may be different. This is written on the same sticker on the back of the equipment.
After entering the management interface, go to the “Application” section and open the “Application List” menu. Here you need to add a new application using the “Click here to add an application” link.
At the next stage, we enter the parameters for the new application: The name can be anything you want. We choose TCP and UCP as the protocol, since this way we can cover a larger range of ports. In all the following paragraphs, enter the corresponding port that needs to be opened.
Click “Add”.
We have added the application for which we will open the port to the application list. But this is not the end of the procedure. Now you need to go to the “Port Forwarding (application list)” menu in the same section. Here you only need to enter the IP address of your computer within the local network. If you do not know it, follow this procedure: Minimize the browser and press the Win + R key combination. In the window that appears, enter the “cmd” combination and click “OK”.
The Windows Command Prompt will appear. Here you need to send the “ipconfig” command.
After this a lot of text will appear. Among it you need to find lines that describe the DNS server, IP addresses, subnet mask, and so on.
Transfer the value from the IPv4 address line from the command line to the LAN host IP address line of the router management interface. Click Add. You can repeat the procedure if you want to open multiple ports.
That's all. All that remains is to check whether everything has been done correctly. To do this, you should use special services or programs. Fortunately, there are a huge number of such tools on the Internet for every taste. Both paid and free.
Reset before setup
Before setting up a Wi-Fi router, you need to reset the settings. This process is necessary both for a new Internet distribution device and for a purchased router.
Resetting settings is the first step in setting up Wi-Fi.
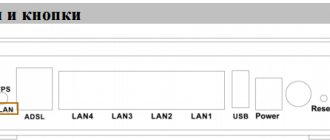
To reset the router to factory settings, you need to find a special “Reset” button on the device. Typically this panel is located on the back of the appliance next to the switch. Externally, “Reset” is a narrow hole. To make it easier for the user to find a reset, this button is labeled.
In order to reset the device to factory settings, you need to insert the thin key that usually comes with the device into the “Reset” hole. Then you must wait at least 10 seconds and the reset process will be completed. If the router components provided to the user do not include a reboot key, then any thin wire, toothpick or unfolded paperclip will do.
How to enter the settings of a Rostelecom router?
If for some reason you need to enter the main interface of the router (for example, during the initial setup yourself), do the following:
- check the connection of the cable connecting the computer and the router, or the correctness of the entered login/password when setting up via wi-fi;
- make sure that the computer has “picked up” the network and the “Connected” icon is displayed in the right corner of the screen (or “Connection limited” if you had problems earlier);
- open your browser and enter the following combination into the address bar: 192.168.1.1 or 192.168.0.1;
- In the login form that appears, enter the keyword “admin” as the login and password (sometimes Password can simply be an empty value or the combination 1234).
We sorted out the question of how to enter the settings of the Rostelecom router.
There are two main errors that can occur during the login process:
- The login form does not open;
- I can’t log in using the standard login and password.
Solving the authorization problem is a “global” issue and will be discussed in the relevant part of the article. As for the availability of the IP address, changing the Internet protocol settings can help here:
In most cases, when you call the protocol properties, a window opens with the settings for automatically receiving an IP address and DNS server. If this is not the case, save the specified values of all fields in a separate file and switch the protocol to automatically accept all parameters. Save the settings and try to log into the router interface again.
If the problem occurs when automatic receipt is set, try specifying addresses manually by entering the following values in all fields (in order):
If it doesn’t work, replace the penultimate one in the first, third and fourth fields with a zero (i.e. you should get 192.168.0.1). Such manipulations should solve the problem of how to enter the settings of the Rostelecom router.
What intercity tariffs Rostelecom offers for Moscow can be found here.
How to open ports on a Rostelecom router?
Opening ports on a Rostelecom router is no more difficult; this is necessary when running torrent programs, as well as client applications for various games. To create the port you need, enter the main router settings menu, select “Advanced settings”, then the “NAT” submenu. In the interface field, you must select the connection interface (specified in the documentation). After that, go to the virtual servers section and indicate in it:
- protocol (most often “TCP/UDP” is suitable);
- your port or range of ports (the starting and ending numbers will be different);
- The computer’s IP address (local) is the very first value that we specified in the properties.
We apply the changes made and see the new port we created in the list of servers. We hope you don’t have any questions about how to open ports on a Rostelecom router.
If everything is fine, but the port is still not working, activate the demilitarized zone (DMZ link in the NAT menu and enter the computer’s IP address in it, as in the previous menu).
Where can I find the IP address of a Rostelecom router?
In order not to delve into the reasons for the difference in IP addresses (namely: one and zero, which we have already discussed) for different routers, we will only say that the IP used by it is indicated on the case of each model. It can also be found in the accompanying documentation included in the kit. You need to be very careful with this small difference, since one incorrectly specified IP address of the Rostelecom router means a complete lack of access to the network, so always clarify and check this point.
Problems and their solutions
When trying to open ports, a number of difficulties may arise. Let's highlight the main ones:
- When accessing the device, the system throws up the router’s admin panel. Change the http or media port.
- If you have done port forwarding on your Gpon Rostelecom router, but the situation has not changed, the problem may lie in your antivirus program or firewall. Try disconnecting them and connecting again. Also check that the NAT option is enabled for the connection through which you connect to the global network.
If you are unable to open ports, you can use the following solutions:
- make sure that the gateway IP addresses are the same as the router IP;
- enable the open DMZ server option, which allows you to send requests from the Internet to one IP within the user’s local area.
Performing these actions allows you to cope with possible problems when forwarding ports. If insoluble difficulties arise, it is better to contact the specialists of the provider company.
Port forwarding // step by step
1) Enter the router settings
It is logical that the first necessary action is to enter the router settings. Most often, it is enough to type the address https://192.168.0.1/ (or https://192.168.1.1/) in any browser and press Enter.
Use admin as the login and password (or fill in the login field and do not enter the password at all).
If suddenly the IP address does not work, but you have a network and it’s working, then try opening a command line and entering ipconfig. Among the bunch of parameters that appear, you should see the line “Default gateway” - this is the IP address of the router settings.
How to find out the IP address to enter the settings in the router
2) Assign the computer a permanent local IP address
Every time you turn on your computer or laptop, it connects to the router and receives its IP address on the local network (i.e., the home local network organized by the router). For example, your laptop may have an address of 192.168.0.101, and your computer may have an address of 192.168.0.102.
This address is local (internal) and it can change (unless specifically configured)! Those. today your computer had IP 192.168.0.102, and tomorrow it was 192.168.0.101. And for port forwarding, it needs to be constant and not change over time.
To do this in routers, you usually need to know the MAC address of the network adapter through which you are connecting to it. For example, in laptops this is usually a wireless adapter, in computers it is Ethernet.
You can also find out the MAC address on the command line - the ipconfig/all command will show the physical address of the device (this is the MAC address). See screenshot below.
The physical address of the adapter is the MAC address
Actually, then in the local network settings in the router (where the binding of a specific static IP to MAC is set), specify your local IP address and the MAC address of the network adapter. Thus, even after shutting down your PC (rebooting), etc. – your IP will be permanent (i.e. in our example, 192.168.0.102, i.e. the router, in fact, will assign it to you and will not give it to any other device!).
Static IP address (clickable)
ASUS - binding IP to MAC address
3) Open the port for the desired program
Now all that remains is to open the port for a specific program. But first, one small question...
For example, in uTorrent the port can be viewed in the connection settings (see screenshot below).
uTorrent Settings
In my case, 16360 (but it can be changed). Browsers use port 80, Skype - like uTorrent, you can specify in the settings (and change if necessary).
Typically, the ports (that need to be opened) are specified in a help file, in the application settings, or simply in an error that will tell you about NAT problems!
As for some games, this point needs to be clarified in the technical characteristics of the game, or with the developers (you can also use thematic forums).
Let's continue...
In the router settings, in the section for setting Internet parameters (often the WAN section), you can set port forwarding. In the Tenda router, this is the “Advanced Settings” section.
It is enough to indicate the internal local IP address (which we tied to the MAC address in the previous step of this article) and the port that you want to open
Please note that you may also need to specify the TCP or UDP protocol (if you don’t know which one to open, open both)
A couple of screenshots are presented below (for ASUS and Tenda routers).
The uTorrent port has been opened!
ASUS - ports open (as an example)
Actually, the ports are forwarded. You can save settings and use programs - everything should work...
4) A few words about the DMZ host
We did everything that is written above only for one or two ports. Imagine if you need to open all ports?! For example, this is often necessary to create a game server, to organize video surveillance, and other situations.
For this purpose, all modern routers have a special DMZ host function. By turning it on and specifying the desired local IP address on your network, you open all ports on this computer. An example of settings is shown in the screenshot below.
Enable DMZ host / Enable also UPnP
I note that this should only be done when necessary. Still, in such a quick and simple way, you open your entire PC for access from the Internet (which is not very good in terms of security).
And that’s all I have on the topic of the question for now.
Additions are welcome...
Happy setup!
RSS (how to read Rss)
Router specifications
In the winter of 2021, I got my hands on the Rostelecom SERCOMM S1010 router, hardware version V1. By that time, it had already been used on the operator’s network for about a year and did not fit into the role of a “fresh” model. But what was my surprise when, 3 years later, RT-FL-1 fell into my hands - I felt déjà vu when I saw the same body. The similarities didn't end there. As it turned out, this is a complete double of the S1010 v1.
Chip – MediaTek MT7620DA RAM – 64 MB ROM – 16 MB (Integrated into SoC) Ports: 4 x LAN 10/100 Mbps 1 x WAN 10/100 Mbps WiFi – 2×2 802.11 b/g/n Dual-Band 2.4 GHz and 5 GHz
The platform is already quite outdated, but it copes with its task of connecting to a provider and distributing the Internet at a rate of up to 100 Mbit/s.
By the way, the similarities do not end there - the version and checksum of the bootloader for these routers are identical. Although their firmware is different. I did not have the opportunity to check how interchangeable they are with each other. If you have the opportunity to check, please post the results.
How to open ports on a router
This is our next task. We will give brief instructions.
TP-Link
The technology is like this.
We launch the router interface through the browser. We open it using the word admin as both login and password. It is installed by the manufacturer, so this option is suitable for new “boxes”
Used devices are usually password-protected by the previous owners. Attention to the left side of the screen! We go through Forwarding to the next section - virtual servers (Virtual Servers) and add a new one there.
We fill out the “form”: indicate the Port and IP address of your computer or gadget. We also select the protocol (all is possible), active status (enabled). Save. Here's a short summary of how to open ports on a TP-Link router (Figure 2).
Figure 2. Adding or changing virtual server entries on the TP-Link router
Rostelecom
The procedure is similar.
- In a well-known way, we call the distributor program.
- Let's go to advanced settings.
- Before opening the ports on the Rostelecom router, click on the connection interface.
- Let's start working with the virtual server (open).
- The protocol is set to TCP/UDP (used most often).
- We indicate for Port the same digital designation as the beginning and end.
- We indicate the IP address of the computer as local (Figure 3).
Figure 3. Visual interface of the admin panel on the Rostelecom router
Zyxel Keenetic
Now - how to open ports on the Zyxel Keenetic router.
- The first steps are standard: we activate the control software through the browser.
- We go to the home networks menu and activate redirection.
- Fill in other data (Figure 4).
- Save.
Figure 4. Opening ports on a Wi-Fi router from ZyXEL Keenetic
Asus
There is no fundamental difference in how to open ports on an Asus router and on products from other brands.
- Using a browser, go to the router’s page.
- Go to “Internet”, click on “Forwarding”.
- Let's activate it.
- Fill in all the fields that appear.
- If we set permission for a specific service, indicate it (for example, a torrent program).
- You can specify which specific ports to open on the router, or their range (two numeric names separated by a colon).
- We indicate the IP address of our computer as local.
- Fill in the remaining fields and click “Apply”.
Figure 5. Setting up and opening Wi-fi ports on an Asus device
D-Link
Another instruction concerns how to open ports on a D-Link router. After normally opening its main menu (browser - IP), perform the following steps:
- Go to “Firewall”, select “Virtual Servers”.
- Adding a new one. We either use a ready-made template or create our own (custom) version.
- Next, fill in all the fields, as in the above descriptions for other devices: protocol, IP addresses, etc. (Figure 6).
- We apply.
Figure 6. Configuring and opening Wifi ports on the D-Link router
Impressions and features
It would be logical to assume that over such a long period of time the manufacturer has identified and eliminated all possible problems with the device, and now it should work “like a clock.” But it was not there!
Firstly, there are quite a lot of defects: sometimes it doesn’t turn on, sometimes something rattles inside, then something else. Although in this case they change it without talking to a new one.
Secondly, if your RT-FL-1 uses firmware 1.0.6 or older out of the box, then immediately upgrade to the latest version. Currently it is version 1.0.11. Otherwise, you will get unstable WiFi operation, which means that devices fall off the network and can no longer connect to it. After rebooting the router, it is possible to connect to it, but after a while the story repeats itself. I will show you below where to download the RT-FL-1 firmware and how to flash it.
The coverage area of the wireless network is also not great. Here, on the one hand, internal antennas have an effect, and on the other, again, “crooked” firmware, with a reduced transmitter power. It’s still somehow enough for a one-room apartment, but not so much for a larger area. The manufacturer promises to solve the problem with a software update. In the meantime, try to find the optimal location for the router in the apartment, because the quality of Wi-Fi depends on this.
There are no problems with a cable connection; the router provides the stated 100 Megabit tariff without any problems.
What is port forwarding? How to forward ports on a router
Port forwarding is the mapping of a specific port on the external interface of the router to a specific port of the desired device on the local network.
Port forwarding is one of the functions of the NAT (Network Address Translation) mechanism. The essence of NAT is that several devices on the local network use one external interface.
In home networks, the external interface is the WAN port of the router, and network devices are computers, tablets and smartphones.
And the essence of redirection is to provide access to some device on the network from the Internet, using some open port of the router.
How to forward port on a gateway (router, modem)
This is what is popularly called “how to open a port on a router.”
Let's say there is a task to provide access to a remote desktop of a computer that is connected to the Internet via a router. To do this, you need to create a rule to redirect any free port of the router’s WAN interface to port 3389 of the desired computer.
3389 is the default port used to accept incoming connections from the Remote Desktop Server service.
After creating such a rule and applying the settings on the router, requests received on the specified external port will be redirected to 3389 the desired computer on the network.
To do this, you need to go to the port forwarding settings on the router and add a rule.
An example of setting up port forwarding on a D-Link router.
1 Open the Advanced section.
2 Select the Port Forwarding setting.
3 Configure the redirection rule:
- Specify any rule name convenient for you;
- Specify the public port number (or range). A public port is the one that will be open on the router for access from the Internet via the WAN interface. If you only need to open one port, specify the same port as both the start and end port in the range. In our case, we need to open port 3389, so we specified it twice in the top line of settings.
- Specify the IP address of the computer (server) on the local network that is running the service to which you want to provide access. It is recommended to reserve the IP address for this server in the DHCP reservation settings on the router so that it does not change in the future. Instead, you can also specify the IP address manually in the settings of the network adapter on the computer, to which you will forward on the router. In our example, we specify the internal gray IP address 192.168.1.100, which belongs to a computer with Windows Server 2008 with a configured remote server desktops.
- Specify the port for receiving incoming connections on a computer on the local network. In our case, the default port 3389 is used on the server for the Remote Desktop Server service.
- Click the checkbox on the left to enable the rule.
4 Click Save Setting
Verifying that port forwarding is working
To test that port forwarding is working, you need to connect to your computer using an external IP address or hostname.
Press win+r, type mstsc and press Enter:
In the Computer field, enter the external IP address of the router (assigned to the WAN interface by the provider) or the host name.
Click Connect:
(This way, you establish a connection to the router’s WAN port at 3389. In this case, port redirection is triggered on the router according to the rule to the internal IP address 192.168.1.100 and the specified port 3389)
If you see the caption Setting up a remote session, then port forwarding is working:
As a result, you should see the desktop of the remote computer (remote desktop server):
Note
In the web interface of routers, instead of the Port Forwarding setting, there may be a Virtual Server setting. And sometimes - both.
Keep in mind that you can use both the Port Forwarding and Virtual Server settings to publish a single port.
The difference is that the Virtual Server setting allows you to forward (publish) only one port on the local computer, while using the Redirection
You can forward both individual ports and ranges.
Recommended articles to read:
Opening ports
What is GPON technology from Rostelecom
Work should begin after checking that the equipment uses the latest firmware version. The routers provided by Rostelecom for rent have different interfaces. To perform port forwarding on a router, several methods are used. In order to forward ports on Rostelecom routers (open them or redirect them), you need to know the PC address on the local network. To do this, right-click on the icon of the desired connection and select “Status” in the context menu. In the connection information, we find out the IPv4 address assigned by the router to the computer. Here you can also see its MAC address, which may be useful in the future.
The port can be used by TCP and UDP protocols. The first of them guarantees data transmission with verification by its own means. The second one transfers without guarantee, but the exchange speed is much higher due to the lower load on the processor. Its use is justified in online games with a large number of participants. In addition to this check, the operating system (OS) of the computer has its own means of protecting against viruses. The Rostelecom router has a firewall in its software that protects local network subscribers from the penetration of malicious products from the Internet.
Thus, it is necessary to create a rule for admitting messages from the desired program. Its code is transmitted as the IP address of the device on the local network with the addition of a port number (added in the transmitted packet after the colon “:”). In order for redirection to occur, the PC must be on the same network with the Rostelecom router that assigns this address to it.
In the settings of the Rostelecom router, in the WAN section of the Network section, check the checkboxes in the boxes marked NAT, IGMP, and Firewall.
We enable the UPnP function, which is responsible for automatically opening ports.
Save the settings. Many routers from Rostelecom have a DMZ (demilitarized zone) item in their advanced settings menu. When used, it turns on the opening of all ports for the local IP address of the device specified in the line. But we must take into account that simultaneous activation of DMZ and UPnP can lead to conflict situations.
If the DMZ function is not available in the Rostelecom router menu, you can use the “Virtual Servers” item located in the “Forwarding” section.
On the page, click the “Add new” button. In the form that opens, indicate the internal and external ports that are used by the program for operation (or ranges of ports). The next field is for the IP address of the computer on the local network. How to find it out was described above. In the “Protocol” line we write TCP/UDP, “Status” we leave “Enable” and save the entered data.