and “Modem mode for a day” from Megafon
The mobile operator Megafon has a new one, which is compatible with all Megafon tariffs with unlimited mobile Internet, and which is responsible for distributing this unlimited Internet to other devices.
It’s no secret that recently, almost the main advantage of Megafon has been the free, officially approved unlimited distribution to other devices. But should you worry about the new service? Not yet.
First, let’s look at the stated parameters, and then let’s try to figure out what kind of service this is.
:
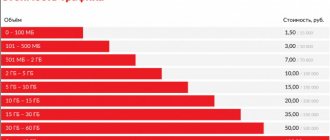
- Fee – 100 rubles per 24 hours.
- The volume of traffic for distribution is unlimited.
- The option is valid for 24 hours.
What it is?
On the first day, as I learned about the appearance, thanks to a post in the Technologikus group on the social network VKontakte, I immediately contacted Megafon technical support: by phone, in VK through messages, in VK through comments in the official group, in chat in mobile application, again by phone.
And everywhere the answers were different: “Such, etc.”
Some of the most appropriate options:
- is intended for old tariff plans with unlimited mobile Internet, on which it cannot be distributed. But I don’t know about such tariffs - either I overlooked them at the time, or they are corporate or non-public. In general, this is also an option.
- is intended for subscribers who do not have unlimited Internet, but may need to distribute it to other devices. Not a bad option. For example, there is no mobile Internet package or it is very small, the network is cut off at home because the Internet provider has fallen, but the Internet is needed, and, preferably, unlimited. In this case, if necessary, you can give 100 rubles. But it all depends on the specifics. Apparently, this option is not what is actually planned.
- designed for tariffs with unlimited Internet. This is also clear from the “Features” of the option. There is a small chance that after some time the vaunted officially permitted free distribution of unlimited Internet will become paid. But there is no need to worry just yet.
- Currently, the option is launched in test mode - not in all regions, not on all tariffs and not for all subscribers. The operator promised “more accurate information”, but there has been silence for several days...
Setting up a network using third-party programs
If setting up using standard means does not suit you for some reason, you can resort to using third-party programs. Let's look at the most famous and convenient of them.
Switch Virtual Router
The official website of the program is located at this link. After downloading and launching the program, follow these steps:
If distribution is enabled, but the Internet is not available, you must manually allow access to it. To do this, use the method described in the “Activating network access” section.
VRP
An application that allows you to create a Wi-Fi network without unnecessary settings. The process is simplified as much as possible. After launching the application, you only need to enter the network name and password. Once you apply the settings, you will create a new network.
Specify the network name and password
After distribution over the created Wi-Fi network is enabled, follow the steps described in the “Activating network access” section so that the network has access to the Internet.
A program icon will be displayed in the lower left corner of the screen, in the Quick Access Toolbar, notifying you of the network status.
Connectify
The free version of the program can be downloaded from this link. When the application is downloaded, installed and launched, all that remains is to specify the network name, password and network that has access to the Internet (which is accessible via a modem). If necessary, make some additional settings. After clicking the Start Hotspot button, you can start using the created Wi-Fi network to access the Internet.
Set the necessary settings and create a network
In the Client tab you can get information about devices connected to the created network.
Connected devices are visible on the Client tab
You can distribute the Internet from a modem to other devices in different ways. To use standard Windows tools, you will need the Command Prompt and Control Panel, and in Windows 10 build 1607 and higher, only the Settings application. If you want to automate and simplify the network setup process, it makes sense to use one of the third-party programs freely available on the Internet.
I myself encountered this problem not because of the lack of access to wired Internet, but because of the persistent desire of my superiors to save money. I’ll briefly tell you how it all began: I work for a small company, we rent premises on the territory of the plant, the network consists of a router, 2 PCs and 4-5 laptops. Previously, we got Internet through the factory network at a decent speed, for which we paid about 3,000 rubles, but one fine morning (fortunately or unfortunately) the director saw a Rostelecom poster with a promise of 2MB for only 1,000 rubles. No sooner said than done, the connected Internet from Rostelecom refused to work at all. The problem was buried in the old telephone network of the plant with a lot of interference and interference, two months of dealing with Rostelecom “specialists” and a bunch of requests did not lead to anything, as a result, one of the employees brought a “trigik” to the office for personal needs, so to speak , the speed turned out to be quite decent - as much as 4 MB, as a result of which it was decided to distribute such Internet to everyone. And here's how to solve this problem:
Firstly: all computers were initially connected to a local network. Connecting a 3G modem to a PC created another network; a simple permission in the network settings to use this Internet did nothing for everyone, because both the Trick and the router distributed IP addresses automatically and, therefore, did not see each other. The local network had to be connected to static IP addresses. To do this, we go into the router settings: in the address bar of the browser we enter 192.168.1.1 (depending on the router model, the exact address can be found in the adapter settings), login/password (if not changed) admin/1234, then find and uncheck the corresponding box.
We define the computer to which the 3G modem will be connected as a server and assign it a static address - remember it! it will be needed to configure the remaining machines.
We repeat these steps on each machine that needs to be connected to the network, but in “Properties: Internet Protocol version 4 (TCP/IPv4)” we enter the following:
The last digit of the IP address for each computer must be unique, I usually start with 10 and work through 11, 12, etc. We get the subnet mask simply by clicking on the appropriate field. In the “Default gateway” and “Preferred DNS server” fields, enter the IP address of the computer to which the modem is connected.
After all the computers are connected to the network, we return to the PC with the modem.
In “Properties: Internet Protocol Version 4 (TCP/IPv4)”, select automatic acquisition of addresses and DNS.
With a little digging into the modem settings, you can set up an automatic connection to the Internet when you connect a computer, reconnect when the connection is lost, and so on. As a result, we get decent Internet and solid savings (550 rubles per month instead of 3000).
Hello! As a continuation of previous articles, this time I decided to tell you how to share the Internet via a router with Wi-Fi. So, not much background...
Recently, my wife and I had to slightly change the place of our usual dislocation and move to another apartment for a while. And since there was no Internet access there, I had to save myself with a USB modem from Beeline. My wife was indignant, since in this case only I had access. I decided to think about how to distribute access from a 3G flash drive to several computers, preferably via Wi-Fi.
I took out my DIR-300 router, which had previously been flashed with unofficial DD-WRT firmware, and started setting up public Internet access. Problems started almost immediately. The Beeline flash drive did not want to work, through the Dial-Up connection I created manually. So, I’ll explain everything point by point:
- Connect the USB modem to the computer. If we have a modem from Beeline, then we launch the Beeline Internet Home program. If “MTS”, then “MTS Connect”, etc. And we check whether the Internet works from the program itself.
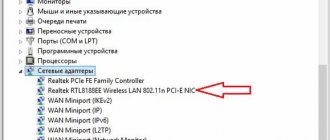
- Open the “Phone and Modem” tab in the control panel or open the device manager, find our modem and open its properties. In the modem properties, select the “Diagnostics” tab and then “Poll the modem” (with the Internet turned off), if everything is OK and the modem responds, go to the next point.
- Open the “Advanced communication parameters” tab and enter the modem initialization line. For Beeline it will be “AT+CGDCONT=1,”IP”,”home.beeline.ru.” For different operators, the line “home.beeline.ru” will be different. You can see it in the profiles of the modem itself.
- Next, go to “Network Connections” and create a new connection. Open “Create a new connection”, then “Connect to the Internet”, then “Set up a connection manually”, then “Via a regular modem”, then enter the name of the connection, for example, like mine “GPRS_Internet”. Next, enter the phone number to connect. Most likely this will be the number “*99#”, but more accurately you can again look it up in the program profiles of your USB modem. Next, enter the username and password, for Beeline it will be:
Username: beelinePassword:
beeline
For other operators and modems, again we go into the program profile. - So, we have created a connection, let’s try to connect. Attention! For Beeline, and perhaps also for some other operators, during connection we do not exit their programs supplied with the flash drive. For some reason this program closes the port after disconnecting from the Internet. If the connection through the connection we created went well, then we move on.
- Open the properties of our created connection, the “Advanced” tab. Check the box “Allow other network users to use this computer’s Internet connection.” We set the address “192.168.0.2” and the subnet mask “255.255.255.0” for our network card.
- We connect the router via the LAN port to the computer’s network card and try to connect using a browser to https://192.168.0.1; if that doesn’t work, change the IP address in the network card settings to “192.168.1.2” and try to connect to https:/ /192.168.1.1. Although, I think you yourself know how to get into the settings of your router. :)
- In the settings of the router, WAN or “Internet connection” we set the following settings:
Connection type: Static IP WAN IP address: 192.168.0.2 Subnet mask: 255.255.255.0 LAN IP address: 192.168.1.1 Subnet mask: 255.255.255.0 Gateway: 192.168.0.1 DNS server: 192.168.0.1 DHCP server: enabled Operating mode: Gateway - Setting up a wireless network. To do this, go to the “Wireless Networks” or “WLAN” tab. We enter the name of our wireless network (SSID), for example, the name “Inet-wifi”. We set the WPA2 phishing type and a network key that is convenient for you. Save the settings and reboot the router.
- Switch the cable from the LAN port to the WAN port of the router. And set the LAN IP address of the computer’s network card to “192.168.0.1” and the subnet mask to “255.255.255.0”.
- We turn on the second computer and are confused about connecting to your Wi-Fi point.
In theory, everything should work :). If you have any problems, ask in your comments. I will definitely answer everyone.
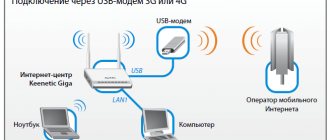
Modern technologies are developing rapidly. Even in the absence of high-quality wired Internet in remote settlements, the mobile option comes to the rescue. Let's look at how to connect WiFi via a Megafon modem and distribute the Internet to all portable devices in the house.
Service testing
On my tariff “Turn on! Try+” - with dwarf packages, but without a monthly fee, the service was available, and I decided to test it.
I enabled the “Modem Mode” option, connected the smartphone to the computer and turned on “Modem Mode” on the smartphone. The result is that I spent the entire mobile internet package from my tariff. There is no unlimited. After that, I connected another option “Modem mode for a day” for 100 rubles. The money was not withdrawn, the distribution did not work. But the next day I was given a new internet package for 70 rubles, thank you very much!
Conclusion
– at the moment, the service is indeed in test mode, but it is clearly not subscribers who should test it, since it does not work or does not work everywhere where it is offered, which can lead, as, for example, in my case, to additional costs.
If you managed to try “Modem mode for a day”, please write about it in the comments.
Option Description
on the official Megafon website: link.
Features of Internet distribution on unlimited tariffs
Internet on Megafon can be distributed free of charge, removing all restrictions. Sharing the Internet on Megafon allows tethering technology, when one phone turns into an access point for other devices. It becomes possible to simultaneously access the World Wide Web on several mobile devices and PCs at once.
A similar wonderful opportunity is available on Megafon’s “Turn On” tariff. All you need to do is set up a Wi-Fi point on your main phone. On additional devices connected to this Wi-Fi point, it will be possible to distribute the Internet as much as possible: unlimitedly download large files from torrents, from file hosting sites, and enjoy watching videos.
Let me note that the Internet network of other operators cannot withstand the excess load if users decide, say, on four devices connected to the point described above, to watch movies at the same time. In this case, they cannot avoid a drop in traffic speed to 128 Kbps, and in some cases even lower.
You can check with your telecom operator at what tariffs from megafon you can distribute the Internet, but it definitely works on the Turn On tariff.
If this cannot be done on your tariff, then you can use it. This service allows you to distribute traffic to other devices on all Megafon tariffs with unlimited mobile Internet. You can connect on the official website at megafon.ru/internet/options/rezhim_modema/rezhim_modema.html
How to connect?
This issue must be approached with all seriousness. Therefore, we will divide all the instructions into logical points, the implementation of which is mandatory for the Internet to work.
Choosing a Router
This is the key factor. Not all models have the appropriate connector and the function of distributing the Internet from modems. Therefore, study the parameters of your router and, if necessary, buy a new one. Main characteristics:
- the router must be equipped with a special connector for connecting a modem;
- in addition to the corresponding port, the router must have the function of distributing the Internet through an external device, because the USB connector can be designed for connecting removable media or a printer;
- Your router may only support certain modem models, so you'll need to check the list of compatible devices.
Connection and setting parameters
First, connect the USB modem to the appropriate port on the router. All. The main part is completed. Now all that remains is to set certain parameters and configure the connection. For this:
- Turn on the router and connect it to the PC via cable or WiFi.
- Find the default IP address on the bottom of your router. Remember it.
- Open your browser, enter the value in the address bar and press Enter.
Now you can proceed to the most subtle settings for distributing the Internet via a modem.
Connection setup
New routers now have a function for automatically configuring a 3G modem connection. To do this you need (let's look at the example of a TP-Link router):
- Go to the “Network” – “Internet Access” tab in the router settings, select “3G/4G only” and click the “Save” button.
- Next, open “Network” – “3G/4G”.
- Select your country, carrier, connection mode and authentication type, then click “Connect”.
- Reboot your router.
If you have an outdated device and firmware, for successful setup you need to know the mobile operator data, such as APN, login and password. The connection algorithm is also changing. Here is the data from MegaFon:
- APN – internet;
- Login – gdata;
- The password is gdata.
All that remains is to enter this data in the appropriate fields. To do this, do the following:
- Go to the “Network” - “WAN” tab in the router settings.
- In the “Connection type” field, select “Mobile broadband” (can also be “Mobile Internet”).
- After this, three additional fields will appear. Let's look at setting up an access point using MegaFon as an example:
- APN – internet;
- Login – gdata;
- The password is gdata.
- Click the "Save" button without changing the remaining fields.
- Reboot your router.
To connect a 4G modem everything is much simpler:
- In the “Connection type” line, select “3”.
- In the "Provider" field, select your country and operator. For example, Russia and MegaFon.
- Next, the remaining fields will be filled in automatically, just click “Save” and reboot the router.
Now you know how to connect WiFi via a MegaFon modem. In a similar way, this can be done with other operators, and the Internet will be in the entire home local network. If you have any questions, write them in the comments.
Source
Setting up a Wi-Fi hotspot on Android
The following steps will be required:
- Enter the smartphone settings.
- Find the item responsible for Wi-Fi.
- Activate the “Access point and modem” mode.
- The toggle switch turned to the right turns on the mode. Additional settings are located just below.
- Next, make the standard network name and password settings. Save changes. When entering a password, you can make it visible for convenience.
I’ll tell you how to find the password for a Wi-Fi point on a smartphone in order to share it with device owners.
- open the “Connections” item.
- Click on “Mobile hotspot and modem”.
- select "Mobile hotspot".
The password will be visible at the top of the display.
How to distribute wifi from a Megafon 4G modem
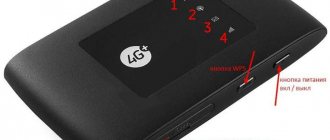
You will need to buy a router. This is a device that allows you to receive a signal from a cable network or mobile phone and distributes Wi-Fi.
Make sure your connection is working. If you have problems with it, then read why the computer does not see the Megafon 4G modem.
Insert the modem into the router (the USB port is most often located on the side). Most routers start working automatically. You must specify the network name and password. They are available by default, but you can specify your own.
To go into the router settings, type 192.168.0.1 or 192.168.1.1 in the address bar of your web browser. The correct address, login and password are indicated on the router body.
Next, look for the Wi-Fi section. For example, in Zeexel Kinetic it looks like this:
Specify the SSID and key.
After this, Wi-Fi will become available on other devices. The router will distribute access to everyone who wants and knows the key.
All these simple steps will allow you to enjoy Wi-Fi access in any conditions.
Source
How to distribute the Internet via Wi-Fi on iOS?
Here are the steps to take:
- Open the settings page.
- Click on the inscription “Modem mode”.
- Connect the mode.
- Click on the top item - it is responsible for Wi-Fi. Settings via USB or Bluetooth are made in a similar way.
- The password can be seen below, there is also a button to change it.
Additional settings
If your phone does not have a modem mode, here's what to do:
- enter settings;
- find the item “Cellular Communications” and click on “Data Settings” there;
- Next, you need to click on “Cellular data network” and get to the “Modem mode” subsection;
- in the APN line enter – internet;
- next to “username” – gdata;
- the same thing after the word “password” – gdata;
- leave the settings page.
After this, “Modem mode” should appear in the device settings. It will be possible to share the Internet in the way already described. Here are some simple instructions. If the desired message does not immediately appear in the menu, I recommend rebooting the device.
Finding the password will not be difficult. To do this, after entering the mobile phone settings, visit the “Modem mode” item. The required combination of numbers and other symbols will be located immediately after the words “Wi-Fi Password”. This is the required code, which will allow you to distribute the Internet to any device, including a PC and laptop.
How to distribute wifi from a laptop via a 4G modem Megafon
This is the first way. Organize distribution from a PC to which the Megafon device is connected. The computer must have a WiFi adapter.
Hover your mouse over the network icon (taskbar on the right) and click the right mouse button (RMB). Select Network Sharing Center.
Go to setting up a new connection.
Select manual connection to the wireless network.
Enter the name of the new network, the security type WPA2-Personal and set the key (security password for the connection). Click Next.
Share. To do this, you need to go to the properties of the current network.
In the “Access” section, check the box.
The connection will be created. Now you will see it on other devices.
At what tariffs can a megaphone distribute internet?
Bypass operator blocking and restrictions
- If your operator is Yota, go here: Bypassing Yota Internet distribution restrictions
- On your tariff, after downloading “many” GB, the speed has decreased, but there are options for other tariffs - go here Discussion of the Internet of mobile telecom operators
- Do you have MTS and standard instructions do not help you?
Let's go here Bypassing blocking and restrictions of operators (Post by djBitoN Petrenko Leonid #30785529) - The header contains a large amount of information, which is why, with a high degree of probability, the answer to your question already exists. Posts containing questions whose answers are in the header are deleted without warning.
- Please note that all resource rules apply to the topic.
- To solve your problem, please briefly and clearly explain your device diagram in the following form: donor device (name/availability of root/what OS/tariff) -> receiving devices -> their number
- Available “Device”
- donor (
name/availability of root/what OS/tariff
) - The distribution is carried out on the “Device(s)” (PC, smartphone, tablet, smart TV, etc.)
*Example:
Sasung SGII is available - donor, there is a root, android 5.1 with the “All for 500” tariff. I distribute on PC+tablet+Smart TV
- IMEI is a unique number used to identify phones, satellite phones, modems and other equipment that use a SIM card for connection on the network. It is a sequence of 15 or 17 digits. Can be changed.
- TTL is a parameter that determines the lifetime of each packet, or the number of hops between routers that a packet can go through. Each pass through the router decreases the value by 1. If the value is 0, the packet is discarded. The value can be changed to a range from 1 to 255.
- DPI is a special technology for accumulating statistics of passing traffic, allowing you to analyze, filter, and block traffic. Within the given topic, DPI is dangerous because, despite the changed emei, changed ttl, it easily detects the distributed traffic, p2p traffic, after which traffic is blocked or the speed is artificially slowed down.
- VPN is a virtual private network, a set of technologies that implement the so-called tunnel through which all our traffic goes from point A to point B. In our case, it is useful in that all traffic is encrypted, due to which the provider’s DPI technologies do not see what kind of traffic we we transmit (read: we calmly distribute the Internet; torrents work)
Connecting a WiFi router and ADSL modem
You can “make friends” of these two devices with each other in several ways (simple and zigzag).
From my own experience I know that a simple method often does not give results, due to various reasons (old device firmware, etc.), you have to look for a solution to the problem in another, more non-standard way.
As an example, consider a wireless connection to the Internet via a “bundle” modem D link DSL-2500U
and
WiFi router D link DIR-320
. This example is universal and fits most other similar models.
Let's start in order...
1.
We check the local network connection.
Open the Start
, in the search field enter “View network connections” (this is the easiest way to open a window with network connections) in the list click on the link
View network connections
.
In the Network Connections window, select Local Area Connection
and call the context menu, in it click on the link
Properties
.
In the Local Area Connection - Properties window, select the component and click the Properties
.
In the Internet Protocol Version 4 (TCP/IPv4) window, on the General tab, make sure that the Obtain an IP address automatically
and
Obtain a DNS server address automatically
. Click on the OK button.
Local Area Connection - Properties
3.
Once the modem is configured (the Internet indicator turns green), you can proceed to connecting it to the WiFi router and further settings.
Disconnect your modem and connect your WiFi router instead.
We insert one end of the network cable into the computer’s network card, and the other into the LAN connector on the router. As a rule, there are several of them, you can connect them to any one.
Open the browser and enter the URL in the address field (in my case, https://192.168.0.1) to access the router via the web interface. It is usually given in the documentation for the device or on its back side.
4.
If the Username and Password are entered correctly, you will be taken to a new window and taken to the page.
5.
First, let's configure the router for wireless data transfer via WiFi.
In the menu on the left, select the Wireless Setup
.
The window asks us to select manual or automatic configuration mode. We will configure it manually, so click on the button Manual Wireless Connection Setup
.
6.
In the next window you need to configure the appropriate settings for the wireless network.
At the top of the page there is a section WiFi Protection Setup
, where you can configure the connection of clients that support the WPS (Wireless Protected Connection) function.
You can enable this option or not. I leave it turned off.
In the Wireless Network Gettings
set the parameters:
- Enable Wireless
– enable this option. The router will be able to receive and transmit signals wirelessly. - Wireless Network Name - enter the name of your network in English (SSID) in the field, it will be used to identify the network.
- Enable Auto Channel Selection
– leave this parameter unchanged. It allows the router to independently select the communication channel for the wireless network. - Wireless Channel
– in this field you can manually specify the channel number for data transmission. In our case, we leave it unchanged. - Transmission Rate
- sets the data transmission rate over the WiFi wireless network. Leave the default value – Best. - WMM Enable and Hidden Wireless
– leave them as default.
In the Secure Mode
select
WPA/WPA2 Wireless Security
, which will allow us to protect our wireless network from unauthorized connections of neighbors and those within the network’s coverage radius.
- Cipher Tip - TKIP
- PSK/EAP – PSK
- Network Key – set the key yourself. It's arbitrary. Be sure to write it down, for example, in a text document; you will need it when connecting to a WiFi network. Any person to whom you tell this key will be able to connect to your network if they are within its range.
After filling out all the fields, click on the Save Settings
. This completes the setup of the router’s wireless network. The settings are saved in the device.
7.
Now you need to view information about the device and write some parameters to a file.
We will need them to configure the modem. Click on the Status
in the top menu of the web interface.
In the window, copy the data from the Lan
(MAC Addresses, IP Address and Mask) and save them in a text file.
But there is a possibility that when writing these parameters to the ADSL modem, the IP address range 192.168.0.x is occupied and it will not be possible to enter our router address (192.168.0.1). So let's change it in advance.
Click on the Setup
and in the window in the
Router Settings
, change the value of the
Router IP Address
from 192.168.0.1 to another, for example, 192.168.1.25.
Click on the Save Settings
to save the new settings.
We log into the router’s web control panel at the new address. In the browser window, enter https://192.168.1.25 in the address field, specify the default login and password.
The router control panel opens again.
8.
Let's change the password to a more complex one.
After all, you wouldn’t want someone to be able to remotely access your router and snoop on your wireless network password. To do this, click on the Maintenance
and in the login section you can leave the same, but change the password, having previously written it somewhere, for example, in the same file.
After the password has been changed, click on the Save Settings
to save settings.
We log into the control panel again with a new password.
Now there is one step left until the final setup. But before that, let's summarize what has been done:
- Checked the network connection parameters - selected automatic mode
- Connected the ADSL modem and configured it to access the Internet
- Disconnected the modem, connected the WiFi router
- Configured the wireless network and the necessary security settings
- Changed the device's IP address (from 192.168.0.1 to 192.168.1.25)
- Changed the password from default to new.
Let's move on to the final part.
9.
Log in to the router’s web control panel and select the
Internet Setup
in the menu on the left. The window offers us two options for setting up the Internet:
- Internet Connection Setup Wizard
– Configuration using a wizard; - – Manual setup.
Click on the Manual Internet Connection Setup
and in the next window, in the
ACCESS POIN MODE
, check the box opposite. We switched the WiFi router to access point mode, in which it can distribute the Internet to clients.
Click on the Save Settings
.
The settings will be saved, and the router will go into Access Point Mode
. The router is configured. Disconnect it from the computer.
11.
Open the LAN tab in the menu on the left, and in the window click on the
Add Entries
.
12.
In the window, set
the MAC address of
the WiFi router and its
IP address
.
We previously saved these parameters to a file. Just copy and paste them into the required fields. Click on the Save/Apply
.
A new entry will appear in the table window with a static IP address and a unique MAC address of our router. Click on the Save/Reboot
. The modem will “go into reboot”.
13.
After saving the settings, disconnect the modem from the computer and turn it off for a couple of minutes to end the connection session.
15.
We connect the modem to the router using a second network cable. We insert one end into the modem, the other into the WAN (Internet) port on the router.
Connection and setup is complete. If everything was done correctly, the Internet will be broadcast via LAN and WiFi.
In this mode, the router distributes the Internet via LAN if several computers are connected to it via WiFi.
General description of the line
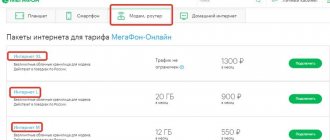
Wireless unlimited Internet from MegaFon is offered in two tariffs:
- “Wi-Fi for yourself” – with access speeds up to 7 Mbit/s;
- “Wi-Fi for the family” – with access speeds up to 150 Mbit/s.
Routers are supplied with them - they are rented or purchased at full price. The equipment provides a stable connection to the network within the “Create Wi-Fi” coverage map. There are three types of places listed here:
- With coverage from 7 Mbit/s;
- With coverage from 50 Mbit/s;
- No network coverage.
We see here a guaranteed minimum speed, which is not available on standard tariff plans for MegaFon modems. It is also indicated here that this card may differ from the standard one created for other services.
Features and benefits of the Wi-Fi router included with the tariff plans:
- Organizes an access point with speeds up to 150 Mbit/s;
- Provides a stable connection to the mobile Internet;
- Equipped with ports for wired connection of computers.
Megafon tariff “Wi-Fi for yourself”
This is the junior tariff plan from the new line. It is designed for one user, which is due to the speed limit.
Tariff description
The tariff is provided with a subscription fee of 750 rubles/month. Renting a router will cost an additional 100 rubles/month, purchasing – 5,790 rubles. Calls to local numbers, if you call from a phone, cost 5 rubles/min. Long-distance calls – 15 rubles/min. Sending SMS to local numbers costs 1.95 rubles/piece, to all-Russian numbers – 2.8 rubles/piece. The maximum speed of mobile Internet is 7 Mbit/sec – just for one user. There is no traffic limit, but the offer specifies a limit of 3 TB, after which the speed may be limited.
How to switch to tariff
The transition to a tariff plan is carried out only through your personal account. The cost of the first TP shift within a month is 0 rubles, the second shift is 150 rubles. To purchase a SIM card with a router, fill out an application on the MegaFon website and select a store for pickup. Starting balance – 300 rub. When purchasing a router, pay the full price. Rent is paid from the balance.
Megafon tariff “Wi-Fi for family”
If you need Wi-Fi for your home, with a large number of connected devices, use the “Wi-Fi for Family” tariff plan. You do not need a USB adapter (modem) with a router - it will not provide the required speed. Instead, the tariff includes a high-speed router with 4G support - in guaranteed speed zones it will provide at least 50 Mbit/s. The maximum speed will be up to 150 Mbit/s. This is enough:
- To quickly download files;
- To watch TV on any device;
- For working with torrents, there are no restrictions on their use.
Use the Internet as much as you need.
Tariff description
The subscription fee is 1,300 rubles/month without restrictions on traffic (the offer specifies a limit of 3 TB, after which the speed may be limited). There are also discounts - 25% for the next month if the traffic consumption is less than 25 GB and 10% for the next month if less than 100 GB were used. Renting a router costs 100 rubles/month, purchasing – 5790 rubles.
The cost of calls and SMS on this tariff is the same as on the “Wi-Fi for yourself” tariff plan - such a high cost is due to the fact that this line is not intended for calls.
How to switch to tariff
The transition is carried out through your personal account - USSD commands are not provided. If this is the first transition in a month, its cost will be 0 rubles. If less than 30 days have passed since the last change, the cost of changing the tariff will be 150 rubles. You can buy a new SIM card with a router on the MegaFon website by filling out an application and selecting a store for equipment pickup.
Bypass restrictions
You can bypass the restriction using:
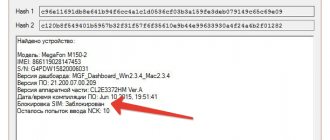
- IMEI changes. To distribute the Internet, you will need to replace the IMEI of the connected device. As a result of the operation, the operator will regard the device connected to the access point as the transmitter itself. The algorithm of actions is as follows:
- set command *#*#3646633#*#*;
- opening the “Connections” tab and the “Radio Information” subsection;
- in the AT+ line you will need to write EGMR = 1.7,[required IMEI];
- saving parameters using the Sand AT command;
- reboot the device.
- TTL changes. The method is only available to owners of rooted Android devices. To unlock the ability to connect your gadget to a modem you will need:
- switch the device to “offline” mode (turn off the cellular antenna);
- in the ES utility follow proc/sys/net/ipv4;
- open the ip_default_ttl file and change parameter 64 to 63 (the main thing is to use a number that is less than 64);
- save new settings;
- disable offline mode.