The Internet connection function is an important component of any modern Android device, allowing you to receive timely updates to the operating system and installed applications. For such a connection to work correctly, you must use certain network parameters depending on the type of connection. In this article, we will talk about the basic methods for setting up an access point on absolutely any smartphone.
Set up a mobile Wi-Fi hotspot on your phone
As of version 2.2 of Froyo, Android includes a Wi-Fi hotspot, so it should be available on your phone.
However, you need to check with your mobile operator to see if your plan allows data sharing. To create a Wi-Fi hotspot, open your device settings. You can do this from the application list. Or swipe down on the screen to lower the notification panel, then tap the gear icon in the top right corner.
The next step depends on your device. In our example, on the Honor 8 Lite device, you need the “Wireless Networks” item.
Click Modem Mode.
Tap Wi-Fi Hotspot.
Next, select “Set up Wi-Fi hotspot” to set the network name, password, and other Wi-Fi settings. When you're done, click "Save."
When the configuration is set, click “Save” and activate the switch next to the access point name.
When your mobile hotspot is active, it should look the same as any other Wi-Fi network on your other devices. Use the password you chose when setting up the connection.
You can also quickly enable or disable the feature from quick actions in the notification panel. Swipe down on the screen to view quick actions. Tap Hotspot and turn it on or off.
If you plan to connect multiple devices to your Android Wi-Fi hotspot, you need to be mindful of data usage. On Android, you can control and limit the use of your data if you have limited data.
If you apply a data limit to your device, Android will automatically turn off your data connection when you reach the limit.
On the modem
You can receive an automatic installation configuration if the user has a modem. The program additionally comes with drivers for computer equipment. Instructions:
- Install a USB port. The connection to the Internet occurs automatically.
- Activate access using the standard algorithm.
If the user was able to successfully connect to the Internet, but then a failure occurred, he needs to reconfigure the devices and open access. For help, you should contact Beeline service specialists. You can call the toll-free number 8-800-700-8000 or bring your mobile phone to any branch of your mobile operator. Employees will configure access manually.
Limitations and third party applications
You can create Wi-Fi hotspots with third-party apps available in the Google Play store, but most people don't need to worry about this. Android's built-in hotspot method works great for most people who need to set up a Wi-Fi network for use with other devices.
However, if your carrier doesn't allow you to connect other devices to your phone, the standard Android hotspot method may not work. Your carrier may also impose data usage limits on devices that connect through your hotspot.
Apps like PdaNet+ offer a workaround, but you may need a rooted phone to completely bypass your Android phone's tethering restrictions. And keep in mind that this probably violates your carrier's terms and conditions.
Price: To be announced
Why does the Internet not turn on and work through the access point?
After connecting the mobile Internet and activating the hotspot, the user may encounter difficulties. There are three reasons why a Wi-fi access point may not work correctly.
- blocking the connection with an antivirus program;
- the impact of a downloaded application or virus on network operation;
- error in the OS.
An antivirus that protects your smartphone in real time can block network connections. Go to the application, disable the firewall and activate the access point. If there is no connection, uninstall your antivirus program and try again.
Installed applications make changes to the operation of the operating system. Check your smartphone with antivirus and block malicious files. Using Application Manager, find out which program has rights to control network connections and remove it. Then turn on the access point.
If the previous methods do not work, reset your gadget to factory settings. For this:
- Go to the "Options" menu.
- Select "General - Backup and reset".
- Click Reset Settings.
By performing a factory reset, you will lose all data saved in the device memory. Create a backup copy first.
Your mobile operator can block the distribution of traffic via Wi-Fi. If you set up an access point on Android according to the instructions and eliminated the errors described above, contact the contact center with a request to check the network settings and the presence of blocking.
How to distribute Wi-Fi from a smartphone
Wi-Fi has become one of the conditions for a comfortable existence, along with running water, electricity and sewerage. However, don’t be upset if the hotel you like or a nice new cafe doesn’t have the coveted “Wi-Fi” - very often you can organize it yourself using your smartphone. All modern smartphones are capable of organizing a Wi-Fi network and distributing the Internet received via mobile networks.
Android
Most Android smartphones can work as a router. But before you start sharing Wi-Fi, you should make sure that your smartphone has something to distribute. Check if mobile data is turned on. Only in this case does the smartphone gain access to the Internet.
If you have two SIM cards on your phone, make sure that the card for mobile Internet is selected correctly. You can turn on mobile data from the quick access panel by swiping down from the top of the screen twice.
On different models, the data transfer icon may look different (most often it is two arrows pointing in different directions).
You can also connect mobile Internet to a specific SIM card in the “Data transfer” or “Mobile data” menu item of the smartphone settings.
Now you can try to turn your smartphone into a router. Enabling this mode is unlikely to cause any difficulties; rather, difficulties may arise with finding the necessary settings.
Depending on the OS version and the specific firmware, you may need a menu item called “Modem Mode”, “Access Point”, “Modem and Access Point” or something else, but mentioning the modem or access point. The menu item itself can be either in the root section of the settings menu or in the “More”, “SIM cards and networks”, “Wireless networks->More” sections, etc.
Wi-Fi distribution is turned on if you move the slider next to the words “Access point” or “Mobile network sharing”. Immediately after this, you can already look for a new one in the list of wireless networks (as a rule, it has the same name as your smartphone). We, however, recommend paying attention to a couple more settings: the password and the frequency range.
There are two options with the password: by default it can be empty and you can already connect to your network. The downside here is that anyone else can do it too. Well, if the device has set the password randomly (this also happens), you will definitely have to, if not change, then at least look at the password, otherwise you will not be able to use Wi-Fi.
Make sure the Wi-Fi frequency is set correctly. Most Wi-Fi devices operate at a frequency of 2.4 GHz - set this in the settings if you want the network to be accessible to any devices. But keep in mind that the 2.4 GHz band can be very busy - especially in high-rise buildings and offices. If both your smartphone and the device you want to connect to the Internet can operate on 5 GHz, it is better to choose this frequency.
In addition, in the settings you can change the SSID (the name under which the network will be visible in the list of wireless networks), encryption type (it is recommended to leave WPA2 PSK), protocol, etc. Or you don’t have to change it - here the default parameters are enough to work.
iOS
On iPhones everything is about the same.
First of all, you need to make sure that mobile data is turned on:
In the settings, go to the “Cellular Communications” section and look at the “Cellular Data” slider.
Then, in the “Modem Mode” section, enable this very mode.
That's it - the iPhone starts distributing a wireless network with the same name as your smartphone. The automatically generated password for connecting to the network is displayed on the same page.
Windows Phone
Windows Phone is noticeably inferior in popularity to previous operating systems, but this does not mean that it has fewer capabilities. Devices running this system can also be used as a Wi-Fi router. The algorithm of actions is the same as on Android or iOS. The first step is to enable mobile Internet - the settings menu item “data transfer”.
Then, in the “shared Internet” settings menu item, Wi-Fi access to the mobile Internet received by the smartphone is enabled. The default name and automatically generated password are listed on the same page. You can use them or set new ones by clicking the “install” button at the bottom of the page.
A spoon of tar
It would seem that everything is fine and it is generally unclear why devices such as routers (and especially mobile routers) are needed if Wi-Fi is easy to distribute from a smartphone. Unfortunately, there are some disadvantages to this solution:
- When you actively use your smartphone in modem mode, its battery drains quickly. However, if there is somewhere to plug in the charger, then the problem is small.
- The speed of a Wi-Fi network created by a smartphone can be quite disappointing.
Firstly, wireless network distribution is still not the main task of a smartphone, and its resources in this mode are not used in the most optimal way. A low-power smartphone may simply not be up to the task of routing data flow on the network. Secondly, the Internet speed on such a “Wi-Fi” directly depends on whether the phone is within the coverage area of high-speed mobile networks of the third or fourth generations. The icon on the status bar will tell you this: Based on this, you can estimate the possible maximum Internet speed:
As you can see, the speed of all second-generation standards and most third-generation standards is, to put it mildly, insufficient for modern Internet activity. Alas, reliable 4G reception is not available in all populated areas, not to mention the “wild”. Thirdly, the speed of Wi-Fi distribution from a smartphone is initially inferior to that of routers. The reason is the number of transmission channels. Low-cost smartphones have only one transmission channel and provide a maximum of 150 Mbps in the 2.4 GHz band on a single connected client, regardless of the speed of the mobile network connection. More expensive smartphones may have 2-3 transmission channels (MIMO 2x2 or 3x3), which increases Wi-Fi speed by a factor of 2. Top smartphones have up to 8 transmission channels and support for MU-MIMO technology, which provides simultaneous transmission over several channels at speeds of up to 1 Gbit/s. True, such smartphones cost 10–20 times more than a router with similar capabilities. - The number of devices that can be connected to a smartphone is limited. This is up to 10 devices on iOS or Android and up to 8 devices on Windows Phone.
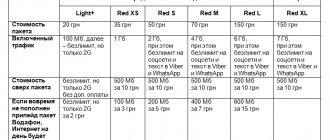
- Well, another unpleasant nuance is that cellular network operators do not like it when the mobile Internet is used in this way. Some “unlimited” tariffs allow you to distribute only a certain amount for free (for example, 50 MB, and everything “above” will cost a fee), and some do not allow you to use a SIM card at all for distributing the Internet, and not for directly using it . And although this ban can be circumvented using a VPN or other “tricks”, it complicates the task of connecting to the Internet.
Creating an access point on Android
Not all Android-based equipment can distribute the Internet, so make sure that your phone has GSM/3G and, of course, a Wi-Fi module. Turning such a device into a modem that will distribute the connection is quite simple.
This is done in the following way:
- Go to the settings menu, select the “Wireless Networks” section.
- Open the “More…” tab and click on the “Modem mode” line.
- Select the “Access Point” section and open the settings for this parameter in the window that appears.
- A window will appear for creating a new connection, where you enter a name for the network under which it will be displayed in the list, set a password and indicate its encryption type.
- Save your changes and return to the Access Point menu to activate this method of operation.
Now you can use your phone as a router, to which you can connect from various equipment. Subsequently, you do not need to reconfigure the settings; you just need to enable the “Access Point” line.
You can also track who is using your Wi-Fi - the list will appear in the “Modem Mode” window. Additionally, the Android platform provides a speed limiting function, which is activated as follows:
- Open the Bandwidth Usage window.
- Enable the bandwidth throttling line.
Applications
There are special programs that turn your smartphone into an access point, for example, FoxFi or Wi-Fi Tethering. There is also a Tethering Widget utility that works as a widget. What are they needed for? If you often use a mobile device to distribute a signal, it is not very convenient to activate this method of operation every time through the settings, but the presence of a special icon in the menu greatly simplifies the process.
Automatic setup
There is a special section on the MTS website where you can order data for the Internet. You can get to it this way: “Help” - section in the top menu, then select “Mobile Internet”.
Here in the list of services you can find both manual and automatic settings. You need to enter the number and click “Submit”. They will come in a message with the option of auto-installation.
Creating a hotspot on Windows Phone
On equipment running Windows 8, you can configure connection distribution as follows:
- In the smartphone settings, open the “Internet Sharing” section.
- Turn on sharing mode, after which, if necessary, you can change the network settings - its name or password.
This is all! As you can see, enabling modem mode in this operating system is very simple and easy. It is worth clarifying that the maximum amount of equipment that can simultaneously connect to the phone is no more than 8 units.
JoikuSPot app for Nokia phones
To create an access point on models from this manufacturer, you will need the JoikuSPot program, which is available in free and paid versions. Download it and do the following:
- Launch the application and confirm the request to allow external devices to connect to the Internet.
- In the list that appears, select an access point, wait until the program creates a connection called JoikuSPot based on it.
- After turning on the network, in the main menu of the application you will see its name, the “Stop” button if you want to stop the connection, and the “Buy full version...” option when using the free version.
- The second tab of the menu shows information about the connected equipment, the third - general data about the operation of the program.
Preliminary measures
Logo
You don’t always need to blame everything on a non-working Wi-Fi module or just a parameter failure.
First of all, check if the Wi-Fi you want to connect to works on other devices. Additionally, try also joining another connection.
If your smartphone doesn’t connect at all, although everything is fine on the other device, then you should try setting up Wi-Fi yourself.
If it is the router that is not working, you need to check the configuration via your smartphone. Let's take a closer look at this.
Settings on your mobile device
Example of password entry
First, turn on your router and Wi-Fi on your smartphone. This can be done either through the parameters or the menu bar (it appears if you pull the top of the screen down).
Click on the image of four waves tapering towards the bottom. In the settings, just swipe your finger towards “Enable”.
Next, your device will search for networks available within range. As a rule, in public places there can be more than 10. Some require a password. After introducing it, everything should work.
Additional settings are required when the connection is hidden in the router settings or DHCP is disabled.
The network is hidden
Click “Add”
In this case, you need to go to the settings in the Wi-fi section and scroll through the entire list of networks available for connection to the end. Then click on the “Add network” panel.
The following is required for connection:
- enter a name;
- specify the security type;
- save the connection.
If you are not sure about the security type, it is better to double-check. Otherwise it will be impossible to connect. This setting must be the same on all devices.
Most modern smartphones support security types such as WEP, WPA/WPA2 PSK, 802.1x EAP, WAPI PSK, WAPI CERT.
DHCP
This is a special network protocol. Thanks to it, users can connect third-party devices. They automatically receive all the necessary information for working in a TCP/IP network.
If DHCP is disabled, then your device cannot receive data from the network, and therefore you cannot access the Internet either.
This protocol must be configured in the router itself. If it is disabled, then there are two options: either you enable it, or work without it.
In the second case, go to Settings, to the Wi-fi section and look at the advanced settings.
They will have the following parameters:
- proxy server;
- IP address;
- change password
- static IP.
It is the last parameter that is needed to restore the connection. Turn it on and enter the details of the network you are connecting to:
- IP address - the address of your device. Typically, it is in the range from 192.168.0.100 to 192.168.0.199. However, there may be other options depending on the router configuration.
- gateway - the main route for communication with other gateways. Used in TCP/IP. The gateway determines the ability to access the Internet. In most cases, you can find out by looking at the information on the bottom of the router or by contacting your provider;
- network mask - bit mask. Also required for connection. Most often it comes in the format 255.255.255.0. More precisely, you can look in your settings on your computer. Having opened information about the network, one of the fields should indicate a mask.
- DNS 1, DNS 2 - DNS is a special service that connects you to a specific resource. That is, you enter the site address, and the DNS server processes it and recognizes what IP this resource has. This way you can move from site to site. In addition, there is a primary and secondary DNS. When setting up a connection, you can use public servers from Google: 8.8.8.8. and 8.8.4.4.
If you don't know the information you need, you can look it up on your computer. To do this, you need to go to the connection properties. You can also call your operator or find an agreement with your provider; these parameters may be indicated on it.
After filling in the fields, save the changes and connect again. In most cases, everything starts to work. Otherwise, check the functionality of the Wi-fi module or router.
Options for connecting the tablet to Internet distribution
So, we have a tablet PC with a 3G or 4G module.
You should choose the best way for you to use it as a modem:
- using Wi-Fi;
- using a USB cable.
In both cases, connection will not take much time, and no special knowledge is required. There are some nuances when connecting gadgets running on different operating systems. However, once you delve into the very essence of the process, no difficulties will arise.
Before you start connecting, you need to set “Modem mode” on the tablet (“Settings” - “Wireless networks” - “Data transfer” - “More” - “Modem mode”). The names of the sections may differ slightly depending on the installed OS and the interface used, but their meaning remains the same. You are then prompted to select a connection method.
Tablet as a Wi-Fi hotspot
The solution to use the tablet as a modem by creating a Wi-Fi access point is suitable even for “dummies” who are not particularly versed in software. The connection process can be divided into several steps:
In the wireless network settings, select the “Wi-Fi access point” item (in some operating systems this item is called “Wi-Fi HotSpot”), go to the settings and name the created point with a special name. This is the name that will be detected by other devices in the list of possible connections. Choose an authorization method
Tip: the most optimal authorization method is WPA2 PSK. It is supported by most devices and is the most secure in terms of using the tablet as a modem.
It is very important to come up with a complex password, otherwise anyone can connect to your connection. An unsecured access point is a real gift for your neighbors
And rest assured that this chance to use someone else’s Internet for free will not be missed. A good password consists of at least 8 characters of varying case and numbers. Save the settings, turn off and then turn on the “Wi-Fi access point” option.
Having consistently completed all the above steps, you have configured your gadget to distribute the Internet to all surrounding devices via Wi-Fi. On a computer or other device, you need to select the name of the newly created access point, enter the password, open the browser and enjoy the delights of the Internet.
When you are finished using the Internet, the access point should be turned off.
The active Wi-Fi function requires significant energy consumption and quickly drains the device.
Tablet PC as a USB modem
The process of setting up Internet distribution using a USB connection is a little more complicated due to the fact that the appropriate drivers must be installed on the computer connected to the network.
When you connect the USB cable to your computer, you will be asked to enable “USB storage mode”; this request should be rejected. Next, in the wireless network settings, select “USB modem”, after which a notification appears that the connection via USB has been established. The computer automatically detects the connected modem and establishes a connection.
When using this type of connection, problems may arise with driver installation on Windows XP. This prevents the computer from recognizing the connected tablet PC correctly. In this case you should:
- go to “Device Manager”;
- find an unidentified device there;
- try to fix the problem.
On more recent versions of Windows, there are no problems installing the necessary software. And since XP is already a thing of the past, you shouldn't worry too much about it.
Upon completion of work, you must disable “USB modem” in the settings and disconnect the cable.
How to set up WiFi on Android?
We must immediately stipulate that the question of how to set up an access point on an Android phone will be discussed in detail below. Now we are talking about connecting to an existing wireless network in order to gain access to the Internet.
To connect to a wireless network, you need to know its name and password. In most cases, the user only needs a few taps on the smartphone screen:
- In the “Network and Internet” menu, open “WiFi”.
- Move the slider to the “Enabled” position if it has not already been done.
- Select the desired name from the list and tap on it.
- In the window that opens, you must enter a password. This is done once, then the smartphone remembers the password.
In this situation, two problems are possible: the desired network is not visible in the list and there is no connection due to DHCP settings. Both problems can be solved if you manually configure Wi-Fi on your Android phone. To do this you will need:
- Scroll through the list of available connections to the end and find the “+Add” button.
- Enter a name and click “Advanced”.
- If DHCP is configured on the router (all devices automatically receive an IP address), then in the “IP Settings” section leave the value DHCP.
- If the router is not configured or does not support such a function, then you must select “Custom” and manually enter the IP address, gateway, and the addresses of both DNS servers.
This completes setting up WiFi on an Android phone; these instructions are also suitable for Android tablets.
What is an access point on a phone?
An access point is a station that provides access to a wireless Internet network. Any devices located in the coverage area can connect to it. A variety of equipment can be used as an access point, for example, modems, routers, laptops, tablets. But smartphones are ideal for this purpose.
You can distribute traffic in different ways, the main thing is to configure the mode correctly and ensure the connection is protected. The basic requirements for a mobile device are the presence of a Wi-Fi and GSM/3G module. If the smartphone does not support these types of connections, but works with OTG technology and is capable of detecting flash drives connected to it, you can connect a USB modem to it and also use it to distribute the Internet.
When turning your smartphone into an access point, you should pay attention to the following nuances:
- Connected devices will consume mobile traffic. If the tariff is not unlimited, you need to track the balance status after the end of the session.
- Some operators charge an additional fee for using the mode, so it is advisable to clarify this point in advance.
- Activating an access point increases battery consumption. Before activating the mode, you must charge the battery.
Using a smartphone as an access point is relevant in many situations. For example, a person went into a cafe where there is no Wi-Fi network. If he needs to connect a laptop to the Internet, a smartphone will come to the rescue.
Connecting to the Internet via a telephone is also advisable in the case when a Wi-Fi network is available in the establishment, but is distributed without a password. Since it is accessible to anyone, there is a risk of losing confidential data or valuable information. It’s better to play it safe and set up an access point on your gadget.
How to set up an access point on Android?
It’s one thing to connect to existing WiFi from your phone, and another to distribute the Internet yourself. It should be noted that only mobile Internet can be distributed from a smartphone.
Due to the fact that phones only use one WiFi module, it can either only receive or only distribute traffic.
Before you enable the “Hotspot” mode, you need to make sure that “Mobile data transfer” is turned on on your phone and “Airplane mode” is turned off.
To do this you will need:
- Open Settings and make sure Airplane Mode is turned off.
- Scroll up the menu and select Data Transfer.
- For each SIM card, mobile Internet is turned on separately using the sliders.
After this, you can enable the access point:
- In the “Network and Internet” menu, tap “Access point and modem mode”.
- Slide the Mobile Hotspot slider to the On position, and then select Mobile Hotspot Settings.
- In the new menu, select “Settings” again.
- Set a name, password, and select a security level. Click "Save".
This is how you can set up WiFi on a Samsung, Xiaomi, HTC, Meizu or any other phone with the Android operating system.
By the way! After you manage to cope with the system settings, we recommend that you familiarize yourself with one interesting service: WiFi Calling. It can help you save significantly on conversations with family and friends.
How does it work?
Everything is quite simple. Let's imagine that you have a smart phone on Android OS. Now:
- You go to the menu, find settings - something like Modem mode.
- The main thing is that you need to find the Mobile Hotspot item. Turn it on.
- Next, there will be settings for the point where you can specify your login, password, and network name (SSID). For the first time, I recommend setting a simple login/password just to test it. It’s better to set up the point first, and then activate it.
- After activation, your phone/smart is already distributing the Internet. He created a Wi-Fi network, by connecting to which you can receive the Internet that is on your phone.
- Of course, everyone who has connected to Wi-Fi will use the telephone Internet, that is, the megabytes will come from your operator. What I mean is that the service may be paid - be careful.
- Usually such a point on Android works stably, unless of course there are interferences with Wi-Fi - for example, load-bearing walls, several partition walls. The presence of viruses is, of course, also undesirable.
- Also keep in mind that the battery discharges a little faster in this mode.
Example settings on Android. Their location depends on the system version, but everything is approximately the same.
In the future, the point can be easily included in the curtain menu.
How to set up WiFi on iPhone?
The general connection principles for iPhones and Android phones are almost the same. To connect to the wireless Internet using an Apple smartphone, you will need:
- Open "Settings".
- Select "WiFi".
- Select the desired network.
- Enter your password.
There are also two types of problems on iPhones: the network is not visible (hidden) and the connection does not work due to the lack of automatic settings. However, these problems are solved in different sections of the menu.
To connect to a hidden network, you will need:
- In the “WiFi” menu, in the list of available connections, find and click the “Other” button.
- Enter the name of the network and the type of security that is configured in the router. If a window with a password appears, enter it (some security types have a password for connection, some do not).
If the Internet does not work due to a lack of automatic settings (DHCP is not configured or missing), then you will need to configure it manually:
- Find the one you need in the list of WiFi connections and click on “i”.
- Select the DHCP tab.
- Enter the IP phone and router, subnet mask and DNS server address.
Using these instructions, you can debug the configuration of both iPhone and iPad.
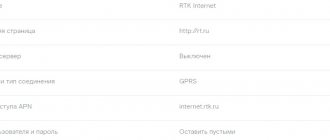
Common APN Options
- Name . It is indicated either arbitrarily (no additional verification of the validity of the input is performed on the receiving server) or in accordance with the information received on the official website of the provider. As an option - Beeline Internet.
- APN . Exact ID. In most cases it resembles a URL, like internet.beeline.ru.
- Port , server and proxy. Text fields that do not require filling.
- Username and password . The parameters are issued by the provider or operator. They contain mostly letters, but in rare cases numbers.
- Authentication type . PAP or CHAP. Preference is for PAP - this is what modern cellular operators use, but there are exceptions. You should look for details in support.
- APN type . In the Type section of the APN access point, regardless of the operator, the combination default, supl, mms is indicated. It is important to maintain the writing order (without spaces between words and punctuation marks, as well as case), otherwise the selected settings will not work as intended.
Mobile operators rarely divide the listed settings into categories: along with the WAP wireless protocol, dedicated packet radio communications, Internet and MMS multimedia messages automatically take effect.
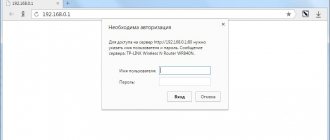
Enter the password and configure
Most home Wi-Fi networks are password protected. To gain access to the Internet, you must enter it. There are several ways to do this.
In settings
The method is suitable when connecting from the standard “Settings” application. After the user has performed a network search in the manner described above, he must:
- click on the appropriate one in the list;
- enter the password in the window that opens;
- click “OK”.
After this, a connection will occur and data exchange will become possible.
To log in, you need to click on the desired network from the list, and then enter the password.
In Control Panel
Another way to connect is through the quick access panel, which is much more often called a “curtain”. Here the procedure is much simpler. You will need:
- Call up the curtain by swiping your finger from the top of the screen to the bottom;
- press the Wi-Fi icon and hold it for a few seconds;
- in the list that opens, select the desired network and click on it;
- enter the password in the pop-up window that appears;
- click “OK”.
If the user has already connected to the network before, just clicking once on the corresponding symbol in the “curtain” is enough. The system can remember the password. So it will enter it automatically. However, to do this, when entering for the first time, you need to check the box next to the phrase “Remember password”.
In notifications
Through notifications, they connect to a network that has previously been connected, but the password for which has been changed. This method is also used if the “Remember” checkbox was not previously checked when entering.
In such situations, the system finds the desired Wi-Fi access point and displays messages in notifications about the need to enter a password to connect. To do this, you will need to do the following:
- Call up the notification menu by swiping from the top edge of the screen to the bottom;
- click on the desired message;
- enter the password in the pop-up window that appears;
- Click "OK".
Connection via WPS
WPS is a technology that allows you to connect to a router even if the user does not know the password. It is supported by most modern mobile devices. However, you need to remember that such a connection is not secure - data transmitted over the network can easily be intercepted. Therefore, you should not connect to someone else’s router this way. You can use the technique for yourself if you forgot your password and your provider doesn’t have time to check it.
WPS allows you to connect to a secure network.
To use a WPS connection, you must complete the following steps:
- launch the standard settings application on Android;
- go to the “Network and Internet” section;
- open the “Wi-Fi” subsection;
- call the subsection menu;
- select “Settings”;
- select “WPS connection”;
- wait for the network search to complete;
- click on the one you need.
To use WPS, you need to enable it on your router. Typically the device has a physical button with a corresponding label. It must be pressed before connecting. If this is not done, the smartphone simply will not see the signal produced by the router.
Common connection difficulties
If you need to access the Internet from a regular computer that does not have a Wi-Fi module, or if you simply do not want to waste your smartphone’s battery power, you can use a wired connection from your gadget to your PC. When you enable modem mode in the settings of your Android smartphone, any computer running a modern operating system like Windows 8 should automatically install the necessary drivers, after which a new network connection will appear in the PC control panel.
Of course, you can access the Internet in this way only from one computer at a time, but the smartphone’s battery charge is not only not wasted, but is even replenished while using the connection.
It would seem that setting up, searching, connecting and using Wi-Fi is not difficult, but experts have identified the main problems that arise when connecting.
Cannot set a password for the access point. The most common mistake is that the security key is set to less than 8 characters. The minimum number is exactly eight. Can't connect to Wi-Fi from another device. In this case, you need to make sure that the entered password is correct and whether the users are trying to connect to the right network. Your phone/tablet/PC is connected to a Wi-Fi network, but the Internet is too weak or non-existent. Faced with such a nuisance, you need to make sure that the USB smartphone router has Internet access and is also located in the network coverage area
It is also important to make sure that the connected devices are not too far from the access point.
These are the most common difficulties that users encounter.
There may be several main reasons:
- Incorrect operation of the operating system, possibly being damaged by malicious components.
- The Firewall system blocks the function.
If a third-party application that changes configurations or a malicious component is installed in the gadget, then solving the problem will be somewhat more difficult. It is recommended to install an antivirus and scan your smartphone; if viruses are detected, they must be removed. As for malicious applications, those that somehow affect traffic need to be removed and the performance of the remote access point monitored.
By following all the instructions described above, even an inexperienced user of modern gadgets will be able to create a remote access point to distribute Wi-Fi.
Possible problems and their solutions
“I can’t set up Wi-Fi on my phone,” “connection error,” “nothing can be configured”—readers come to us with these and many other questions. Typically, these problems are not difficult to deal with.
- Connection errors most often occur when the password or network name is entered incorrectly. It’s worth double-checking the spelling, and you can also try changing the WiFi password.
- Another category of difficulties arises when a user tries to connect to a public network in cafes, parks, shopping centers, etc. The law requires mandatory identification and there are problems with this: SMS confirmation does not arrive, one-time password is not accepted, etc. There is only one solution - repeat attempts until you succeed in connecting.
- Well, the last common difficulty is that the user does not know the manual parameters (DNS, gateway, etc.) that are needed. You can contact your provider's technical support - specialists will tell you how to set up your phone. But this solution is only for the home Internet, since in public and corporate networks all information is kept by the administrator - and you need to contact him.
As you can see from the instructions, debugging the WiFi Internet configuration on your phone is not too difficult; sometimes manual debugging may be required, but this task is quite doable.
Sources
- https://android-example.ru/useful-articles/kak-prevratit-telefon-android-v-mobilnuyu-tochku-dostupa-wi-fi/
- https://club.dns-shop.ru/blog/t-78-smartfonyi/28175-kak-razdat-wi-fi-so-smartfona/
- https://nastroyvse.ru/net/vayfay/tochka-dostupa-wi-fi-na-telefone.html
- https://pomogaemkompu.temaretik.com/1635606166683257202/kak-nastroit-vaj-faj-wi-fi-na-telefone-poshagovaya-instruktsiya-2019/
- https://besprovodnik.ru/kak-nastroit-wifi-na-telefone/
- https://tarifkin.ru/mobilnye-sovety/kak-vklyuchit-vaj-faj-na-telefone