Hello. If the clutter and lack of internal memory on your smartphone is stopping you from working, then read on: in this article you will learn how to clear the internal memory of your Android phone.
It doesn't matter if your Android phone has expandable storage via microSD card - you will fill up all the free space, be it 32GB or 128GB. Use a few simple methods and free up not only the internal memory, but also the occupied space on your device’s microSD.
Android. Not enough free memory: Video
Cleaning via Explorer
The first way is through a special conductor on the device itself. It is called differently in different gadgets. To clean, you need to go to this utility, select one of the categories, click on the pencil icon at the very top and select the files that need to be deleted, then click the button with the image of a trash can at the bottom. As a result, the file will be deleted. In cases where the necessary programs were demolished (however, this is only possible if you have Root access), it will be possible to restore them.
When is a complete cleaning needed?
Before looking for the answer to the question of how to delete all data from an Android phone yourself, you need to understand the reasons for this action. Global cleanup is necessary in the following situations:
- there was a need to simply clear the internal memory. This is a cache memory that stores all system elements activated while using mobile phone applications, as well as when searching for information in the browser;
- the user needs to remove all passwords, addresses and other data that were saved while using the mobile device. The data will not be deleted on its own. It can become a problem if someone gains access to the cell phone;
Forced memory clearing
- You need to clear your cookies. These are files activated while searching for information in the browser, as well as due to the use of applications that work only on the Internet;
- it is required to remove all information from the phone before selling it;
- the owner may have forgotten the password for the mobile device and therefore cannot use it. Often, to save money, you simply have to reset the entire system to factory settings.
Note! Smartphone applications remember not only passwords, but also bank card data. If the phone falls into the hands of fraudsters, they will easily use the money.
How to get ROOT rights: Video
Cleaning with Clean Master
The second way to clean it is to use a special utility - Clean Master - one of the most rated programs, which significantly speeds up the system. It is located on Google Play at . Working with the utility is very simple. You need to download and run it. A window will open in front of the user, where two circles with numbers will be displayed. The first is large - system memory, the second is RAM. When you click on the first circle, a scan will begin, which after a few seconds will show what exactly can be freed.
Next, a table will appear where you can select files that can be compressed or deleted and that are not critical for the operation of the platform. Clicking on the “Save” button will clear it.
The easiest ways to free up memory
In about half of the cases, users need to free up RAM. This is usually required in order to have the resources to run a game with very heavy graphics - for example, some kind of 3D shooter with a first-person view.
The easiest way to free up RAM is to close all currently open applications. This is done by pressing the corresponding system key and “swiping” the thumbnails of running programs.
You can also use third-party utilities for this purpose. For example, CCleaner or something similar. Some such programs can close applications automatically, every hour or some other period of time. Modern Samsung smartphones have an analogue of this utility, called Smart Manager . It can be used to clear both RAM and permanent memory.
If you have problems with storage on Android
Sometimes situations arise when memory on Android is lost, although nothing was installed. One option is a virus. A possible solution to this problem is to thoroughly scan the system for malware. After this, it will become clear whether there is a threat. In another case, already installed programs are updated and begin to take up more space. This article explains in detail how to check Android for viruses.
Storage setup
The last thing I would like to mention in the article is how to configure memory on Android. Each utility has the ability to be transferred beyond the card. To do this, go to “Settings”, then click on the icon with the image of the program and click on the “Transfer to card” button. This only works in cases where the program is not a system one and a card is installed in the gadget.
How to clear system memory on Android
Lack of free space in system memory is a common problem for Android devices. This problem is especially relevant for users of budget devices. After all, such devices only have a few gigabytes of memory available.
If you also encounter a similar problem, then this article should help you. Now we will talk about how to clear system memory on Android.
Step No. 1. Remove unnecessary applications.
If you are faced with the need to clear system memory on Android, then the first thing you need to do is remove unnecessary applications. This is quite easy to do. To get started, open your Android settings and go to the “Applications” or “Application Manager” section.
This settings section will display a list of all applications installed on your Android device. If you carefully study this list, you will probably find quite a few applications that you never use. By clicking on an unnecessary application, you will open a window called “Application Information”. To remove an application, simply click on the “Delete” button.
Step No. 2. Transfer applications to the memory card.
If your Android device is equipped with a memory card, then you can transfer applications to it and thus clear the system memory. Transferring applications to a memory card is almost the same as deleting them. Open Settings and go to the list of installed applications. After that, open the application that you want to transfer to the memory card, and click on the “To SD memory card” button
After clicking this button, Android will automatically transfer all application files from the system memory to the SD memory card.
The only limitation of this method is that not all applications can be transferred to a memory card. If the application is not transferred, the “To SD memory card” button will not be active and you will not be able to use this function.
Step No. 3. Deleting unnecessary files.
In order to clear system memory to the maximum, you must examine the files that are stored on your device. Very often, a large number of unnecessary files accumulate in folders such as Bluetooth, Documents, Movies, Music, Download, Pictures and Sounds. There is especially a lot of garbage in the Download folder, into which files are downloaded from the Internet. If you often use Bluetooth to transfer files, then the corresponding folder will also be filled with a lot of old files.
Download the file manager application and use it to inspect the files in the system memory. For example, you can use the File Manager (Explorer) application.
Step #4: Use the SD maid app.
The SD maid application is designed specifically for removing junk files from an Android device. Despite its name, SD maid can clean not only the SD memory card, but also the system memory. To clear system memory using this application, launch it and go to the “System” section.
In the “System” section, click on the “Update” button.
After the system analyzes the system memory of your Android device, click on the “Delete” button.
After this, the SD maid program will ask for confirmation and, if received, will begin cleaning the system memory on your device.
See also:
- How to clear RAM on Android
- There is not enough memory space on your Android device. How to fix?
- How to clear phone memory on Android
The principle of operation of such programs
- After you have launched the application, you need to tap on the “Analysis” button;
- The program will begin scanning the drive and will indicate in a message which programs are best to remove;
- To start cleaning your phone, just click one button.
Attention! Before starting the installation, it is advisable to additionally review which elements the application will delete. If you do not have experience with such programs for cleaning the drive, you need to make a copy of important elements to another storage medium in advance.
Advantages of this method
- An application like this makes it possible to clean elements in a couple of touches;
- Such programs have a method of carefully searching for items, application clones, unoccupied folders that you do not need;
- Excellent for searching for files that you either don’t use or use them quite rarely.
The main disadvantages of the method
- You need to preview the installed elements;
- Some of the program's features work only in the version of the application for which you need to pay;
- If you decide to freeze or delete some of the system files, you need root rights.
Offload memory using cloud storage
Google Photos and Yandex Drive are ready to come to your aid and save all your photos from being deleted. These two apps will copy all your photos and back them up to their cloud storage. Moreover, they provide complete unlimited! That is, you can connect regular backups for any volume of your photos, while these files will not take up disk space and you will not have to pay for them. You can also choose when to download: only when connected to the Internet via Wi-Fi or any type of connection.
Now you can unload your phone from gigabytes of photos by transferring them to the cloud. In addition, they will always be available to you when connected to the Internet. But there is one drawback - if you also enable saving video files, then the virtual disk space will already be consumed, which means that very soon you will have to pay to expand it.
To enable backup for Google Photos:
- Download the application and log in using your Google account.
- On the main screen of the application, click on your avatar in the upper right corner and select “Settings”.
- Here you need to activate the “Startup and Sync” option.
To auto-upload photos to Yandex Disk :
- Download the application and register using your data in Yandex Passport.
- The system itself will prompt you to automatically upload your photos. If this does not happen, then click on your avatar in the upper left corner, and then open “Settings”.
- Choose the optimal backup conditions for you.
Now you can safely delete media files from your device.
Clearing hidden files
Some applications, for example, VKontakte or Telegram, can create their own folders on the phone to store downloaded files. Other apps download their pictures to your phone to speed up the reloading of their interface (for example, Viber stores photos of users you've chatted with). Even native photo storage applications can create thumbnails of them and take up disk space. However, this multimedia data will not be visible in the Gallery.
Therefore, to delete them we go to the My Files . There you will additionally need to open the “ Device Memory ” section. Now check all application folders for hidden files. This way you can manually get rid of unnecessary files and clean up your phone’s memory.
Conclusion
During operation, the internal memory is filled with personal information and temporary files. A lack of free space leads to restrictions on saving new data, and some familiar functions become unavailable. Therefore, we recommend cleaning your device’s memory on time and maintaining the storage in optimal condition.
Tell us in the comments which cleaning method helped you. Share the article via social networking buttons so that your friends and acquaintances also know how to clear memory on Android.
Was the article useful to you?
Rate it and support the project!
( 5 ratings, average: 4.40 out of 5)
Lack of memory is a common problem for smartphone users. It is not enough to install applications, download large files, save photos and videos. There are several ways to clear your phone's memory on Android. It all depends on what to clean – RAM or ROM. Let's try to understand the types of memory and how to clean it.
Method for manually clearing smartphone memory
Most suitable for experienced people who are familiar with the Android file system.
The manual cleaning method is one of the best and safest options for removing excess elements. This process takes a lot of time because you need to check the attachments of each folder separately. Experience with the Android file system is required, and you need to know what an individual file is responsible for. If you have such skills, then the possibility that you will accidentally delete an important file is reduced when compared with automatic cleaning.
To use manual cleanup, we need a "file manager". Also, it would not hurt if it had the “Occupied Space Analysis” function. In this case, you can use the same Solid Explorer.
How should you work with such a program?
- Install "File Manager". We decided to install Solid Explorer;
- Go to settings, then files and activate the display of “hidden files”;
- We begin memory analysis to find voluminous folders;
- We find and remove elements that we do not need.
Advantages of the method
- There is a small chance that you will accidentally delete an important element;
- Thorough analysis and removal of unnecessary data;
- Small requirements for programs - only a file manager is needed.
The main disadvantages of the method
This method takes a long time. In addition, it is quite monotonous.
How to view memory usage statistics
Before taking specific actions, it is recommended to assess the state of free memory on your phone. To do this, you need to go to settings, open the “Storage” section. This tab displays complete information about the load on the permanent memory on the device. On the top panel you can see how much memory out of the total amount is free at the moment. Below in the menu there are categories in the following sections:
- Applications and their data;
- Images and videos;
- Audio (music, ringtones);
- Cache data;
- Other files;
- System memory.
Under each name there will be an exact workload figure. To obtain more detailed information, you can go to any section, view: what was installed and when, what size it occupies.
Clearing memory using third-party applications
Suitable for people who are familiar with installing programs on Android.
Programs from various companies make it possible to conduct a more detailed assessment and more thoroughly clean up your memory. For example, the SD Mail program does an excellent job of clearing the cache in a similar way to the previous one. Download from Google Play.
In addition, the program does an excellent job of searching for duplicate elements. The application gives the user a choice. Carry out cleaning manually or automatically. Due to this, a person is given the opportunity to remove a larger number of elements in one period. Some of these applications analyze the application time of programs. The program advises removing those that are little used by the user or not used at all.
If the user has Root rights, he can delete, including system applications. Or, they can be frozen. In addition, some games can be transferred to a flash drive. This is especially useful when the game takes up a lot of space.
We optimize the internal space of the smartphone
Useful for all users as an auxiliary method for increasing hard disk space.
- It is necessary to replace some programs with their lightweight counterpart;
- We delete games that we do not play and programs that we do not use;
- If, due to physical parameters, your smartphone does not have a slot for a flash card or you occupied the second slot for a SIM card, then you need to use cloud storage and upload files there automatically;
- It is necessary to use an external drive to store maps, music, photos;
- You need to specify in the browser the folder where you want to save files on the external drive;
- If you have Root rights, you need to transfer massive games to a flash drive. If you don’t have such rights, and you don’t really like to play, then you need to keep additional elements on a flash card. Before you start playing, the necessary information folder must be copied to the appropriate section of the disk. When you're done playing, the folder should be deleted;
- You need to combine the internal drive with a flash drive when the phone’s memory is quite small;
- You need to check your OS with an antivirus.
Reset settings to factory defaults
This is already a last resort. But, if there is no other way out, you can use it.
This is the most extreme method to clean Android. When you perform such a reset, all information from the hard drive will be deleted. Including most malware. This action will allow you to return all installed programs and OS settings to their original state. Once you have completed this cleanup, you will need to configure the OS again.
Also, those changes that you made using Root rights will be returned to their original state. You can read how to restore factory settings here.
Hard reset your phone
How to check your phone for wiretapping on Android - learn about surveillance
If there is no need to save data, do a hard data reset. To do this, use one of the methods, which depends on the software version.
Hard reset for old versions of android
Old versions of Android can be completely cleaned by restoring them to factory settings. This will help in improving the performance of the entire device. To implement your plan, you must perform the following sequence of actions:
- Fully charge the device and turn it off.
- Next, you need to press a specific key combination on your phone to enter reset mode. For most devices, this is pressing the volume up and power keys simultaneously. In some gadget models, you need to press the volume down key and the power button, as well as all three buttons available on the smartphone.
- Wait for system information to appear. An inscription should appear on the dark screen.
- Use the volume down key to go down to “Wipe Data / Factory Reset” and confirm the action by pressing the power button.
- Agree by pressing confirmation with the same key in the next action.
The system will open the hard reset option, begin the operation and automatically reboot the phone as soon as possible.
Factory reset older versions of Android
Hard reset on Android 8 and later
Modern smartphones can also be returned to factory settings if you follow all the manufacturer's recommendations. There are instructions for this:
- Go to the “Settings” folder, select the “System” subsection.
- Next, open “Reset settings”.
- Here are several options for resetting data on your smartphone. If a hard wipe is required, select the “Delete all data” option.
Reset settings on Android from version 8 and higher
The selected action is confirmed. The owner only needs to wait until all data is deleted and the phone automatically reboots the system. Upon completion, you need to turn on the smartphone and use it for its intended purpose or sell it.
Note! A hard reset to factory settings is not recommended every time you encounter problems with your Android. The presented operation is resorted to only if all the actions carried out earlier did not give the desired result.
A hard reset can cause a system failure, which will require you to contact a specialist to ensure normal operation of your mobile device. They will flash the system, but it will be expensive.
Clearing the application cache
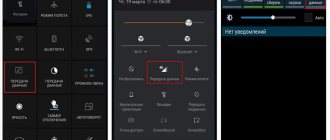
To make the interface of frequently used pages load faster, applications store their image. But if you need to free up memory from such cached files, then go to “ Settings ” (swipe down from the top edge of the screen and click on the gear icon). Then open the Applications . Now open frequently used applications one by one to delete the cache.
Depending on the Android version, the interface of the application information window will change.
In earlier models, for example, running Android 5 , in the “Applications” section you will need to open the “ Application Manager ” subsection and from the list that appears on the “Downloaded” tab, select the applications that need to be cleaned one by one. In the window that opens with information about the program, there will also be an information block with data on memory usage, and there will also be two cleaning options: “ Clear data ” and “ Clear cache ”. The first option is responsible for user data and your personal application settings. If you delete them, you will have to register again. In the application. The second option will clear the current cache and will not change the settings.
If you do not need to delete data, but want to clear the entire cache at once, then go to the “ Settings ” section in the “ Memory ” section. The Cached Data item will appear on the screen . By clicking on it, the system will prompt you to delete unnecessary files from the device.
In Android 11, you will need to scroll down to the Usage block and click on the Memory . In the window that opens, you will also have 2 options for cleaning the application: “ Clear data ” and “ Clear cache ”.
If you want to delete only the cache and not touch the settings, then doing this for all applications at once, as this happened in previous versions of Android, will not work. The developers decided to give this part of memory management to full automation.