MTS is a telecommunications company that offers mobile and fixed-line communication services, home and mobile Internet, as well as satellite TV service.
Let's figure out how to set up satellite TV from MTS. If you do not want to call an installation specialist at home, you will have to install MTS TV yourself. Therefore, before purchasing equipment, you should familiarize yourself with all stages of installation and configuration.
What is satellite TV from MTS
The operating principle of any satellite television is as follows: a station from a television center transmits a signal to a satellite. The satellite, in turn, transmits the signal back to Earth through transmitters called transponders. These signals are received by users' individual satellite dishes. And the received signal is converted using special set-top boxes and transmitted to the TV.
MTS, along with other operators, also offers the MTS TV satellite television service.
Advantages of the service:
- Wide coverage area;
- A large number of channels with very high picture and sound quality;
- The ability to install the antenna anywhere, even far from populated areas;
- Affordable cost of service.
Coverage map
Before connecting to the service, you should familiarize yourself with the coverage map. This information is available on the company’s official website at the link: https://moskva.mts.ru/personal/podderzhka/sputnikovoe-tv/ya-uzhe-vash-klient/nastroyki/samostoyatelnaya-nastroyka-oborudovaniya/. Here you can also find detailed instructions on installing and configuring the antenna.
On the page you can see the map as a whole. Or you can enter a specific address. The better the reception, the darker the area is painted. In areas with less coverage, it is recommended to install a larger diameter plate. You can submit a connection request on the company’s online portal using the following links: https://moskva.mts.ru/personal/dlya-doma/checkconnect/moskva/sputnikovoe-tv or https://sputnik.mts.ru/ #.
Now you can go directly to how to install the equipment.
Necessary equipment
To connect satellite TV you will need the following equipment:
- Antenna with a diameter of 0.6 or 0.9 m (this option is for weaker reception);
- MTS TV set-top box or CAM module (depending on the TV model);
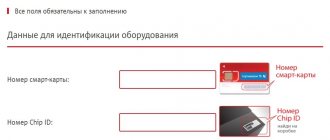
- Smart card;
- Converter is a device that is mounted on the antenna feed and receives a signal from the transponder;
- TV or coaxial cable RG-6.
If your TV is equipped with a DVB-S2 receiver with a built-in CI/CI+ connector, then there is no need to install a set-top box. To do this, you need to use a CAM module, which will decode the signal and coordinate it with the television device.
A smart card is a plastic card with a built-in chip with an individual subscriber number. It is inserted into the set-top box (receiver) or CAM module.
Now you can call the contact center toll-free number 8 800 250 0890 (or 0877 - short number for mobile phones) and call a wizard who will perform the complete setup. Or start setting up the system on your own.
Selection of components
There are three types of equipment from MTS TV:
- Interactive console. To unlock the maximum potential of the set-top box, a 3G MTC signal is required. This television has a large number of functions.
- Linear HD set-top box. It is characterized as multifunctional equipment. Comparable to a lot of TVs.
- CAM module. The device is suitable for TVs equipped with a DVB-S tuner. Based on this, we draw conclusions: before purchasing a CAM module, you need to be sure that there is a built-in tuner. Since even new TV models are released without a tuner.
To set up satellite MTS TV, you will need:
- Tools.
- F-connectors in the amount of 2 pieces.
- Bracket to secure the antenna.
- Directly the CAM module with a smart or SIM card. Also a prefix, if the choice is on it.
- Antenna.
- Coaxial cable.
- Converter.
As an additional set, the following may be useful: a divider and a plug. The first is needed when connecting two TVs; its operating range is considered to be from 950 to 2150 MHz.
Antenna installation
Installation and configuration of satellite broadcasting begins with the installation and configuration of the antenna.
To begin, select the location for connecting the plate. The imaginary line from the antenna to the satellite should not be blocked by obstacles: buildings, trees, etc.
The antenna should not be installed in attics, balconies or other enclosed spaces.
The plate itself must be assembled according to the instructions supplied with the plate. The bracket is attached to the wall with elements that will be reliable for the specific wall material and also correspond to the strength of the wind.
When you entered the coverage area on the website, you would see a green line by placing a dot on the map. This line shows the direction to the satellite and the corresponding azimuth (the angle between the north direction and the satellite).
It is recommended to download the Protractor and SatFinder phone application, which can be used to set the antenna direction. You will need to select the ABS 2-75 E satellite.
You will also need a compass to determine north. You need to stand with your back to the place where the dish is connected, find the north and set aside the azimuth, which is shown in the application or on the website. Now you know where the antenna should be pointed.
A holder is attached to the antenna, and the converter is inserted into it, with the connector facing down (to prevent precipitation from getting inside). Now you can attach the antenna to the bracket on the wall. But it needs to be secured in such a way that it can be turned with effort. After final adjustment, complete immobilization will be required.
After this, you need to prepare the cable by connecting the F-connector to both ends.
The cable is inserted into the converter connector and attached to the holder using, for example, electrical tape. The second end of the cable will connect to the set-top box or TV if a CAM module is used.
Now, in order to receive satellite TV from MTS, you still need to configure the dish.
To configure the MTS satellite antenna, perform the following steps:
- The smart card must be inserted into the receiver or CAM module;
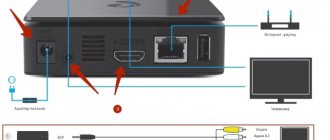
- Connect the set-top box with an HDMI cable to the TV;
- Turn on the TV and set the reception mode from the output to which the receiver is connected;
- Turn on the set-top box. Find the antenna setup menu (may have a different name depending on the model);
- A scale of the signal level coming from the dish will appear;
- Now you need to adjust the antenna position. To do this, it is moved left, right, down or up in steps of about 1 cm. After each movement, you need to wait a few seconds for the signal change to be displayed;
- Having reached the best scale value (it should be at least 70%), you can finally fix the antenna.
It is much more convenient to manipulate the antenna settings with two people. It is also best to perform installation in clear, windless weather.
How to connect correctly
As soon as you determine the installation location of the satellite dish, you should begin its installation:
- Take a drill or hammer drill and create holes in the outside wall, attaching a bracket support to which the antenna will be mounted. The supports must fit firmly and keep the plate stationary even in strong gusts of wind.
- Do not neglect the instructions for the satellite dish. Use it to assemble the bracket, mirror (plate) and support rod. The instructions also indicate the necessary bolts for the fastenings. See which bolt to use for which mount.
- Place the assembled structure on a support. Position the dish at the angles shown to you by SatFinder or the MTS map. Focus on the indicators: converter position - 26°, antenna tilt -6°, satellite direction degree 134°.
- Place the converter in the rod with its face facing the plate, then rotate it to the desired angle indicated by the card or program.
- Connect the antenna cable and the F-connector so that it fits tightly to the braid.
- Connect the converter to the cable and insulate the connection. You can use sealant or regular electrical tape. To prevent the cable from hanging down, it can be secured to the rod using the same electrical tape.
- Route the cable into the room and connect it to the receiver. In this case, the receiver must be turned off from the 220V network.
Useful: How to connect and configure satellite TV
Installation and configuration of MTS satellite TV
After completing the most labor-intensive stage, you need to start setting up MTS satellite TV.
Let's look at the main nuances of how to set up MTS satellite TV yourself.
To connect to the service you need to perform activation. Activation is necessary to link the equipment to the subscriber’s contract and to understand which service package is available to the client. Until MTS receives the original signed agreement, the user can only view it in test mode.
Options for activating the receiver, CAM module or for an interactive set-top box without connection (3G):
- Call the company's call center;
- If you are an MTS communication subscriber, send a message to 9909, in which you need to indicate the smart card number and, separated by a space, the ID of the receiver or CAM module;
- From any other number to +7985-00-00-890 with the same message text;
- On the website at https://lk.ug.mts.ru/#/satellite testview.
If the equipment was purchased at retail outlets, you must first log in using the link https://lk.ug.mts.ru/#/satellite and then perform activation. If the purchase was made from an MTS dealer, then he performed the activation
Activation of an interactive set-top box with 3G occurs through the set-top box menu after turning it on for the first time. For interactive receivers, for authorization you need to write an application to enter your data into the database at MTS customer service points.
Now you need to figure out how to install or configure channels on your TV. After activation and authorization during the initial connection, a “Settings Wizard” will appear, which will help you with the setup using prompts. Its appearance will differ depending on where the smart card is inserted. The channels should tune in automatically.
For interactive TV:
- After connecting the receiver, it may take a few minutes to activate;
- A window will appear where you can create a user profile, select an access level, change the password (default 0000);
- Next, the channels are scanned.
For console:
- In the initial installation menu, you can select a language, configure the satellite and transponder;
- Then perform a search using the navigation buttons;
- After the search is completed, the first channel in the found list will begin broadcasting.
For CAM module:
- After turning on the TV, information about the presence of a CAM module should appear;
- In satellite signal reception mode, you will need to configure the satellite: select polarization, modulation, speed, etc. The parameters must be specified in the instructions.
System Setup
It is quite possible to set up MTS television yourself. This stage should be started only after the installation of the dish itself has been completed and its direction towards the satellite has been checked. Before you start setting up your television equipment, you should connect the set-top box to the TV using a special cable and a separate plug. If there is a cam module included, it should be installed directly into the TV.
If all steps to install the device were completed correctly, the equipment will be configured automatically. The user only needs to perform the following actions:
- install the SIM card into the appropriate slot of the set-top box;
- start the 3G signal analysis process, wait for this process to complete;
- authorize the equipment, while viewing channels must be allowed within 5 days (before the end of this period, all required documents must be provided to the operator);
- create a user profile, set age restrictions if necessary;
- configure the channels; after completing the search procedure, a list of them should appear on the screen.
We advise you to study How to test a resistor with a multimeter
Setup process
Important! To figure out how to install the MTS satellite dish yourself and how to set up stable signal reception, it is recommended to use the instructions. If you have any questions, you should contact a specialist who can always suggest ways to improve signal quality and answer other questions
Authorization is carried out in two ways: via SMS or calling the operator.
So, independent installation and configuration of MTS TV is quite possible. You can find out how to install the device from the manufacturer's instructions or by watching various videos on the Internet. They clearly demonstrate the process of assembling the elements of the device, the order of their connection to each other and connection to the system. One of the most difficult procedures is the installation of the satellite mirror itself. To ensure a stable signal, it has to be rotated frequently. This requires an assistant who will change the position of the “plate” while the user evaluates the quality of the image on the TV screen. If any difficulties arise, you should immediately contact the service center. This will avoid serious equipment breakdowns and situations that will void the warranty.
Frequent connection problems
When setting up an MTS satellite dish yourself, some problems may arise.
- For example, the “No Signal” error may appear if the connection of cables and other components is poor, as well as bad weather conditions, under which there will be no signal. Another reason is technical work on the operator’s side.
- "No channels." The smart card may have been inserted incorrectly or the subscription to the service package has expired.
- An error with code E is displayed. The list of symbols can be found on the company’s website or by calling the hotline number. If a different letter is displayed, there may be a problem with the TV.
- Video and audio mismatch. A factory reset may help.
- Not all channels were found. The list needs to be updated.
As you can see, the process of installing equipment for connecting satellite TV is quite labor-intensive, but if you follow the instructions and safety precautions, it is quite possible to cope with this task yourself and without calling a specialist.
FAQ
Perhaps you still have some misunderstandings about certain things. Let's look at the 3 most common questions.
How to connect an MTS router to a computer
There is nothing complicated here. We will need:
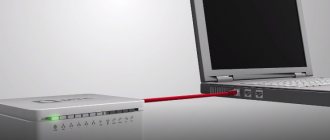
- The computer itself, which has a working Ethernet port or at least has a network card.
- A router with free connectors for expanding the network, distributing or transmitting the Internet via a network cable.
- A network cable that you can buy in a store, or perhaps it will already come with the router.
We connect the network cable to one of the additional ports of the router, as well as to the PC itself. Next, we simply look at the connected networks in the computer control panel; the router should be in them.
How to change the password on an MTS router
Everything is just as simple here. All you need is the password and login of the router itself. If they have not been changed before, then they will be the simple word admin.
Next, in the browser, enter 192.168.1.1 as a link; in the page that opens, you need to enter the same login and password. We find the settings, there will be a WLAN item there. Then simply enter a new password, remembering to select “WPA/WPA2-PSK” as protection.
Ready! The password has been changed and can be checked on any device.