Wi-Fi communication is widespread and actively used all over the world, as it makes it possible to quickly and wirelessly connect to the Internet. There are some things everyone should be familiar with when setting up a wireless connection. In this article, we will look at how to find out the wireless network security key on a laptop, as well as how to change the wireless network password.
Figure 1. Detailed guide on how to find out the password for a Wi-Fi wireless network
Security basics
Let's figure out why to put the code on the router?
- Everything is very simple; firstly, your personal information will be inaccessible to hackers and other curious individuals.
- Secondly, you can safely store personal information or other secret documentation..
- Thirdly, by installing a dongle on your wi-fi network, you will save a fair amount of traffic.
- Password on a yota router is one of the main tasks that a subscriber must solve.
Vulnerabilities
On November 6, 2008, at the PacSec conference, a method was presented that allows you to crack the TKIP key used in WPA in 12-15 minutes. This method allows you to read the data transmitted from the access point to the client machine, as well as transmit fake information to the client machine. The data transmitted from the client to the router has not yet been read. Another condition for a successful attack was to enable QoS on the router.
In 2009, employees of Hiroshima University and Kobe University Toshihiru Oigashi and Masakata Moriya developed and successfully implemented a new attack method that allows hacking any WPA connection without restrictions, and, in the best case, the hacking time is 1 minute.
WPA connections, which use the more secure AES key encryption standard, as well as WPA2 connections, are not susceptible to these attacks.
How to set a login password in windows 10
On July 23, 2010, information was published about the Hole196 vulnerability in the WPA2 protocol. By exploiting this vulnerability, an authenticated user on the network can decrypt the data of other users using their private key. No key hacking or brute force required.
However, until 2021, the main methods for cracking WPA2 PSK were dictionary attack and brute force. To do this, in the wireless card monitoring mode, the airwaves are scanned and the necessary packets are recorded. Next, the client is deauthorized to capture the initial exchange of packets - “handshake”, or you need to wait until the client makes a connection. After this, there is no longer any need to be close to the attacked access point. The attack is carried out offline using a special program and a file with a handshake.
In October 2021, a key reinstallation attack on WPA2, called KRACK, was published, which allows you to reset the nonce, when using AES-CCMP, to reproduce previously sent packets and decrypt them, when using WPA TKIP and GCMP modes, to decrypt and inject packets into the connection.
Why put a key on the router?
We won’t scare you with stories that you can get secret photos from last year’s vacation through the Internet. Although, if there are craftsmen, they will bypass passwords for this purpose. The latter is necessary for much more banal things, for example, so that no one else uses your network. Indeed, in this case, the data transfer speed is significantly reduced.
Imagine, someone “leftist” connects to your WiFi and starts downloading a 150 GB file. If you are watching a video at this moment or also trying to download something, the speed will be very low. Even worse, if your traffic is not unlimited, yes, why?
There is a more serious reason. People who connect to your WiFi will access the network from your same IP address. If they commit illegal manipulations, the police will come to you. Of course, they will figure out that it was not your computer that was used, but you will definitely have time to get nervous. That is why every person should know how to set and how to change the password on the Eta router.
Protecting your wireless network on your router
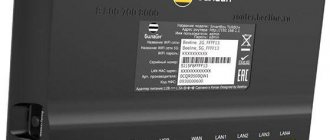
A router is a device that receives a signal from the network and transmits it to home gadgets. Yota has standard routers that connect to the Internet via cable or modem. And there are those that work from a SIM card (mobile routers). Recommendations apply to all devices.
Watch the video review of the mobile router here:
To change the Wi-Fi password on the Yota router, we need to get into its control panel. Everything is the same as with other routers:
- In the address bar we write the IP of the device. For Yota, this is an unusual address for us: 10.0.0.1, 192.168.0.0 or 172.16.0.0.
- In the authorization window, enter the familiar admin/admin in both windows.
- We look for the section with access point settings (Wi-Fi), then go to the wireless network protection tab. There we change the network key, and, if desired, the SSID (network name).
Since we started with the Yota router, let's protect its web interface as well. To change the password for the administrative panel, proceed as follows:
Network key for Wi-Fi on modems
I will tell you how to change the Wi-Fi password on Yota using the example of a 4G LTE modem. We do the following:
- We connect the device to the USB port.
- When the computer finds the wireless network (it will be open and not password-protected), go to any browser and type the address 10.0.0.1 or status.yota.ru in the address bar.
- Click Device Settings. A working panel will open where you can set the network name and change the Wi-Fi password.
- During initial setup, the access point will be open. We need to change the security type to WPA
- In the “Password” line, write the security key. Be sure to copy it onto a piece of paper so you don’t forget!
- It is also recommended in the line "Automatically turn off Wi-Fi" o.
- Check if Wi-Fi is activated. ABOUT.
After saving the settings, you can use the Internet and connect home devices and gadgets. Don't forget that you need to use a new network key to connect!
Here is a simple video instruction:
Instructions for popular router models
By connection type, routers are divided into:
- Ethernet routers connecting to the Internet via twisted pair.
- ADSL routers connecting to a telephone line.
- Routers for 3G and 4G modems.
Companies that produce routers for the home:
- Asus, D-link - the most common routers, inexpensive and easy to set up.
- ZyXEL are reliable routers with a wide range of functions, there are Russified firmware.
- TrendNet, TP-Link, Huawey are inexpensive and easy-to-use routers with a standard set of functions.
- Ubilitu nano, Mikro Tik - new, modern inexpensive Wi-Fi access points.
- Apple – WiFi routers for Apple devices.
- Cisco, 3Com, Acorp, Negear, Linksys also produce network equipment.
How to set a password for a Wi-Fi modem Iota 4g
And so let’s look at how to install a dongle on Wi-Fi 4G.
Instructions for installing an Internet access key via a Wi-Fi network:
- Turn on the device.
- Let's go to the browser.
- In the search bar, enter the address of the official Yota website (yota.ru).
- Let's go to your personal account.
- Go to the device settings.
- The wi-fi setup window opens.
- In the empty fields, enter the name of the access point, select the type of protection, and set the key.
- Click the save option.
- We exit the browser and try to establish a connection to the Yota wi-fi network.
The network should ask for a password when connecting, which means you did everything correctly and the key is installed on your wi-fi network. Secure access is activated.
How to change the Wi-Fi password on a modem
I hope that we have figured out the priority of installing a reliable key on the yota modem and now let’s study the detailed instructions. This can be done in just a few seconds. To change the wi-fi yota password on the modem you need to log into the interface. During a new installation, the interface window with settings pops up automatically. Since all drivers yota will be installed without your participation, you just have to wait a little. If this does not happen, enter https://10.0.0.1 in the address bar. Next, you will be asked to change or leave the default password for the yota wi-fi router.
How to change your wireless network password and make it strong
Finding out or selecting a code from a computer, smartphone or tablet is absolutely easy and will take no more than 5-10 minutes. It is precisely because of the ease of hacking Wi-Fi that you should take setting a password seriously. You can also replace an existing one to make it easier to remember and enter later. Using the following diagram, you will learn how to change the network security key on Rostelecom routers and select the most reliable combination of characters.
On a computer or laptop
- To carry out this operation on a PC, you need to go back to the router settings through a browser by entering the IP address in the address bar;
- Go to the “Wireless” tab in the “Wireless Security” section and look for the “PSK Password” window, opposite which the existing code will be displayed. Code editing is carried out directly in this window, so it is enough to enter a new or edit an existing code. In order for the data to be saved, you must click on the “Save” button.
On a smartphone or tablet
- In order to change the wireless network password on Android, just go to the browser (“Opera mobile”, “Chrome mobile” and any other). All operations that need to be performed are identical to the code change scheme in the Windows OS.
What parameters must be observed to correctly change an insecure wireless network password?
- Length is one of the most important factors. For example, cracking a code of 8 characters or more will take approximately 11 months through standard programs;
- Complexity - it is recommended to combine letters of different registers (“d”, “D”) and numbers (from 1 to 10), however, it is better to avoid spaces (“ ”, dashes “_”) and complex symbols (“&”, “ $" "#"), since they are at least inconvenient to enter each time from a new device;
- Lack of names, dates, common phrases . Special programs run, first of all, the most frequently occurring combinations.
In this article, we answered the most popular queries on the topic of the network security key - how to find out on a computer and change it.” Viewing and changing your Wi-Fi password is absolutely easy, the main thing is to strictly follow the instructions.
Access with or without password
Any router (router) used to organize wireless access to the Internet can provide access with or without a password. If you password-protect an access point, only those who have the password will be able to connect to it. Everyone else will have to guess it. This approach is often used in hotels where wireless access needs to be organized. Guests receive a password from the establishment administrator.
Cafes and restaurants most often use Wi-Fi networks without a password - such access points are called open. Their danger lies in the fact that data transmitted by some users can be intercepted by attackers. This is how passwords from social networks and bank card details are intercepted.
What network to organize at home and how to configure the router is up to the user to decide. But it is best to have access locked with a password. Setting a Wi-Fi password on Yota is not difficult; to do this, you need to log into the administrative panel and change the password. Now we will tell you how this is done on certain devices.
On Yota Wi-Fi modem
In order to change the password on Yota Wi-Fi, you need to get into the control panel of the modem by connecting it via USB. Login address – status.yota.ru or 10.0.0.1 (it is recommended to use the first option). The next step is to go to the Wi-Fi settings and change the password for the wireless access point. Here you can also select the type of protection, and in one of the fields the name of the wireless AP changes.
You can also change the DHCP range for the Yota modem in the settings (a range of dynamically assigned IP addresses) - do not change anything here if you don’t know what it is and what it is needed for.
If the user has forgotten the password, he needs to reset the modem settings. This is done on the page https://status.yota.ru/advanced by clicking the corresponding button. After this, the device must be configured again. It is impossible to set a password on the modem so that no one can delve into the administrative panel - the device does not have sufficient functionality.
On the Yota Many router
Setting up a Yota 4G LTE router called Yota Many will allow us to get a more secure access point. Here you can password protect not only the AP itself, but also the entrance to the administrative panel. The default login and password is admin, the router IP address is 10.0.0.1. To set up your router, go to Wi-Fi settings and set the access point parameters. Change the SSID if necessary.
We save the settings, disconnect from the router, find the desired AP in the search, and try to connect. If everything was done correctly, in a few seconds the computer will be online. We connect other devices in the same way - smartphones, tablets, multimedia players, smart watches and much more.
It is impossible to find out the password (security key) hidden under the asterisks. To change it, go to the administrative panel and specify a different key.
Security options and encryption types
The wireless network security key is transmitted in a special form. That is why, if the user does not have information about him, he will not be able to connect to the network.
There are 3 types of protection:
- WEP (least reliable for a key; many routers no longer support it).
- WPA (optimal for private users).
- WPA2 (optimal for entire companies, but this type is also recommended for ordinary users).
Encryption is performed using different algorithms:
- TKIP (does not work in 802.11n mode);
- AES (recommended method).
I forgot my password for Wi-Fi Iota, what should I do?
Forgot your password for accessing the Wi-Fi Internet network, do you need to restore access? No problem, now we’ll tell you how to get out of this situation.
The first thing I would like to advise is to train your memory and don’t forget anymore. And don’t rush to immediately reset your router to factory settings. After all, in this case the user forgot the password, and this problem can be solved.
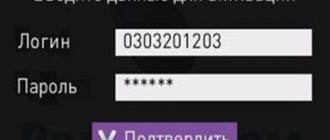
In order to view the key to the wifi network, just do the following steps.
- We point the mouse arrow in the lower right corner on the desktop of the laptop computer to display networks.
- Select your wi-fi network, right-click, go to properties.
- In the window that opens, select Security.
- We see 3 fields in front of us. Security type, encryption type, network security key in which our access password is written.
- We mark the section for displaying entered characters, and our password will be displayed.
- All passwords have been restored, we rewrite them, remember them, and use them.
The second way to view the key for Wi-Fi Internet access is through the official Yota website, link to the site yota.ru, or enter the IP address 10.0.0.1 in the search bar, and also go to your personal account and look at the key for Internet access there.
I forgot my yota wi-fi password: where to find it
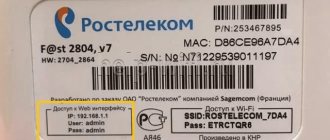
All data on a wireless network device is usually located on stickers on the modem or in the packaging box from it.
Some stores change their access data on their own. Possible login and password options are admin admin 12345 01234. The next step is to go to the protection and security tab in order to save your own encryption key and your network name. You must save and confirm all actions.
How to find out the password from a wi-fi router
It’s very easy to quickly find out a new password for your yota wi-fi router. To do this, you will have to reset the new device to factory settings and set new clearance data.
- First of all, press the reset button on the Yota Wi-Fi router for 15 seconds. We remind you that the reset button can be located both externally and internally.
- When you see that the device’s lights go out and then blink again, it means the device has rebooted.
Another option is to log into the router's management interface https://10.0.0.1. Here you will see a Factory Reset button with a Restore command inside. But the easiest way is if you just bought a WiFi modem or router and did not change the factory settings. To find out the login and password for the network, just look at the device case. All the necessary information will be on a white sticker.
Tip one:
If you are planning to purchase a new router from Yota, do not forget to ask the seller if the Wi-Fi password has been set and where it is written down.
Tip two:
If you forgot to do what is described above and have already arrived home, do not rush to run back to the seller. Usually the password for the Yota Wi-Fi network is located on the back cover of the device. But remember, this is usually done and intermediaries selling Yota products can set their own rules.
Tip three:
Log in to the router control panel and change the settings to new ones. To do this, open your favorite browser and enter IP instead of the address - https://10.0.0.1
You can change the passwords for accessing the router control panel, the password for the Wi-Fi network and set the Encryption Type (WPA 2 recommended)
Tip four:
Don't forget to save all the changes you made to the Yota router. Otherwise, everything will return to the original values. In order for all changes to take effect, you must immediately click the Save . It is located below each action that you change (or at the end of the page).
Tip five:
If suddenly you cannot even get into the control panel of the Yota router, then do not rush to panic. Usually on new routers the Username -admin, Password is -admin
Yota is a federal operator that provides mobile communications and 4G Internet services. Not everyone knows that this company was the first in Russia to launch 4G communications, and subsequently the new LTE data transmission technology. At the beginning of 2021, Yota ranks 3rd in the ranking of cellular operators. At the same time, it bypasses Beeline, MTS, and Megafon.
This was a small lyrical digression, now let's get down to business. Yota modems and routers are very popular. Especially modems, in conditions where it is not possible to provide home Internet. The company offers unlimited Internet for all networks - 2G, 3G, 4G, 4G+, 4G LTE. While other providers set a limit for all networks except 4G. In conditions of such demand, the question is often asked - how to set a password for the Yota Wi-Fi network. This will be discussed below.
How to find out the key using third-party programs
Another way to find out the wireless network security key on a laptop is through special applications. Our instructions will tell you how to enter a wireless network password using other programs.
For Windows OS:
- You can use a special free password search and selection program “WirelessKeyView”. This application operates on the Windows 7, 8, 10 platform with the exception of 8.1, Vista and outdated XP;
- Download and run the program as an administrator (right-click on the file shortcut to run and select this command from the list);
- Immediately after launch, all data about the connections saved on the computer will be displayed: IP, a sixteen-digit code version (but you won’t need it) and the password itself. Copy it and enjoy your Wi-Fi connection.
Note : When working with “WirelessKeyView”, you must disable the antivirus, which recognizes the application as malicious (since it requires access to the root files of the system).
If for some reason it was not possible to install the utility, or the application itself does not display data, there are other free programs such as Netstumbler (version for Vista - Vistumbler), inSSIDer (by the way, this application displays connection intrusion), Technitium, CommView for WiFi and many others.
Figure 6. Appearance of the inSSIDer application interface
For Android OS:
- The Google Play Store (“Google Play Market”, also known as “Play Market”) contains many programs to find out the Android network security key. We recommend using only reliable applications, for example, “WiFi Password”. It is worth noting that all applications for the Android system also require root rights and without them it is impossible to obtain the necessary data;
- Download the “WiFi Password” application , launch it and open the necessary access rights in the window that appears. Immediately after this, a history containing all connections ever made will be displayed;
- Select the required connection from the list and click on the eye icon located next to its name. The code will be displayed.
Another way to obtain an Android network security key is to hack using specialized applications. The use of such methods entails criminal liability. However, this is the only quick option in case you somehow erased all system data. These applications are referred to as “brute force” (also known as “brute force” or brute force method) and work on the principle of selecting variations. Since most of the codes installed by both users and by default are a combination of simple combinations, the program will quickly select the required option and display it on the screen. Among the most effective applications are “Aircrack-ng” for Windows, and “WIBR” for Android.
How to install a key on a Yota router
When you turn it on for the first time, you need to log into the modem interface through the basic login credentials. Usually they are indicated on the back of the router, or on the box that comes with it. The most commonly used login and password is admin/admin.
- Open your browser and type in https://10.0.0.1;
- Enter the basic login and password for the WiFi modem;
- After authorization, go to “Settings” - “Protection”;
- From here you can set any password on the Yota modem, as well as change the network name;
- Done, your WiFi is protected.
If you do not know how to set a password on the Yota router when using it again, proceed in the same way. First authorization, then “Settings”, etc. If you have forgotten your own password, in order to set a new one, you need to perform a factory reset, log in again using the basic login credentials and enter a new key.
The reset button is located on the body of the Yota modem; sometimes it seems to be “recessed” inside. Use a needle and long press until the lights go out and come back on.
We recommend changing your password every 2-3 months, and writing it down in your phone notes or notepad. Remember, your network security is in your hands!
How to come up with a good password on WiFi Yota
Well, now you know how to change the password on the Eta Wi-Fi modem, you can do it at least every day.
Here are some recommendations we can give in this case:
- You should not write your name (name of husband, child, cat, dog) as a secret code. If one of your neighbors wants to borrow your WiFi, these are the first options they will try. It is also advisable not to indicate dates of births, weddings and other events known to a wide range of people.
- Phone number, apartment number, house number, address are also bad ideas.
- A strong password is one that is difficult to guess. For example, you can enter your name, but type it with the keyboard set to the English layout.
- It is advisable to add numbers and punctuation marks to the letters;
- Do not try to change the key to a super complex combination - most likely you will not remember it yourself. Come up with something simple, important to you, and unexpected for others. And dilute the word with a number somewhere in the middle;
- Do not use the same passwords for different resources and accounts.
We’ll wrap it up, now any Yota user can change the WiFi password on their router at any time. True, not everyone understands the importance of this procedure. And yet, remember, only you are responsible for the security of your WiFi, so don’t be lazy and try to change your password at least once every few months.
What should be a good password?
A good password should be strong. To ensure reliability, it must meet the following requirements:
- complexity (the password should not be easy to guess, “qwerty” is very easy to guess and connect to the network). Password complexity can be ensured by the following: using different registers;
- using not only letters, but also numbers and special characters;
- password length is at least 10 characters;
Compliance with the listed reliability requirements ensures the creation of a password, the encrypted data of which will be extremely difficult for another user to guess to connect to your Wi-Fi network.
More information about setting up Wi-Fi security is described in the following video:
Why can’t I go to status.yota.ru?
In your router personal account, you can change settings, restrictions, and identifiers. But sometimes, when you try to access the start page, an error occurs and the screen displays the following message: “Could not access the site” or “Page unavailable.” You can solve the problem in one of the following ways:
- Open another browser and try logging in from it.
- Disable the device. If it is a router, turn off the power with the button; if it is a modem, disconnect it from the computer. Then connect again.
- If the distribution device is turned on via a USB cable, try connecting to it via Wi-Fi.
- Check network settings. For this:
- open “Control Panel”;
- in the “Network and Internet” section, select “Control Center”;
- go to “Change adapter settings”;
- right-click on the connection named Iota and call up the context menu;
- Click on the “Properties” item.
- in the window that opens, go to “TCP/IP Internet Protocol Properties” and see if automatic acquisition of IP and DNS addresses is set. If not, check the appropriate boxes.
What else can be done to protect Wi-Fi
If you use a Wi-Fi network not only to access the Internet from your smartphone or laptop, but also have organized a home network with shared multimedia resources, then one of the security recommendations for you is to create an isolated virtual network segment. Such a network allows any device to connect to Wi-Fi using a guest password, which, unlike the main password, can be made simple and easy to remember. The Guest Network provides only a limited Internet connection, and other elements of the HomeGroup are not available to Guest members.
Another convenient feature of the guest network is the ability to turn it off without turning off the main Wi-Fi access.
By completing all the points listed above, you will secure your own Wi-Fi network as much as possible, and you will not need third-party protection programs for this. However, we note that such programs exist. Basically, they check the Wi-Fi network you are already using for security compliance, and all the check points coincide with those listed above. Based on this, we can make the obvious conclusion that WiFi protection programs do not actually protect you, and at best only offer to use the built-in VPN service. In this regard, we do not recommend using such software without first thoroughly studying the capabilities.
This concludes the next article on our blog. Thanks to it, you learned how to protect your WiFi network, and we believe that you will put this knowledge into practice.
Watch our video where we tell you how to find out your WiFi password:
Simple tips
And finally, here are some tips:
- When buying a router (Yota or any other), ask the seller whether the interface and wireless network are secure. Write down this information. First of all, when you get home, set a password for your Yota modem (router).
- If you forgot to ask, don't worry. The parameters for logging into the “admin panel” are always indicated on the device itself, on the back side. You can change the Wi-Fi security key according to our instructions.
- After entering the data, do not forget to click the “Save” or “Apply” button.
- If you have problems with authorization and admin/admin does not work, reset the settings to factory settings. Now try to log into the interface again using the standard login/password.
Sources
- https://yotagid.ru/voprosy-i-otvety/kak-ustanovit-parol/
- https://yota-faq.ru/kak-pomenjat-parol-na-wi-fi-modeme-yota/
- https://yotazone.ru/kak-pomenyat-parol-na-wifi-routere/
- https://mymeizu-online.ru/spravka/yota-izmenit-parol-wifi.html
- https://WiFiGid.ru/nastrojki-routera-dlya-provajdera/kak-postavit-parol-na-wi-fi-yota
- https://tarifberry.ru/yota/kak-postavit-i-pomenyat-parol-wifi-na-yota/
- https://tarifkin.ru/yota/ustanovka-parolya-na-tochku-dostupa-wi-fi-v-modemah-i-routerah-yota
- https://yota-faq.ru/kak-uznat-parol-ot-wi-fi-yota-tochnaja-instrukcija/
- https://umchas.ru/igry/kak-uznat-parol-ot-wifi-modema-i-routera-yota-podrobnaya-instruktsiya
- https://yotazone.ru/kak-postavit-parol-na-wifi-modem/
- https://yota-kabinet.ru/postavit-parol-na-modem-yota
[collapse]
Pros and cons
As an interim solution, VPA is not perfect and still has a lot of room for improvement. Listed below are the advantages and disadvantages of using WPA security.
Advantages
WPA, unlike its predecessor, radically provides more secure security for wireless networks. It has additional authentication instead of the simple basic encryption provided by WEP. It includes RADIUS servers and allows administration, logging and auditing. If you cannot use WPA through a specific device, WPA computers will communicate using WEP encryption. Another feature is support for devices that are not updated with backwards compatibility support. A Certificate Authentication (CA) check is performed to block the hacker's access to the network. Part of the recommended configuration is a certificate authority server. This is done to ensure that WPA computers are safe from exchanging keys with unknown individuals or groups.
Flaws
Older firmware and operating systems cannot be updated to support WPA. WPA software must be present on computers, access points, and wireless adapters for WPA to function. WPA was released in 2003 shortly after WEP. Devices such as computers, routers and other equipment older than 2003 cannot be updated. In any version of WPA, in order for a connection to occur, the wireless access points and network clients must have the same configuration. This is the same as the old WEP security standard. Denial of service attacks can occur even when using WPA. Requires complex setup and complexity for typical home users. The transmission time is longer due to the size of the additional packet. Using dedicated WPA hardware will make encryption and decryption more efficient.
Popular mistakes and ways to solve them
"Windows was unable to connect to the network..." or "Cannot connect to this network"
This message often appears after various changes to the parameters of the network to which you have already connected. Solution methods:
- Check that the password is correct. It may have been changed and now you will need to enter a new one. In any case, you must complete the next step.
- Delete the found network and reconnect to it again. In the connection management window, repeat the steps shown in the photo. Right-click on the appropriate Wi-Fi and select “delete”. Then establish a new connection to the network in the usual way.
- Reboot the router and the laptop itself. This will help the machine update its settings faster.
- If all the previous methods do not work, change your network password.
- Select a different router operating mode in its settings.
"Security key mismatch"
This error occurs in Windows 7 and 8, in version 10 it looks a little different, but the essence is the same - you are entering the password incorrectly.
The problem appears when connecting to the network and looks like in the picture - after an unsuccessful attempt to connect to Wi-Fi, you are prompted to enter the security key again.
Even if you repeat the procedure, nothing will change until you enter the correct password. The algorithm for solving this problem is as follows:
- First of all, we check the access code and enter it again.
- We remove o to make sure the security key is correct.
- Determine if Caps Lock/Num Lock and other active keys are enabled.
- Make sure that the correct layout is selected and that you are not entering Russian characters in English.
If the error does not disappear after following the instructions, change the network password in the router settings.
"Invalid key or passphrase"
If you cannot connect your laptop to Wi-Fi and encounter this error, you need to double-check that the password you are entering is correct. This problem is practically no different from the previous problem and means that you are entering a security key that is less than 8 characters long. To fix this error, use the instructions from the previous paragraph.
"The network settings saved on this computer do not meet the requirements of this network"
This error usually occurs after setting up the router. After the first connection, the laptop remembers all network data, including name, password and others. Therefore, when you change any of these parameters, the machine cannot find new information in its memory and notifies you about it using this message. Fortunately, fixing this error is quite simple:
- Remove the Wi-Fi network as shown above;
- Restore the network connection in the standard way;
- Restart your computer and router.
If the method described above did not help you solve the problem, the last and most radical option remains - resetting the router to factory settings
Please note that in this case there is a very high probability of intervention by a third party who previously changed the router settings without your knowledge
The laptop is connected to the Internet, but the connection does not work.
If the connection status icon looks like the one in the screenshot, and the pages in the browser are not loading, you are faced with another common error.
There are several reasons for and ways to solve this problem. Let's take it in order.
Problems with the router
- First of all, check whether you have paid for Internet services;
- Then reboot your router using the WPS button;
- Call your Internet provider to make sure that technical problems are not caused by global problems;
- Check that the router is connected correctly. A wire may have become disconnected somewhere;
- Review your router settings. Sometimes they go astray without our desire.
Laptop problem
If other devices connect to the network without complications, but your device stubbornly says “no network access” or “restricted,” you need to look for other ways to resolve the error. The following method is suitable for Windows 7, 8, XP and 10:
- In the connection management window, go to change adapter settings.
- Right-click on the appropriate network to open Properties.
- Click on the Internet Protocol Version 4 icon and go to its properties.
- In the window that opens, check the boxes opposite the items indicated in the screenshots.
- Enter the appropriate addresses in the fields marked in the photo.
- Save the new characteristics.
- Restart your laptop.
Let your computer always connect to Wi-Fi without any problems!
Report content
Network security key mismatch
When you try to connect to a wireless network and receive a "Network security key mismatch" error message, then the key/password you are using is incorrect.
There are several common reasons why you might receive a mismatch error:
- Incorrect password . Most often, you entered the wrong password. sword. Check your password again, remember that it is case sensitive. Sometimes it helps to type your password in Notepad or Word so you can see what you're typing. Then copy and paste it into the wireless password field.
- Incompatible device - Some older devices do not support the new WPA2 network passwords. So you can see the network, but your device can't connect to it because it doesn't support the same network security key protocol.
- Router or access points freeze - Not often, but sometimes the router or access point just freezes. A quick reboot of the router (shutdown) may solve the problem.
If nothing works, you will have to restart your wireless network. Now you have two options: you can create just a new wireless network or reset your entire router/access point.
To create a new wireless network, log into your router or access point and go to the wireless network tab. Delete the old network and create a new one. Make sure you choose a strong password, I recommend using a password manager to keep your passwords safe.
Another option is to reset the entire router. Make sure you find your router's default login credentials and make sure you have your Internet settings handy. With some routers you may want to back up your configuration, if possible do this before rebooting the device.
Defeat evil
UC-CERT quickly began to notify manufacturers. Most received letters on August 28-30, 2021. The development of patches took longer, and some are still missing. Release dates for updates are published on the official project website kb.cert.org/vuls/byvendor?searchview&Query=FIELD+Reference=228519&SearchOrder=4.
Give up the idea of changing your password. A software patch will help. US-CERT immediately opened a page where they will describe the released patches. Initially, of course, the list turned out to be completely empty. Some old modems are left unattended. Here is the address of the project page kb.cert.org/vuls/id/228519. You can be sure: the old models were simply abandoned by the manufacturer.
An interesting situation is created: some system administrators are lucky, others are now forced to shut down the wireless network or upgrade the hardware (routers).