Android for beginners users of a smartphone or tablet may find it confusing or difficult. The instructions for Android devices contain very little information on the basics of use.
In this article we will look at what Google Android OS is, as well as how a novice user can quickly set up and use all the advantages of Android.
What is the secret of the popularity of Android OS?
The majority of smartphones and tablets in the world run on the Android operating system. According to the leading analytical company in the field of information technology IDC (International Data Corporation), at the end of 2013, Android OS set a new record - 80% of the global market among mobile operating systems. Moreover, a lot of other equipment is already based on Google’s OS: watches, cameras, players, and even systems such as Smart Home.
Android is an open operating system, so it is easy to adapt to any device and needs, but the principle of use remains the same, familiar to each of us. It is enough to understand it once and you will be able to control any device regardless of storing all data on the Internet; you can quickly and easily access your contacts, records, music, programs from another smartphone, knowing the password for your account. With proper configuration and installation of the necessary applications, your smartphone or tablet can become a truly indispensable assistant in almost any field of activity: business, work, household, sports and, of course, entertainment.
What is Android
First you need to understand what Android is and what it is. Android is just the name of the system on which the device runs. Its brother is iOS, which is mainly used in phones from Apple.
Most devices currently run on the Android system. More and more smartphones, tablets and even e-readers are striving to be based on this system. The Google company, which developed this system, has implemented its functions in all gadgets. That is why on an Android smartphone you can easily find Google Chrome as the main browser. The user can also access other functions and services from Google.
Android devices are quickly customizable. There's no problem with that. The user can install various applications, including social networks or games. A convenient calendar is available, which, if necessary, is synchronized with other devices, for example, with a computer.
Every year Google improves its operating system, adds new functionality, changes its design, and tries to surpass other advanced systems. Despite this, many will read Android rather than other operating systems. This is due to comfort and ease of use.
Game progress
The Google Play Games app allows you to save your game progress. If you switch to another smartphone, just log in to load game saves from your previous phone. The program also displays the time spent in the game, and also contains classic games that will help pass the time in the absence of the Internet.
Advantages and disadvantages
Any operating system has its advantages and disadvantages. What kind does Android have? To find out more about this, you need to look at the table below, which gives a brief description:
Advantages and disadvantages
The system itself allows you to multitask the use of utilities. That is, the user can quickly switch from one screen to another without delay. The system supports about 8 different programs in the background. This is very convenient if you need to quickly switch from one window to another.
The device owner is independent in choosing additional utilities.
Many applications are free through the official source - Play Market.
Simple and easy interface
Access to many desktops at once. The user can place many program icons on them.
Some Android devices also have a built-in special system that allows you to control the phone with several fingers at once.
You can install Android on different devices.
The operating system is not compatible with all devices. For example, some phones cannot install a certain version. This can be done easily on other mobile phones.
If we consider individual models, the user will find a large number of errors. This is also due to degraded functionality and the fact that the system is not adjusted to this model.
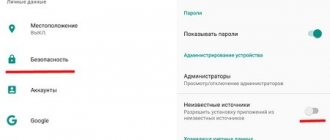
The system is open, which means viruses and malware can enter the device.
Clipboard functions are poorly developed.
Some manufacturer-installed utilities cannot be removed.
A lot of advertising.
As you can see, the system is far from perfect. Despite the large number of positive aspects, there are negative ones that often spoil the picture completely.
Android still remains the most popular operating system, although users see all its disadvantages. This is due to the fact that the price for Android devices is much lower than for other devices of similar OS.
Account Sync
To prevent the loss of important user data and simplify the recovery process, synchronization is provided for each Google account. With every change on the device, a copy of the data is sent to the server. For example, synchronization will make it easy to restore phone book contacts or transfer them to another device. Users often disable or do not use synchronization to reduce power consumption, risking losing important data.
How to set up a new phone
If we consider the full setup of a smartphone, it can take about one hour. If you carry out the settings carefully and scrupulously, then everything will take a long time. Before performing any manipulations with the device, it is recommended to read the settings.
Reading should be done in sections and chapters. Immediately after reading, perform the setup steps. The new phone should be customized to suit the user, to suit his or her convenience.
Once the new phone is activated, the user needs to select the language in which the device will operate. If it is Russian, then he is chosen. The language will determine whether the user can continue to read commands and generally use the device.
After the user has connected the device and selected a language, they need to connect to the Internet. As a rule, everyone sets up the device right away with Wi-Fi. This is much more convenient than with any other connections, including mobile Internet.
The Internet connection menu will appear immediately. It is necessary that further there was an opportunity to set up a Google account. Also, so that in the future the user does not forget to connect the Internet on the phone.
Note! The system asks you to log into your Google account immediately so that you can synchronize data in the future.
How to transfer contacts
In order to quickly transfer contacts, the user can use both individual services and specialized applications. In order to transfer contacts to a SIM card or additional memory, you should do the following:
- First you need to open your contacts;
- After this, you should go to the point with export or import;
- The location from which the contacts will be moved is indicated, as well as where they need to be directed.
As soon as the user has transferred contacts to the SIM card from the old phone, it is removed and inserted into the new device. This is a simple transfer algorithm. There is also transfer of contacts using Bluetooth. It's more complicated, but to do this you need:
- Activate bluetooth on the old and new devices;
- Now you should go to the Bluetooth settings on your old phone and set up synchronization with the new device;
- Now you need to open the phone book with contacts;
- Select the contacts you would like to send;
- Transfer selected contacts.
Another good option is transferring using synchronization with Google, but for this the user needs to already have a Google account on the old device, which can be opened on the new gadget. In order to synchronize contacts through an account, the user should use the following settings:
- We go into the phone settings, select the item with a Google account;
- Now it’s time to go into synchronization. To do this, you need to tap your finger on the mailbox;
- Next, check the box next to the account item and wait a while.
As soon as the user completes this action, all the necessary information for the account will appear on the other smartphone.
Another transfer method is using a USB cable. This method requires a laptop or computer and a pre-installed application.
Remote search
If you have a Google account and the remote search function is activated, it is easy to find a lost or stolen smartphone, provided the Internet is turned on. If there is no positive result, the search function will allow you to remotely format your smartphone and erase all user data the first time you connect to the network.
For more details, see the article “How to find a phone through a Google account.”
How to call and send SMS on Android
In order to send you letters, your smartphone has an application called “Messages”. Thanks to it, the user can not only receive letters, but also send SMS. In order to start communicating, you need a little:
- Open the special “Messages” application;
- Next, you should tap on the “New message” item;
- Now enter the name of the contact to whom you would like to send a message;
- Print the message itself;
- If you wish, you can even save the draft if you tap on the “Back” button;
- Send the typed message using the “Send” button.
The message can be easily forwarded. To do this, you should hold down the typed SMS, and then select the contact you would like to write to through the menu.
In order to make a call on the Android OS, the user just needs to click on the application, the icon of which is made in the form of a handset. A list of contacts will appear. In it you just need to select the one you need and tap on the green tube.
If the contact is entered from scratch, then in the same application there is a field where to enter the number. After the user has dialed the desired number, the green tube is pressed. There is a call. If necessary, you can put it on speakerphone or put another contact on the line.
How the interface looks and works
Android OS has a huge number of varieties that distinguish them from each other. Device manufacturers rarely use the stock version; as a rule, they create their own fork versions.
This is due to the fact that manufacturers want to stand out, thereby creating a new design and interface. This helps you not to get lost among a large number of similar devices. The manufacturing company makes amendments not only to the design, but often to the functionality.
All of them are designed for standardized actions. But there are programs that highlight the device. Most often new utilities are added:
- Xperia UI is a shell made by Sony. Its difference is that the user will not find standard “home” or “back” buttons in it. Everything is more complicated, since they have been replaced by labels of different shapes at the bottom of the screen;
- Sense is already a development from HTC. It is very similar to the standard version of Android, but it has a new news feed and a general gray background;
- Touch Wiz is a product from Samsung. The version is unique in its colors, namely blue, gray and white. This design can easily be found on other products of the company;
- LG UX is an interface from the company of the same name. The peculiarity is a combination of colors that is rarely found anywhere. Shortcuts are in the shape of a square, but there is no usual application bar;
- Emotion UI – this version was introduced by Huawei. The shell is very similar to the interface from Apple, but it has many differences, even in the form of an unusual lock screen.
If a user chooses a smartphone, he should remember that all updates are regulated by Google. First, they receive device updates from this company.
The stock version is the standard, but companies are trying to find new labels, choose unusual colors to stand out, and quickly attract more buyers to their devices.
Night mode
The image on most IPS matrices gives off a cold tint, which is the result of an over-emitting blue light along with red and green. Blue light accelerates eye fatigue, causes insomnia and damages vision. Therefore, most smartphones have a “night mode” or “reading mode”. Activation causes blue to be suppressed at the expense of red, giving the image a pleasant warm tint. As a result, the eyes do not get so tired when working with a smartphone for a long time.
The mode is turned on on an ongoing basis or at a certain time of day in the screen settings. If such a function is not provided, there are many applications for suppressing blue light.
How to use the keyboard
Keyboards on devices can vary greatly. Moreover, the user can even download additional versions through the official Play Market, but they will be from third-party developers. Despite this, the basic manipulations when editing text and entering are not at all different.
To enter text, you need to call up the keyboard. To do this, you just need to tap on the input field. If you need to remove the keyboard, then you need to tap on the “Back” button. You can enter text in the same way as on any other system or device. If the user wants to change the language, he needs to tap on the button in the form of a globe.
The main actions also include:
- To enter a capital letter, click Shift;
- If you press Shift twice, the user will type only capital letters;
- To wash, tap the button in the arrow water;
- Next, you can hold down the text and select the desired fragment using the sliders. This fragment can then be copied or deleted;
- There are emoticons;
- Each key has an additional symbol. This way you can hold down a letter and see an additional option, for example, a dash.
How to customize your desktop
There are many steps you can take to customize your screen. There is a main, working screen, but you can also add an additional one. This may happen in cases where you need to mark up a large widget, the main page is heavily filled with various shortcuts, or you simply need to create a page only for programs of one specialization.
To do this, you just need to hold any shortcut on the screen. It will automatically become mobile. The user needs to drag it to any part of the screen, after which the additional desktop is activated.
The number of shortcuts you can activate varies on some devices. As a rule, the limit is 5 pieces, since a large number does not simplify, but rather only interferes with the normal search for information, a shortcut or an icon.
If the user has created a desktop, it needs to be populated somehow. To do this, you need to add an icon, and this is done by holding your finger on any part of the screen and selecting a program from the menu list that opens.
If there is a need to combine several programs, use the “Folder” item. To create it, you just need to drag all applications into one place. You can see more details about setting up your desktop in this video.
Cloud storage
Also, with a Google account, the owner receives free 15 GB of disk space in the Google Drive cloud storage. A cloud drive will allow you to store an additional copy of important data, copy or share files. And if you install the client on your computer, then all the data will always be at hand.
Read more in the article “How to use Google Drive.”
What is the status bar and notification shade?
The status bar and notification shade together make up a very important package. To activate them, just swipe your finger from top to bottom across the screen. Once the user sees the expanded row, he can manipulate it.
In it you can not only view notifications, but also, for example, read a received email or regular letter. If you want to remove a notification, you need to swipe your finger in any direction on the notification. If you need to hide everything, then tap the button in the form of steps. Setting up the line and notifications is easy.
How to use Google Play Market
Play Market is an important part of the system. It allows you to download programs and remove them to facilitate and improve the functionality of the device.
Installing applications
The very first step is to install programs. In fact, on Android you can install the program both from the Play Market and from a third-party source. But it is generally recommended to choose an official source, as it is safer:
- It’s worth going to PlayMark and entering the name of the application you would like to download in the search bar;
- Then the desired program is selected from the list;
- Next to it you can find the “Install” button;
- It's worth clicking on it;
- Next, the user should wait for the download to complete and find the utility on the main screen of the phone.
Uninstalling apps
The user can delete the application in several ways:
- Uninstall by clicking on the program on the desktop. You should hold down the shortcut for a long time and then drag it to the trash;
- Through the settings, you can enter the “Applications” item and find there the one you need to get rid of. The “Delete” button is tapped.
As a rule, additional files remain on the phone that can be cleaned using special utilities, for example, using Clean Master. The program can also be downloaded through official sources.
Protection against accidental purchases
The user can also apply for protection against accidental purchases to prevent accidental purchases and withdrawals of money from the card. To do this, you should enable authentication. It starts automatically in programs and games.
The bottom line is that purchasing a game depends on entering the required information. Most often this is the password. As a rule, you can change it or completely reset it directly in your Google account or through the Play Market.
Important apps for your smartphone
Now that you have figured out how to use a smartphone as a beginner, we will tell you a few applications that you need to install on your device.
Antivirus. “Android” is the same as a computer, and it can be affected by a virus. Therefore, it is important to take care of anti-virus protection and not install applications from dubious sources.
Battery saving application. Such a program will promptly terminate unused applications, tell you where exactly the battery power is being spent, calculate how long the battery will last, etc.
Application for cleaning "garbage". With such a program, your smartphone will not slow down or freeze. It will help you clear your device's cache, remove unnecessary residual files, and also see where your smartphone's memory is being used.
By following these simple rules, you will easily learn how to use your smartphone. The names of the functions listed above may vary depending on the phone model, but since even the most sophisticated device has an intuitive interface, you will not have any difficulties.
How to customize your screen and wallpaper
The screen and wallpaper are the first thing the user sees as soon as he logs into his device. Personal photographs and some pictures from the Internet are often used as wallpaper. Despite what will be on the user’s phone, he can easily replace the image further.
Note! The replacement depends on what version of the operating system the user has installed. It may vary slightly.
- First, you need to tap your finger on any free space and pinch this area;
- A menu will appear in which you need to select “Wallpaper”;
- The user can choose an option both from those proposed by the system and from his own gallery of data. The default wallpaper is set in the shell itself. The user can easily choose the right one, there is one for every taste. If you choose from the gallery, it is important to ensure that the quality of the image is normal;
- Then you need to click on the “Set wallpaper” item. The system will ask you to specify where to install them: on the lock screen or on the main screen.
If the user wants to find unique wallpapers, then he can use a search engine on the Internet.
You can also customize small details in the device's operation, even the font, size, scale and brightness. To change settings on the screen, you need the following:
- Open settings on your phone and select “Screen” from the options offered;
- Now you need to select from the list of parameters the one you would like to change;
- Tap the “Advanced” item if the required setting is not in the list.
Note! If you need to change a setting quickly, use the Quick Adjustment panel.
Conclusion
The article describes in detail how to effectively use an Android phone. Having a Google account offers more features, weeks only access to the app store. And automation of processes such as synchronization and backup will allow you not to worry about losing important data. The calendar will remind you of important events, and the use of biometric authentication will secure personal information and make it more difficult to hack the device in case of theft or loss.
What is your recipe for effectively using an Android phone? Share your opinion in the comments below the article.
How to set and change the ringtone
Unfortunately, not all users may like the standard ringtone installed on their phone. Often, after a purchase, people automatically think that they need to change the melody. This is very easy to do, the procedure will not take much time:
- You need to go to your phone settings;
- It is worth selecting the “Sound” section;
- Select an item with a ringtone;
- Open the ringtone menu. You can look and choose from those offered or add your own;
- To change other sounds, use the advanced settings.
You can set your own melody for each user. Thanks to it, you can determine who is calling at one time or another. Original ringtones are also welcome.
Always On Display
Many smartphones have a function to display notifications without unlocking the screen. It is enough to pick up the mobile device, after which the screen lights up for 2-3 seconds to display the time, missed calls and messages. Also, the Always On Display function allows you to control music or go straight to the application with a missed notification. And thanks to the unnecessary need to unlock the screen every time, Always On Display allows you to further save battery power.
Read more in the article “What is Always On Display”.
How to work with Google services
Google services are very useful for users. They help simplify the operation of the device and its ecosystem. To find the service you need, you can look at the main screen. Shortcuts are the necessary services. If they are not on the main panel, then you should go to the “All applications” section.
To open the program, you should swipe from bottom to top. In the list of applications, click on the desired shortcut. You can also switch between open utilities:
- Swipe up from the bottom panel of the screen without lifting your finger;
- Then remove it and swipe right and left to find the utility;
- Select the desired shortcut.
To close any program, you should swipe from bottom to top, and then wait, holding your finger approximately in the middle. It is worth selecting a utility that the user does not need and swiping up. To close many programs, tap a cross or a special “clear all” item.
If the user does not deactivate the utilities, there will be no less memory, but the battery will drain several times faster. Therefore, it is worth monitoring programs that run in parallel and disabling them more often.
Reminders, notes
It is better to put your to-do list, important dates, business and everyday meetings on the calendar. If you have an added account, all notes are automatically synchronized. And the entered reminders will warn you about upcoming events in advance.
It is more convenient to store notes, thoughts and ideas in the Google Keep application. Compared to other note-taking apps on Android, Google Keep automatically syncs with your account. And thanks to the web version, it is convenient to work with notes on a computer.
How to connect to Wi-Fi
Owners of Android devices can easily not only connect to the network, but also configure it, add and delete it. When Wi-Fi is turned on, the phone automatically connects to it as soon as it appears in the access area.
How can a user connect and activate the Internet? Very simple. To do this you need to follow several steps:
- First you need to open the settings of your smartphone;
- Afterwards, select a special section, which, as a rule, is located at the top - network and Internet;
- It is worth activating Wi-Fi using the slider;
- Next, you need to select the desired network from those provided. If it is not password protected, then it is easy to connect to it;
- Once the user has entered the password, a successful connection will be established.
The activated network is automatically saved in the user's system. If a person appears with a phone in the Internet coverage area, the phone will automatically connect.
To open additional settings, the user just needs to swipe the tap from top to bottom, hold down the Internet icon and configure everything as needed.
Start using the Android system
Turn on the device, log into your account and establish a connection to the Internet
Following the instructions, we turn on our smartphone or tablet, after which the system desktop will appear in front of you, or, if the device is turned on for the first time, the initial setup wizard will start. For example, on a smartphone the wizard suggests doing the following:
- Select interface language.
- Connect to the Internet via Wi-Fi - if you don't have a network nearby, you can skip this step. Why does this menu appear the first time you turn it on? Due to the fact that most programs are designed to be used with a working Internet connection. This does not mean at all that a phone or tablet is useless without the Internet; this step was created rather for convenience - they say, connect to it immediately, so as not to worry about it later.
- Next, the system wizard will prompt you to log into your Google account or create one if you have not yet acquired an account. We highly recommend that you create an account for yourself, because the Android system itself is strongly tied to Google services. Without it, you won't be able to access the app store and won't be able to use email. In addition, creating an account is not difficult, but it will always be with you on all devices where you want, which is quite convenient.
- In the next menu you need to confirm the time and date, which are almost always determined automatically, or enter them manually.
- In the last window you will see items related to determining your location - it is better not to turn them off so that all services work correctly and the smartphone correctly determines the time and date.