How to log into a Yota modem or router?!
On most Yota modems and routers, to enter the device’s web interface, simply enter the following in the address bar in your browser: https://status.yota.ru and press the Enter key.
If that doesn’t work, try logging into your Yota router’s personal account by entering the IP address in your browser - 10.0.0.1:
After this, in a normal scenario, the device’s web interface should open:
Here detailed information about the current connection to the Yota network is displayed: IP address, identifier, radio signal quality, speed and amount of received and sent traffic. Here are some more useful modem interface pages:
- https://10.0.0.1/manualupdate - manual firmware update
- https://10.0.0.1/network - changing the network parameters of the modem
- https://10.0.0.1/dir - hidden device settings
- https://10.0.0.1/advanced - Advanced modem parameters: setting up a DHCP server, port forwarding, etc.
In order to reflash your modem or router, before going to the update page, first do not forget to download the latest firmware version from the official Yota website.
Where can I see my IP?
There are several ways to find out your IP:
To determine the IP on a PC or laptop:
The line “IPv4 Address” (or IPv6) contains a numeric code separated by dots. This is the IP of this device.
To determine whether it is static or dynamic, you should disconnect and reconnect to the Internet. After that, look at the IP again. If it is the same as in the previous session, then it is permanent. If the address changes every time you log in, it is dynamic.
I can’t log into 10.0.0.1 - what should I do?!
There are three main reasons why you cannot log in to https://10.0.0.1 or status.yota.ru. The first is that the local network connection through which we connect to the router contains some other IP address. To check this, you need to go to Windows network connections (press the Win+R keys and enter the command ncpa.cpl ):
Once in the network connections, select the one through which we connect to the router. If it is connected via USB, then the connection is via local network. And if via WiFi, then you need to select the “Wireless Network” icon. Right-click on it and select “Properties”:
Now you need to double-click with the left mouse button on Internet Protocol Version 4 (TCP/IPv4) to open the following window:
We check that automatic address acquisition is selected for both the IP address and DNS servers. Let's try to go to https://10.0.0.1.
The second reason is that the DHCP client service on the computer is not working or is disabled.
No problem - we’ll enter the address manually. Open TCP/IPv4 Protocol again:
Tariff and receipt
The cost of the additional service is 400 rubles per month. You can connect it when submitting an application to connect to Internet services from the Yota provider.
If you are already connected:
- fill out an application stamped and signed by the head of the organization;
- send the completed application by email through your personal account on the website yota.ru;
- within 24 hours after consideration of the application, you will be connected to the static IP address of the Yota provider.
After receiving it, to log in to the Internet via a static address, reboot the modem.
A sample application for a static IP can be downloaded HERE.
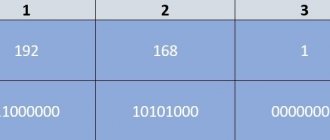
What is a modem's IP address and why might you need it?
When it comes to setting up a device, its IP address is the address of the page with its settings on the local network, which is created when this device is connected to a computer. Of all the generally accepted local network ranges, most manufacturers choose 192.168.x.x, and for Yota modems and routers it is 10.0.0.1. That is, when the Yota modem is connected to a computer, it becomes a gateway, and all devices working through it receive “gray” IP addresses from the 10.0.0.x range.
In addition, during the initial connection, this address will be needed to manage the modem: assign or change the administrator password, wireless network name and password, etc.
When is a static IP needed?
- Maintenance of a website hosted on its own server.
- Working with banks or payment systems to exchange confidential data.
- Interaction with mail resources.
- Secure data transmission channel.
- Organization of IP telephony.
- Remote work with data.
Only the user of the channel or the persons to whom he has granted access can use the connection via a dedicated IP. A permanent IP address associated with the site allows you to increase the authority of the mailing list with mail services; the company’s letters will not end up in spam.
If employees often travel on business and transfer important data, you should not trust third-party resources. Through any network, the user can contact his router via static IP and then forward information over a secure channel.
How to access the Yota web interface?
To gain access to the Internet, setting up an Iota modem or router is the first step you need to take. It is performed on the device’s WEB interface page: here the user will need an IP address.
After connecting the modem to the computer, you need to open any working browser, enter the numbers 10.0.0.1 in its address bar and press Enter. A page will load that displays the current parameters of the Yota modem. Alternatively, instead of the IP address, you can enter the host name - status.yota.ru. The result will be the same.
The start page shows the device status and connection parameters. Here you can assign an administrator password for subsequent secure access to the web interface. The router version will also have a second tab - logging into the WiFi profile, where you can change the name, password and other settings of the Yota router.
To access the advanced settings of the Yota modem, after 10.0.0.1 and the “/” sign at the end of the address, enter the following words (without quotes):
- “advanced” - for opening ports, manually configuring DHCP, etc.;
- “network” - to change the network parameters of the modem itself;
- “manualupdate” - for manual software reinstallation, i.e. flashing;
- “dir” - to access advanced device settings.
What IPs does Yota have?
Regarding the regional affiliation, Iota IP addresses are divided as follows:
- Moscow: 109.188.124.1 - 109.188.127.255
- St. Petersburg: 94.25.228.1 - 94.25.229.255
- Astrakhan: 188.162.41.1 - 188.162.41.255
- Vladimir: 109.188.121.1 - 109.188.121.255
- Vladivostok: 188.162.228.1 - 188.162.228.255
- Irkutsk: 188.162.82.1 - 188.162.82.255
- Yoshkar-Ola: 188.162.43.1 - 188.162.43.255
- Kaluga: 109.188.122.1 - 109.188.122.255
- Kostroma: 94.25.230.1 - 94.25.230.255
- Krasnodar: 188.162.166.1 - 188.162.167.255
- Krasnoyarsk: 188.162.80.1 - 188.162.80.255
- Kazan: 188.162.39.1 - 188.162.39.255
- Novosibirsk: 188.162.14.1 - 188.162.15.255
- Naberezhnye Chelny: 188.162.42.1 - 188.162.42.255
- Omsk: 188.162.86.1 - 188.162.86.255
- Orenburg: 188.162.40.1 - 188.162.40.255
- Samara: 188.162.36.1 - 188.162.37.255
- Sochi: 188.162.132.1 - 188.162.132.255
- Tula: 109.188.120.1 - 109.188.120.255
- Tomsk: 188.162.84.1 - 188.162.84.255
- Ufa: 188.162.38.1 - 188.162.38.254
- Khabarovsk: 188.162.229.1 - 188.162.229.255
What to do if you can’t log in to 10 0 0 1?
If, when you enter your IP address in the address bar of your browser, the Yota status page does not load, you need to sequentially check for the following possible problems:
- Make sure that the numbers are entered correctly, there are no spaces between them, and there are periods and not commas. In addition, you can try entering a letter value - hostname http status yota ru and press Enter.
- Disconnect the modem from the USB port and turn it on again after a few seconds, then try to log into the Yota router again. If unsuccessful, try switching the device to a different USB port. If you use a cable as an extension cord for connection, try to exclude it: the fault may lie there too.
- If you receive a message about being blocked by Windows built-in security when you try to sign in, you can temporarily disable the firewall that considers your modem software to be a threat to your computer. To do this, press the key combination “Win+R” and enter the command “firewall.cpl” in the “Run” window that opens. In the firewall settings window, mark both lines that disable protection and click OK.
Procedure for obtaining a dedicated IP
To get a white yota ip, you need to be a legal entity - this service is not provided to individuals. Many users do not understand this limitation.
- To activate the service, the subscriber must write an application using a single form, obtain a signature from the head of the organization and a company seal.
- The completed application is sent by email or sent to the nearest Iota branch.
- On average, the duration of a permanent IP connection takes a day.
- You can find out about the successful completion of the service through your personal account. It displays all the necessary information.
The address will remain unchanged only when working with Russian sites. The provider will be able to change your address, he will send a corresponding notification. Please note that each device is assigned its own IP address. They must be paid separately. You can change the terms of service at any time. To do this, you need to provide the operator with documents. Because of this, the change can be made at the service center. You can disable the provision of a statistical address in your personal account. The stop occurs when there is no money in the account.
Conditions for providing a static address to legal entities
On the official Yota website, a permanent address is issued under the following conditions:
- Activation of the service is free
- Monthly fee 400 rub. in view of VAT
- Only corporate Iota clients with devices connected to their personal account can use it.
- In the month of connecting/disconnecting/renewing the service, the subscription fee is charged in proportion to the number of days during which the service is used.
- The operator has the right to change the static (permanent) IP address by notifying the client by email.
- The service is provided for all devices in the Yota corporate profile throughout the operator’s presence.
Obtaining a static IP for business legal entities
To obtain a static IP for business legal entities, the subscriber:
- fills out an application in the prescribed form;
- signs the application from the manager or his authorized person;
- puts a wet seal of a business or legal entity;
- takes it personally to the Yota post office, or sends a scan of the application by email.
Typically, it takes no more than a day to connect a static IP connection service for business legal entities. A notification about service activation appears in the subscriber’s personal account. The IP will remain unchanged only as long as the subscriber works with domestic sites. If a subscriber uses a static IP on several devices simultaneously, he pays for each separately. The user has the ability to change the terms of use of a static IP. The provider has the right to change the IP at its discretion. But it notifies the user of all changes.
Interface
Before we tell you how to connect and configure the Yota router and give step-by-step instructions, let’s get acquainted with the interface. This will make it easier to understand the functions of the indicators, buttons and connector; we will look at the images.
LTE/4G network presence indicator:
- blue – the router is connected to the 4G / LTE network;
- flashing blue – network search;
- red – network error or lack thereof.
Wi-Fi network indicator:
- blue – indicates the presence of connected devices via Wi-Fi;
- does not light - accordingly, there are no connected devices.
Battery indicator:
- blue – battery is charged;
- red – discharged.
The logo glows in the corporate color (blue) when transmitting data.
on/off button RESET button and SIM card slot
Setting up the router
In order to ping the router, you need to press the already familiar key combination: Win+R, and then enter the command: ping 10.0.0.1 –t. The reason to be wary will be a message about exceeding the timeout interval for the request. With a high degree of probability, it means problems with the firmware or a hardware malfunction of the router. To get the full picture, it is better to try connecting it to another computer that you are confident is in full working order.
If the router responds as expected, but you cannot access the settings, there may be some problems with the browser. You can try to close the current browser, open another one and try to perform the necessary manipulations in it.
In addition, an antivirus or firewall installed on your computer can prevent you from achieving the desired result. You can try to turn them off, only then remember to turn them back on, returning the security system to its original position.
If none of the above helps, it’s time to resort to a radical remedy that has been tested by many generations of users. It is popularly known as “Seven Troubles – One Reset”. You will first have to try to find the desired button. Manufacturers place it in such a way that you won’t find it right away. It can be located on top of the power slider, under the cover, under the SIM card. Perhaps in order to press it you will need auxiliary means: a needle, a toothpick or something like that. The button must be held down for at least 15 seconds.
If such extreme measures do not help, you will have to go to a service center, or even get a new router.
Connection
We'll tell you step by step how to connect the device.
- Insert the SIM card into the router.
- Press the power button and hold for 3 seconds until the indicators light up and be sure to wait until 4G turns on.
- Pay attention to the back of the box, the name of the network will be indicated there. Find it in the list of available ones on your PC/tablet/smartphone and connect to it.
- Launch your browser and enter any address, you will immediately be redirected to https://start.yota.ru.
- Here you will be asked to come up with a password to access the Wi-Fi network → “Save”.
Reconnect to the network and enter the password you created, then start surfing the network.
Tariff for the service
If you need a dedicated ip yota, you need to contact the communication center. This service is provided exclusively to legal entities; it is not yet available to individuals. The cost of this service is 400 Russian rubles per month. This amount will be indicated in monthly bills for every 1st day. If you started using the service after this period, the amount will be calculated proportionally, and a portion will be provided for payment. If you need a white IP address, contact your operator. A specialist will quickly help you resolve any problems that may arise.
Source
WEB interface capabilities
In this section we will talk about the capabilities of the WEB interface, which allows you to change the network name and password, and change the password to access the router. More experienced users will be interested in the following sections:
“System update” - by the way, the update occurs automatically and does not require user intervention; “Advanced settings” – use of DHCP ports and ranges and much more.
First, instructions for logging into the Yota router:
- Enter the address https://status.yota.ru in the browser address bar.
- On the page that opens, select “Device Settings>” - here you can change the basic parameters of the router, including the password and SSID (network name) WiFi, as well as the password for the router input - which is indicated on the box.
Section "Settings".
- Be sure to check the “Automatically turn off Wi-Fi:” checkbox in the “No” position.
- Enter the desired SSID in the “Network name:” field - replace the one indicated on the box. The next point is for those who do not know how to change the password on the Yota (Eta) WiFi router or create one if the network type is changed.
- Select “Security Type:” from the drop-down list → “WPA2 Protected” → and enter the password.
To go to advanced settings, follow the link https://status.yota.ru/advanced.
As stated earlier, this section is intended for more experienced users and if you are not sure, do not change anything.
How can you use Yota's external IP address?
Yota external IP address is useful for creating:
- Home web server. We host our websites on your home PC. The number of sites is unlimited. No hosting payment required. Hosting provider employees do not have access to scripts. Only the user will have it.
- Own PBX based on Asterisk. We remove any restrictions on calls from a landline phone. Feel free to experiment and call cell phones of any operators absolutely free. If necessary, contact your provider. The possibilities of communication are limited only by your own imagination.
- Home mail server. Please note that the cost of server rental services from different providers varies from 3 to 7 thousand rubles/month. When installing a mail server on your home PC, there is no need for such expenses. In addition, the user receives: reliable protection of his mail;
- a guarantee that letters will reach the addressee and not strangers;
- the ability to flexibly configure mail settings according to personal needs and preferences;
- Own Minecraft server.
Reboot and reset settings
This point cannot be ignored; it is often necessary to reboot the router, and sometimes reset it to factory settings, about each in order.
RESET
There is a saying among IT specialists: “Seven troubles - one RESET,” when any failures occur, the first thing you need to do is simply reboot the device, for this:
- press and briefly (about 2-3 seconds) hold the RESET button on the router - use some thin, sharp object, it could be a paperclip, a needle, etc. This is the answer to the question of how to reboot the Yota router. In addition, there is the concept of “Emergency reboot”; if the above method does not work, resort to it:
- Press and hold the device's on/off button for about 10 seconds, the guideline is to turn off the power indicator.
Reset settings
Resetting parameters to factory settings can be done in two ways.
- By pressing and holding the RESET button for about 10 seconds until the power indication turns off.
- Follow the link to https://status.yota.ru/advanced.
- then go to the already familiar “Ports” section → scroll down to the bottom of the page;
- Click “Restore default settings” - keep in mind that all the settings you previously made will be lost.
How to activate the service for legal entities
To connect to the service, you must fill out an application stamped and signed by the head of the organization. This application can be sent through your Personal Account or to the address, or submitted to the Sales and Service Center. The service will be activated within 24 hours.
Legal entities are serviced using the credit method of payment. A legal entity can receive original invoices and invoices by contacting sales and customer service points, or by ordering an invoice delivery service by courier or mail.
A package of documents can be obtained at points of sale; for this you need to have the following package of documents:
- When receiving financial documents, the client must have an identification document and a power of attorney. The power of attorney must indicate the right of the representative to receive financial (tax, accounting, primary, closing) documents, certified by the seal of the organization and the signature of the person who issued the power of attorney (the general director of the organization or another person authorized to do so by the constituent documents).
- The package of documents delivered by courier and mail includes: an invoice with a facsimile of the seal and signature of the head and chief accountant of the organization, a transcript of the invoice, an invoice with original signatures and a transcript of the signatures of the head and chief accountant of the organization.
Important nuance:
When a device is disabled in a personal account (at the client’s initiative or forced by Yota for non-payment), the fixed IP address is also disabled. After reconnecting the device in your personal account, the fixed IP does not automatically connect; to restore the service, you need to fill out an application.
Speed setting
If the Internet speed has decreased, then you will have to take the following actions:
- First you need to check the signal strength. It must be no less than SINR 2 RSRP -110. To find out what kind of cellular signal is being supplied, you should go to the device category.
- If there is no signal, you need to visit the official portal https://yota-faq.ru/yota-zone-map/ and check. If necessary, by moving, you can increase the radio coverage of the Yota network.
- If the signal is excellent, but the speed is low, then you need to reboot the device. In addition, all downloads with their updates should be disabled.
- Then you should go to the page and read the article about YotaSpeed. It will indicate how to properly test all the Upload-Download capabilities of the device.
How can you use Yota's external IP address?
Yota external IP address is useful for creating:
- Home web server. We host our websites on your home PC. The number of sites is unlimited. No hosting payment required. Hosting provider employees do not have access to scripts. Only the user will have it.
- Own PBX based on Asterisk. We remove any restrictions on calls from a landline phone. Feel free to experiment and call cell phones of any operators absolutely free. If necessary, contact your provider. The possibilities of communication are limited only by your own imagination.
- Home mail server. Please note that the cost of server rental services from different providers varies from 3 to 7 thousand rubles/month. When installing a mail server on your home PC, there is no need for such expenses. In addition, the user receives: reliable protection of his mail;
- a guarantee that letters will reach the addressee and not strangers;
- the ability to flexibly configure mail settings according to personal needs and preferences;
- Own Minecraft server.
Alternative methods of using the Yota 4G/LTE modem
Agree, why buy a router if you already have a Yota 4G/LTE modem. You may say, how to distribute the Internet? There are routers that support 4G modems, one of these is Keenetic 4G, which, as a rule, already comes with pre-installed Yota modem settings. So, let's look at how to configure a WiFi router for a Yota 4G/LTE modem.
- Connect the modem to the Keenetic 4G router.
- In your browser, enter https://my.keenetic.net→ [enter].
- As a rule, the default login is admin and without a password; this data will be indicated on the box.
There is no need to make any additional settings, just indicate that a USB modem is being used.
After which all settings will be automatically completed. Further on the screenshots, you will see what settings are indicated.
Who can use the static IP address service on Yota
I immediately want to upset individuals who use the iota operator . There is no such service for them yet, for what reason is such a restriction in place? The support service responded:
“Unfortunately, the “External Static IP Address” service cannot be provided in LTE networks due to technical features of the network.”
But there is no need to despair; you can use a third-party service that can solve this problem. I found a video on YouTube that will teach you how to make a static address on internet.