Review and cost of the service
Before we dive into the available offerings, take a look at the pros and cons of white IP.
- using your own computer as a server;
- simplified and accelerated work with file-sharing networks;
- Certain benefits are available in broadcasts and some online games.
- the ability to get an IP block on websites or forums;
- the level of privacy decreases.
If you are satisfied with the advantages and disadvantages, then proceed to activation. For individuals, the operator offers to use the “Fixed IP” service. There is no installation fee, but the right to use costs 150 rubles/month.
For legal entities, the “Static IP” function with a dedicated line is provided. It provides the following features:
- access to corporate programs for all employees located anywhere in the world;
- access to programs that require authentication by IP address;
- setting up a VPN connection.
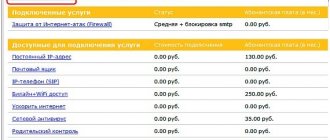
The cost directly depends on the chosen contract. You can find out more about the available tariffs in the table:
| Tariff plan | Installation fee | Subscription fee |
| Standard | Provided free of charge | 220 rubles/month, traffic cost – 6.45 rubles/MB. |
| 2 GB | For free | 590 RUR/month, 2 GB of traffic available. |
| 20 GB | For free | 2200 RUR/month, 20 GB of Internet available. |
to corporative clients
There is a similar service for the business segment and is called “Static IP address”.
The option is provided for use on mobile Internet from Beeline. The principle of its operation is similar to that described above. Specific equipment is assigned a unique permanent address. The difference lies in the breadth of use and customization. For individuals, no settings are required; for corporate clients, you need to manually enter the parameters. Let us repeat once again: the presence of a constant Beeline IP is possible ONLY on its own mobile Internet . When you try to switch to another communication provider, your address is lost.
Price
As in the previous case, there is no charge for IP connection; there is a monthly fee of 220 rubles for each . There is also a per-megabyte payment for all traffic: 6.45 rubles. during the period from 8 am to 24 midnight.
There is an offer with 2 GB traffic already included, its price is 590 rubles. and 20 GB for 2200 rubles per month. In these tariffs, the usage time is around the clock.
Settings
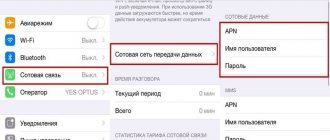
Parameters that must be entered into mobile equipment manually for correct operation:
- APN access point – static.beeline.ru.
- Enter the login and password beeline/beeline.
- Dial *99#.
- We do not touch the static address cell.
- DNS address.
- PAP type.
What's interestnig? Since we manually enter the settings into the equipment ourselves, they do not change while roaming. That is, if general access to any information was previously configured, it will remain working, although the traffic will flow according to roaming tariffs.
What might be useful?
If you are setting up a remote connection on a computer, also specify the initialization string: AT+CGDCONT=1,“IP“,“static.beeline.ru“
The company also draws attention to the fact that ports 135/tcp and udp, 137/tcp and udp, 139/tcp and udp, 445/tcp and udp, 593tcp are blocked for security purposes. This information will mainly be of interest to organizations that purchase communication products through tenders.
Connection
The big disadvantage of this service is that it cannot be connected remotely. A personal visit to a communication salon and writing an application is required. As a rule, an application for connection occurs simultaneously with the main Internet. Likewise, if the need for static has ceased, then deactivation is possible only through a statement.
How to connect a static IP address
Installing the option is only possible when using Beeline Internet tariffs. Individuals can enable the function by following these steps:
- Open the website beeline.ru.
- Go to “Personal Account”.
- Enter login and password.
- Go to the "Services" section.
- Select the subscription you want.
- Click the connect button.
A different activation procedure is provided for legal entities:
- Go to beeline.ru.
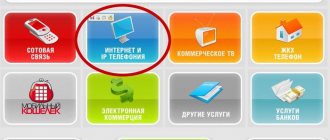
- Click on the “Business” tab.
- Hover your cursor over the “Fixed Line” section.
- In the menu that opens, select “Static IP Address”.
- Specify the required tariff.
- Click "Connect".
- Complete and submit the application for consideration.
After some time, the operator will contact the number specified in the request and discuss all the nuances of connecting the function.
Connection: algorithm of actions
Activation of a static IP is carried out through the Personal Account of the home Internet subscriber. First, on the services page, find the desired service and click the button for details. After this, the description of the offer will open.
To complete the activation, you will need to click on the button located in the right column of your “Personal Account”. A notification about changes in the total tariff fee will appear below it. A legal entity can connect a static address only upon request to the corporate customer support service. This can be done directly from the options page on the Beeline for Business portal.
How to connect with the “All in one” tariff
For subscribers using tariffs from the “All in One” line, a static IP address is connected as follows:
- Log in to your personal account on the operator’s website.
- Open the “Internet at Home” tab.
- Go to the service catalog.
- Find the option you need.
- Activate the function by clicking on the corresponding button.
How to configure the option
Regular subscribers do not need to configure this service. For correct operation, legal entities must select special parameters when connecting:
- access point – static.beeline.ru;
- login and password;
- dial-up number - *99# ;
- authentication type – PAP;
- IP – empty;
- connection address – DNS.
When establishing a remote connection, you must specify the line: AT+CGDCONT=1,“IP“,“static.beeline.ru“.
If you want to use a static IP address, you must first connect to the Internet from Beeline. After this, you can purchase the subscriptions presented in the article.
Source
Internet setup in Mikrotik
Now is the time to connect to your provider and set up the Internet. It is difficult to cover all possible connection options. There can be many of them. I will look at the two most popular methods:
- You receive settings from the provider automatically via dhcp.
- The provider gave you ready-made settings and you enter them manually.
As I wrote earlier, we will use port 5 to connect to the provider. Connect the provider's wire.
To get settings for dhcp, go to winbox in the IP -> DHCP Client section and press the plus sign. Select the ether5 interface and click OK.
If you did everything correctly, you will see what IP address you received. In the IP -> Addresses section there will be information about the settings.
Let's consider the option when the provider has provided all the settings and you need to set them yourself. Let's assume that our Internet settings are as follows:
| IP address | 192.168.1.104 |
| Mask | 255.255.255.0 |
| Gateway | 192.168.1.1 |
| DNS | 192.168.1.1 |
First, let's specify the IP address. We do the same as in the previous paragraph when setting up a static IP. Only now, instead of the bridge1 interface, we indicate ether5 and enter the corresponding address - 192.168.1.104/24. Here we immediately indicated both the address and the subnet mask.
Next we need to set the default gateway. Without this mandatory step, the Internet will not work. Go to the IP -> Routes section and click the plus sign to add a default gateway. In Dst. Leave the Address as is 0.0.0.0/0, and enter the provider’s gateway in the Gateway field and click OK.
The Internet should be working now, but without specifying a DNS server, you can only access direct IP addresses. For example, you can ping the IP address of Google servers. Open New Terminal and check.
Now let's install the DNS server. To do this, go to IP -> DNS, enter the DNS address of the provider's server in the Servers field. If you have two of them, then by clicking on the triangle with its vertex pointing down, you can enter another value. Be sure to check the box next to Allow Remote Requests.
If you have an external IP address and have allowed remote DNS queries, be sure to configure your firewall and block all incoming connections. If this is not done, then your router may become a victim of fake DNS requests that are used for DDoS attacks.
That's all, we have completely installed the Internet provider settings. You can check and ping the usual site address.
The router itself already has Internet access. We need to configure it for users. To do this, we continue setting up mikrotik.
ul
How to set up: instructions
If the device is supported by the provider, you can proceed to setting up Beeline home Internet on the router. For example, let's look at the Beeline WiFi router, but for other models the instructions are little different.
Connection and authorization
First you need to connect the equipment and enter the settings. Take these steps:
- Make sure that the router is plugged into a 220 V network. If this is not the case, plug the power supply into an outlet.
- Insert the connector of the wire that the installers brought into the apartment into one of the LAN ports of the router. Alternatively, you can set up Beeline Internet at home via WiFi, but at the initial stage it is better to use a cable.
- Log in to any web explorer. It could be Opera, Safari, Firefox, Google Chrome, Internet Explorer or any other.
- Enter your login information into the URL line. To go into the Beeline router settings, enter the IP address 192.168.10.1 (www is not specified), and then press Enter.
- In the window that appears, enter your username and password. If this information has not changed, you will need to enter admin twice. After that, click on the OK button.
If everything was done correctly, you were able to log into the router's web interface. Here you can set up Beeline Internet for your home.
Primary data entry
Take the following steps:
- Click on WAN. This is where the main router settings are made.
- Set the connection type to L2TP.
- Enter the IP address/Server name - tp.internet.beeline.ru.
- Enter your username and password - enter your details.
- Select the address type - select dynamic.
- Set MTU - enter 1460.
- Put o.
- Save your changes.
For the router settings for Beeline home Internet to take effect, you must wait until the data is saved. On average, this takes up to two minutes. If the job is done correctly, a message indicating the success of the job appears. After a few seconds, the router should connect to the Internet.
Here we will tell you how to connect the Internet and TV in 2 days.
Setting up Wi-Fi
The next step is to set up a WiFi connection for your Beeline home Internet. Take the following steps:
- Go to the WiFi settings section.
- Enter the Basic section.
- Set the standard to 2.4 GHz (B+G).
- Select AP mode.
- Specify the name of the wireless network (can be anything).
- Set the channel number. It is recommended to set it to Auto. In this case, when connecting, the router itself will choose the best option (from the point of view of channel loading).
- Click on the save changes button.
Preliminary configuration of the router for connecting Beeline Internet via Wi-Fi has been completed. After saving, wait a while for the router to save the data.
Safety
To protect your wireless network, you need to set security settings. This will protect the network from intruders and unscrupulous neighbors. To configure the Beeline Internet router, enter the Security category in the same section (WiFi Settings).
Internet connections
Now let's look at how to SET UP the hUAWEI ws319 wifi ROUTER. Let us immediately note that it will vary depending on the provider you use. However, we will discuss all the most popular options.
PPPoE for Rostelecom
First of all, let's look at working with the PPPoE protocol. It is used by many providers, such as Dom.ru, Rostelecom and others.
The configuration is set as follows:
- check the box next to “enable connection”;
- in the service type field, select Internet;
- type of connection, select IP router (PPP);
- we go down below and leave the nearest points unchanged;
- activate the “always online” item by placing a dot in the appropriate field;
- Next, enter user data in the login and password fields. We take them from the contract from your provider;
- select the service name Internet;
- at the end, don’t forget to click on the “save” icon so that the changes you make take effect;
That's all. After a few seconds, an active connection should appear. Otherwise, double-check all parameters, as well as the integrity of the cable.
Dynamic IP for TTK
This setup is done in an almost identical way.
Let's just highlight the differences:
- in the connection type field you need to select IP routing (IP);
- IPv4 addressing - select DCHP;
- NAT - set the value to “NAPT”;
L2TP VPN connection for Beeline
This is where things get a little more complicated. First, you will need to create exactly the same connection as in the previous paragraph.
It will be used as an internal network.
- then a second connection is created. This is done like this:
- go to the VPN section;
- activate the item “Enable L2TP LAC”;
- in the WAN item you need to specify the previously created connection;
- LNS address - indicate the official Beeline server;
- then enter the user data from the contract;
- set the connection mode to automatic mode;
- click the save icon;
ul
Results
Regardless of the model, setting up a Beeline router follows the same principle. First you need to connect the equipment and enter the web interface through a browser. After this, the connection settings are specified and the Wi-Fi parameters for the wireless network connection are set. After saving the data, you can connect to the router with other equipment. If difficulties arise, it is recommended to reset or contact Beeline support for help.
Source
Advantages
- There is access to all the necessary internal corporate programs and databases.
- The VPN connection is encrypted and security is carried out at the federal level.
- Authentication via static external IP.
- Possibility to use from any point where there is access to the global network.
Along with all communication providers, Beeline is a leader and does not lag behind in its offerings. Tariffs for permanent IP service are very competitive , and the setup algorithm is simple. For each service, the official website contains information with prices and connection diagrams, as well as customer support at a single number 0611.
Source
Static IP from Beeline: how to connect and configure, cost of use
Date: November 1, 2021 | Updated: December 13, 2021 | Author: Moblie-man
Static IP addresses are widely used in business today, since this way it becomes much easier to provide employees with access to corporate databases, servers and networks. And, as you know, if we talk about gaining access to the Internet at any time and anywhere, mobile operators today have no competitors. Unfortunately, a fixed address when accessing the mobile Internet today is not simply provided.
Settings for correct operation
Necessary settings for correct operation.
For individuals, setting up a computer or router for correct operation with a fixed IP is not required. If the connection does not work after activating the service, you need to restart the gadget.
If you are using a fixed business address, the mobile device will need to be configured to function properly. To do this, you need to create a new access point in the gadget settings and enter the following parameters there:
- APN address - static.beeline.ru;
- login and password - beeline;
- dialing number (via modem or VPN) - *99#;
- authentication algorithm - PAP.
In addition, in a separate field for the address, if available, you will need to specify DNS. After this, access to office resources should open.
How to get a static IP address on Beeline
If you are seriously interested in connecting to this service from one of the largest telecom operators in Russia, you must immediately clarify that this offer is available for use only by corporate business clients. Such subscribers have the opportunity to activate the option, providing uninterrupted and high-speed access to all corporate programs and necessary resources.
p, blockquote 4,0,1,0,0 —>
To successfully activate the service, you must contact the corporate customer service directly. Unfortunately, there is no option to activate the service remotely, which is quite obvious, because this option is not one of the simple additional features.
Immediately after submitting a request to connect the service, you will also need to configure the equipment accordingly. After that, the use of Internet resources will occur from a fixed and unchangeable address assigned by the operator to specific equipment.
p, blockquote 6,0,0,0,0 —>
Cloud PBX Beeline
For corporate clients who want to organize full-fledged telephone communication in a short period of time without purchasing equipment, a cloud PBX becomes the solution. It unites all employee phones under a single city number with a menu and voice greeting. Sets distribution rules for incoming calls between call centers, specific employees, faxing, and conferences.
Connecting local Russian numbers, united by a common call center, makes advertising companies more effective, “tailored” to the specifics of the business. It is easier for clients to respond and place an order in their city, and the company does not need to open regional offices. Flexible tariff plans offer more than 30 additional options.
Beeline virtual PBX is customizable to the requirements of small, medium and large businesses. Mobile numbers do not depend on being tied to a specific office, allowing you to stay in touch without being present at your workplace. Integration with popular CMR systems via API is provided.
Due to the multi-channel lines, no calls are lost. All conversations are recorded, increasing employee productivity. Keeping call statistics allows you to take into account data on all conversations, call failures and the percentage of calls. Adding IVR options makes it possible to easily connect with the required specialist.
The PBX uses existing mobile numbers with the ability to transfer calls through short commands. Integration with SIP telephony means an unlimited number of lines and calls via an Internet connection. Speech is digitized, transmitted between phones and computers via VoIP gateways. A secure communication line makes the transmitted information truly confidential and protected from eavesdropping.
All services and activation of the necessary options can be independently managed through your Personal Account. The manager can use it to monitor the activity and workload of employees. All devices connected to a single network operate in parallel, the call goes to all phones at once, allowing a free employee to receive it on any device.
Beeline offers five packages for connection, the options of which are fixed. The minimum tariff of the “Personal” package has a monthly fee of 50 rubles/month and is designed for one client. The maximum tariff is for the “Professional” package, where for 4,500 rubles. connection of up to 150 numbers with a wide range of options is offered. One-time or monthly tariff payments are possible.
Setting up the Beeline cloud PBX allows you to connect to Asterisk, Bitrix24 AmoCMR, etc. Integration of the Beeline virtual PBX and CMR occurs using ready-made modules through your Personal Account, allowing you to coordinate your work as accurately as possible. After activating the token, a module is configured that matches users from the PBX and the selected CRM. The integration process takes no more than 15 minutes, allowing you to fully work in a few clicks.
How much does it cost on Beeline
The financial conditions for using the offer are as follows:
p, blockquote 7,0,0,0,0 —>
- Service activation fee: not provided;
- Subscription fee: 220 rubles monthly;
- Traffic payment: 6.45 ₽ for each received/sent megabyte from 8 a.m. to midnight.
As you can see, the financial terms of the service cannot be called very favorable, however, if you have no other options other than getting a static IP on Beeline, this offer is optimal to use.
p, blockquote 8,1,0,0,0 —>
Negative aspects of the Beeline service
After connecting the option, the user may encounter difficulties related to the specifics of permanent IP. One of the negative sides is the likelihood of getting blocked or banned on various portals, such as forums and dating sites. This can happen when a subscriber who has activated the service posts content that violates the terms of use and current legislation.
Another disadvantage of the service is reduced privacy protection. This negative side is due to the fact that it becomes easier to identify the user if he has received a fixed address.
You should be careful before committing potentially illegal actions from a static IP to avoid consequences, including criminal prosecution.
Setting up a static IP on Beeline
For the service to work correctly on the device used, subscribers must independently configure the device manually, which is used in conjunction with a SIM card with a fixed IP. To do this, you must specify the following functional changes in the device connection settings:
p, blockquote 9,0,0,0,0 —>
- APN point for gaining access: static.beeline.ru ;
- Login/access code fields: beeline/beeline ;
- Phone number for calling: *99#;
- IP address field: leave empty (empty);
- Address field: DNS ;
- Authentication type used: PAP ;
It is also necessary to pay attention to the fact that under normal conditions of activation of the service in question, it will work correctly even in roaming (national and international). Therefore, there is no need to make any additional settings when traveling. As for traffic tariffication, it will occur according to the terms of the roaming offer used.
p, blockquote 10,0,0,0,0 —>
p, blockquote 11,0,0,0,0 —>
Preparing for work
What needs to be done before setting up? In fact, it requires very little effort from you.
We perform the following manipulations:
- We take out the device and the original packaging and make sure that the kit is complete. In particular, check the presence and integrity of the patch cord (this is a small cord, usually yellow);
- then insert the cable from your provider into the WAN connector of the device (there is only one and is highlighted in color). Make sure the connector is tight. Otherwise, replace it as the signal may be lost;
- Now insert the patch cord into any of the four LAN ports. Its second end must be inserted into the corresponding connector on your computer;
- Next, you need to make sure your network card is configured correctly. If you have previously used any Internet connection, then there will be no problems.
Virtual machine on your PC. Read the article on installing Virtualbox on Windows XP
Installing Windows XP from a flash drive to a netbook. The methods are here.
If you have problems with the network card, then use the following simple tips:
- The first step is to make sure that the network card is active. To do this, go to the device manager and find it in the appropriate item. If it is missing or is recognized as an “unidentified device”, you will need to install (update drivers);
- If you have a factory disk with drivers, there will be no problems. Otherwise, you can find them using the identification code. You can find it by clicking on the “properties” tab;
- If these steps do not produce results, there is most likely a problem with the network equipment. It's better to consult a specialist.
ul