With the release of the Federal Law “On Communications” in 2014, the state program “Elimination of the Digital Divide” (“EDD”) is gradually being implemented in Russian spaces from 2021. The project is intended to provide rural residents with a broadband connection through the introduction of free Wi-Fi in rural areas from Rostelecom.
The government plans to implement the program through the leading telecommunications company Rostelecom for one decade. The coverage of hard-to-reach rural areas with Wi-Fi access is moving at an accelerated pace. The provider plans to complete the ambitious project much ahead of schedule.
Providers in rural areas
The population density in many rural settlements is constantly falling - people are leaving to live in cities. Therefore, it is not profitable for Internet providers to build their networks in villages and towns . However, many residents in rural areas have hope that one day they will have access to high-speed Internet. Already today it can be offered by mobile operators.
But this connection method has several disadvantages:
- 3G and 4G networks are not deployed everywhere - you have to be content with the Internet at a “snail” speed;
- Mobile operators do not offer the most affordable tariffs - for large traffic packages you have to pay quite large sums;
- There is no unlimited traffic, at least with a speed limit - unlike traditional providers.
Also, in villages there is no access to ADSL technology, not to mention other technologies.
In large cities, they are already abandoning outdated telephone lines and connecting subscribers to high-speed optical networks. There is clearly inequality between residents of cities and rural settlements - the former can consume hundreds of gigabytes of information, while the latter are forced to access the Internet via cellular networks. The “Closing the Digital Divide” program allows us to solve this problem.
Other assignments
As a result of the same meeting, the President instructed the government to consider the possibility of including regional costs for digitalization and development of the digital economy in the costs taken into account when determining the estimated volume of expenditure obligations of this region, that is, in the model budget. This will be done in order to distribute subsidies to equalize the budgetary security of the regions. A corresponding proposal was also put forward by Kiselev at the meeting.
Another instruction concerns the introduction of state regulation of the rent that owners of power transmission lines charge from telecom operators for the use of these poles for carrying fiber optic lines and other communication cables. Kiselev said at the meeting that rent for poles is quite high, and this forces operators to raise tariffs for their own services. The owners of the supports, according to Kiselev, in this case behave like monopolists. This problem also slows down the digitalization of regions, the official explained.
Kiselev also raised the issue that operators have to fill out a lot of paperwork in the process of obtaining permission to build communications facilities, in particular cell towers, “as if they were trying to build multi-story buildings.” As a result, the president instructed the government to consider introducing amendments to the Urban Planning Code regarding standardization and simplification of the procedure for obtaining such permits.
Closing the Digital Divide Program
This program is aimed at making communication services more accessible. And in particular - in small settlements where there are obvious problems with Internet access. The project is being developed within the framework of the law issued by our president back in 2014. It provides for the construction of wireless points in the smallest settlements , with a population of 250 to 500 people. Thus, in the near future, any subscriber who has activated the appropriate service will be able to connect to Rostelecom via Wi-Fi in rural areas.
The network is not developing very quickly, since 10 years have been allocated for the implementation of the project. And you can’t connect to Wi-Fi from Rostelecom in rural areas everywhere – points are built only in small towns and villages. The program is definitely necessary. But the implementation, as always, let us down - larger settlements are still left without high-speed Internet. That is, we can connect to Wi-Fi from Rostelecom in rural areas. But the connection is only present in farmsteads, auls, miniature villages with 3-4 hundred population – that’s all.
Satellite Internet
The main advantage of this type of connection is that you can catch a satellite signal in any wilderness.
If you really need a decent Internet connection where there is not even a signal from cellular operators, then two-way satellite Internet will help you. It requires only a set of equipment and electricity, and does not depend on the availability of a telephone line or communication towers in the area. It has a reliable connection and can be shared among several computers, because... The connection speed is quite high - about 10 Mbit/s.
More about Yota: Yota internet disappears on modem and phone: why is it always not there?
However, satellite communications have significant limitations that do not allow using the network in real time, because the response delay ranges from 650 ms to 1500 ms. The price of the equipment starts from 9 thousand rubles, that is, this is the most expensive option for obtaining personal access to the Internet in the wilderness.
Many have television satellite dishes with a diameter of 55 cm, and this can also be used to organize satellite Internet. In practice it looks like this. You already have some way of connecting to the Internet (mobile modem, cell phone with GPRS or Dial-Up over a telephone line) and satellite TV, but you are not satisfied with the speed of downloading movies or large amounts of music.
Connecting to Wi-Fi from Rostelecom in rural areas
If you live in a small village or your parents live there, you can always go to the World Wide Web and take advantage of all its possibilities. Rostelecom's Wi-Fi coverage in rural areas is still very weak; you can check it on the provider's website. Here you will be surprised to discover that Wi-Fi has already reached almost all regions of Russia. Let's see how to connect Wi-Fi from Rostelecom in rural areas.
Especially for this, the provider created three access points at once:
- RTFree – used for free access to government resources (the full list is published on the provider’s website, it includes more than 2000 resources);
- RTOpen – hot spot is used to register new subscribers and create a personal account;
- RTWi-Fi is the main point for connecting to all network resources (available after registration and payment for services).
Next, we will provide step-by-step instructions that will allow you to connect to the Internet in rural areas via Wi-Fi from Rostelecom.
At the first stage, you need to connect to the RTOpen network - you can enter it without a password . We connect and go to the Rostelecom website, then go to the “Personal Account” and proceed to registration. To do this, you need to come up with a username and password, enter your personal data (full name, date of birth, your region), indicate your email address and phone number. After this, a confirmation SMS with a code will be sent to the specified number - you will need to enter it in a special field.
The RTOpen access point does not allow you to visit any other resources, with the exception of the Rostelecom website and the “Personal Account”.
At the next stage, you need to log into your personal account through the same point, using the previously specified login and password. Now we need to connect the Wi-Fi service from Rostelecom for rural areas - here it is called “Universal communication service (Wi-Fi)”. Again, indicate your phone number, check the box indicating your agreement with the terms of the agreement, and click on the “Connect service” button. On the next screen you will see your login and password to access the service (the information will be duplicated via SMS).
Remember or write down your login and password somewhere – you will need them to access the Internet.
You don’t have to choose a tariff plan—Internet access is free.
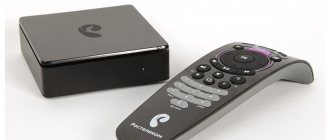
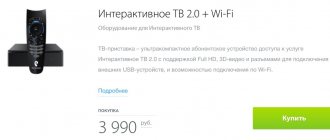
How to enable and configure a Rostelecom Wi-Fi router?
If you purchased a Wi-Fi router or rented it from Rostelecom (by the way, the monthly rental fee there is only one ruble), then you need to turn it on correctly and then configure it.
Be careful! All work on connecting wires is carried out with the equipment turned off from the network!
- Connect the wire to the INTERNET connector on the Wi-Fi device.
- Find the connector on the device marked one and insert the included Ethernet cable into it.
- Connect the other end of the Ethernet cable to the network card connector of your laptop.
- Insert the device's plug into the socket and wait until the WLAN LED lights up steadily.
Next, we will talk in detail about how to enable and configure Rostelecom Wi-Fi on a laptop or computer so that everything functions well in the future.
- Configuring the network card: click on “Start” to go to the “Control Panel”.
- Enter the Network and Sharing Center.
- Click on the section with the networks that are available and click on the “Properties” section.
- Go to the “General” tab.
- Find there the column “Internet Protocol (TCP/IP)” by hovering the cursor over it and double-clicking the mouse.
- Check o and “Obtain an IP address automatically.”
- To confirm your actions, click “Save”.
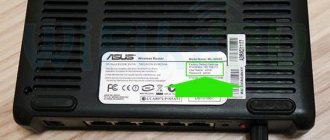
- Now log into your browser and enter the router name in the address bar. You can find it in the contract or turn the device over and look at the bottom cover.
- You will need to provide a username and password to log in. Try entering the word admin in both windows. If the values do not match, contact support for advice.
- Now you need to open the “network” tab.
- Open the WAN tab and click on IP.
- Please check the following boxes next to the appropriate items:
- DNS - automatic
- IGMP - active
- After this, save the result using the “Save” button.
- When another window opens, click on “Add”.
- A new page will appear, all sections of which will need to be filled out according to the diagram below so that everything can be successfully enabled:
- "PPR" tab
- Username and password - take the relevant data from the contract for the provision of services to Rostelecom.
- Authentication algorithm – AUTO
- MTU – 1492
- LCP interval – 30
- LCP failure – 3
- Keep alive – check the box.
- Ethernet Tab
- MUT – 1500
- MAC address should be selected using the instructions for the device
- Main settings tab
- Connection type – PPPoE
- Port – Port5
- Name – you can come up with a name for the network if you wish
- Allow – check to activate
- Miscellaneous Tab
- NAT – check the box
- Firewall – check the box
- Now click on “Save”.
- Check if you are connected to the World Wide Web. If not, restart your computer and try again.
- Go to the router menu.
- Open the Wi-Fi section and activate the wireless connection.
- Go to the “Basic Settings” tab and find the network name that you came up with earlier.
- Open the "Security Settings" section.
- Change the “Authentication system” item to “WPA/WPA2 mixed”.
- Password your Wi-Fi access.
- Set the number next to “Maximum value of clients” to zero.
- Now you need to save all the settings you have made and then restart the laptop.
- Check if a new Wi-Fi network has appeared and if it is working correctly. If everything is ok, you can disconnect the Ethernet cable.
- All is ready! You can turn on Rostelecom Wi-Fi.
Remember that at any time you can change your mind and turn off Wi-Fi on the router, but this does not mean that you will not have to pay more for the Internet!
We access the Internet through smartphones and tablets
In order to connect to the Internet in rural areas via Wi-Fi from Rostelecom, you need to connect to a wireless RTWiFi point. An authorization window will open in front of you with two fields at once - for entering your login and password to access the network (and not just a password, as usual). We enter the data received earlier and accept the certificate offered to us . Now you can open the browser and start surfing (or using any other network applications).
In a similar way, free access to government sites is provided through the RTFree access point.
DSL connection via telephone line
Today this method, known to most, is still relevant. It requires only one device - a DSL modem, to which a telephone wire is connected on one side, and a computer and telephone on the other. At the same time, using the Internet does not interfere with talking on the phone at the same time. So if you only have a telephone and there is no optical line nearby, then you can provide yourself with access at speeds of up to 15 Mbit/s at a reasonable price (no more expensive than cable Internet tariffs).
Video
The service allows you to hide the identification of your mobile phone number when calling the numbers of other subscribers. The service works correctly when the calling and called subscribers are located in the Moscow region. The operation of the service is not guaranteed for outgoing calls to phones of subscribers of networks other than Rostelecom, including public city networks.
Automatic Caller ID (Caller ID) allows you to find out the name or number from which an incoming call is coming, find out the numbers of the last incoming calls - received or missed, and set different ringtones for numbers. The service is connected to all subscribers free of charge.
Short Message Service - short message transmission service. The service provides the transmission and reception of short text messages via a digital cellular network.
Additional parameters that are not listed in the list should be left with default values. After manually setting up the phone, send an MMS to any recipient, for example, to your own number. This is necessary to register your number in the Rostelecom network as a user of the MMS service.
Basic mobile internet settings. To configure your phone to access the Internet or to work from a computer using the phone as a modem, you need to set the following parameters:
The service provides the opportunity to communicate with several interlocutors at the same time, which is convenient for conducting business negotiations when it is impossible to quickly gather all those responsible and interested in the discussion for a personal meeting. If you need to communicate with several friends at the same time. Up to 6 subscribers can participate in the conference simultaneously, including the call initiator.
The conference initiator has the ability to connect subscribers of both fixed and mobile networks to the conversation; switch the current conference to standby mode (in this case, participants will continue telephone communication). Make outgoing calls, answer incoming calls, join or remove participants from a conversation. These actions can be performed through the phone menu. Conference joining of incoming calls is available when active.
Conference participants have the ability to make outgoing and receive incoming calls without interrupting the conference, leave the conference without interrupting the communication of other participants (if the initiator leaves, the remaining participants will be automatically disconnected).
You won't miss a single call. The service will report all missed calls during the time when the phone was out of network coverage or turned off.
The service is provided to Rostelecom subscribers when they are in the Moscow region and in roaming.
Can I trust the PO on the official website?
An important point is that the availability of communication services on the official website is calculated by computer based on the location and density of base stations. The actual signal level may differ from the calculated one for several reasons:
- terrain - ravines, hills, tall buildings and dense buildings;
- weather conditions - precipitation, wind or magnetic field can significantly reduce the signal level;
- the load on the base station and algorithms for distributing subscribers between base stations also affect the signal level.
You can more accurately assess whether the connection will be received by asking your neighbors. If none of them uses RTK, then you can focus on TELE2 - they are the ones who provide their base stations for RTK clients.
The company regularly updates information about base stations for the mobile network and wi-fi Internet, but it is still unknown whether Rostelecom’s fiber coverage area will appear. But we can hope that the company will respond to user requests.
Tariffs for Internet use
Rostelecom's mobile communications costs largely depend on the current tariff plan.
Rostelecom has a huge product line; you can choose per-megabyte pricing or unlimited with payment at the end of the month. Tariff plans for mobile Internet from Rostelecom are described below:
- Internet with you. There is a flat rate of 4 rubles. in a day. In return, the operator provides you with 70 MB/day;
- Extend the speed - this is an additional option, it gives you another 60 MB. Product activation will cost you 10 rubles;
- Easy Internet per megabyte payment. The cost of 1 MB is 1 rub. This service is suitable for those who occasionally visit the World Wide Web to check email or download a small file. You can activate the service for free the first time, but then the procedure will cost 10 rubles;
- For more active users there are tariffs of 3-25 GB. With this traffic, you will be able to download a movie or audio files. The price of such tariff packages varies from 125 to 400 rubles.
How to install a cell signal booster in a small house
Nowadays, sometimes you need to talk on a mobile phone even in places that are not very suitable for this - for example, in the subway or elevator. Unfortunately, the possibilities of cellular operators are not yet limitless. Residents of rural areas or remote regions, clients and owners of shops and salons located in basements are well aware of the problem of a weak cellular signal or even its complete absence. In these cases, cellular signal boosters can significantly improve the situation.
Installing a booster will not require much time or special knowledge from you. However, you may need additional information. Your first assistant is the installation instructions for a mobile amplifier, which you will find in the amplifier kit, and can also be downloaded from our website from the model page of your amplifier. This article can also help you in installing a mobile repeater correctly.
First, you need to know what is included in the package.
- A. Mobile signal booster
- B. External antenna with standard cable
- C. Internal omnidirectional antenna with cable
- D. Power supply (DC 9v)
Now let's move directly to the amplifier installation process.
INSTALLATION STEPS
- Find a suitable location for the external antenna
Requirements for installing an external antenna:
- The external antenna should be located on the roof of the building, or in another place, so that your mobile device falls within the network coverage area. The cellular signal should be stable - preferably 3-4 bars on the cellular signal indicator shown on the screen of your phone.
- the external antenna must be mounted vertically
- Connect the external antenna to the mobile amplifier from the base station side and secure it well.
- Connect the indoor antenna to the mobile amplifier and secure it well.
Requirements for installing an internal antenna:
- The internal antenna should be installed at a distance of about 5 meters from the external antenna
- the internal antenna must be at least 2 meters above the ground
- The internal antenna must be mounted vertically
- Connect the cellular signal booster to the power supply
Some models have a built-in power supply. Please read the instructions that came with your model. If your package does not include a separate power supply, skip this step.
If the indicator light on the booster comes on after switching on, this means that the installation was completed correctly.
Attention: Turn on the signal booster only after you have connected the external and internal antennas properly!
- Test your mobile phone signal - the number of bars on your phone screen should be as high as possible anywhere within the amplifier's coverage area. If the cellular signal is still unstable, try moving the external antenna to a different location or angle.
Note:
- The cable attached to the outdoor antenna must not be damaged and should be positioned as straight as possible so as not to interfere with signal reception and transmission.
- The cable length should be reduced to the maximum acceptable so as not to interfere with signal reception and transmission.
- To protect the amplifier from water entering it through the cable, secure the cable in a loop.
- Install the outdoor antenna as far as possible from high-frequency antennas, high-voltage wires, transformers, etc.
How to install a mobile phone booster in a car
We spend almost half the day on the road. And at this time, we also need to be in touch with our family, friends, and colleagues. However, depending on the terrain, nearby buildings and signal instability when constantly moving, the mobile signal may weaken or disappear altogether. A reasonable solution to this problem would be to install a mobile amplifier in your car.
A mobile amplifier is a special device capable of amplifying GSM and 3G signals transmitted from a mobile operator’s base station, thereby guaranteeing the proper level of mobile communications.
The installation process of a mobile amplifier does not require much time or special knowledge. However, to do everything correctly, read this article or download the instructions from the page of the corresponding model. If you require further advice on the use or installation of your amplifier, please contact our technical support team in a manner convenient to you.
First of all, we advise you to carefully read what is included in the package.
Next, let's move directly to the process of installing the amplifier.
INSTALLATION STEPS
- Find a suitable location for the internal antenna in the car (for example, under the driver's seat)
- Clean and dry the area where you are going to attach the indoor antenna. Securely secure the device using the nylon strap.
- Connect the internal antenna to the amplifier and secure it well.
- Install the outdoor antenna in the trunk of the car using two bolts.
- Connect the outdoor antenna to the amplifier and secure with bolts.
- Plug the amplifier into your car's cigarette lighter.
If the indicator light on the amplifier lights up, the installation has been completed correctly.
Attention: The amplifier must be turned on only after the internal and external antennas have been correctly installed!
- Test your cell phone signal. After installation, the mobile signal should gain maximum strength. If the signal still remains unstable, try changing the location of the antennas and find the optimal one.
How to install a mobile amplifier in a large room
Nowadays there are enormous opportunities for using mobile phones. Cellular communication may be required anywhere, even the subway or elevator. However, the possibilities of mobile operators are not unlimited. Residents of rural and remote areas, owners and clients of large stores and salons located in basements are still faced with the problem of a weak mobile signal or its complete absence. The solution to the problem can be a cellular signal booster.
Installing the amplifier is a simple and quick procedure. However, as with any technical device, you may need additional assistance. Your first assistant can be the amplifier installation instructions, which you can download from the page of your amplifier model. This article can also help you in installing your mobile booster correctly.
First, you need to know what is included in the package.
- Outdoor antenna + standard cable
- Internal omnidirectional antenna
- Standard cable for indoor antenna
- Power supply (DC 10v)
- User's Manual
- Mobile signal booster
Now we can proceed directly to the process of installing the amplifier.
INSTALLATION STEPS
- Find a suitable location for the outdoor antenna.
Requirements for installing an external antenna:
- The external antenna should be located on the roof of the building, or in another place, so that your mobile device falls within the network coverage area. The cellular signal must be stable - preferably 3-4 bars on the signal strength scale shown on the phone screen.
- The outdoor antenna must be mounted vertically
- Connect the outdoor antenna to the amplifier on the side where the base station is located and secure it well.
- Connect the internal antenna to the amplifier and secure it well.
Requirements for installing an internal antenna:
- The internal antenna should be installed at a distance of 5 m from the external one
- the internal antenna must be at least 2 meters above the ground
- The internal antenna must be mounted vertically
- Connect the cellular signal booster to the power supply
Some models have a built-in power supply. Please read the instructions that came with your model. If your package does not contain a separate power supply, then skip this step!
If, after switching on, the light on the booster turns on, this means that the installation was performed correctly.
Attention: Turn on the signal amplifier only after you have connected the outdoor and indoor antennas properly!
- Test your mobile phone signal - the number of bars on your phone screen should be as high as possible anywhere within the amplifier's coverage area. If the cellular signal is still unstable, try moving the outdoor antenna.
Note:
- The cable attached to the outdoor antenna must not be damaged and should be positioned as straight as possible so as not to interfere with signal reception and transmission.
- The cable length should be reduced to the maximum acceptable so as not to interfere with signal reception and transmission.
- To protect the amplifier from water entering it through the cable, make a loop out of the cable.
- Install the outdoor antenna as far as possible from high-frequency antennas, high-voltage wires, transformers, etc.