MMS messages carry much more possibilities than ordinary text SMS: with the help of them, in addition to text, the author can send various media files (audio recordings, photos or videos).
The obvious advantage of MMS messages is that you do not need the Internet to send them: all data is transmitted through a regular cellular network. Tele2 has developed tools for working with MMS messages.
If you need to know how to view MMS on Tele2 via a computer or smartphone, then detailed instructions are described below.
Automatic setup
There are several ways to configure your phone settings for working with MMS; in any case, it will take no more than a couple of minutes.
- Automatically receiving and registering parameters is the most common way to configure a mobile phone and the easiest. If your device is not exotic, then the parameters will be registered automatically. Operators, as a rule, pre-register MMS parameters and settings in the SIM. When a user installs a SIM card in a new (different) phone, a request is sent to a special operator server, in response to which the data used in the setup is received. The user just needs to confirm them, and the service for receiving and sending mms is automatically activated.
- If this did not happen due to a failure during the procedure, or you accidentally canceled, or for other reasons, it’s okay, since you will still receive the settings for mms from Tele2.
You need to dial the number on your phone 679
The system will automatically recognize the phone model and notify that the application has been accepted. In a minute or two, your phone will receive a system message with all the parameters (settings for the Internet and MMS), you simply confirm the installation, and all the parameters will be automatically registered in the device.
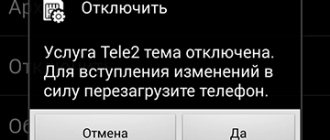
The phone should then be rebooted. That’s it, from now on the device will be able to receive and send MMS multimedia content without the Internet.
View MMS using the Internet
Many subscribers are wondering, is it possible to view MMS via the Internet? This is very simple to do: when a message is received (the user learns about this from a notification that is activated when any messages are received). To view, you need to click on the attached media file, it will be played after the download is complete.
Many customers' mobile phones do not have sufficient characteristics to play all media files well, and such users are wondering whether MMS can be opened on other devices.
Manual setting
If your mobile phone model is not in the automated service database (the system could not identify it), or the settings arrived but could not be registered automatically, you can set all the necessary settings manually. There is nothing complicated in the procedure, especially if you follow the instructions below. Just enter the received data in the appropriate fields.
So, go to the phone menu and look for the item with installation/settings of MMS parameters. The section will display a window with fields in which we enter:
- profile name - think of anything, Tele2 is possible;
- data channel (channel type) – enter GPRS;
- IP – enter 193.12.40.65 (carefully, don’t make a mistake);
- operator server – //mmsc.tele2.ru ;
- port – 8080, if the phone is an outdated model, then port 9201;
- the access point is the same as the home server - mmsc.tele2.ru;
- subscriber name – leave blank;
- password is empty.
Now all changes need to be saved and returned to the general menu, where we set the main connection to the profile you just created (for example, Tele2). The phone must be rebooted for the settings to be activated. After this, try sending a test MMS, and you can send it to your own number. In this case, your phone will automatically register with the service.
If the message is not sent and the phone gives an error, then go to the section and carefully check all the fields for errors. If the MMS passed without any error notes, then no verification is required, everything was done correctly.
How to manually enter MMS Tele2 settings
If the automated service does not find your model in the database or MMC still does not work with the received settings, configure the parameters manually. This is not difficult to do - carefully following our step-by-step instructions, enter the required lines in certain fields.
Third method: open the phone menu, find the section for setting MMS messaging parameters. Enter manual settings for MMS Tele2 in the window that appears:
- Profile name – any.
- Data channel type – GPRS.
- IP – 193.12.40.65.
- Server (home page) – https://mmsc.tele2.ru.
- The port number is 8080 (for legacy phones: 9201).
- Access point – mmsc.tele2.ru (exactly in this format, without the https:// prefix).
Leave the subscriber name and password fields blank. Save the entered information and return back to the menu. Set the connection profile you created by selecting it by name. Reboot your phone and be sure to send 1 test MMS (can be to your number) to register your phone in the service. If an error message appears, carefully check the entered data. If the MMS is successfully sent to the recipient, the service is configured correctly. If you want to get acquainted with the favorable Tele2 tariffs for the Internet, you need to read the article at the link; the review has everything you need to make a choice.
Through “Personal Account” - the fourth method
If the other 3 methods do not suit you, use your personal account to set up Tele2 mms.
- Go to the official website.
- Log in to your personal account
- Select the section “Tariff and;
4. Enter the name of the phone model, click “Get”.
Settings in your Personal Account
If for some reason the above methods do not suit you, then you can use the operator’s web service – Personal Account.
- We go to the main page of the Tele2 website.
- Log in to your Personal Account.
- We go to the services and tariffs section, then go to “Phone settings”.
- Enter your phone model and click on “Get”.
After this, after a while you will receive a system notification on your phone, simply confirm the settings and reboot your phone. That's it, you can use it.
Sending MMS from a computer
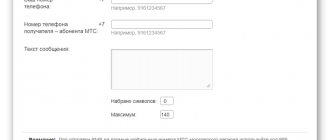
Tele2 provides its customers with the service of sending MMS messages from a computer. To do this, the subscriber must follow the link https://tele2.ru/services/messaging/mms-send/, enter all the recipient’s data and the text of the message, then the service will offer to attach media files and send messages. Sending an MMS message via the Internet is charged according to the tariff plan used by the subscriber.
Tele2 draws the attention of its subscribers to the fact that viewing Tele2 MMS messages on a computer or phone is not always worth it.
You should be suspicious of messages from unfamiliar numbers, unexpected messages from numbers in your contacts list, as well as MMS of an advertising nature.
Each of them can contain a malicious program, which, when downloading a media file, is embedded in the phone and can cause a lot of trouble to its owner.
Setting up MMS from Tele2 on an Android device
If you have an Android smartphone, then the MMS parameters from Tele2 are downloaded and registered as standard. The operator has all the popular models in its service database, and it is constantly updated. But if you have a model that is too exotic, then the parameters can be easily entered manually. It is worth noting that some parameter names may vary from OS version to OS version and on different shells.
First, in the connection settings of your smartphone, you need to activate the smartphone connection for transfer. Next, in the mobile communications section we find “APN points”; we must create a new point by calling up the menu. A window will open with fields for recording, which we carefully fill out.
- In the apn type line we write mms.
- In the MMSC address line we write the website //mmsc.tele2.ru .
- In the APN line we write mms.tele2.ru.
- In the authentication line, select disabled.
- Port – 8080.
- Proxy server – 193.12.40.65.
The main thing for all versions of Android is not to make mistakes in ports, IPs and addresses. There is no need to write any logins or passwords. Where these windows exist, we leave the fields empty. By calling up the menu, save the profile and reboot the smartphone.
Tele2: MMS settings for iPhone
To properly configure MMS Tele2 on iPhone 5, open the “Settings” sub-item in the menu, the “Cellular” tab, turn on cellular data. In the MMS subsection, enter:
- APN – mms.tele2.ru
- MMSC – https://mmsc.tele2.ru
- Proxy – 193.12.40.65:8080
Leave other lines on iPhone 4 and higher, including the subscriber’s name and password, blank. Restart iOS by turning off and on your smartphone one after the other. Be sure to send a test MMS message to register the device in the service.
You will learn all the information about registering and logging into your Tele2 personal account from another article.
Setting up MMS from Tele2 on iPhone
On an iPhone, the setup will also be performed automatically, since all Apple models are supported by the operator’s system; however, you can also enter the data manually. In the smartphone settings, you need to go to “Cellular Communications”, enable data transfer and in the appropriate section (MMS) enter the data provided by Tele2.
All settings for phones can be viewed on the operator’s website. On iPhone, the login and password fields should also be left blank. We save the profile, reboot the device - that’s it, you can receive and send MMS.
Rules for setting up the MMS service for Tele2 subscribers
Home / Setting up MMS on TELE2.
The MMS option allows Tele2 subscribers to exchange multimedia messages that can contain completely different attachments. For example, these could be photographs, video files or audio recordings. It is worth noting that the size of one multimedia message is limited. But today, almost all mobile devices can automatically compress MMS messages to the required size.
In order to activate this service, you need to make the following settings, otherwise this option will not be activated and it will be impossible to send MMS messages. You also need to know that the subscriber to whom this message will be addressed must have a mobile device that supports this type of communication. Otherwise, he will only receive a link to the MMS gallery and a code to receive this message. But if the subscriber’s phone does not support receiving MMS messages, then he can simply go to the gallery website from any computer and view the contents of this message.
At the moment, almost all existing mobile devices, smartphones and tablets can send and receive multimedia messages. But in some situations you will be required to manually configure the existing gadget. The thing is that only the most popular and widespread models have automatic settings. If you do not have the most common device, then most likely you will have to configure it manually.
If you don’t want to set up your gadget yourself, then you can contact any nearest communication store and they will definitely help you. Only the provision of this service in communication shops is carried out on a paid basis.
You can also call the Tele2 hotline and clarify all settings. But keep in mind that the waiting time for an operator response can be quite long and the best way is to make the settings yourself.
Automatic settings MMS TELE2
Undoubtedly, almost every subscriber would like his device to automatically accept settings from the Tele2 operator. It is worth noting that in most cases everything works out this way - you just need to insert a SIM card into the device and within a few minutes automatic settings will be sent to it. You will only need to activate these settings and then use the service of sending and receiving MMS messages. If a situation arises that the automatic settings did not arrive or they were previously rejected by the subscriber, then you will need to order them again.
There are two ways to order automatic MMS settings on Tele2:
- Call a short number 679
- Order settings through your “Personal Account”.
Manual setup of MMS on TELE2
Manual configuration of MMS on Tele2 must be done in the “Connection settings” section. The name of this section can be individual for each device.
Here you need to specify the following parameters:
- Profile name – Tele2 MMS
(or any other); - Home page – mmsc.tele2.ru
; - Proxy – enabled
; - Proxy server IP address – 193.12.40.65
; - Port – 8080
(for older phones with WAP 1.1 the port number is set to 9201); - Connection type (channel, etc.) – GPRS
; - Access point (APN) – mms.tele2.ru
(not to be confused with the home page); - Username – blank
; - Password – not filled in
.
As soon as you enter manual settings, you will need to send an MMS message to absolutely any phone number. This action will help you determine whether everything was done correctly.
How to set up MMS for devices running the Android operating system
Most devices that run Android can automatically configure settings for receiving and sending multimedia messages. If automatic settings have not been performed, then you will have to configure this device manually.
To do this, you need to go to the mobile network settings, find the access point settings item and create a new point with the following parameters:
- MMSC (home page) – mmsc.tele2.ru
; - Access point type – mms
; - Access point (APN) – mms.tele2.ru
; - Proxy – 193.12.40.65
; - MCC 250
; - MNC 20
; - Login and password are empty
.
How to set up Tele2 MMS on iPhone
In order to make settings for receiving and sending multimedia messages for iPhone, you will need to go to the network settings section and select the “Cellular Data Network” menu item. The setup on iPhone4, iPhone5, iPhone6 is almost the same.
In this section, an APN (access point) for MMS will be created with the following parameters:
- APN – mms.tele2.ru
; - Name and password - not filled in
; - MMSC – mmsc.tele2.ru
; - MMS proxy – 193.12.40.65:8080
.
You can leave the remaining items blank. After entering these settings, you must restart the device and enter your phone number directly in the “your number” section.
As with Android devices, you can try and download automatic settings by calling 679
or use “Personal Account”.
MMS is not sent - what's the problem?
If you entered the settings manually and rebooted the iPhone, but the MMS still does not “go away” from the device, the reason may lie in the following:
- Message is too big . Some operators set a limit on the size of the photo sent (about 1 MB). The solution to this problem is simple: you need to reduce the image resolution - how this is done is described here.
- LTE module activated . While sending MMS, you should switch to the 3G module, then you can return to the usual speeds. The transition from one module to another is made through the “Cellular Communications” section in “Settings”.
- iMessage enabled . The option needs to be turned off - to do this, go to the “Messages” section in “Settings” and deactivate the corresponding toggle switch.
If none of the described methods helped send MMS, you should take an extreme measure - resetting the network settings . Follow the path “Settings” - “General” - “Reset”, click on “Reset network settings” and enter the security password.
All network data will be deleted, but user information will remain in place. You will have to enter the MMS settings manually again.
How to send MMS from iPhone?
There are two equally effective ways to send MMS from iPhone:
Through the Messages application.
Step 1 . Go to “Messages” and click on the icon depicting a sheet with a pencil.
Step 2. Click on the “Photo” button.
Step 3. Select one of two options from the menu that appears: “Take a photo or video” or “Select an existing one.” In the first case, the camera will be activated on the iPhone; in the second, the device will open the Photos application. We will take the second path.
Step 4 . In the Photos app, find the image you want and click on it.
Step 5 . Click the “Select” button - the picture will be attached to the message.
Step 6 . Enter the recipient's phone number and click on “Send.”
Via the "Share" button.
This method of sending SMS is even simpler than the previous one.
Step 1 . Go to the Photos app and select the image you'd like to send.
Step 2 . Click on the "Share" button, which is located in the lower left corner.
Step 3 . Click on “Next” and in the menu that appears, select the “Message” option.
The iPhone will attach the photo to the message - all you have to do is enter the recipient’s number and click “Send”.
Is it possible to configure MMS automatically?
You can request MMS settings in one of three ways:
- Call the operator's hotline number and find out if you can adjust the MMS yourself. Most likely, instead of a consultation, a Call Center employee will offer the user to receive SMS settings.
- Contact the operator’s office in person and ask the employees to set up the iPhone. In communication stores, services related to operator options (including setting up MMS) are provided free of charge . If employees start asking for money, ask them to provide a price list of paid services - setting up a multimedia messaging service will definitely not be on this list.
- Send a free empty SMS or dial a short number. The list of numbers of the most famous operators is presented below:
| MTS | Megaphone | Beeline | |
| SMS number | 1234 | 5049 | — |
| Number to call | 0876 | 05049 | 060432 |
As soon as the message with the settings arrives, you need to open it and click the “Save” button. After this, you can already check whether the MMS is working.
Setting up MMS is pointless if the service of the same name is not activated on the number.
The MMS service is part of the basic package of options and is automatically connected to all numbers, however, it can be deleted due to some failure on the operator’s side or the intervention of a user who does not “understand”. This means that before setting up, you should call the operator’s support service and check whether MMS is present on the number. You can also use your Personal Account.