We will describe how to find out your tariff on Life (currently the operator has changed its name to Lifecell).
To clarify such information, you should use one of several methods to choose from. Having received accurate information about which Life tariff you use, you can assess the rationality of your costs and switch to another package of Life services. Tariff plan for Life is a set of communication services and related services that are provided or can be provided by the operator to each and every subscriber who is served by the company under the terms of this tariff.
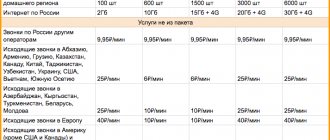
The range of such services may include the conditions for the provision of mobile 3G Internet, the cost of calls, SMS messages.
Call to operator
There are times when it is easier to talk to an operator than to spend a long time searching for the correct request. By calling the standard number 5433 you can find out all the information about your number, tariffs, payment for mobile communications and all services connected to your number.
Be prepared for the robot to ask you to choose to automatically answer your questions, but at the end of a long menu it will tell you what to click to contact the operator. This may take some time if the line is busy. But the operator’s answers will quickly help resolve your issues, including changing the tariff or reporting on the use of funds.
lifecell
The operator can not only tell you how much money you have left in your account, but also provide all the necessary information about your tariff, the amount of traffic used, conditions for replenishing your account, current promotions and additional services.
If you need to call the operator from a landline or other mobile operator, then dial 0 800 20 5433. The call will be free and you can find out all the information by dictating your mobile phone number. This function is convenient for those who have experienced a breakdown and need to find out the necessary information from the operator.
How to check the balance of a Lifecell SIM card
There are several ways to check the balance on your Lifecell number:
- using the USSD code - *111# (total balance and bonuses), or *121# for a full check (how many megabytes of Internet, minutes and SMS are left at the current tariff, when is the next monthly payment and until what date is the number valid);
- by calling the operator (call number 5433, listen to the robot’s introductory words, exit to the main menu, press “2”, then “5”, then “5” again, then we can enter any number from 1 to 4, press “0” and exit to the finish line, where you need to press the number “1” or “0” to connect with a live operator);
- by visiting your personal account “ My lifecell ”.
These methods are the same as they were on the good old “Life”, or in other words “life:)”.
lifecell news
Among the current news from the lifecell operator is the launch of a new 4.5G Internet connection. The operator guarantees high-speed Internet and excellent coverage. You can already check whether your phone and card can connect to high-speed Internet.
lifecell
From October 10, 2021, lifecell increased the volume of Internet traffic in the Gadget package without additional payments. Now subscribers can use 500 MB per day instead of the usual 100 MB. The cost of the tariff has not changed - 100 UAH per month.
In October of this year, lifecell opened a self-service store. At the new Digital Store point, subscribers can: purchase a regular phone number with random numbers or choose a number with a specific combination of numbers, replace an old SIM card with a new one, or top up their account. Currently, 4 points with Digital stores are open in Kyiv:
"Aladdin", Kyiv, st. Mikhail Grishko, 3A;
"Oasis", Kyiv, ave. Obolonsky, 47;
"Globus", Kyiv, Independence Square, 1;
Dream Town 1, Kyiv, ave. Obolonsky, 1B.
lifecell
Promotions and offers
Until the end of the year, participants in the “Cloudless Autumn” campaign can receive one of 12 portable speakers as a gift. To compete for a speaker, you must be a user of the lifebox application and upload at least one piece of content from your device, this can be a photo, video or audio file. The prizes will be 12 Air Music Flip Orange speakers and 3 General Mobile 8 smartphones. Every week, from 09/30/2019 to 12/22/2019, lifecell subscribers have the opportunity to become the owner of one of the prizes.
Refer a friend is a popular referral program among many companies. Now existing lifecell subscribers can receive their referral link to transfer it to a new subscriber. You and your friend will receive 50 bonuses to your bonus account as a gift. The promotion is valid until December 31, 2019. Bonuses are valid for 60 days after they are received.
For getting to know a subscriber, lifecell gives additional Internet traffic. Each subscriber who fills out a form on the website will receive 1 GB of Internet and another 1 GB of Internet will be received for confirming your email. In the questionnaire you will need to answer only four questions, after which the reward will be instantly credited to your bonus account.
Online chat
If it is more convenient for you to quickly find out information from your computer, use lifecell’s online chat. The operator will answer your question electronically. This type of communication is convenient if you need to clarify problematic issues and record correspondence. For example, if money “disappeared” from your account or the operator transferred you to another tariff without your knowledge, added services that are not interesting to you without permission, etc.
Online chat is convenient for that category of subscribers who are abroad and cannot use their number while roaming.
Apache
- one of the most popular web servers. Distributed free of charge. When developing websites and web applications, it is more convenient to debug not on the provider’s server, but on a local server installed on your own machine.
This article requires an Apache server installed, starting with version 1.3.14 (a package including Apache, PHP, perl, MySQL - PHPTriad can be downloaded free of charge and legally here
,
here
or
here
), operating system Windows 95/98/NT/XP. It was not tested on earlier versions of Apache, as well as on Windows Vista; the author of the original article has no comments on this matter. If the computer is joined to a domain, problems may arise with winMySQLAdmin included in the PHPTriad package.
Apache
configuration file At this stage, you need to decide on the directory in which the sites will be stored. By default Apache uses C:\Program Files\Apache Group\Apache\htdocs
, where you can find server documentation immediately after installation. It is not very suitable for serious purposes - the name is too long, so it is recommended to make a separate disk for all sites (for example, with the name Z:).
On drive Z: you need to create a home directory, and in it a localhost
.
It will store the contents of the Apache master host - the one accessible at https://localhost
.
In the localhost
, create
the cgi
and
www
. The first will store CGI scripts, and the second will store documents and PHP programs. I note that a similar operation will need to be done every time you create a new virtual host.
Open the httpd.conf
, which is located in the
conf
Apache
directory .
Set the ServerName
as follows:
ServerName localhost
Just don't forget to uncomment the ServerName
, that is, remove the “#” symbol before this parameter (it is commented out by default)!
In general, everything that comes after this character and until the end of the line Apache
.
In the DocumentRoot
indicate the directory in which your
html
files will be stored.
We previously agreed that this would be Z:\home\localhost\www
):
DocumentRoot "z:/home/localhost/www"
Find a block that begins with a line and ends with a line (in general, such blocks indicate settings for a given directory and all its subdirectories). This block may contain many comments - please ignore them. It needs to be changed to this block:
Options Indexes Includes AllowOverride All Allow from all
Thus, this block will store settings for all default directories (since this is the root directory). Namely, for all directories, by default, the ability to automatically generate an index is installed - a list of the directory’s contents when viewing it in a browser, as well as SSI support and permission to use .htaccess files for individual directory settings.
Find a similar block starting and ending with . There will be a lot of comments, don't pay attention to them. This block needs to be deleted, since all settings for the directory with pages should be inherited from the default settings that were just installed.
Set DirectoryIndex like this:
DirectoryIndex index.htm index.html
These are the so-called index files, which are automatically issued by the server when accessing any directory if the name html
-document.
In principle, you can add other names here, for example, index.php
, etc.
However, it is still better to make additional settings in .htaccess
for each site separately. Find and correct this setting:
ScriptAlias /cgi-bin/ “z:/home/localhost/cgi/”
Add this line after it:
ScriptAlias /cgi/ “z:/home/localhost/cgi/”
A similar parameter tells Apache that if a path like https://localhost/cgi-bin
, then you should actually go to the
z:/home/localhost/cgi
.
Now you need to find the parameter block starting with and ending with. These are settings for CGI
-directories. Since there is no need to specify any additional parameters in place of those already set by default, this block must be deleted.
Find and configure (don't forget to uncomment!) the following setting:
AddHandler cgi-script .bat .exe .cgi
This tells Apache that files with extensions exe, bat
and
cgi
should be treated as CGI scripts. And lastly, set the following parameters:
AddType text/html .shtml AddHandler server-parsed .shtml .html .htm
Apache testing
To start the server, click Start, then Programs, Apache Web Server
,
Management
and
Start Apache
, this will display a window very similar to an
MS-DOS
and nothing else will happen.
Do not close it or touch it until you finish working with Apache
.
If the window opens and then closes immediately, this means that there is some error in the httpd.conf file. In this case, you will have to look for inaccuracies. The easiest way to do it is this:
Start an MS-DOS
.
To do this, click Start, then Run. Type command in the dialog that appears and click . A command prompt will appear. (If it is not possible to launch MS-DOS
, use some other tool. For example, launch
Far
and work through it. Viewing the results of the program -
+
.)
Type the following DOS
:
c: cd "\Program Files\Apache Group\Apache" apache.exe
If Apache has not started before, you will receive an error message and line number in httpd.conf
where it happened.
Correct httpd.conf
and repeat the process above until the window displays something like "
Apache/1.3".
14 (Win32) running… «
HTML validation
In the directory z:/home/localhost/www
with
html
documents, create an
index.html
with any text content. Now launch your browser and type:
https://localhost/index.html
or simply
https://localhost/
The created file should load.
SSI Verification
In the directory z:/home/localhost/www
with
html
documents, create a file
test.shtml
with the following content (carefully follow the spaces in the
include
!):
SSI Test!
Now type in your browser:
https://localhost/test.shtml
A file should load that consists of the text “ SSI Test!”
" followed by the contents of the
index.html
between two horizontal bars.
SSI
is not configured correctly .
CGI check
In the directory z:/home/localhost/cgi
for CGI scripts, create a
test.bat
with the following content:
@echo off echo Content-type: text/html echo. echo. dir
Now in your browser type:
https://localhost/cgi/test.bat
The window displays the result of the DOS dir
.
Apache Virtual Hosts
There are two types of virtual hosts: separate for each IP address or using one common IP
-address (so-called
name-based
hosts - hosts identified by name).
For training purposes, we will consider both options, namely, we will create a hacker
using the same address as
localhost
, as well as a cracker host with the address
127.0.0.2
.
The hacker server will be stored in the directory z:/home/hacker
, which needs to be created right now (along with its
cgi
and
www
), and the
cracker
is in the
z:/home/cracker
. These directories will contain:
- access.log
files with a log of access to the virtual server; - errors.log
files with server error log; - www
directory , where, as usual,
html
documents will be stored; - cgi
directory for storing
CGI
programs.
To install virtual hosts you need to make some changes to the Apache httpd.conf
(see above), as well as in some
Windows files.
Open httpd.conf
the Edit
shortcut in the Start menu - Programs -
Apache Web Server
-
Management
). Go to the end of it, you will have to add a few lines there. Add the following lines at the end of the file after all comments:
NameVirtualHost 127.0.0.1 #—-localhost ServerAdmin [email protected] ServerName localhost DocumentRoot "z:/home/localhost/www" ScriptAlias /cgi/ "z:/home/localhost/cgi/" ErrorLog z:/home/localhost/error .log CustomLog z:/home/localhost/access.log common #—-hacker ServerAdmin ServerName hacker DocumentRoot “z:/home/hacker/www” ScriptAlias /cgi/ “z:/home/hacker/cgi/” ErrorLog z: /home/hacker/error.log CustomLog z:/home/hacker/access.log common #—-cracker ServerAdmin ServerName cracker DocumentRoot “z:/home/cracker/www” ScriptAlias /cgi/ “z:/home/cracker/ cgi/» ErrorLog z:/home/cracker/error.log CustomLog z:/home/cracker/access.log common
Open the system hosts
, which is located in the
C:\WINNT\SYSTEM32\DRIVERS\etc
.
It should contain 1 uncommented line:
127.0.0.1 localhost
Replace it with:
127.0.0.1 localhost hacker 127.0.0.2 cracker
Please note that the host is a hacker
is described on the same line as
localhost
.
The fact is that
only unique
IP
hosts .
If several hosts are mapped to one address at once, then one of them (the one that comes first) is declared the main one, and the rest are its synonyms. In our case, localhost
is the main one, and
hacker
is its synonym.
Apache, when receiving a request to the address 127.0.0.1
, recognizes that it came to a host named
hacker
, and activates the corresponding block.
Apache setup
to work with
PHP
Open the Apache httpd.conf
.
Find the following commented line in it:
#AddType application/x-httpd-php php
Uncomment it:
AddType application/x-httpd-php php
Immediately after this line add the following settings:
ScriptAlias /_php/ "C:/Program Files/PHP4/" Action application/x-httpd-php "/_php/php.exe"
PHP testing
Create in the directory z:/home/localhost/www
test.php
file with the following content:
Via the Internet on the operator’s website
On the Internet you can quickly find out the cost of your Life tariff, the price of additional services and other details of cooperation. There are two versions of subscriber accounts available - a mobile application and a browser version - Personal Account.
- The application will need to be downloaded and installed on your device. Official versions are available for Android , iOS and AppGallery (from HUAWEI).
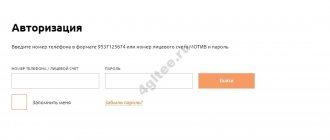
- To authorize in the browser version, you just need to go to the website life.com.by, select the “ Login ” button and enter your personal data for authorization.
All the information of interest will appear on the main screen immediately after logging into your account:
- remaining traffic;
- remaining included minutes;
- number of free SMS;
- tariff plan.
How to find out your Vodafone (MTS) tariff
Using USSD command
You can check your account balance and find out the name of the tariff using the same USSD code. Open the dialer, enter *101# and click on the call button. In a couple of seconds you will receive information about your current balance, number expiration date and the tariff plan you are using.
Via the My Vodafone app
Vodafone subscribers can also use the My Vodafone mobile client. This application, which does not exceed 50 MB in size, is available for free on Google Play and the App Store. With its help, you can top up your balance, check the balance of package services, as well as find out your tariff and switch to another tariff plan.
Once you have installed My Vodafone, open the app and accept the terms of use. Then enter your number and click Next. A message will be sent to your phone containing a four-digit code. Paste it into the appropriate field and click on the “Login” button.
The main page of the program will open. Unlike the user's phone number, the name of the tariff is not displayed on it. To find out, expand the menu and go to the “Tariffs” section, and then select “My tariff”.
By calling the Vodafone help center
Vodafone subscribers, unlike Lifecell users, can find out their tariff without contacting a call center operator. Just call the help desk and follow the instructions from the answering machine.
Dial 111. Once you hear the voice of the virtual assistant, go to dialing mode and press 1. Listen to information about the My Vodafone application, after which the voice assistant will tell you the name of the tariff.